
Snapshots??!! Most photographers aspiring to improve scoff at making “snapshots”, those being the quick images taken without much thought by the point-and-shoot crowd. We’re serious photographers here and want to instead be Crafting Photographs, right? But in this article, I’m talking about a feature in Lightroom you may not have tried or understood and it is called – Snapshots. Let’s explore how it might benefit your work.
What are Lightroom Snapshots?
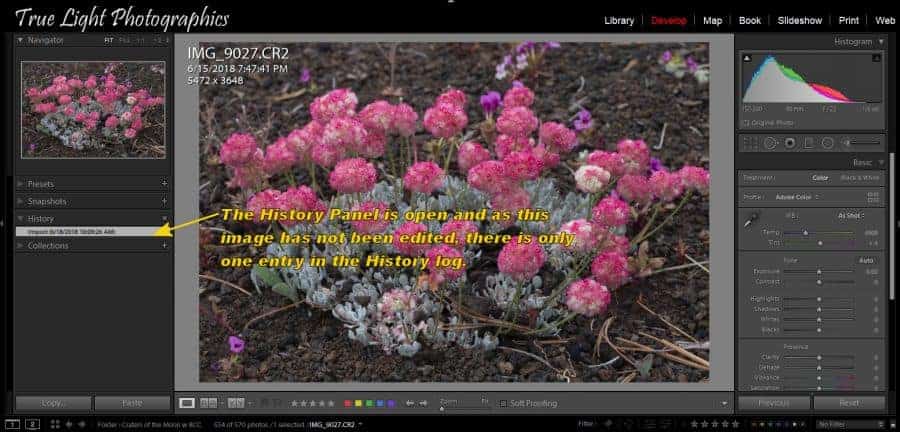
Like a real snapshot, A Lightroom Snapshot captures a point in time, in this case, a point along the History log of the image you’re editing. So let’s first take a look at the History panel. You will need to be in the Develop Module of Lightroom to see it and have an image selected for editing. The History panel will be the third item down in the left panel under Presets and Snapshots. Click the arrow at the left side of the word History and it will open. If you’ve not yet begun to edit the image, it will have one entry showing when that image was imported. As you begin to edit the image, Lightroom will begin keeping notes, adding to the History of that image.
The Faithful Secretary
This is how Lightroom works: Your Raw image is located somewhere on your drive. Some people have the misconception that when you “Import” images into Lightroom, you bring them “into” the program. No, all that a Lightroom Import does it tell Lightroom where the images are, create pointers to them, and create thumbnail previews for quicker viewing. You can use Lightroom to Import image files from say an SD card, but it is not bringing them “into” Lightroom, but simply copying them from the SD card to a hard drive location and also at the same time telling Lightroom where they are and making thumbnail previews. At no time during a Lightroom edit is the original Raw image changed in any way and the original Raw file remains where it was stored on the hard drive.
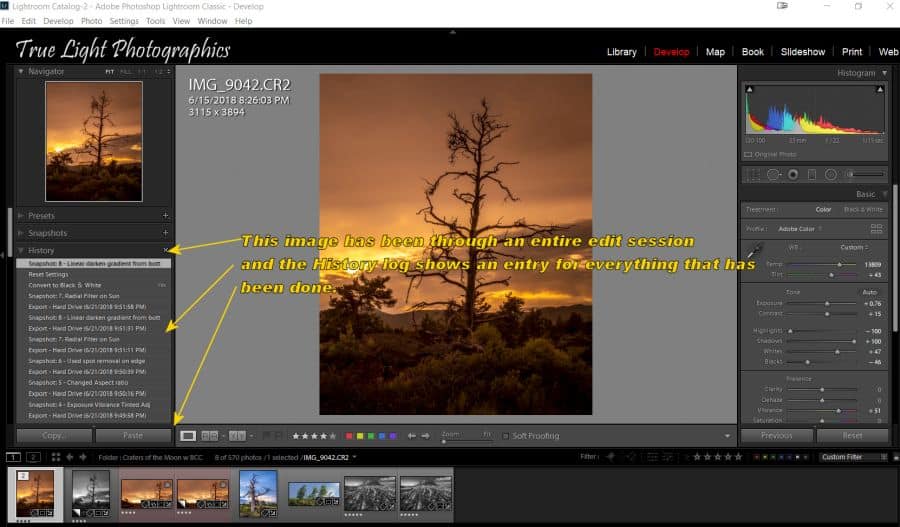
What Lightroom does do during an edit is, like a faithful secretary, keep extensive notes about everything you did to that image. Then later; days, weeks, months, however long it is before you want to review that image, Lightroom looks at the Raw image, brings up the editing notes, and what you see is the Raw image with the notes applied. Because the notes are logged in consecutive order, they form a History of what was done to that image in the edit. The most recent thing done to the image will be at the top and the list will read backward through all the edit steps. If you edit a document in a word processing program and don’t save the file, (or the computer crashes before you do), all your work will be lost. Because the faithful Lightroom secretary saves all your editing notes on-the-fly, there is no “saving” with an edited image and even a crash will not lose any work. Cool huh?
The “Master Notebook” – The Lightroom Catalog
All the notes for all the images are what forms the “Lightroom Catalog.” Everything you’ve ever done to all the images you’ve edited in Lightroom is recorded in the Lightroom “Secretaries’ Master Notebook,” the Lightroom Catalog. So, even should the Catalog become lost or corrupted, your Raw images are still left untouched. Your edits may be gone, (the reason you back up your Catalog, right??!!), but not your images. So what’s this have to do with Snapshots? Hang on… we’re getting there.
The Jealous Secretary
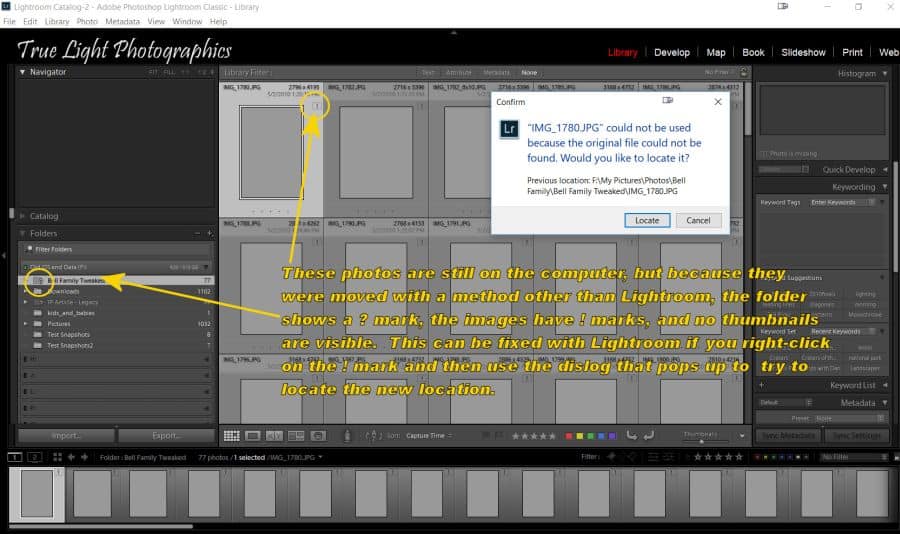
When you decide to use Lightroom as your tool of choice for editing, know that you’ve hired a jealous secretary. “She” will keep scrupulous notes about everything you do with an image; the edits, if you move a file, if you’ve added it to a Collection, made Virtual Copies, given it a rating, added keywords, everything. But, if you “cheat on her,” and use a method outside of Lightroom to move, edit, or manipulate your image, she will not know about it and will not have those notes. So, the next time you view that image in Lightroom, you will not see those changes. If you move the image outside of Lightroom, “she” will not know where you’ve put it and you may get a ? mark on the folder and a bunch of ! marks on your files or no visible images at all. If you did something your “secretary” didn’t take notes on, you will have to brief her on where you did put the images and relocate them for her. The images are not gone, just not where Lightroom expects to find them. You can fix this with some searching and updating the links, but next time don’t go “cheating” on your faithful secretary and work outside her watchful gaze.
Oh Yes, Snapshots
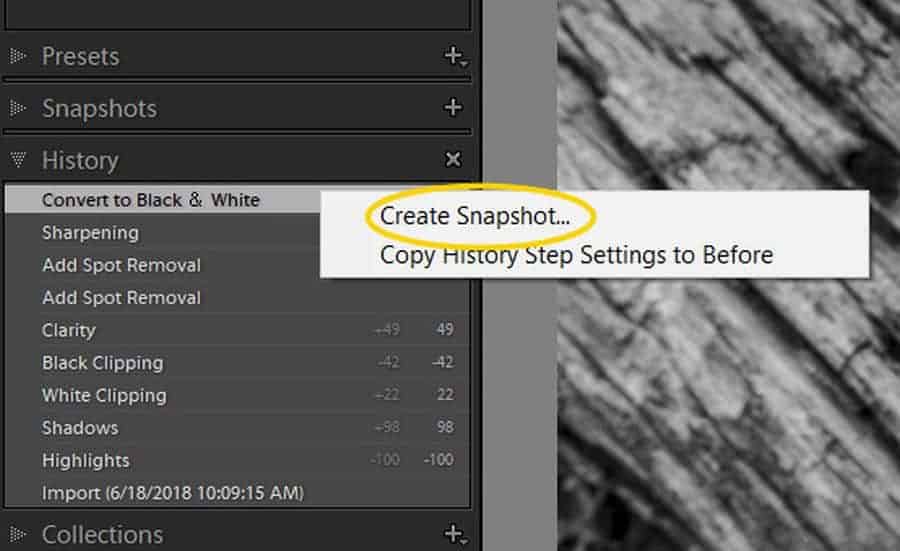
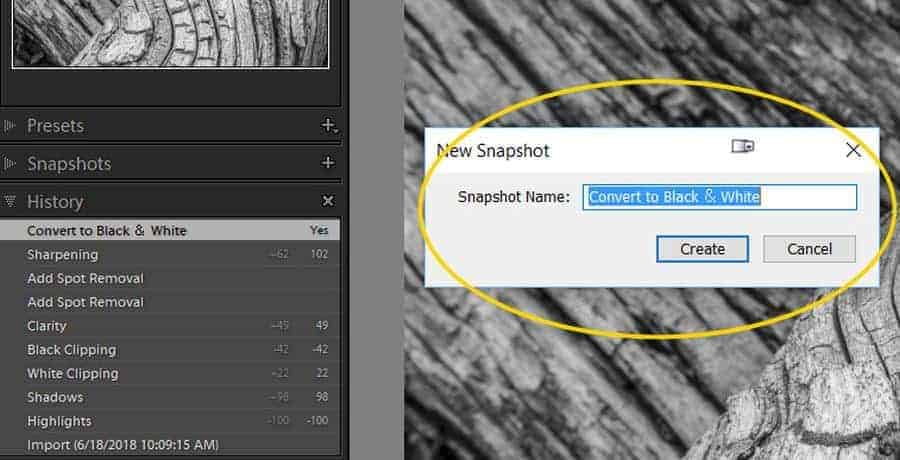
Back to Lightroom Snapshots. So you have a History for the image, a set of notes in consecutive order about each step of the edit. Now, what if you wanted to see how the image looked at a certain step in that edit process? Take a “Snapshot!” Looking at the History panel, click on the spot you want to see. The image will appear as it looked at that point. Right-click on that spot in the History, (or use the keyboard shortcut Ctrl-N (Cmd-N on Mac), and you will be able to Create Snapshot. The Date and Time will be the suggested name, but you can wipe through that and name it whatever you like. Of course, you can also take Snapshots as you go, making one at each critical juncture in your edit. Now let’s look at some reasons you might want to make Snapshots and how a naming convention can help you better use them.
Saving Drive Room
It used to be that if you wanted to create different versions of an image; a color version, a monochrome version, maybe a version with a Preset applied, different cropping, whatever, you had to save out a separate copy of each, each separate file taking extra room on your hard drive. Now with Lightroom, you can edit the color version, make a Snapshot, change it to monochrome, take another Snapshot, try something else, make another Snapshot, etc. Make as many changes as you like and if you mark your spots along the edit History with Snapshots, you can later jump to those spots and see how it looked at that point. If you do want to export out a file at that spot or maybe print it, if you’re on that Snapshot that’s how it will look. Multiple versions, but with only one file saved, saves drive room and, because you’re coming directly off the edited Raw file, gives maximum quality.
Which is of my Edit Versions is Best?
Say you edit your image but aren’t sure if it’s what you want. Take it one direction and make a Snapshot. Then try some other things, making Snapshots at the end of each variation. Now you want to compare versions to see what you like. Right-click the first Snapshot you want to compare and then click Copy Snapshot Settings to Before. Then click on the Snapshot you want to compare it to. Then use the backslash (\) key and you will be able to toggle between the Before and After versions. If you want to see the versions side-by-side, use the Before & After view in the toolbar at the bottom of the screen (click the T key on the keyboard to bring up the Toolbar if you can’t see it).

Documenting Steps
I’m teaching a class and I want to show my editing steps to my students, showing how I affected the image at each step. I can use Snapshots to record and later display those steps. Here’s how, (and why I mentioned a naming scheme).
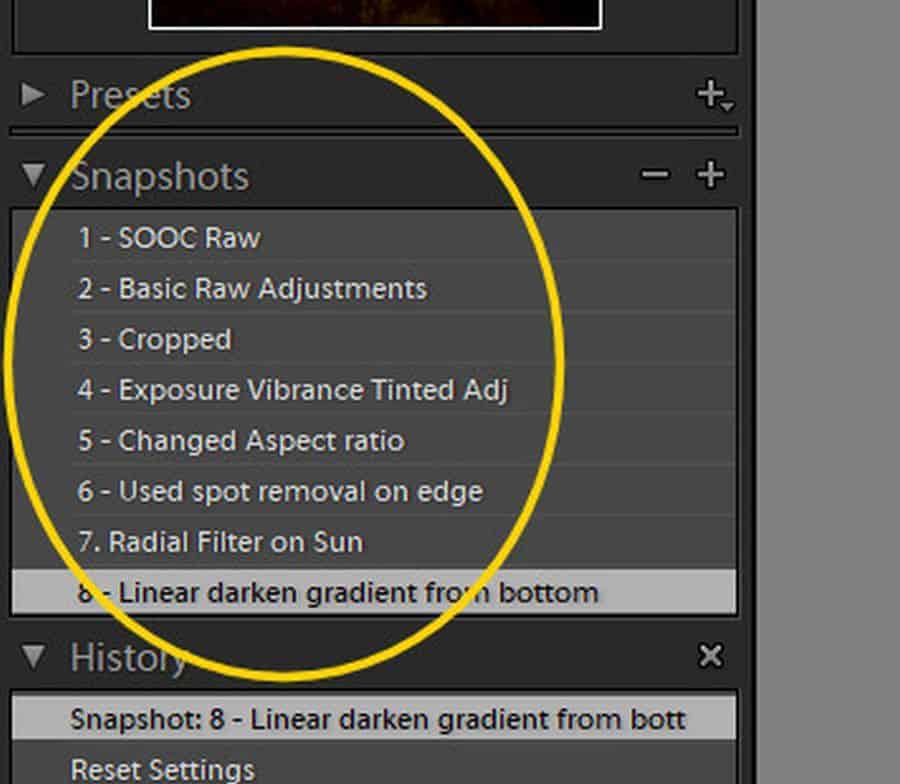
- In the Develop Module, click on the image you will be editing. I make a Snapshot right away to show the unedited SOOC (Straight-Out-Of-Camera) image. So Ctrl-N, then name the Snapshot like this – 1 – SOOC Raw. Because I want to preserve the order of the sequence I’m developing, using the “1 –“ will assure the Snapshots will sort in sequential order.
- I do whatever next step I want in the editing, for me basic Raw file adjustment, (Highlights down, Shadows Up, Set White and Black Points, Add a touch of Clarity, perhaps adjust the Exposure). Then another Snapshot – Ctrl-N, name it 2- Basic Raw Adjustments.
- I continue the process, making and labeling Snapshots at each major spot in the Edit (see the example below). Note how because I use the number in the name they sort in the order I performed them.
What’s nice is when I’m done, the Snapshot steps are saved with the image. Move it to another folder, include it in a Collection, even make a Virtual Copy of it, and the Snapshots stay with it.
Exporting to Show a Sequence
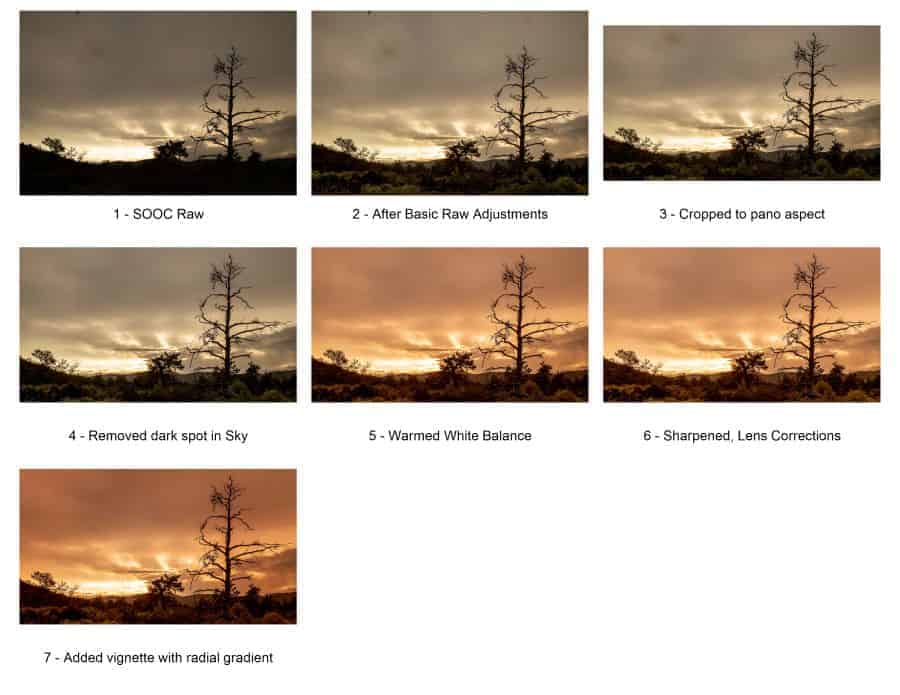
I sometimes like to be able to show students a step-by-step view of my edit steps so I make a sequential montage. Here are the steps to do that:
- Bring up the edited image in the Develop Module
- Click the Arrow on Snapshots to see your Saved Snapshots
- Got to each step in the sequence and Export a .jpg of that step
- File, Export, (set the Location and export parameters as you like)
- Repeat for each step in the sequence. When Lightroom tells you that file already exists, click Use Unique Names and it will append a number to each sequential file.
- Go back to the Library Module and Import the Folder you just created. It will have each of the images you exported in it.
- Create some Captions to describe what you did at each step.
- In the Library Module, Highlight each image and go to the Metadata pulldown. Type what you like in the Caption field. Repeat for each image. These will be the captions for each photo in your Montage.
- Select them All and then go to the Print Module
- Set up the Layout you like. I used a Page Grid of 3 rows and 2 columns for this example.
- Be sure to Click the Photo Info checkbox under the Page item in the right column. Change Filename to Caption. Adjust the Font size to your liking.
- You can print this to a printer or save the montage as a .jpg. To save as a .jpg image –
- Under the Print Job item in the right column menu, change Print To to be JPEG File.
- Click the Print To File button and Save the montage to where you like. You will have a single .jpg like below.
So What about Virtual Copies?
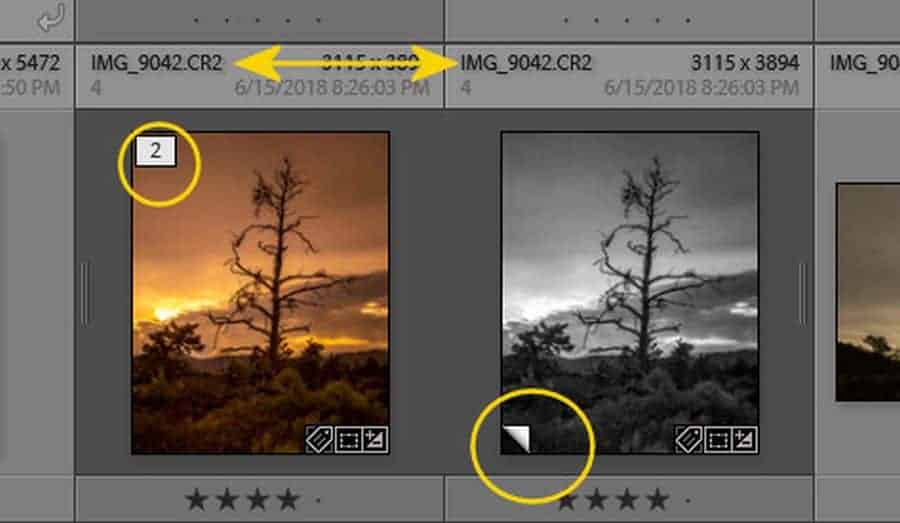
A Virtual Copy in Lightroom is similar, but with a few differences from a Snapshot. Remember that a Snapshot is a point along the History timeline, a way to place a marker to get back to the progress of an edit at a certain point. A Virtual copy is a way to apply a separate set of edit instructions to a single file. When you make a Virtual Copy of an image, (right-click an image in the Library or Develop Module and Pick Create A Virtual Copy), a new file is not created and no additional drive space is taken up. You will see another copy of your original image on the timeline along with the new Virtual Copy. Both will have the same filename. You will know it is a Virtual Copy because the file on the Filmstrip will show a little page curl icon. The Copy will also show 2 of 2 if you hover it in the filmstrip. Otherwise, it will look like another file, but it’s not. Think of it as the original file with a different set of instructions.
Let’s look at two ways to do the same thing, one with Snapshots, the other with a Virtual Copy. Say you want to have a monochrome version of your original color Raw file. Using the Snapshots method you would edit the file as usual, at some point getting the image edited into the monochrome version you wanted. You would make a Snapshot at that point. You could later do other things if you wanted, but clicking back to the Snapshot, you’d see it as it existed when you made the Snapshot. You could have other Snapshots in the same image as well.
If you wanted to use the Virtual Copy method you would make a virtual copy of the original file and then edit that into the monochrome version. If you wanted other variations, you’d likely make additional Virtual Copies and then take those in other directions. Because Virtual Copies are treated like real images, you can do all the things you do with regular files. Using my Montage example, if you made each edit variation a separate Virtual Copy, you could select all the versions and then going to the Print Module, bring them into the layout as I described.
When to Use Which?
So which should you use when? You can likely get to the same final result using either, but think of it this way:
- Snapshots live inside one image and are like bookmarks in the edit History of that image. You use them to go to spots in that edit History. You can export from and print from a Snapshot.
- Virtual Copies are like “versions” of the same file. Lightroom treats them like separate files, but they aren’t and take no additional drive space. You can also place different Virtual Copies in different Collections if you like, print them, export them, pretty much do whatever you do with a regular image.
A Few Other Tips
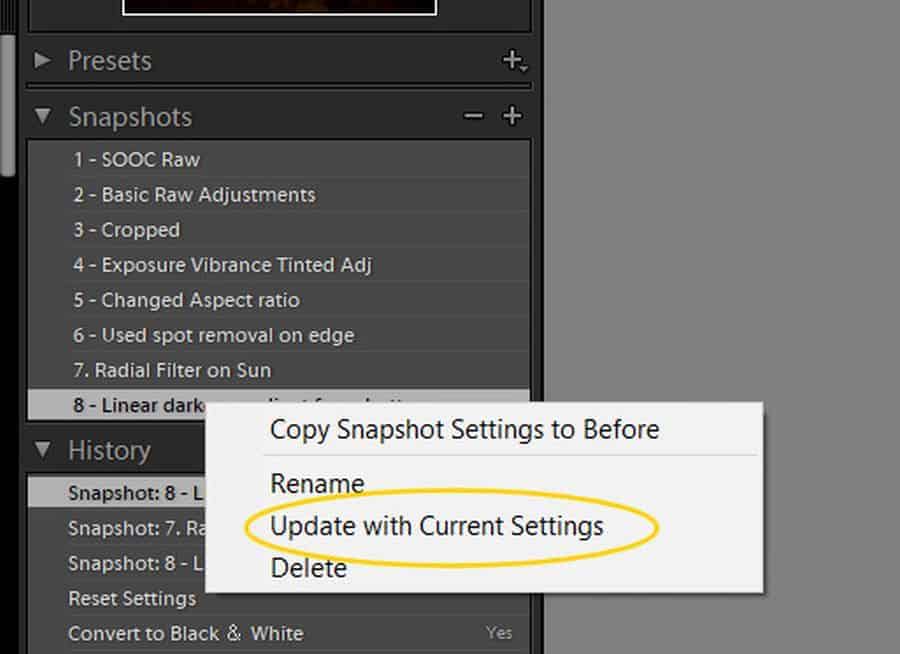
- Say you want to update a Snapshot to reflect the current settings. Right-Click the Snapshot and choose “Update with Current Settings.” If you want to delete a Snapshot, right-click it and choose Delete from the menu.
-

If you make edit changes by don't want to make a new Snapshot, you can Update the Snapshot to reflect the current settings like this. 
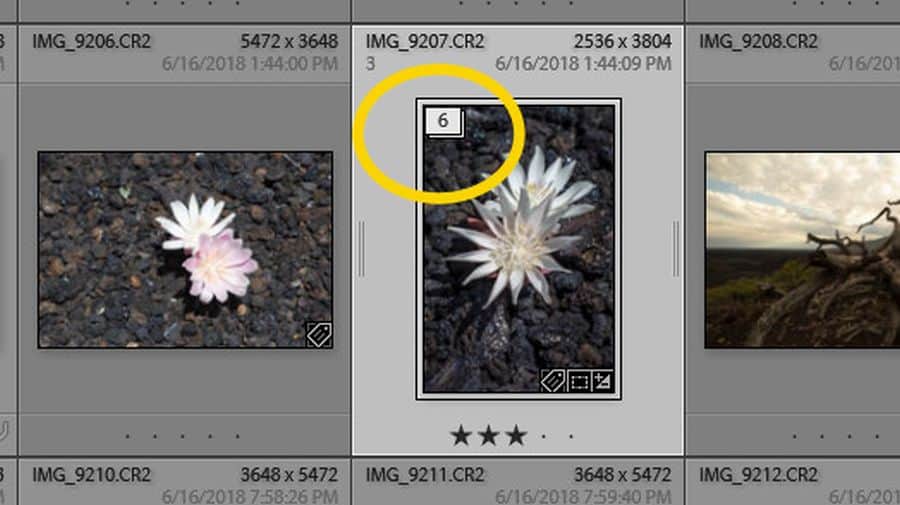
The “6” in the box means there are six stacked Virtual Copies here. Stacking reduces clutter on the Filmstrip. You can Expand the Stack by clicking the box and show each of the images separately. To reduce clutter on the Timeline when making Virtual Copies you may wish to stack them. Select the Original and the Virtual Copies you wish to Stack, then right-click on them and select Stacking, and then Group into Stack. The images will stack and a box with the number of images in the stack will appear in the top left corner of the image. To expand and contract the stack, click on that numbered box.
It All Works Until…
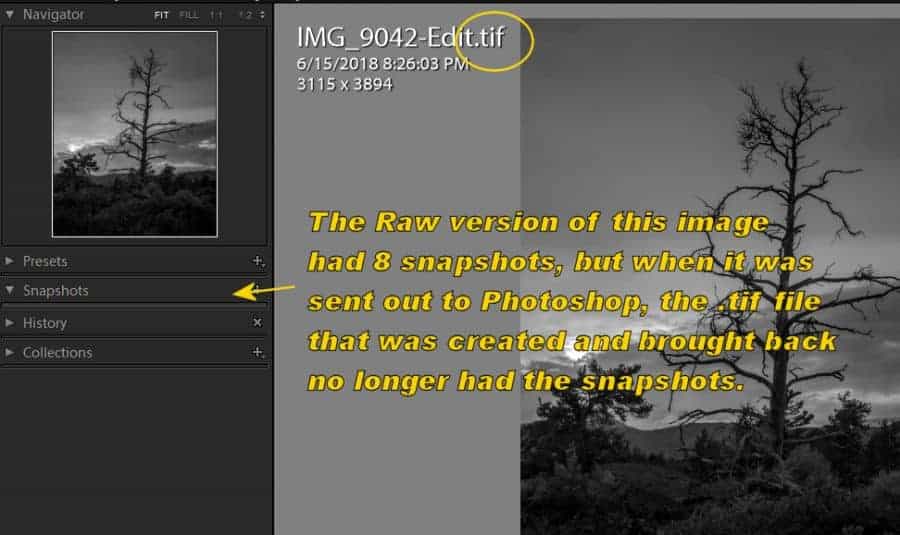
When you stay in Lightroom, things like Snapshots and Virtual Copies all work fine. These are variations tied to the original Raw file. But sometimes when editing, you may want to do something Lightroom cannot do and “round-trip” out to Photoshop or maybe some other editing plug-in. Keep in mind when you do that, a Copy of your original Raw file, (usually a .TIF unless you’ve changed the options) will be created and that is what will go out and come back into Lightroom. That file, being a real, not virtual image, and not tied to the original Raw file, will no longer have any Snapshots you might have added nor will it be tied to any Virtual Copies.
Experiment!
There are a lot of options, variations, and ways to increase the possibilities open to you while editing when you experiment with the History, Snapshots, and Virtual Copies functions in Lightroom. You may want to see what you can achieve by using them in combination! Best of all, unlike the old days when having multiple versions of an image meant separate files taking up additional drive space and without the means to revert back, in the “virtual world” no additional drive space is taken and you’re never finished or limited in options until you want to be. Now go make Make some Photographs and don’t be afraid to also Take some (Lightroom) Snapshots.
Rick,
Excellent article. I have suggested it to many of my friends. Thanks so much for the information.
Really appreciate your clear explanations about how these options work and suggestions on how to use them effectively. Great article.
Lightroom has so much functionality and power–I really appreciate how you’ve carved out the “Snapshot” functionality (incl History and Virtual Copies) and shown how this can be useful and what steps one would go through to take advantage of it. I’m definitely bookmarking this page!
Really appreciable and informative article. Thanks for sharing such an useful and helpful article.
Is it LR 6.0 or LR CC classic, please?
I use LR CC Classic, but I believe both Snapshots and Virtual Copies have been options for quite a while now so yes, 6.0 will have it. I can’t say about LR CC (the online version). I, (as many of my fellow pro and semi-pro photographers seem to agree) have no current plans to use that version.
Thanks for the nice comments friends! With my next article, I will have written 20 pieces for Improve Photography. This link will take you to all of them and will update as new ones are added – https://improvephotography.com/author/rohnsmanmsn-com/
I’m not much of a LR user but enjoy reading about your insight. Terrific tutorial!