
![]() Adobe Lightroom is a super digital Photography managing and editing application as most of you reading this know. It has very powerful Digital Asset Managment abilities along with some super powerful and fairly simple editing tools. There are a few things that can make Lightroom more enjoyable to use and also more productive. In this article, I will share some tips and tricks that will have you working in Lightroom more quickly and with greater understanding in regards to some of the tools. So let's dive in!!
Adobe Lightroom is a super digital Photography managing and editing application as most of you reading this know. It has very powerful Digital Asset Managment abilities along with some super powerful and fairly simple editing tools. There are a few things that can make Lightroom more enjoyable to use and also more productive. In this article, I will share some tips and tricks that will have you working in Lightroom more quickly and with greater understanding in regards to some of the tools. So let's dive in!!
1 – Expand Your Work Area
When working on an image in Lightroom, it is best to have the image area as large as possible. With all the panels and options that Lightroom affords us, it is inevitable that valued real estate will be sacrificed on your display. If you have a large display this may not be of huge concern but every little bit of extra space helps. Below are some workflow tips to help maximize your image area.
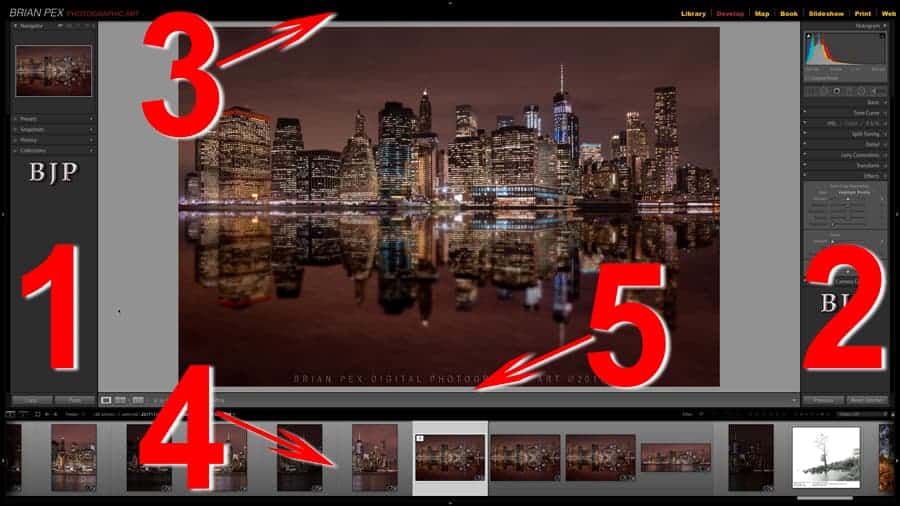
Numbered here for you are the main panels in Lightroom. Panels 1&2 are the Left and Right Module Panels. Depending on what module you are in, these change in appearance and function. Sometimes you may want them there, sometimes you won’t. The choice is yours. Panels 3&4 are the Module picker and Film Strip Panels. These can also be hidden or shown. Finally, number 5 is the Toolbar. These all have shortcuts to toggle on and off. They are as follows:
1 LEFT MODULE PANEL F7
2 RIGHT MODULE PANELS F8
3 MODULE PICKER F5
4 FILMSTRIP F6
5 TOOLBAR “T”
You can toggle them off using their keyboard shortcuts one by one. You can hide 1 & 2 by hitting the TAB key. Want to close 1,2,3 and 4? Press SHIFT & TAB to toggle them on and off. Number 5 (Toolbar) can be toggled simply by hitting “T”
Pressing SHIFT & TAB again will bring the 4 panels back to view.
It really helps unclutter the display and keeps your eyes on the image details that you are working on. Bigger is always better when viewing images during review or editing. There is also “AUTO HIDE & SHOW” that makes the panels vanish and then appear when you hover over them again. This allows you to use the tools in the panel without having to see the panel, therefore, giving you more valued room on your display.
The options are pretty much self-explanatory. “Sync with Opposite” does just what it says; it syncs it with the opposing panel on the left or if you were on the top panel, it would sync with the bottom. Again, if you want to make the panel appear without having to move over, use the shortcuts mentioned above. When dealing with lots of images, even a few seconds here and there can really add up!
2 – USE SOLO MODE
When you are editing your images in the develop module, you want to work with one panel at a time. The way Lightroom comes “out of the box” isn’t the best way in the eyes of many. For instance, when you are making white balance adjustments and exposure tuning in the Basic panel, you may want to jump to another panel such as the Lens Corrections panel to remove chromatic aberration or enable lens profile corrections for the particular lens that you shot with. After that, perhaps you may then want to move to the HSL/Color/B&W panel. These are very common workflow practices but what happens is you now have all those panels open in the right panel and if you’ve ever worked with a smaller display like a laptop, it can be a pain scrolling back and forth between the different sub-panels within the right panel in the Develop module.
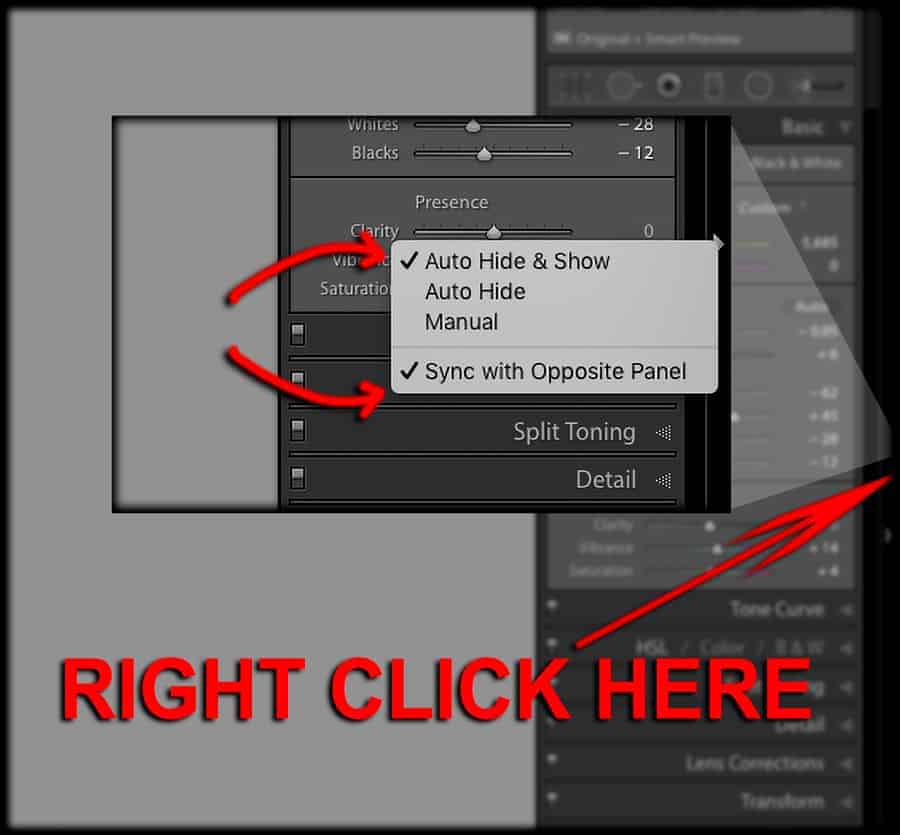
To avoid this, activate SOLO Mode which stops this from happening by allowing you to only open one panel at a time (with the exception of the histogram which can remain open while others are being used).
It can be done as shown below:

To get this Pop Out Menu, simply right click on the little-dotted triangles that the big red arrow is pointing to. Then click on SOLO MODE. Also, you can also take away panels if you please if you don’t use them much. For example, I don’t use the transformation panel here in Lightroom because if I need to make transformations, I will do that over in Photoshop. It isn’t a big deal since you can always turn it back on, but the option is there.
While we are at it, a great way to access these panels quickly is using their corresponding and easy to remember shortcuts. For example, if you want to jump to the basic panel, simple hit CMD on a MAC or CTRL on a PC and Zero (0) thru 9. Zero (0) is for the Histogram and then 1 is Basic, 2 is Tone Curve, and so on with 9 being the bottom panel, Camera Calibration. It is just a little tip to help jump around in Lightroom. Again, Histogram is the only one that can be shown with others while in Solo Mode which is a good thing since our histogram is of vital importance and used in the next tip.
3 – Make Exposure Modification USING the Histogram
We all know (OR should!) that the histogram is the one thing that tells us so very much about our image data. The Histogram contains important image data and can show issues that often times cannot be seen just by viewing the image.
But did you know you can work DIRECTLY on the Histogram to make exposure adjustments rather than using the sliders? Yes – YOU CAN!!
To do so, simply place the pointer over the histogram. I created a legend here to show you the different areas inside of the histogram that correspond to the sliders in Lightroom’s Develop Module. In this example, I am hovering above the area that is blue and this then activates the numeric value attached to the highlights. These colors are not shown in Lightroom. I merely made them break up the areas of the graph to show you the different zones and how they relate to the adjustments.

As you slide the histogram left or right, depending on the area you are in, you will see the values change. It is a very quick way to see what you can recover and get from the image. You can always fine tune with the sliders or you can really fine tune using the next tip!
4 – Use Arrow Keys PLUS SHIFT KEY to dial in perfect exposure
The above tip allows you to quickly make exposure adjustments when you’re first editing the tonal information in your captured image. However, there will be times where you’ll want to fine-tune the exposure as much as possible to the finest degree. Using a mouse or trackpad just isn’t as accurate as using the up and down arrow keys to set the various values in the basic panel. To change the values using the up and down arrow keys, simply click on the numeric exposure value in the box to the right of that slider. You can then press up or down to change values with fine accuracy and you may also hold the SHIFT KEY while doing so to make bigger changes. The amount of the change depends on the adjustment you are using.
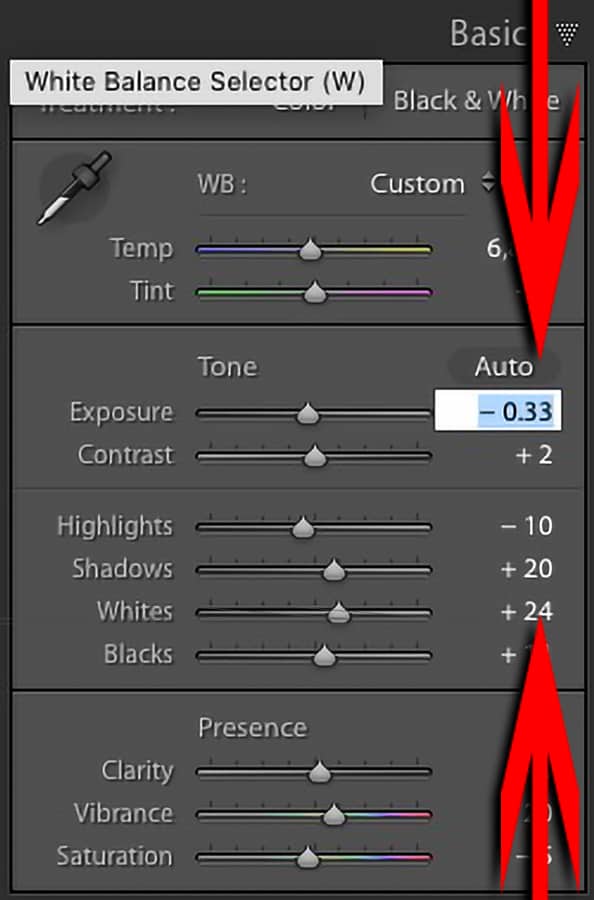
For example when you are in the White Balance Temp value, tapping your up or down arrow keys will increase or decrease the Temp value by increments of 50. If you hold down the SHIFT KEY while doing this, it will make large changes going in steps of 200 at a time. To move to the next exposure setting, simply hit the TAB key and the cursor will jump to the next box. In this case, you will be inside of the TINT slider numerical value box. The tint values will change one at a time and with the SHIFT key, 10 at a time.
As a matter of fact, all of the other values, beside EXPOSURE, change just like the Tint Value – 1 at a time or 10 when holding down SHIFT. This also works in other panels such as the HSL panel.
With the Exposure Slider, you get fine adjustments of .10 at a time when using the arrow keys up or down OR while holding SHIFT, you’ll get ⅓ stop adjustments just like the adjustments in your camera – assuming you have the camera set to third stop increments. So you will see .33, .66 and .99 changes with the arrow keys (UP or DOWN) along with Shift.
What About Clipping?
Some reading this may wonder about the clipping warning when using the sliders and holding down the ALT/OPTION KEY. This can be a good method to check for clipping in the brightest and darkest areas. However, there is another way and that is done by simply hitting the “J” key while making adjustments. The two little clipping warning indicators in the top two corners of the histogram will be outlined and you’ll see a BLUE overlay in the image where shadow detail has been lost and RED in the brightest areas where it has gone totally white and has lost detail.
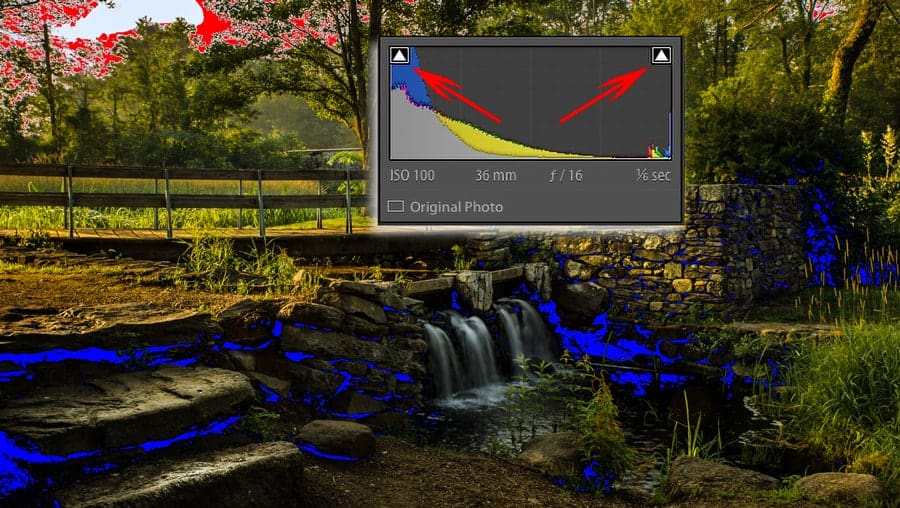
If you’d like, you may click on either of the highlight or shadow warning boxes within the histogram to shut one off. A good reason why you’d want to do this is if you have an image with pure white or pure black in it, you don’t want those distracting colors showing up.
5 – USE THE GOLDEN KEY IN LIGHTROOM
If there is one single KEYSTROKE in Lightroom that you should absolutely know, it is the ALT/OPTION modifier key. This one key modifies that action of so many tools and sliders within lightroom. It is almost safe to say “If it moves, you can use ALT/OPTION key with it!”
What does this mean? Here are some examples:
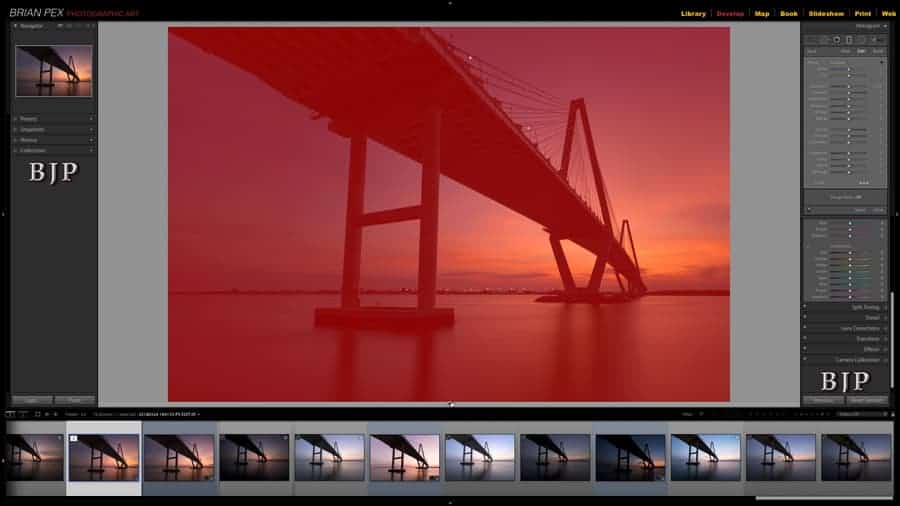
When adjusting any of the exposure sliders (Excluding Contrast), the screen will either turn PURE BLACK (Exposure, Highlights and Whites) or PURE WHITE (Shadows and Blacks) and while holding down the ALT/OPTION KEY, you will see the clipped pixels begin to come through either on the dark end or the bright end. The colors that show first are the actual color channels. Meaning that if you see RED pixels when adjusting the Highlights Slider, it is simply indicating that the RED channel information is coming through first. Below is an example using the WHITES slider:
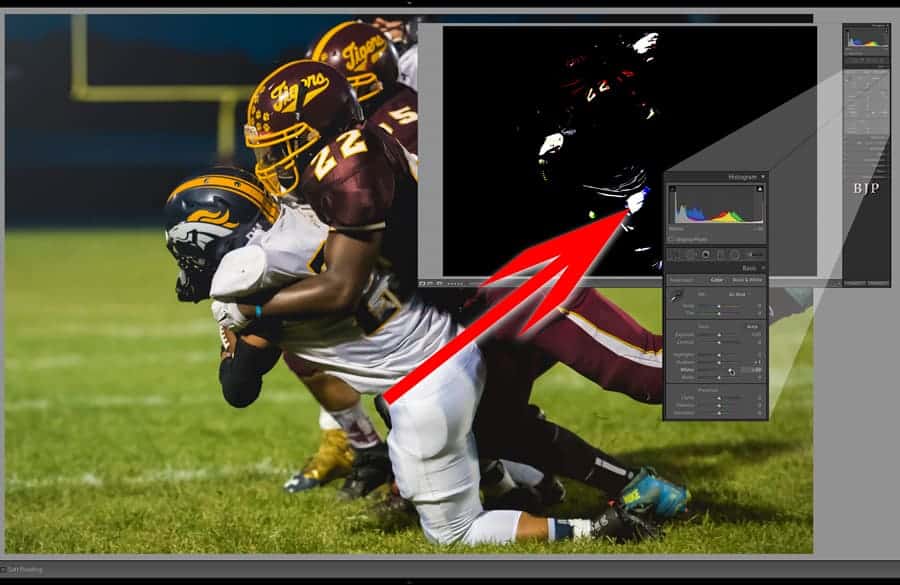
The WHITES slider in this example was pushed to show you what you’ll see when you hold down ALT/OPT and slide the sliders along. In this example, the white uniforms are blown out losing all detail. Dialing the slider back until you see all black will tell you that detail has been restored and the image will look much better. Remember, in images where there is pure white and pure black, it is ok to have clipping in those areas.
As mentioned above, the ALT/OPT key is used along with many tools inside of Lightroom. When using Graduated Filter, for example, once you create one, you can then hold down the ALT/OPT key while moving the bottom of the filter up or down to create harder transitions. It can be used with the Radial Filter along with the SHIFT KEY to make perfect circles. It can also be used with that same tool to adjust one side of the shape without affecting the other.
It is of VITAL importance when using the SHARPENING sliders in the DETAIL panel. An example is below:
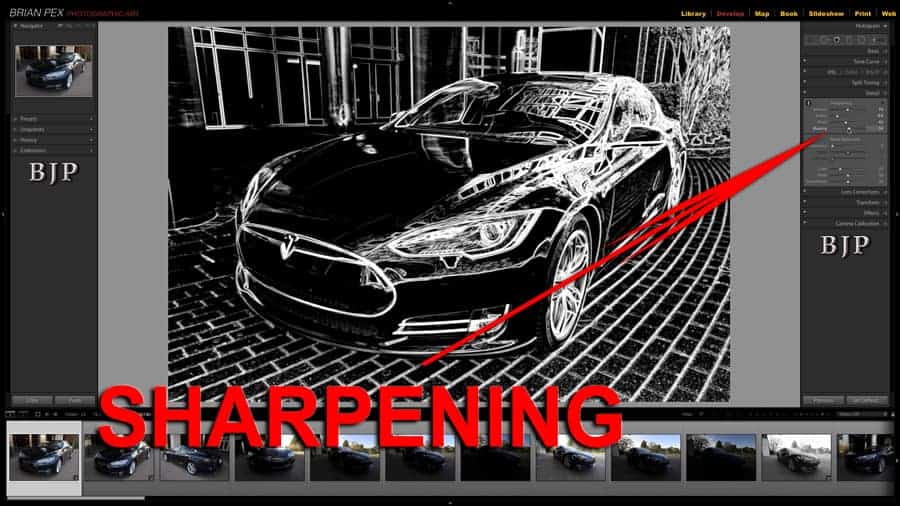
It is important to mask sharpening away from areas like the sky and also skin. These sliders make that possible and using the ALT/OPT key makes it a snap and visually observing it is very simple.
6 – TONE CURVE
The TONE CURVE in Lightroom is a great tool for tonal control and also color adjustments as well when you are working with the RGB channels in the Panel. It is one tool where I really must say Photoshop has a distinct advantage in this area for a myriad of reasons but this is about Lightroom so we will stick with Lightroom.

A challenging part while using the TONE CURVE in Lightroom is that it is very difficult to make fine adjustments and, when working with curves, fine control is exactly what is needed. If you click on the curve and drag, you will quickly find out that keeping the point in the tonal area you want it in and without moving too fast is tricky. Not only is it difficult to keep the point moving up and down smoothly, it is also a real pain to keep it moving vertically.
Enter TWO modifier keys; SHIFT and OPT/ALT. Holding the SHIFT key while moving the point on the curve will constrain the adjustment in a vertical orientation and won’t let you slide outside of that point to the left or the right – something that just isn’t possible without the SHIFT key. But the point still moves too fast, right? That is where the OPT/ALT Key comes in.
When you hold OPT/ALT and move the point, it will move much slower and this affords you much more accurate control.
This is very important when working in the RED, GREEN or BLUE channels within the TONE CURVE for color grading.
Many novice and even seasoned Lightroom users know that using the TONE CURVE allows you to alter contrast by using the RGB Curve. However, there are many Lightroom users that neglect to use the RED, GREEN and BLUE curves within the TONE CURVE to modify color and add an artistic effect to their images.
Without a long tutorial on how color curves work, I will briefly explain here. If you choose the BLUE CURVE, for example, raising the curve in any particular area will increase blue tone in the image – more so in the tonal range where you place the point. For example, if you increase the blue point in the lower left end of the curve, that will have more effect on the SHADOW regions of your image. When you decrease that tone curve, the opposite color becomes prevalent in that range. They opposites go like this:
RED – GREEN
GREEN – MAGENTA
BLUE – YELLOW
Experiment with these if you’d like. You can get some very nice looks with this alone.
The ALT/OPT key works with other items as well. The following tip will require use of the ALT/OPT key.
7 – LUMINANCE AND COLOR WITH RANGE MASKS
By now you may have heard that Lightroom now supports both color and luminance masking with the various local adjustment tools. Those tools are the Adjustment Brush, The Radial Filter, and the Graduated Filter tools. When you use these tools, you now have an option at the bottom of the panel that allows you to choose either color or luminance values within that tool.
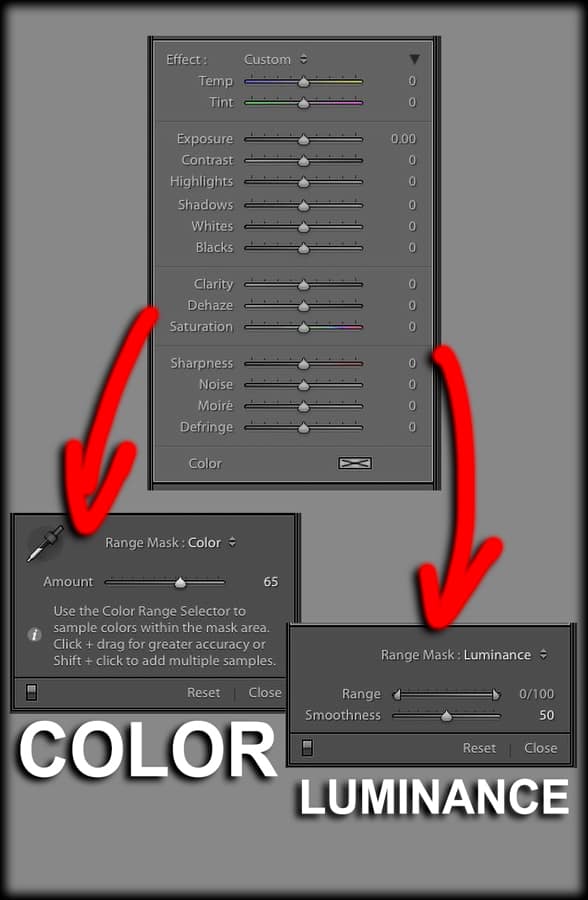
With the COLOR range masking, simply use the eyedropper and pick a color in the scene that you wish to manipulate. Once chosen, you can then go to the AMOUNT slider and, while holding down ALT/OPT, slide to make the selection more or less in relation to that color you have chosen. It can be great for a variety of uses including adjusting colors in a sky.
With LUMINANCE range masking, you have a scale from 0 thru 100. This represents the tonal range from black (0) to white (100). You can slide these sliders while holding down ALT/OPT to see the grey tone of the tonal range you are selecting. As an example, you could set the left slider to 33 and the right slider to 66 and only the tones from 33 thru 66 would be affected. This would effectively be your midtones in the image.
The softness slider can also be used along with the ALT/OPT key to make a harder or softer transition between the tones.
8 – LUMINOSITY MASKING IN LIGHTROOM?!?!
We often see the Graduated Filter used to adjust parts of an image like the sky to add contrast or decrease exposure as well. Did you know that you can select the ENTIRE image using the Graduated Filter and then effectively create a range mask to then pick out ONLY specific tonal values in the entire image to alter while leaving the other areas alone? With Range mask, you basically have Luminosity Masking that is used for advanced editing inside of Adobe Photoshop but in a much easier form here in Lightroom. Here is how you can do this:
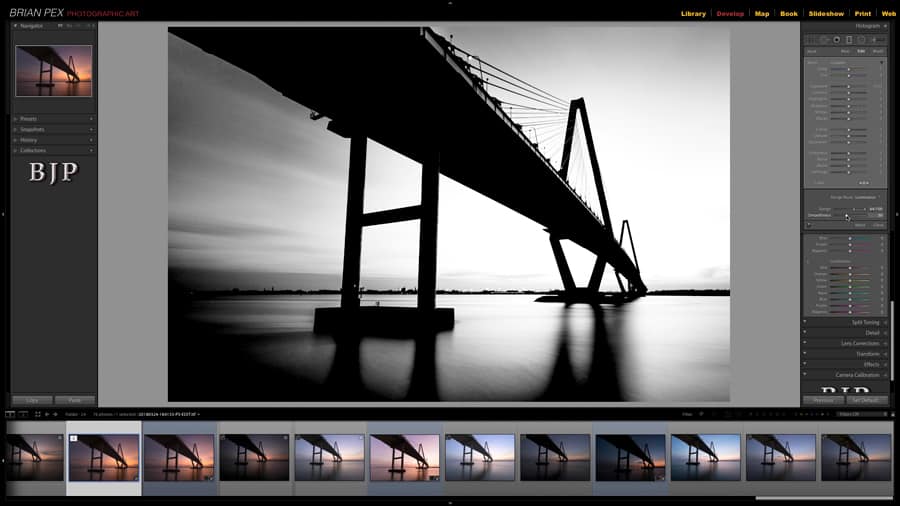
First, select the “M” Graduated Filter tool and drag down to the bottom of the image. To drag nice and straight, hold down the SHIFT KEY while doing so. It should look something like the image below. Hitting the “O” Overlay key will display the red overlay that signifies the area being affected: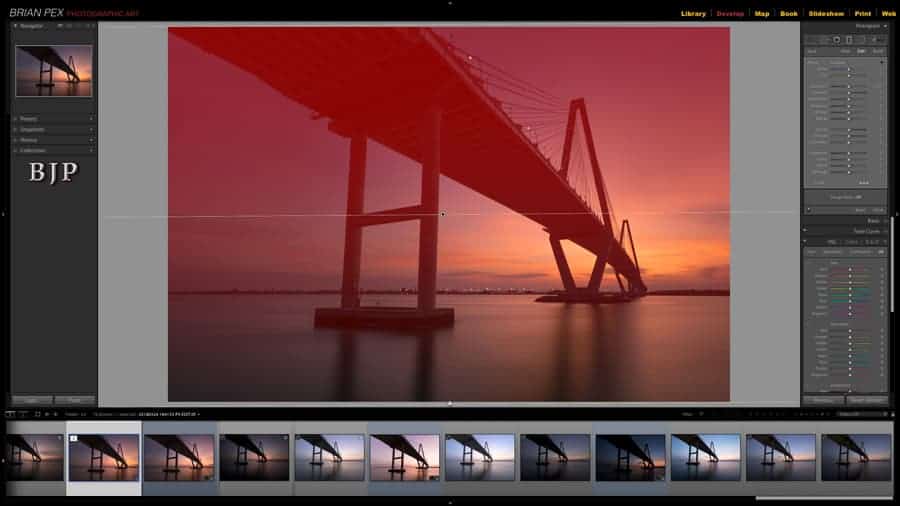
Next, move to the center point and drag all the way to the bottom. This will now effectively make the entire display “RED” showing that the entire image area is now selected.
You can then go over to the Luminance Sliders and, while holding the ALT/OPT key, drag the sliders left or right to get the desired tonal range you want to be selected. You can slide the Range slider for the tonal range and the Smoothness slider for the “Hardness” of the transitions. Both of these sliders should be used along with ALT/OPT so you can see exactly what you will be making adjustments to.
Once you have the desired tonal ranges selected, simply use the sliders to make whatever changes you want to. Works great when adding midtone contrast to an image by selecting just the midtones. That is just one example!
8 – CROP OVERLAYS AND STANDARD SIZES
The CROP tool in Lightroom can be used to create stronger compositions, straighten images using the straighten tool within and create work for standard size prints or web formats. The CROP tool can be accessed by hitting the “R” Key on your keyboard. There are some keyboard commands you should know when using the CROP tool.
The “X” Key will toggle the CROP orientation from Vertical to Horizontal cropping.
The “O” Key will toggle between all the various overlay modes that may help you decide which crop will work best for that image. Try this the next time you use the CROP tool.
Holding down the Shift Key while dragging will change the crop and make the opposite point the anchor point for the crop.
Holding down the ALT/OPT key will cause the center of the crop tool to become anchored.
Using both Shift and ALT/OPT together will constrain the crop from the center out with that aspect ratio locked in.
You can click on the little Lock to LOCK OR UNLOCK the constrained ratio that is just to the left of the lock.

A little trick that I have found helpful is to unlock the lock by clicking on it and moving the borders freely to see what looks best. If you move the borders slowly you will notice the word “CUSTOM” jump into and out of a Ratio. This just means you have moved into a standard sized ratio such as 16:9. I like to see what I like best and then move it to a ratio that I know works well for print or display. For example, my iMac has a 16:9 Aspect Ratio so I often will crop until I get a crop that works well with that. This is also a ratio that works on many tablets and phones when held in landscape view. It is nice to use all the pixels on the display and fully cover them.
If you're printing an 8X10 inch photo, simply lock the lock and choose that as an aspect ratio. Cropping non-standard sizes and then sending off to print will be a big headache and should be avoided whenever possible.
Conclusion
I hope some of these workflow tips can find their way into your current workflow and help you work faster and more efficiently in Lightroom. Do you have any tips you'd like to share? Please post them in the comments below. Feel free to leave any comments or questions as well.
Happy Shooting!
Wow, Thank you so much for this, great learning and Wow.
Some great tips – some that I already use and some that I have taken notes on. Using the ALT / OPTION when selecting the sharpening masking is essential. I didn’t know about X to change the crop from portrait to landscape or vice versa… I would drag the edge of the crop around until it flipped, and it was a bit of a hit or miss situation.
Awesome article! Longtime Lightroom user, and I learned so much from this article! Thanks so much, Brian, for sharing your knowledge and wisdom!
Thank you for taking the time to read!!!
Brian – that was excellent – thank you!
Great stuff. I’m on my second pass now. Is this for Classic or CC?
This is for Adobe Lightroom Classic CC 🙂
Really excellent tips. I like it and bookmark your website in my browser. Thanks, Brain for a nice piece of content.
Excellent tips, thanks much!