
Santorini is a fantastic location to photograph. In this article I am going to write about one of my favourite photos taken when I went to Santorini last year.
I am going to describe the gear I used, the camera settings and the thought process of the image capture. I will then write about how I processed the image in Lightroom and Photoshop.
Santorini
For those of you who don’t know it Santorini is a Greek Island in the Aegean Sea. Santorini is one of the Cyclades Islands, formed by a huge volcanic eruption years ago.
And Santorini is a stunning location – a very special location to photograph. Go to Santorini to take photos and you will have a great time and get some great images. The island is stunning. I absolutely loved it there.
The location
Santorini was formed into the shape and topography that we know and love today some time ago, in the years 1000 to 2000 BC. Or possibly even longer ago than that. That is not important in the context of what I am writing about – a stunning place to take photos.
Santorini is a caldera, with spectacular views from the main body of the island across the sea to the other side of the caldera.
There are some interesting quirks of the island – Imerovigli where we were based was on top of the caldera, and prone to strong winds in the evening which were surprisingly cold, especially after the scorching hot days.
One problem I have with this location is the name of it – Imerovigli. I have lost count of how many times I have spelt it incorrectly!
Next time I am booking somewhere in Oia. Or Thira.
Much easier to spell!
But in all seriousness Santorini is a great place to visit – completely different from the other Greek Islands I have been to, with all those lovely white buildings perched on to top of the caldera.
What I was trying to capture
I had five days to take photos. Out of the couple of thousand of images I took, why am I writing about this one photo?
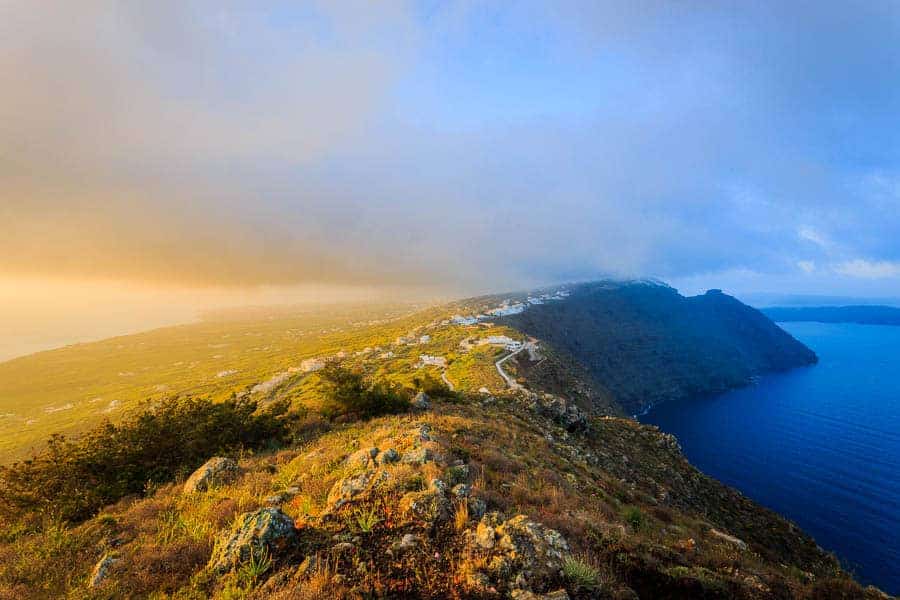
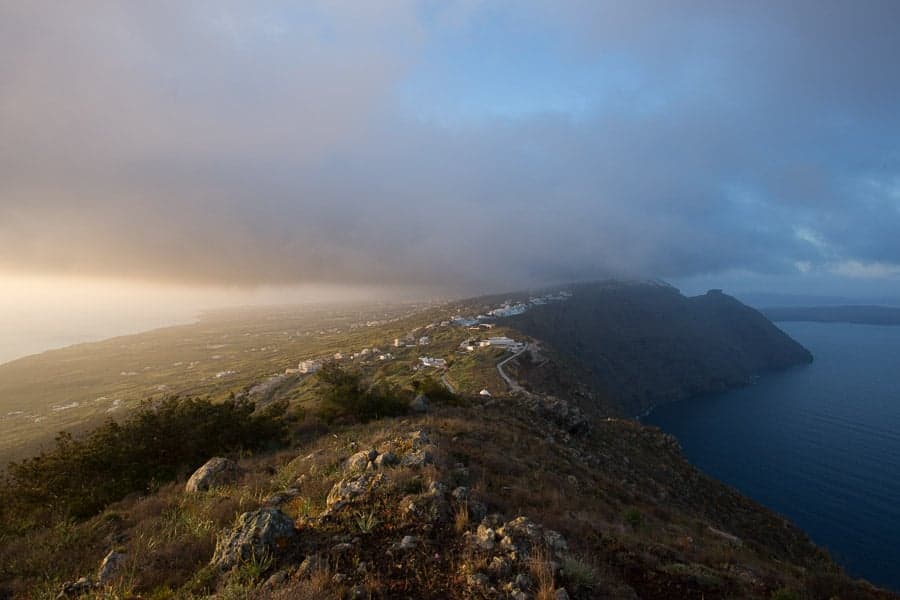
One of the things I wanted to achieve was to capture the island in one image. I wanted to show the sunrise over the gently sloping eastern part of the island, illuminating the top of the caldera and those famous white buildings.
I wanted to show the topography, the cliffs to the west, and the gentle slope of the island from the east coast up to the top of the caldera, as well as the extent of the island from top to bottom. Well part of the extent.
I was not expecting to get the dramatic warm and cold light that you can see, warm in the sun to the east, and cold to the west where the caldera is preventing the sun from having any impact.
I wanted to show the two sides of the island and was hoping for some interesting weather. But did not expect to get this image, which I absolutely love. I have never managed to capture this range of conditions in one image before.
Composition
The thing I want to say here is that when I get to a location I walk around quite a lot, just looking. I might take the odd sample shot with my iPhone, but I do not get my camera out straight away and plonk it on my tripod.
When I am on a shoot like this I love taking my time, getting a feel for a location and everything that is going on. And having five days to shoot I knew I would have the opportunity to go back to anywhere that took my fancy.
Once my camera is on my tripod I still walk around a lot – the places I go and the times I go there after all there is rarely anyone else around, and I can hear other humans quite well over the background noise. And I walk a lot with my tripod over my shoulder with my camera connected.
This is one of the reasons I only ever use a backpack to carry my gear, I want my hands free to hold my gear and help me move around quickly. I work this way on construction sites too.
The composition itself was easy for this shot – what I wanted to capture it is pretty much what you are looking at. As I said before I was trying to capture the topography of the island, with some white buildings, nice light and the lovely green of the lush spring vegetation.
My composition was determined basically by walking around until I found a view with the component elements that worked for me. It took me a good 10 minutes to settle for the composition you can see in this image.
Where I took the photo from
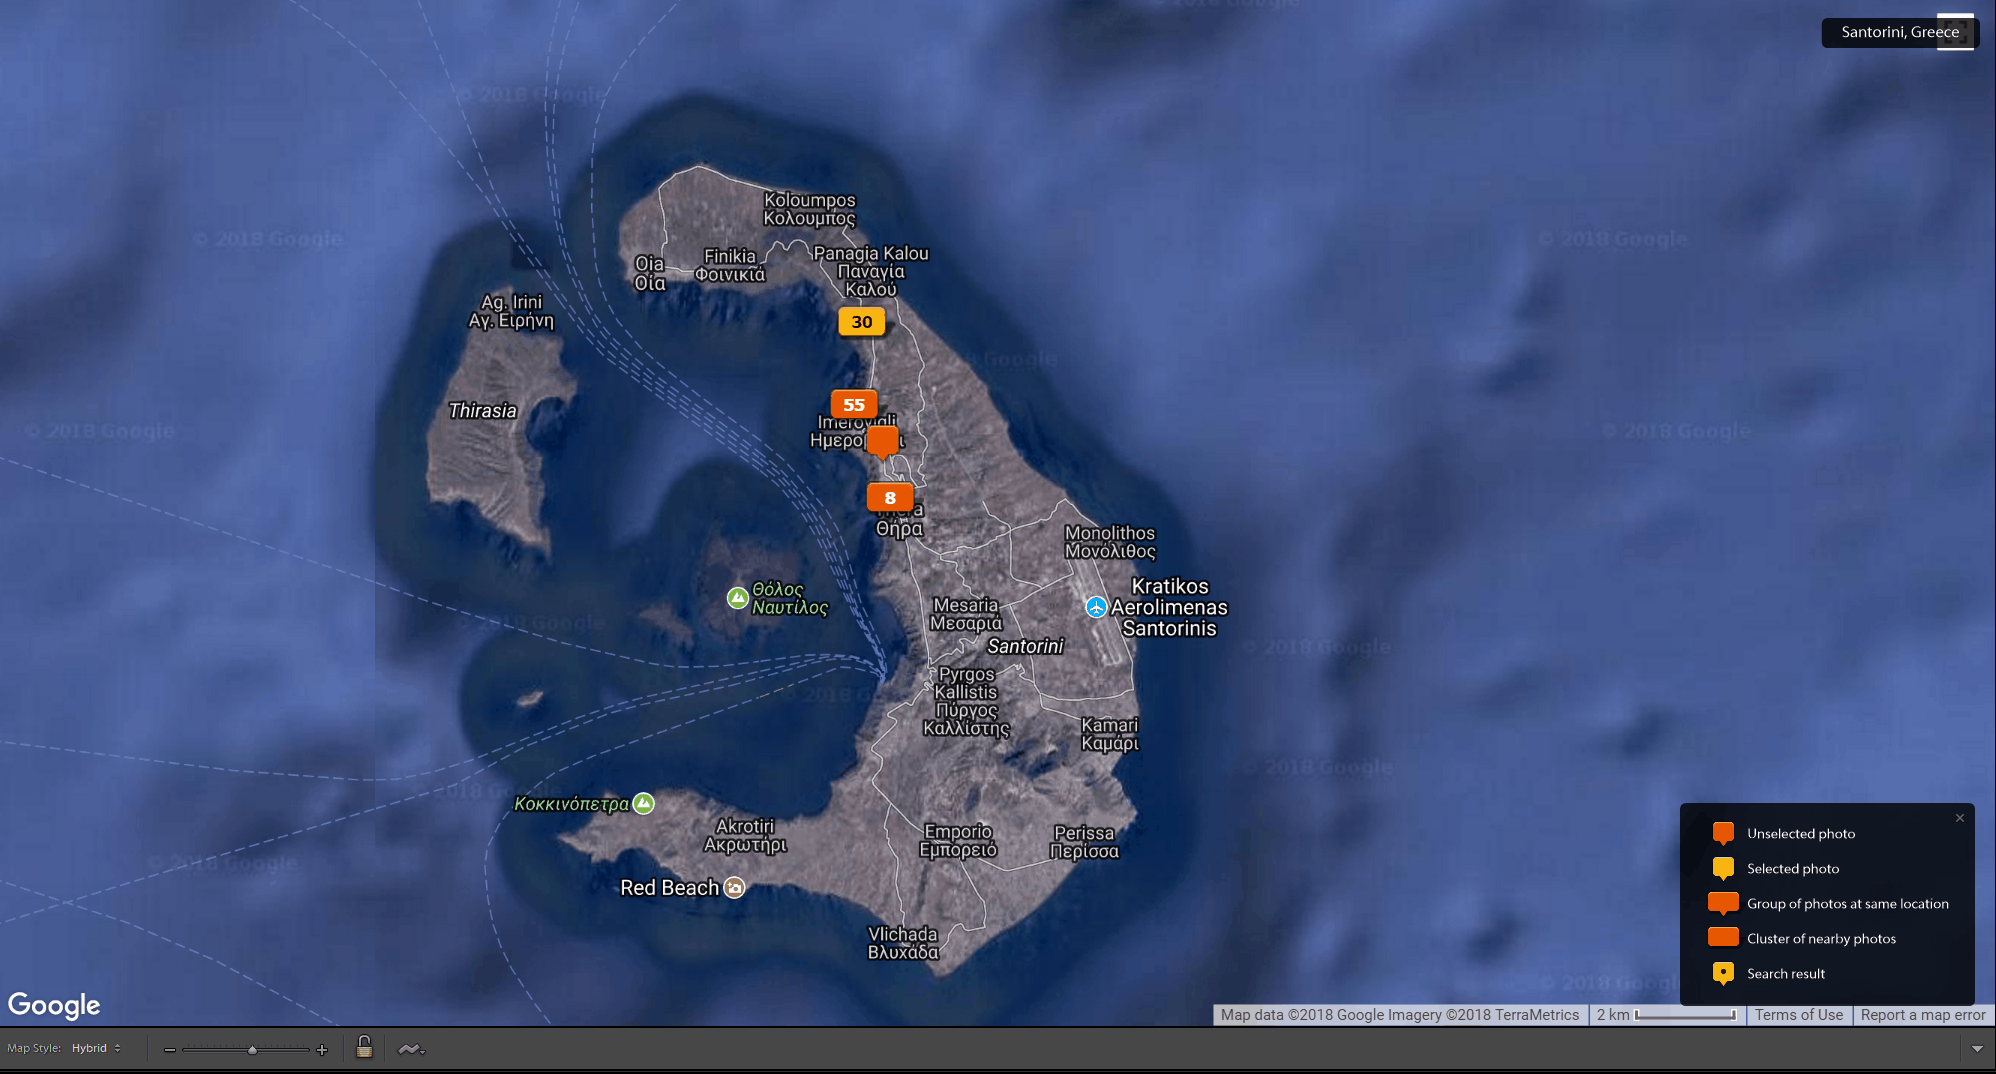
This is where I was taking the photo from. The top of the caldera basically, looking towards Imerovigli on the right and down towards the airport off in the distance down to the left.
Here is a screenshot of the Map Module in Lightroom, showing where this image was taken. I love the Map Module! The exact location is where the tab with the pointy bit at the bottom is.
Timing
I woke up at 4.30am, got dressed, grabbed my pre-packed bag and went off exploring. That gave me plenty of time to get out and about long before sunrise. The image was taken at 5.45am, as the sun was rising and illuminating the tops of the white buildings on the Caldera. That is the moment I was after, and I am delighted to have captured.
Research
I don’t really do research. Shocking I know but I like to get out there and find things for myself. I knew that Santorini was a stunning location – I just had to get out there well before sunrise and see what happened.
I do not want to turn up at a location with other images in my mind.
So, no research other than high level “this looks like a nice place kind of” stuff.
My research is walking around, then returning to what I saw that looked interesting the next morning if I did not manage to capture it on that day.
That is the beauty of having a few days to photograph one location – you can always go back the next day.
And Santorini provided something different for me every morning, and every evening.
The gear I used
- Canon 6D
- Canon 17-40mm F4 L lens
- Manfrotto 190 Go tripod
- Manfrotto X PRO geared head
- L bracket
- Neewer viewer
That was pretty much it.
I had my Canon 70-200mm lens in my bag, and a few other bits, including spares, but not that much gear. This was an exercise in traveling light, restricting my gear to one bag (nearly).
I left loads of gear at home, and did not miss a single bit of it. I enjoyed just having what I needed and nothing else – this is a lesson for all of us!
My camera settings
Nice and easy.
I compose using the viewfinder first, then go into Live View mode for refining. Not sure why I do it this way – I just do and it works for me!
Auto white balance – I am lazy, and Lightroom is wonderful at dealing with this.
RAW – why would you not?
AV Mode – again – I am lazy. I am using a tripod, so the shutter speed is largely irrelevant. I will be shooting somewhere between F8 and F16.
ISO 100 – I am on a tripod so use the lowest ISO for the highest quality image capture.
Auto bracketing – I take three shots, the first the correct exposure, the second two shots under exposed (darker), the third two stops over exposed (lighter).
I use a self-timer set to 10 seconds to take all my landscape images.
Focusing – single shot using back-button focus. Basically, I have separated focus from exposure.
Exposure – I move the white rectangle so the exposure looks about right on my screen. I don’t worry about this too much to be honest as I am taking a bracketed set of images.
GPS on – an invaluable tool that I always use.
How many photos did I take of this scene?
Two. That was all. Well when I say two I mean I took two sets of three bracketed images.
I thought I had taken more but was pleasantly surprised to find that was all it took for this view. Having captured this image I moved on. Literally.
Importing into Lightroom
When I import an image into Lightroom I apply import and develop adjustments.
Why do I do this? I have found over time that I make adjustments such as these all the time, so why not make a start and get them done automatically by Lightroom?
It gets my processing going and gives me a great idea of where the processing of image is going. And it also applies a consistent set of initial adjustments to each and every mage.
The three RAW files
These are the three RAW files stripped of all processing with the exception of the addition of 25 in the detail panel.
Correct exposure
2 stops under exposed image

It is quite incredible how dull, flat and uninteresting a RAW file is, and even more amazing what Lightroom can do to such a file.
Processing in Lightroom
The first question is this – what do I want to get out of my processing of the image? What is my end goal?
This is quite simple.
I want the image to look the best it can, whilst looking completely natural. My image processing is all about bringing out the depths of colours, tones, highlights shades and contrasts. I guess this is why I don’t do much in Photoshop – I don’t feel the need to – Lightroom does all that I want really.
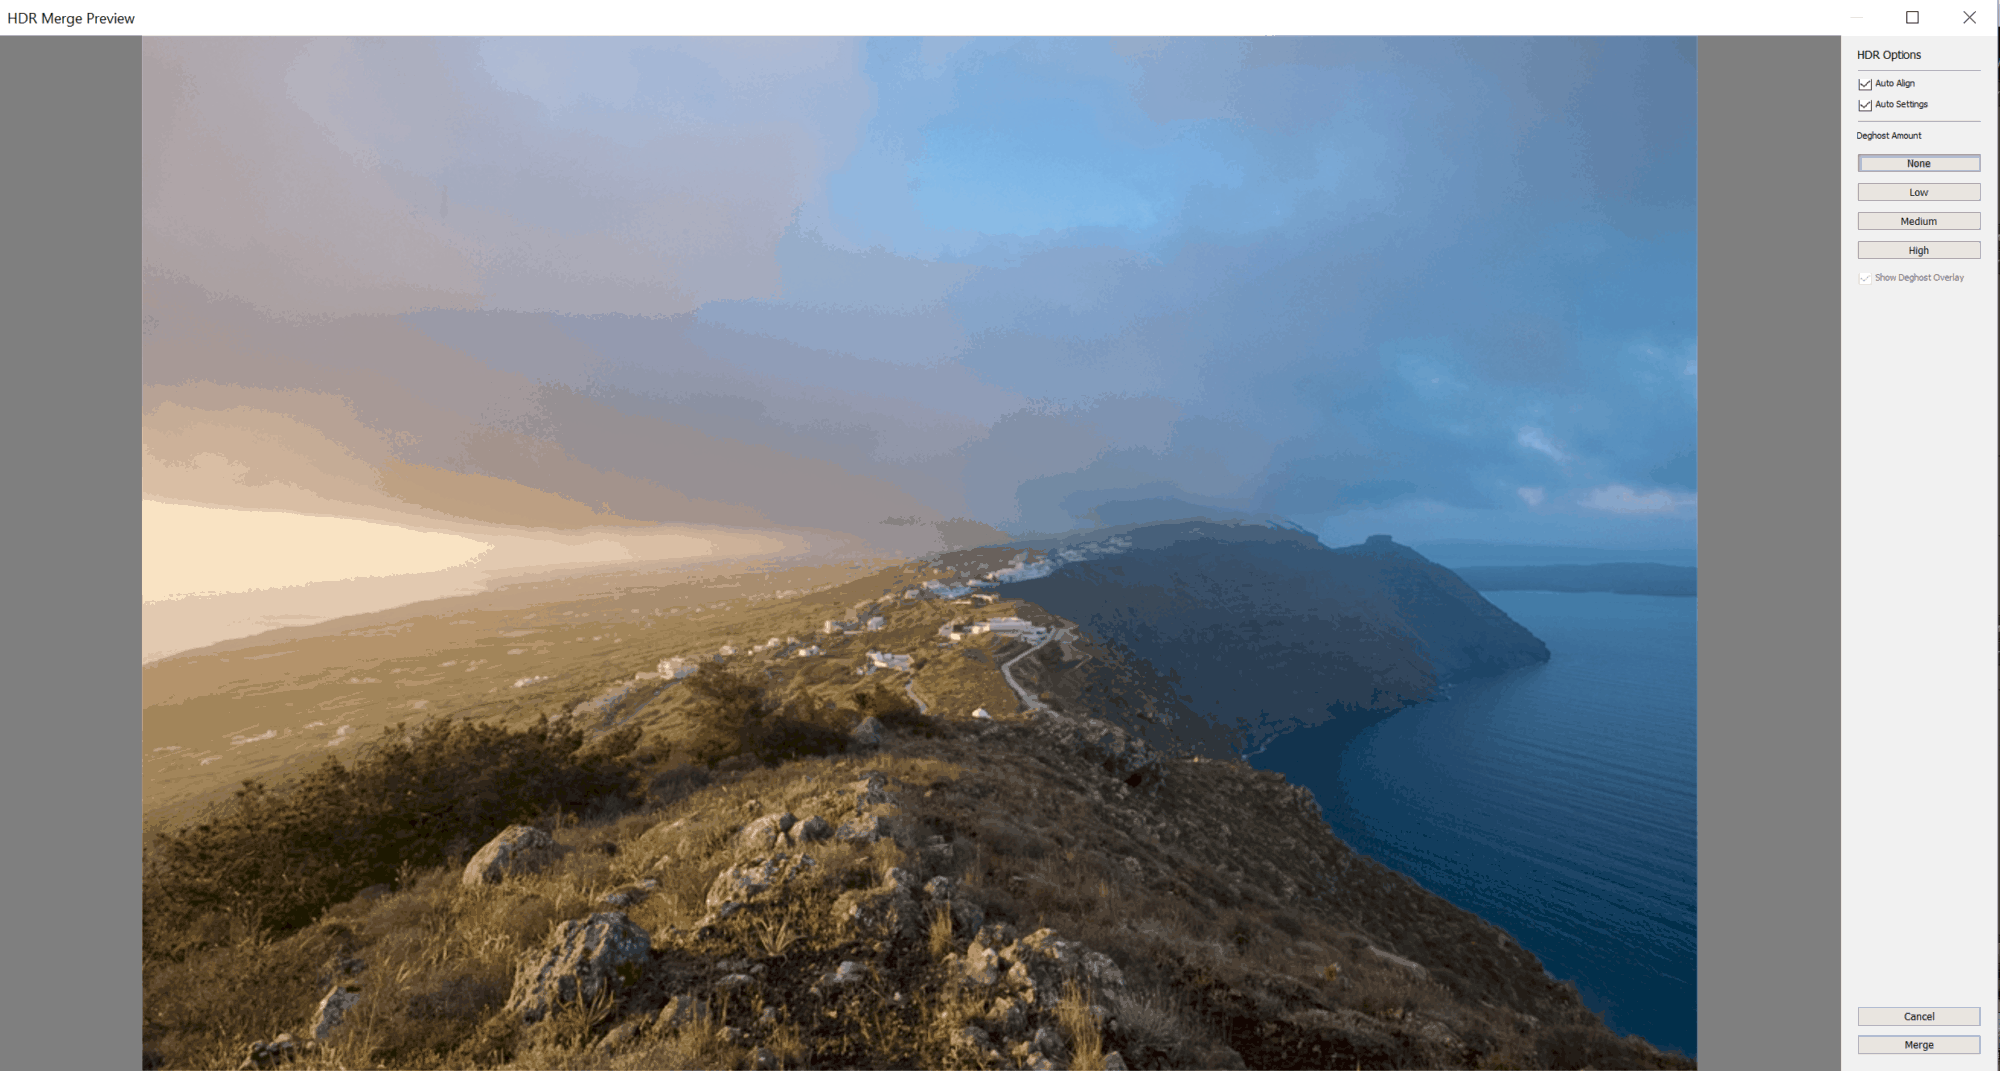
First job is to merge the images into one. As I am only taking about one image all I need to say is that I do this by selecting the two stop under exposed and two stop over exposed images. There is no point adding the first image – it just does not make any difference.
Once the images are selected I use the keyboard shortcut Control H, which brings put the HDR Merge dialogue. Check the options in this dailogue box then hit merge.
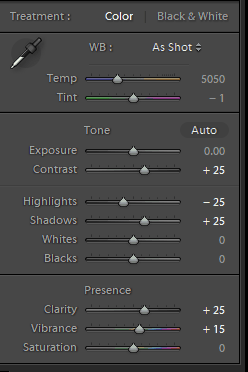
Basic panel
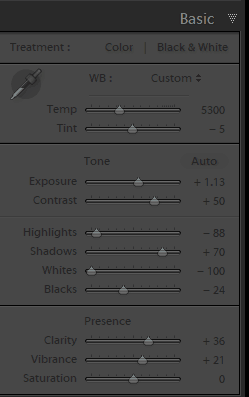
All the adjustments you can see are pretty much visual adjustments of the sliders according to what the image looks like. Apart from white balance. I tend to always do the following
- Increase the contrast
- Reduce the highlights
- Increase the shadows
- Set the white point (by holding down shift and the double clicking on the tab on the whites and blacks sliders – this is Lightroom setting the white and black points for me. I might adjust further to suit what I am looking at, or stick with what Lightroom has chosen.)
- Increase clarity – but not too much
- Increase vibrance
- Leave saturation
White balance
Obviously this was a tricky one, as I had the warm light to the left and the cold light to the right. All I did was select the eye dropper tool and move the tool around the sky area until I got the three numbers to be the same – that was the grey point in the image. Just click where the number are close (they are never identical) and that is white balance done for me. White/ grey clouds are great for this.
HSL
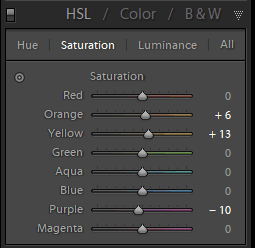
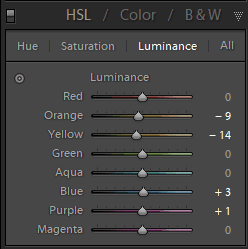
One of my favourite tools. I use the saturation and luminance panels with the selection tool. Just click on the small circle under the word Hue, and move the pointer around the image with your mouse. You will see the text for the various colours highlighted – move the mouse up and down and you can increase and decrease the luminance and saturation of just the colour selected.
You can see the adjustments I have made to the image – quite subtle changes.
A very powerful tool that I always use.
Crop
I do not do a lot of cropping. I seem to get the compositions pretty much as I want them, which is a good thing.
Transform
I did not need to use the transform tool on this image as my camera was level and vertical on my tripod.
Sharpening

To be honest this is applied as a develop preset, and I don’t ever do any more than that. It works for me.
Effects panel
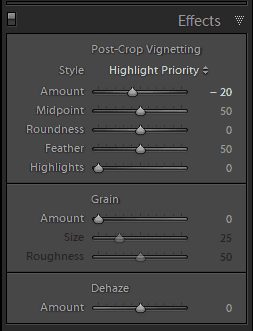
Just a vignette. I apply a vignette of -10 to every image in import. Play around with this – just slide to the left, darken the corners, then come back to the right until you can barely tell there is a vignette.
Processing in Photoshop
Before

After
I don’t do a great deal of work to images in Photoshop. The main thing that I have to do is remove sensor dust spots caused by my shoddy cleaning regime. (To be honest I am scared of cleaning my sensor after a bad previous experience so get it done as and when I am in the vicinity of a Canon engineer – I find once or twice a year does me!)
Apart from removing the defects I have caused I also remove anything that I do not want in an image. I don’t have a problem with doing this as this is not editorial work, and I make no secret of this fact.
I am particularly keen on removing things that spoil the edges of an image – if something is cut in half by my composition I either crop it out or remove it.
Apart from removing things I am not great with Photoshop. I have never used layers in anger, and have not found a reason to.
One point on Photoshop and Lightroom. When I send a file to Photoshop for final cleaning up Photoshop creates a new Tif file. When I save the image after I have done all I need to do in Photoshop the image replaces the Tif file with the edited version. The RAW (or dng) file in Lightroom is still there – the one that I sent to Photoshop.
And it is sent back to the stack with the three original images and the new dng file. Neat!
Shoes
One thing I have to mention here – I forgot to bring anything other than a pair of Moshulu pumps. I never thought that I would need proper walking boots.
Do not make that mistake.
By day three my feet were pretty sore! And on the last day I was almost relieved that the last long walk back was just that – the last long walk!
Clothing
The shoes thing reminded me – pack proper clothing. I spent a good amount of time planning my gear, organising my bag, cleaning stuff, making sure I had everything that I could possibly need when restricted to one camera bag.
I should have spent a bit more time on my clothing. I had enough stuff to keep warm, but I could have packed much more smartly.
Go to a Greek Island in April and you will find it can be quite cold 2 hours before sunrise, but once the sun is up considerably warmer.
Drinks
A can of Pepsi Max at 5am is hardly ideal. I will have a rethink of this for my next trip.
Alternative edits
As part of the work I am doing to this set of pictures of Santorini I am going to produce alternative edits of this picture, which I am going to write about in a future article. I am going to use
- Luminar
- Aurora HDR
- Affinity Photo
I am also going to produce a range of black and white images – I have not decided what software I am going to use yet as I have not found a replacement for Nik Silver Efex Pro.
Summary
I hope that you found my article interesting, and like my Santorini photo. Please get back to me with any comments, good or bad, which I will gladly answer.
Like
Thanks again
Regards
Rick
Like..
Thanks!
Regards
Rick
Thank you so much for describing the entire process! Someday I hope to get to Santorini… but your techniques and thought process can be used for any shoot.
No sharpness masking? I usually have that up around 40 at least to avoid sharpening skies.
Hi Steve
Thanks for your kind comments. My understanding of the sharpness masking is that this is intended for peoples faces so I dont use it at all.
Regards
Rick
Wonderful Capturing.
Nice images.
http://www.quickenonlinesupport.com
Hi and thanks for your comment.
Regards
Rick
Thanks again Dennim
Regards
Rick
Nice image shot. Keep it up
Thanks again Annie
Regards
Rick
Awesome image shot. Keep it up
Thanks Annie
Regards
Rick
Thanks for the information about how image shot.
Hi and thanks very much for taking the time to make a comment.
Regards
Rick
Hi Rick
Thanks for the tutorial but I can’t see much difference between the before and after picture. Maybe I need to see my optician.
All the best,
Dirk
Hi Dirk
Thanks for getting in touch. The are changes there, albeit it quite subtle ones, which is part of the point. Check out the vegatation on the bottom of the image just to the right of centre – it is not there in the “after” image.
With regards from England
Rick