
In this article, you can read about the different export possibilities in Lightroom CC and Lightroom classic. Lightroom has some powerful tools to make the export easy but most photographer do not know them. It is also a comparison of the export possibilities in the new Lightroom CC and Lightroom classic.
Lightroom CC
The export tool in Lightroom CC is very basic. You can only choose three things. The file type, the saving location and the size. The export dialog is definitely not as overloaded as the Lightroom Classic one. The files can be saved as JPG or as the original RAW. If you have synced the files from Lightroom Classic to Lightroom CC all metadata, except the flag, will be exported, even the colour label, the star rating and the geo tag. If you export only synced files from the cloud, Lightroom CC cannot export a full resolution image. Keywords will not be written as Lightroom hierarchy. For a basic use this function will work great.
Lightroom CC iOS
I am writing about the iOS version of Lightroom CC because I have no access to the Android version but the functions should be similar. In the export tool of Lightroom CC mobile you have more options than at the desktop version. By a click on the gear-wheel you get to the export settings and you can select which metadata you want to include in your file. You can also put in a watermark if you want to. The location info is not set by default. To turn it on can be helpful if you use geotags or want to share the location of the photo in Instagram.
There are six export options (see picture below). “Share” and “Open In” have the same functions. You can export the photo to another app like Instagram, Whats App or Mail. “Save to camera roll” is self-evident. If you choose “save to files” you can save the picture in the file management system (Dropbox and so on). If you choose “edit in” Lightroom shows you other Adobe apps to edit photos on a mobile device. The last option is “export original”. This can only be chosen if you have the original file on your phone.
If you have synced you pictures via Lightroom cloud to your mobile device you can only export a smaller file. In the export dialogue, you can choose between “small” and “full size” but if the original file is not on your phone you will get a smaller file anyway. Also from your mobile device all metadata will be exported except the flag. If you miss some metadata like the location check the export settings. Also here keywords will not be written as Lightroom hierarchy

Lightroom Classic
Compared to Lightroom CC the Lightroom Classic export is the crazy spaceship where you can control everything, but to export from Lightroom Classic is not as hard as to fly a spaceship. You can set export location, file naming, file settings, image size, output sharpening, metadata and watermarking.
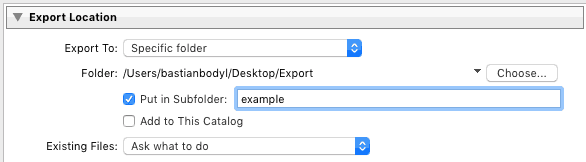
Export Location
Here you can choose where you want to save your exported files. You can choose a general folder and a sub folder. I have made a general folder on my desktop (called export) which I can find easy. If I want to export more photos at once like for a photo book I usually make a subfolder for this. Lightroom will automatically generate the folder or ad the pictures to the existing folder.
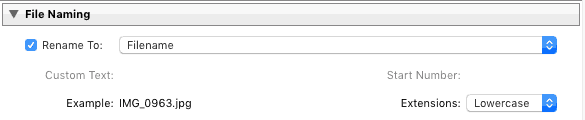
File Naming
Here you can change the name of the pictures. This can be handy if you export a series of images and you want to keep the order, or if you want to put the name of a customer in the file name. You can select between many different things like a name you want to give a sequence, metadata like focal length or GPS data. There are nearly no boundaries just take a look to “customer settings”
File Settings
In the file settings you can control things like the image format, the quality or the maximum file size. If you want to send your customer low res images for the preview just set the image quality down. The file size limitation is handy because some services like Squarespace limit the maximum file size. Here you can type in the maximum kilobyte an image can have and Lightroom will automatically shrink it down during the export.
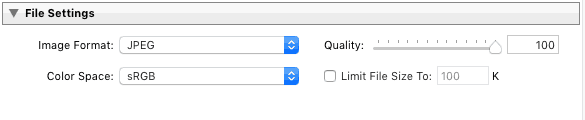
Image Sizing
If you should have a certain size for your image, you can set this in the image size. Many different things can be chosen, for example: the long edge should not be bigger than 1000 pixel. If you can export for a website where your photo has to have a certain pixel size this can be really helpful. You are not limited to pixels, you can set pixels, centimetres or inches.

Output Sharpening
Lightroom has the option for output sharpening. Here I will not give any advice what you should choose. There are many different opinions out there and it depents on what you want to do with your images. Read more about sharpening here.
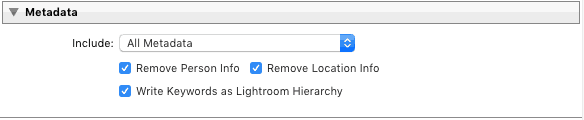
Metadata
Here you can choose which metadata Lightroom should export. Think first which metadata you want to have in your pictures. I know some photographers who do not share anything. I personally leave the most things in the metadata, no matter if I put it on a website or deliver it to a customer. Most time I remove the names of people because I do not want to put any name out there. If you are using a hierarchy in your keywords set “write keywords as Lightroom hierarchy”, otherwise you will get a mess if you import a file without the setting on.
Watermark
If you want to make a watermark in your picture check out this article.
Presets
If you have to export a lot of pictures in with the same settings, you can make yourself an export preset. Set the settings in the way you need and click the add button in the left corner. Now you can give a name and do a quick export with the setting just by clicking on the image in Lightroom with the right mouse button and selecting export.
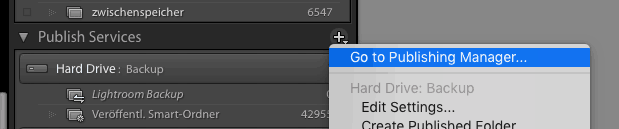
Publish Service
The publish service is a hidden but powerful function in Lightroom. You can create a collection, it does not matter if it is a smart or a normal collection. If you have set it up, you just need to put in photos and hit the export button, Lightroom will do the rest automatically. All updates you make will also be exported the next time you hit the export button.
I will show you this in tree examples I use. I have a smart collection where every picture that is flagged will be exported to an external harddrive. This is an easy way to back up your photos. All you have to do is to hit the export button from time to time.
Another possibility is to export pictures directly to the folder, where your background images are. You can easily add your new pictures to the background.
The last thing I want to mention is a folder, where I export low res images to sync it with my smartphone. I can keep all my images with me without using too much space on my phone.
Plugins
There are also plugins where you can export images from Lightroom directly to different services. Pre-installed are Facebook and Flickr, you just have to put in your login data and you can easily put your photos from Lightroom to this social media.
How many times is Lightroom misspelled?
Hey John
Thank you for the feedback. I hope I have corrected everything.
Nevertheless I hope you have learned something.
For the IOS version, is there a way to retain the sequence when exporting multiple photos to camera roll? I am getting jumbled images on my camera after exporting.
Hi Garry
Check that all meta datas like the date get exported. if not this can cause a mess.