
As one dives deeper into the world of landscape photography, the phrases dodging and burning pop up. It is often a topic of tutorial videos by many professional photographers and is mentioned in passing quite often in podcasts. I have heard photographers say that the difference between good and great photographers is their ability to dodge and burn. Safe to say this is something you need to work on if you want to take your images to the next level.
In fact, Improve Photography has already written an article on dodging and burning. I am here to add to that and explain the tools used in that article.
Let us dive into it then.
What is Dodging and Burning?
Dodging and burning is a technique that hails back to the darkroom days. These techniques were used to lighten and darken specific parts of an image. The great pioneers of photography did this on their images and it wasn't until 35mm film that this technique no doubt began to phase out. Once the digital darkroom was created, a.k.a Photoshop, this technique took a back seat for a while. Then came along photographers who needed greater control over shadows and highlights and thus it was revitalized. Now it is a common technique used amongst pro's and amateurs alike.
So what is dodging and burning then? I have spoken a lot about it and never explained it. Dodging: The processing of lightening a portion of the image. Burning: The process of darkening a portion of the image.
When performing this technique in photoshop often a new grey layer is created and a blending mode is set to that layer. The two blending modes of choice are Overlay and Soft Light. But what are they and why use one over the other?
What is Overlay?
This is direct words from Adobe: “Multiplies or screens the colors, depending on the base color. Patterns or colors overlay the existing pixels while preserving the highlights and shadows of the base color. The base color is not replaced, but mixed with the blend color to reflect the lightness or darkness of the original color.”
I don't know about you but reading that does not make a lot of sense. So let's break it down a bit. “Multiplies or screens the colors”- This is referring to contrast and how this mode will increase contrast in colors, particularly between lights and darks. If you don't believe me, go grab one of your images and create a grey mask set to Overlay and use a black or white brush and see what it does. Next “Patterns or colors overlay the existing pixels while preserving the highlights and shadows of the base color.” This states that if you paint over your image with a color it will preserve both the highlights, shadows and the color, even if you use a color other than white or black. This does mix the colors though, so if you paint with a blue on a yellow, your yellow will pick up a bit of bluish tint.
There are a couple caveats of this blend mode. Overlay gives preference to the layer directly below it. I have never seen this be an issue but theoretically, you could create a focal length blend and the top of your image and the bottom of your image could get affected differently because of this blend mode. The easiest way around this is after you blend your images together create a merged layer of everything and then begin dodging and burning using the overlay blend mode.
So when would I use this? Let's say I wanted to brighten a portion of an image but wanted to keep the contrast within the area, you can use the Overlay blend mode while creating a dodging layer. Adjust the opacity to your liking and then paint away. This will preserve the color and the contrast within an area and lighten it. That is why it is often used by photographers over the soft light
What is Soft Light?
Adobe Describes it as such; Soft Light: “Darkens or lightens the colors, depending on the blend color. The effect is similar to shining a diffused spotlight on the image. If the blend color (light source) is lighter than 50% gray, the image is lightened as if it were dodged. If the blend color is darker than 50% gray, the image is darkened as if it were burned in. Painting with pure black or white produces a distinctly darker or lighter area, but does not result in pure black or white.”
This blending mode is far more simple to understand. In fact, Soft Light used on a dodge and burn layer acts a lot more like the dodge and burn tools in photoshop itself. One thing that is different though is that you can't dodge to pure white or burn pure black a portion of the image, it will lighten or darken quite a bit but won't go all the way unless it is close to either side of the histogram. The other thing is if you are working with a dodge/burn layer this is a non-destructive way of adding contrast to your image.
When would I use soft light blend mode then? I like using this blending mode if you are trying to work with clouds or very small sections of your image. Since the soft light mode actually has a tendency to decrease contrast, I would not use it on a critical part of the image. If you are just trying to add subtle shadows or brightness in the clouds, this is a great option.
Since soft light does decrease contrast this can be used for subtle light painting in the sky to create atmosphere. This will create the effect of hazy skies.
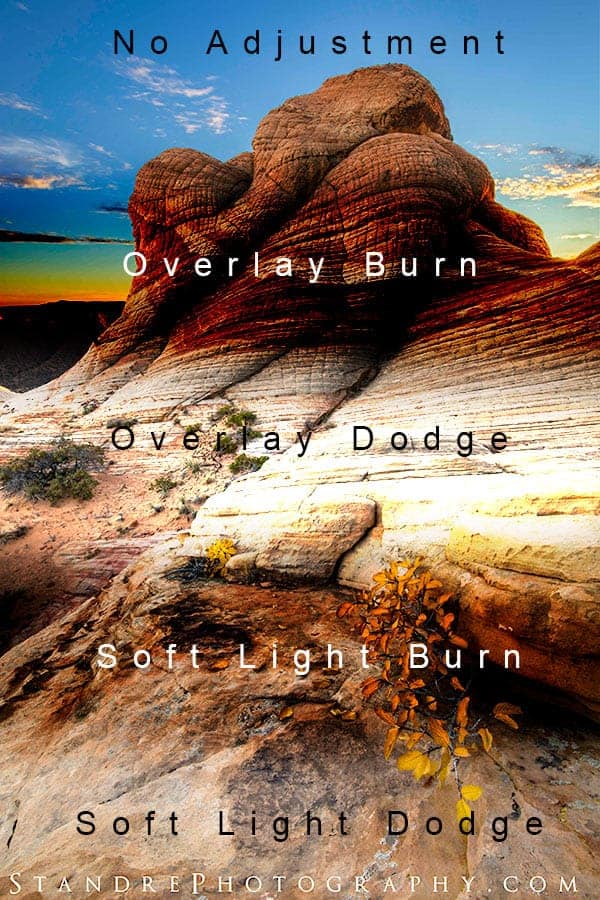
Now that I have explained them, you need to see them to see the difference. The example above has one of each way you can dodge and burn with each blending mode. The brush was left at 100% opacity so you could see exactly what it was doing to the image after it made the adjustment. The top 1/5 of the image is left un-edited. You can scroll down to see the entire image unaffected by the changes I made.
The next portion is the overlay burn. You can see how this effect causes quite a bit of change to an image. Anything that is close to black is turned to black and the highlights are drastically darkened. This is because it is designed to increase contrast, particularly if the shadows. The effect causes parts of the image that are close to black to be shifted strongly to that and even into it.
Next is the Overlay Dodge. Similar to the burn, the dodge causes most of the whites within the image to be blown out while also bringing out all of the shadows drastically. Look at the bush. In the final edit, the bush is actually a bit underexposed. Since it was not a critical part of the image I didn't bother to try to bring its shadows out. When the Dodge Overlay is present though, it is actually exposed quite nicely. That is a really good example of how the Overlay when dodged can really save a dark part of the image without causing damage or looking out of place. If I had done that in the image, that bush would look very nice.
Soft Light, as you can see, is much more subtle at effecting the highlights and shadows of your image. This is why I generally prefer this method because it is less likely to be noticeable and adds a more subtle effect. Since I don't dodge and burn heavily on my images this makes more sense to me.
Since Soft Light blend mode is kind of like shining a light on your image. Soft Light that is burned acts more like an image that is underexposed. Unlike underexposure though, the Soft Light burn will not turn a highlight into a black point on your image. It will darken highlights and will turn shadows to black if they are close enough. Looking up at the effect in the image above, The Soft Light burn is a bit heavy handed but nowhere close to Overlay. This makes it ideal for dealing with shadows when you gently want to bring them down so that you add slight subtle contrast to your image without going over the top.
Soft Light dodge is good for bringing up those highlights without blowing them out. It does have a tendecy to kill contrast really badly though. I prefer using it for light painting and for cloud work. Since clouds have subtle contrast, soft light is wonderful at adding highlights to your clouds. As for light painting with it, using the same dodge and burn method (simply select a color for your foreground color and paint) it adds a nice haze of atmosphere to your image.
Example
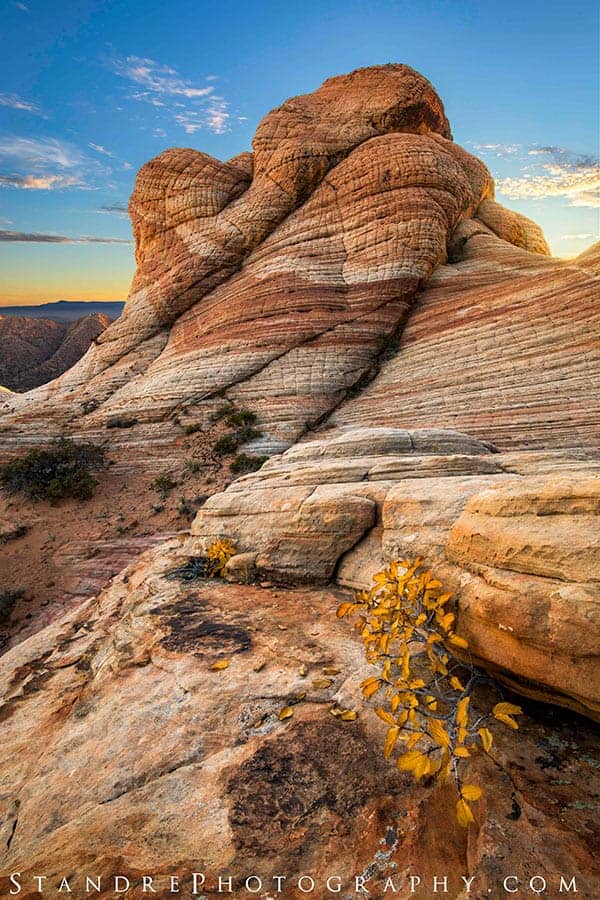
I wanted to show an example of what light painting is. I want you to look at the image above and try to decide where I spent some time light painting…
If you chose the top right corner where the light is gently lighting up the rock you chose correctly. In the original RAW file, the glow was very nice right there, but it was not nearly as prominent as I wanted even after doing my global edits. I liked the glow that was present but felt like it needed some additional love. So in order to give it additional pop, I used a dodge/burn layer and selected the glowing color of the rock as my light paint source. Afterwards, I used the soft light blend mode and decreased the opacity and colored a bit on the rock. This reduced the contrast a tiny bit and created a bit of airglow haze right there. This creates a beautiful atmosphere glow. That is the power of a dodge burn layer and light painting.
Let me know your thoughts. Did I do well and educate you or do you still feel like you need more?
Do any of these work with Photoshop Elements?
it all should
Thanks for the information as it’s very useful even for an old pro such as myself. It informed me of some bits I was not aware of and will be using it with new knowledge.
Thanks for the adjustment tips
thanks