
In this article we provide you with a review of Luminar 2018. You’ve got to hand it to Macphun software. Their pre-launch marketing efforts of photo editor Luminar 2018 have been spectacular. It is hard to be online and not run across their advertisements letting you know that their new product is everything you’ve been looking for in a photo editor. They created quite a buzz in advance of their mid-November release.
Luminar 2018 is a capable photo editor that is easy to use and provides good results. It has most of the components you’d look for in a photo editor and can also be used as a plug-in to several other photo apps. With its expected early 2018 release of digital asset management capabilities (DAM), it could serve as an alternative to Lightroom and also handle some of your Photoshop chores for those that have been disappointed by Adobe’s recent announcements.
Company and Product Background
Macphun, in the process of being rebranded as Skylum, began more than seven years ago and initially focused on building iPhone apps, some of which were photography apps. In 2011 they launched their first photo software for the Mac and now have a number of apps focused on photo editing including Aurora (HDR), Tonality (black and white editing), Snap Heal (remove unwanted objects from photos), Intensify (boosts details), Noiseless (noise reduction), Focus CK (highlights most important subject in a photo), and FX Photo Studio CK (filters and effects). Luminar is their most robust offering and earlier this year the company expanded Luminar and Aurora to the PC platform.
It should be noted that when Luminar 2018 was released, the Mac version came with the full set of features but the Windows version is not yet full-featured. Macphun expects to have the full Windows release out in the next couple of months in a way that will have feature parity with the Mac version. Macphun also is working on adding DAM capabilities to the product in early 2018 and those capabilities will be a free upgrade to all those that own Luminar 2018.
Macphun provided me with a copy of the software for this evaluation. I was also fortunate to be able to get a quick tutorial and have questions answered by Laurie Rubin, Senior Education Manager.
Approach to this Review
While today I focus on landscape and nature photography, I used to do wedding photography. I look at most photo editors through the lens of someone that is looking to cull and edit a large number of pictures quickly but also to be able to address issues that invariably come up in many shooting situations. I took a number of pictures that I have shot in the past and edited with Lightroom, Photoshop, or ON1 Photo RAW, and then re-edited those in Luminar. I might add that today I probably do 90% of my adjustments using Lightroom, 8% using ON1, and 2% using Photoshop. I did this review using the Mac version of the software.
The Basics
Luminar is a standalone editor and also can be a plug-in to Aperture (yes, Aperture still works), Photoshop, Photoshop Elements, Lightroom, and Apple Photos. It has a very clean interface with much of what you’d expect an editor to have: a ton of filters, layers, some tools (crop, free transform, clone & stamp, erase), before and after preview capabilities, presets, histogram, curves, export and share. I was also pleased to find that like Photoshop, it stores history and allows you to roll back changes.
I mentioned earlier that DAM capabilities are coming soon, and this is something that is sorely needed. To edit a picture today with Luminar, you click on “open file”, then navigate to a single file. There is no browse capability, no ability to cull or rank pictures, and more importantly, you can’t really easily pick out your picture. You need to either know your filename before you click “open file”, or you navigate to the directory and then click on the pictures one by one and let Finder (on a Mac) render the picture so you can see which one you are picking. I guess technically an “editor” only needs to edit, but I viewed this as a shortcoming that I assume will be addressed by the DAM module we will see early next year. Until then, it might be easiest to use Luminar 2018 as a plug-in.
The plug-in to Lightroom worked well in my test except that when I saved the file it saved it as a TIFF as opposed to the PSD format that I specified when I set up the plug-in. That is evidently the design point – TIFF will be the format that comes back from the Lightroom plug-in. For the rest of this review, I will focus on evaluating Luminar as a standalone program.
The documentation indicates Luminar can create JPEG (.jpg), PNG (.png), GIF (.gif), TIFF (.tif), JPEG 2000 (.jp2), Photoshop (.psd), and PDF (.pdf). In my testing, I did read and write RAW (NEF), JPEG (.jpg) and TIFF (.tif). It was nice to see that support is also offered for Apple HEIF files, which is the new format created by iOS 11. Luminar edits non-destructively and can store its changes in a container file with the suffix “.lmnr”. It has a couple of options including whether or not you save the original file in the .lmnr container with the changes, and also whether or not you want to save the history so you can roll back changes. It also lets you know what the file size will be with the options you have chosen. In one image I went to store (a NEF raw file with three filters applied), storing everything would have taken 22 MB; without saving the original RAW file in the container the storage requirements dropped to 1.3MB; and, not saving the history took the file size down to 320 KB.
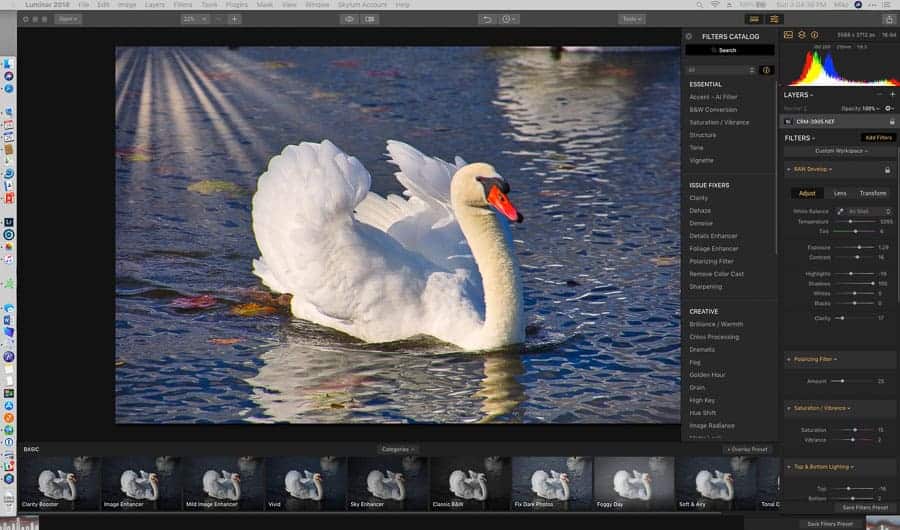
The Interface
The interface is clean and easy to use. On the far right are the layers and filters that have been added to the image. To the left of that is a list of filters grouped by categories: Essential, Issue Fixers, Creative, Professional, and Utility. To the left of that is your image.
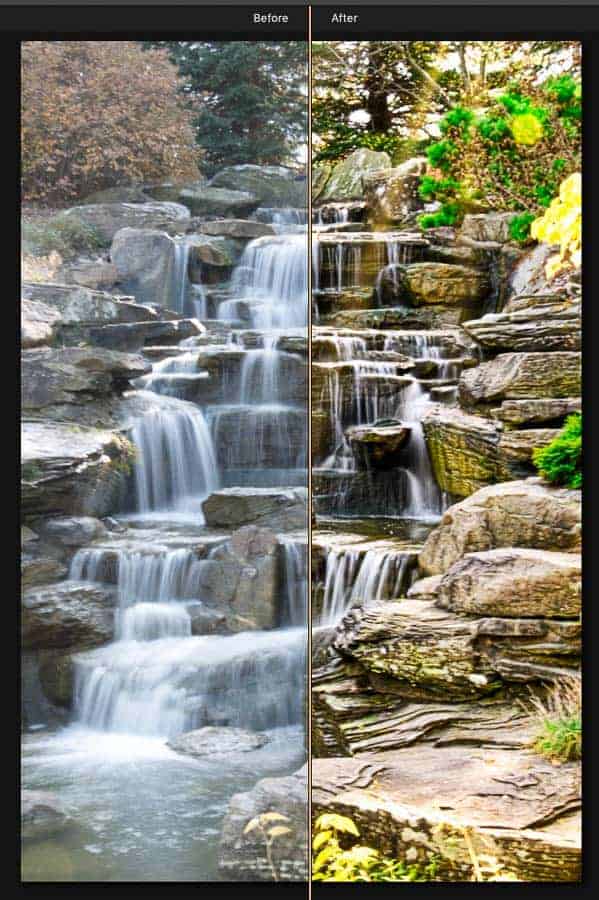
At the top of the pane which lists the filters, there is a search box, which I found very handy. Also, as you hover your mouse over any filter, a flyout appears to the left of it which describes the filter and has an example image. Especially handy when you are starting out, but can be turned off later if you don’t need it or want it. Along the top you have a section to determine your zoom percentage, a toggle to see before and after images, a toggle to create a Before/After line down the middle of your picture that is movable, a history drop down, a tools menu, and a couple of toggles to change screen appearance. For example, you can eliminate the panes on the right and just see your image.
Editing a Photo
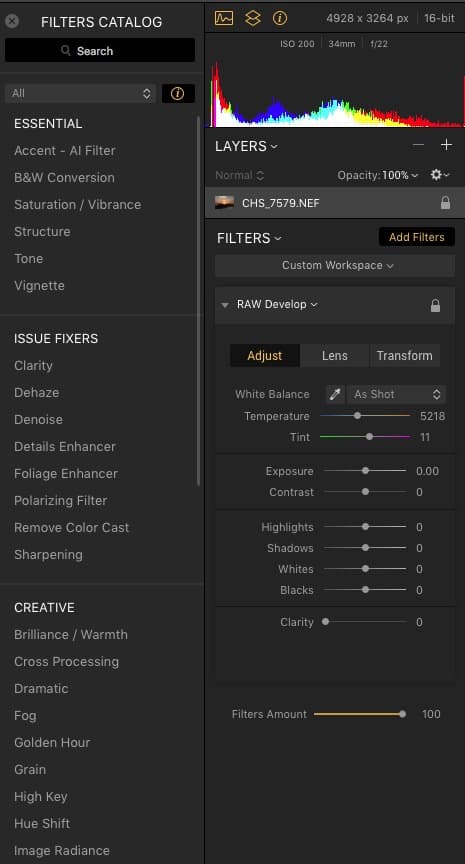
Luminar felt pretty complete for editing. There are filters for just about everything including a Develop filter which is quite similar to the Basic panel under the Develop module in Lightroom; Details and Sharpening filters; Saturation/Vibrance, Structure, Clarity; Dehaze, Denoise, Sharpening, Highlight/Shadows, etc. A total of 50 in all. I especially grew fond of the Golden Hour and Sunrays filters. Sunrays actually puts a sun in your picture and had the rays coming out. At default, it is quite strong and disruptive, but you can change the location, even moving the sun out of the picture so you just see the rays; changing the number and length of the rays, the warmth, the radius of the sun and glow amount, and its penetration. As is the case with many of the filters, there is a “Filters Amount” on the bottom which is like an opacity control. I really liked the Sunrays filter and can see using it a lot.
Filters are listed along the right side in the order in which they were selected and applied, but they are easily moved up and down just as you’d move layers in Photoshop. Each filter then applies to everything below it. There is also an eyeball icon on the top right of each filter that shows up when you move your cursor there. You can use the eyeball to toggle that single filter on and off so that you can see the impact of it. The program is very responsive and smooth as you apply filters and layers. This was a major release for Luminar so I expected it to be a bit buggy or uneven in its performance. I did not find that to be the case at all. In my testing, the product was solid and was very smooth.
When you go to use the cropping tool, in addition to being able to pick all of the standard aspect ratios that you’d expect, there are preset aspect rations for “Facebook Cover” and “Facebook Feed” – a nice touch. The erase tool (comparable to Adobe’s delete with content-aware-fill) worked well in the two photos where I tried it. As we all know, some objects are easier to remove than others. I did not do enough side by side comparison to compare Luminar’s erase function to its competitors, but I was pleased with the tests I did run (though it did seem a lot slower than I expected and am used to).
There are masking tools and layers, and they work as you’d expect. I did not find an ability to create a fill layer and then pick the color I wanted to fill that layer with. You could add an image layer (layer from an image), an adjustment layer, or a new stamped layer. For masking tools, there are brush, gradient, radial, and luminosity masks. They work as you’d expect. A significant shortcoming in terms of masking is the lack of an edge detection tool. This would be limiting in many instances where you want to change a background. During a demo, Linda very capably demonstrated changing a sky very quickly by using the gradient mask and coming down to a horizon line. But taking the family picture taken in your living room and trying to move that family on to an outdoor landscape would be difficult.
You can also turn on a preset panel that will show up as a filmstrip along the bottom of the screen. There are a number of preset category panels to choose from. When you turn on this panel, you get a filmstrip view showing you what a bunch of different preset treatments would look like if you chose them. You merely click the one you like and it is applied to your picture. From there, you can additionally add filters and layers.
I did miss the “straighten” feature of Lightroom. Drawing a straight line on your picture and having that picture straighten out is very neat. Prior to getting a camera with a virtual horizon, I couldn't take a straight picture to save my soul. At one point, I was even convinced that my sensor had been improperly installed in the camera resulting in all pictures being tilted. With the transform tab under the Develop filter in Luminar, you can easily rotate a picture (with the help of a grid) to straighten it out, and then use the scale slider to eliminate the inevitable edge gaps, so the fundamental capability is there. And of course now that I have a camera with a virtual horizon, I don't need the straighten function nearly as much as I used to!
I would be remiss if I didn’t mention the Accent – AI filter. Macphun literature indicates that this actually uses artificial intelligence to analyze a scene and determine what adjustments to make. When you select this filter, you just set the “Boost” amount with a slider, and then you can select the filter amount (sort of like an opacity level). In my sample of images, I found it was a good idea to use this filter first, as it often did a pretty nice job of enhancing a photo without much effort. In fact, getting a great result without much effort was a recurring theme in my review of Luminar.
Workspaces
Luminar has done a nice job implementing workspaces. A workspace is a collection of filters. For example, Luminar ships with standard workspaces titled Professional, Quick & Awesome, Essentials, Aerial Photography, B&W, Landscape, Portrait, and Street. If you pick the Quick and Awesome workspace, for example, the Accent – AI Filter, Saturation/Vibrance Filter, and Clarity Filter are all loaded into your filters panel ready to be adjusted. On the other hand, if you pick the Landscape filter the following filters are loaded into your filters workspace: Develop, Accent AI, Adjustable Gradient, Saturation/Vibrance, Advanced Contrast, Polarizing, Foliage Enhancer, Dehaze, Golden Hour, Curves, LUT Mapping, Structure, Image Radiance, and Vignette filters.
The beauty of this is that you can also set up your own custom workspaces with the filters you typically use. When you bring in a picture, one click and you can bring up your standard filters. Well done, Macphun.
Exporting and Sharing
The export dialog is clean and simple with a reasonable number of options: Sharpening (low, medium, high), Resize (original, or specify long edge, short edge, or dimensions), Color Space, Format, and Quality (slider 1- 100). When I occasionally look at Lightroom alternatives, I find the export options on Lightroom are very robust and most competitors fall far short. While not as robust as Lightroom, Luminar certainly does well in this regard.
In the upper right of the screen, there is a share icon that provides a load of options including Mail, Facebook, Twitter, Messages (Mac), SmugMug, and 500 PX. I tried the Mail share and it opened up a mail message and inserted a TIF file (jpeg would have been a better idea). I also tried the Twitter option and that seemed to work fine.

Batch Processing
Luminar does have a batch processing feature. These include some defaults for generating JPEGs for the web and for email. There are options to apply a preset, perform file renaming, and resize on a batch basis. I did not test the batch processing feature.
Documentation, Education and Support
One thing I learned with Adobe is that any time I wanted to know how to do something, one Google query would yield dozens of free videos and “how to” websites showing me what tools to use and how to use them. Moving to a new tool has its risks if you can’t figure out how to use it.
I was pleasantly surprised to find that Luminar has a downloadable 156 page PDF manual to start with. It seems pretty complete. By way of example, almost 60 pages are devoted to describing the filters and each slider within the filter. I like manuals like this as they are a great quick reference without forcing you to wade through hours of video tutorials hoping to find a little bit more info about a particular filter or slider. Sadly, I don't see these manuals often enough.
But there are many cases where you just can’t beat a video tutorial showing you more specifically HOW to achieve what you want to do. There are a number of free video tutorials on the Macphun website that take you through all the basics. They have a deeper dive set of videos available for $15. I went through almost all of the available tutorials and found them professionally done and easy to follow and understand. Individually, most of them are on the shorter side – say 5 minutes, and that is a good thing. They make most of what they show look pretty simple. So simple that I first cast a jaundiced eye at the videos. But in reality, I found the interface and labeling as easy to use as it seemed in the videos. A real plus.
I should also add that many of our readers might be familiar with Nicole S. Young (nicolesyblog.com) who provides video and e-book training for ON1. I found that Nicole also provides similar training for Luminar, so that is a third party source.
I believe there may be an issue with support in the short term. I emailed customer support and received a reply saying they were receiving 3,000 emails a day and only had a staff of five to respond, so it could take a while to get to my ticket. I think this is the nature of working with a younger company that is growing by leaps and bounds, and also reflects the enthusiasm in the marketplace for alternatives to the existing photo editing offerings. The email promised that they were looking to hire more support staff as quickly as possible, and I would hope that at some point down the road they will get in balance on support. This is a risk area for now, though.


Conclusion
Adobe’s latest announcements have some of the community unsettled and talking of alternatives. A vast majority will stick with Adobe as their investment in the platform is significant and its features and capabilities are so complete as to be required for many professionals. Others are asking if Luminar is a viable alternative?
For the moment, I'd have to call Luminar incomplete. I think many of us want to pull up a directory of photos and pound through them one by one. That isn't easy with Luminar right now. The inability to quickly move from picture to picture in a directory, and to star rate pictures, is a big drawback. But I do think using Lightroom to sort through your pictures and then use Luminar to enhance them is a viable approach (and for the moment, I won't get into all the complaints about Lightroom performance and its weaknesses as a tool to cull your pictures).
But assuming the soon-to-be-released DAM module satisfactorily resolves this shortcoming, I’d have to say Luminar would be a very fine and pretty complete alternative for many. Luminar provides very good results with very little effort. While some may enjoy spending anywhere from 10 minutes to 2 hours post-processing an image, many of us would like to improve our images to wall-hanging quality with only a few minutes of work, and this is where Luminar comes in. The product is straightforward, yet rich with all the capabilities required for most of our images. True, you won’t be painting Aunt Mary into the family picture (nor painting out Uncle Bob), but how often do you need to do that?
Programs like Photoshop and ON1 have a lot of richness, but it takes a lot more to understand how to use them. I didn’t do a side-by-side comparison with timings, but viscerally, Luminar sure seems to accomplish just about everything I want to do much more quickly and easily than its well-known competitors. In fact, in some cases where I took an image into Luminar that I previously had edited with a more powerful competitor’s offering, I would say I actually got a better result with much less time with Luminar. It made it a pleasure to use. My current workflow is to begin by taking my images into Lightroom and apply a preset on import. Most of the pictures are then called “good enough,” with only a handful being selected for further enhancement. With Luminar, I can see myself enhancing a larger number of images.
The price point ($69 USD) and lack of a subscription requirement will be especially compelling for those that don't make photography their primary source of income, and that is an awful lot of people.
I believe the market is best served when we have competition. Adobe has ruled supreme for a long time, and will no doubt continue as the king of the professional marketplace. But with many of the complaints getting louder, perhaps they have become complacent and the market is ripe for competition. I think Macphun, soon to be Skylum, is challenging the market at a good time and we’ll all be better off for the improved product offerings that result from a competitive marketplace.
Note: Luminar 2018 is available at the Macphun Luminar website for $69 USD. If you are interested in a 14-day free trial, go to the very bottom of the page and then scroll up about 1-1/2 screens where you will see “click here to try Luminar 2018” in the middle of the page. A new DAM module is expected in early 2018 and will be a free upgrade.
Nice write-up. I’ve been playing around with Luminar since the latest update to Lightroom has basically killed the import function (it took four days to import about 250 photos of roughly 600 after which it basically stopped importing completely!). I’m continuing to pay for the CC subscription while I try to see if Luminar will work for me. I agree that the catalog function of Lightroom is nice and I took for granted how convenient it can be. Currently I’m pairing Luminar with Fast Raw Viewer for my culling function and I’ve been reasonably happy with it. The nice thing is that I’m not downloading all the photos from my card just to go in and delete many of them. I’m hoping the cataloging and culling features come to Luminar sooner than later and are highly functional at which point I would probably drop my CC subscription. My initial impression of the software is very positive although I don’t think the erase function is nearly as good as lightroom’s equivalent function. I’m going to test out the clone/stamp function to see if it’s more suitable for what I was trying to do. Of course, I should probably clean my camera too to minimize the dust spots I was trying to remove!
MarcT – When you talk about removing spots (I’m assuming dust spots on your sensor), I tried some of those with Luminar. I tried erase and I tried the clone/stamp tool. I got the job done, but not as well as I’d like. On1 and Adobe both do that beetter.