
In any type of photography, getting the right exposure is important. But, is the best exposure one where the histogram is evenly spread out like a bell curve, one where it leans towards the right (ETTR) or to the left (ETTL)or do modern sensors make it all meaningless through ISO invariance?
If you’ve been around photography for a while, you’ve probably heard someone talk about exposing to the right (ETTR) or ISO invariance. It’s less common to hear fans of exposing to the left (ETTL), but they, too, exist. In this article, we’ll explore ETTL, ETTR and ISO invariance to help you understand which technique might work best for you.
ETTL
Back in the film days when many professional photographers shot slides, a standard technique in scenes with a wide dynamic range was to underexpose the shot so as to prevent blowing out a highlight. It was better to have some areas go black than to blow out a highlight.
If you were to look at a histogram for that shot, the histogram would be stacked a bit towards the left side of the graph, reflecting the preponderance of darker tones in the image. They were exposing to the left (ETTL).
Some photographers still advocate that approach. Exposing to the left by, for instance, underexposing by a stop or stop and a half will preserve highlights, they say. In addition, it will make your shot look more punchy straight out of camera, saving you time in post-production. Modern sensors and software have amazing capabilities to bring back shadows and reduce noise, so you can recover detail in the darker portions of your shot while maintaining rich colors and details in the highlights.
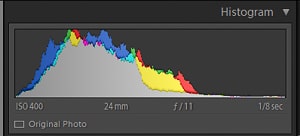
[x_alert type=”success”]NOTE: The histogram you see on the LCD screen on the back of your camera is taken from the JPG image it displays for you to review. It may not, and often does not, reflect what the RAW file includes. Most often, the RAW file has more detail than is shown in the JPG histogram at both ends of the histogram. The JPG histogram is still useful to avoid blowing out highlights.[/x_alert]
ETTR
Increasingly, we hear photographers advocate exposing to the right (ETTR), or overexposing your image by a stop or stop and a half (or more), while being careful not to blow out the highlights. This kind of image results in a histogram that is stacked towards the right, reflecting the higher proportion of light tones in the image. Jeff Harmon devoted a Photo Taco episode to how he ETTRs.
 The advantage of ETTR is the ability to capture more detail across the tonal ranges of your image and to cleanly bring that back in post processing with minimal noise. The thinking behind this technique begins with the nature of modern camera sensors, instead of the limitations of film.
Without getting into the physics of light or the electrical engineering inside a sensor, what’s important for a photographer is that, in essence, the amount of data an individual photo-diode in a camera sensor is able to record doubles with each one-stop increase in exposure value and halves with each one-stop decrease. This means that fully one-half of the recordable data is in the brightest tone while very little is in the darker tones*. To illustrate, consider a 14-bit sensor that can record a dynamic range of 12 stops. There are 16,384 (2^14) tonal values between pure black and pure white. So the brightest stop can record 8,192 tonal values and the darkest stop can record only 4!
| Darks | Mid- | Tones | Brights | |||||||||
|---|---|---|---|---|---|---|---|---|---|---|---|---|
| Stops | 1 | 2 | 3 | 4 | 5 | 6 | 7 | 8 | 9 | 10 | 11 | 12 |
| Tones | 4 | 8 | 16 | 32 | 64 | 128 | 256 | 512 | 1024 | 2048 | 4096 | 8192 |
We can simplify the details and still get the point by thinking of a histogram divided into 4 equal parts, from right to left: highlights, light mid-tones, dark mid-tones, darks. Here, ½ of our tonal values come from the highlights, ¼ from the light mid-tones, 1/8 from the dark mid-tones, and 1/16 from the darks.
So, overexposing your image (without clipping the highlights) means that you are recording more tonal information, which also leads to a better signal-to-noise ratio, resulting in less noise. The resulting image will, of course, appear bright and washed out. However, you’ve recorded lots and lots of data, which makes it easy to darken it down in post processing and to pull the colors back into the image without adding noise.
For several reasons, noise is much more visible in dark areas. It then follows that taking a lighter image (which starts out with less visible noise) and darkening it down will result in less noise than starting with a dark image (with its attendant higher level of noise) and brightening it up.
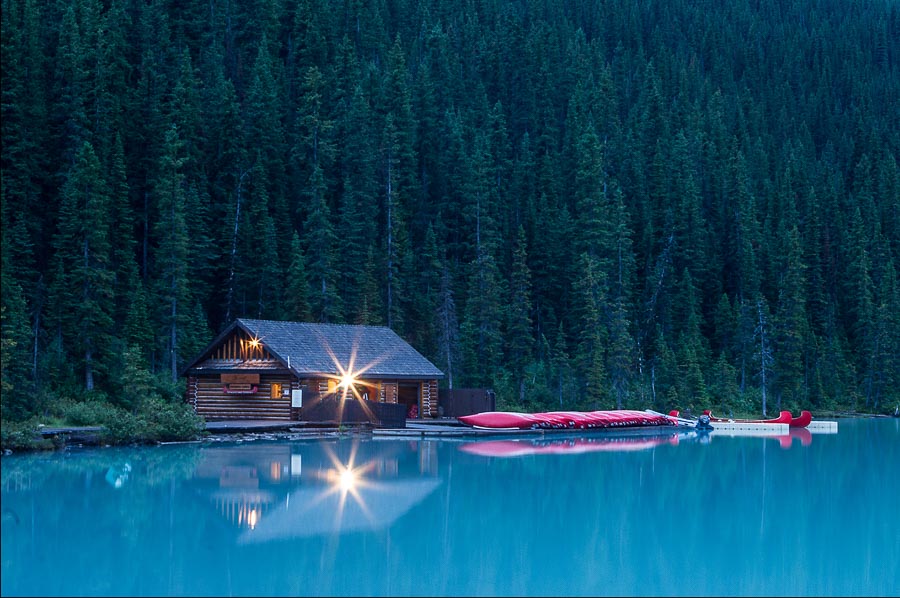
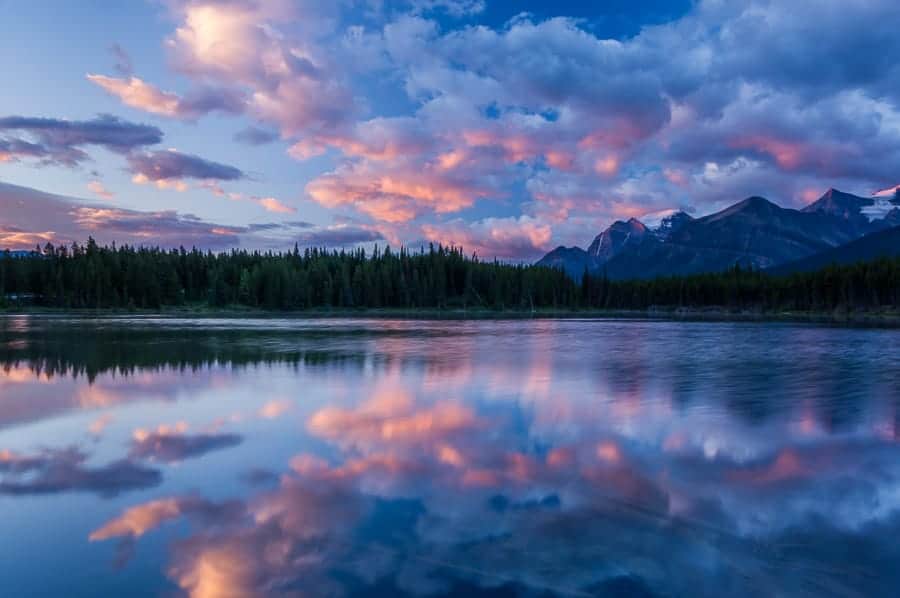
In the Lake Herbert shot at the top of this page, I took two images. One was exposed to the right in order to save detail in the trees, and one was exposed a bit to the left to keep detail and color in the sky. The two were blended in Photoshop. In the Boat House photo, I exposed to the right, which allowed me to darken things back down without getting a lot of noise in the trees. The lights on the building were going to be blown out anyway, so I didn't need a darker exposure. In the early morning light at both locations, the trees were very dark and brightening them up in Lightroom or Photoshop would have accentuated the noise that was there already. Taking multiple exposures and doing HDR on the Lake Herbert shot would have resulted in trees that were not as crisp and detailed, partly from the limitations of HDR and partly because wind was moving he trees. In both cases, ETTR was a big help.
[x_alert type=”success”]TIP: This works best when shooting RAW and having your “blinkies” on (the flashing lights on your LED screen warning of clipped highlights and shadows).[/x_alert]
So, which will work best?
It depends.
If you’re shooting a wedding or sports, you probably won’t use either. ETTR and ETTL work best when you have time to carefully set exposure, as in a landscape or architectural shot. When there’s action and the available light is changing rapidly, these probably aren’t the best techniques for you.
Then there’s the nature of the shot, itself. Underexposing a black bear against a dark background isn’t very helpful, so ETTL won’t do much good. Some shots are made for ETTR, some for ETTL and some for neither.
One consideration might be how ETTR or ETTL affects your settings. What shutter speed and aperture do you want? Using ETTR and going for a fast shutter speed and narrow aperture might force you into a high ISO which could introduce noise, for example. Don’t get so hung up on the technique that you lose track of your other settings!
Another issue is your camera sensor’s ability to handle dark tones with minimal noise. Sony sensors handle darks really, really well. Using ETTL and brightening shadows can work just fine. Inexpensive to mid-range camera sensors are a more prone to picking up noise in the darks and boosting your shadows a lot in post-production can make that a little too visible. If your camera doesn’t have a great sensor, I’d stay away from ETTL and try ETTR.
For most shooters, in daylight, ETTR can work well. If you are shooting at night, for astro shots or the Milky Way, try ETTL.
And then there’s ISO invariance
Quite a few recent cameras have sensors that are ISO invariant. With an ISO invariant sensor, you can get the same image quality by shooting at a low ISO, underexposing your shot, then brightening it up in post-production as you would by shooting a perfectly exposed shot at a higher ISO. For instance, shooting a sunrise at 1/5 second, f11, ISO 100 boosted three stops in Lightroom gives you the same image quality as you’d get shooting that scene at 1/5 second, f11, ISO 400. In many cameras, you can do this by as much as 5 stops! That ISO 100 shot boosted 5 stops in post would be of the same quality as one shot at ISO 1600. This ability can help you get the right aperture and shutter speed combinations and is particularly important when the scene calls for extremely high ISOs.
The explanation is complicated and involves things like native ISOs and how back end read noise is amplified. I’ll spare you the gruesome details and jargon. Suffice it to say that, for ISO invariant sensors, there’s no value in shooting at anything higher than the camera’s native ISO range. The native ISO range of my Nikon D750 is ISO 100 – 12,800, but extended ISO is up to 51,200. For anything over ISO 12,800, the camera is “simulating” a higher ISO by amplifying the signal, which will also amplify any noise present. So, for any scene that meters out at over ISO 12,800, I’m better off shooting at 12,800 or less and then brightening up in post than I am in shooting at a higher ISO.
Jim Harmer wrote about ISO invariance and provided a partial list of cameras whose sensors are ISO invariant.
One advantage with this approach is that a really high ISO introduces a large amount of noise across the entire image. Shooting at a lower ISO and brightening up only those areas that you need to keeps that extra noise from appearing in the darker areas, where it would be most noticeable.
What should you do?
The first thing you need to know is the capabilities of your camera. Is it ISO invariant? What is the native ISO range? How well does the sensor handle dark areas? There are websites that have done all sorts of tests and can help you get a sense of the capacity of your camera and sensor. But nothing beats your own experience actually using the camera and developing your shots. When you’re working in Lightroom or whatever post-production software you use, pay special attention to the noise in dark areas and what your histogram shows.
For me, in daylight hours, if I can get the shutter speed and aperture settings I want, I’ll go ETTR and overexpose by about a stop. Once processed, I can see a small, but noticeable difference, compared to a regular exposure. For night shots, I’ll go ETTL by a stop or so. And, when the situation calls for extreme ISOs, I’ll rely on my camera being ISO invariant and shoot accordingly.
What about you?
* I realize this isn’t the exact scientific explanation, and engineers will quarrel with it, but I’ve tried to cast it in a way will make sense to photographers. The accompanying chart is a variation on one created by Martin Bailey on his website, martinbaileyphotography.com.
I used to have a Canon 5D Mark III. Bringing up blacks inevitably resulted in banding and chroma noise that rendered the image unusable. The Fuji X-T1 cured this and today I shoot with an X-T2 and expose to the left ever so slightly. I used to bracket nearly ever shot with my Canon, it’s mostly unnecessary with the Fuji. ISO invariance is ultimately what prompted me to switch over to Fuji from Canon.
People do love their Fujis! ISO invariance does make a world of difference. Totally agree Mark.
Glad you found it useful, Francisco!
On my a7RII, I use ETTL but use zebra highlight warning to adjust just how much to the left I need to go. I also use the Smooth Reflections app when wind isn’t an issue to gain an additional 1 to 1.5 stops of dynamic range. What that means is my images out of the camera are typically 2-3 stops underexposed thus preserving all the highlight detail. Then in post, I can recover shadow detail without incurring much noise. The sensor on the a7RII often saves me the step of digitally blending bracketed shots in post.