
Everyone can enjoy and appreciate a beautiful sunset. And admit it, regardless of how cliche it may be, sunset photography is tons of fun. Having the ability to capture the last rays of the day and amazing golden light bathing the landscape is very satisfying.
A couple years ago, I decided that I was going to capture an image of the sunset every day for the entire year. It was an unrealistic goal and I knew that going in. For starters, I didn't decide this until February, so I had already missed a month. Secondly, considering all the cloudy and gray overcast days that we have where I live, many days the sun isn't even visible. Finally, even if the weather does cooperate, sometimes a nice sunset just doesn't develop. By the end of the year, I had photos for about one-third of the days, and I was fine with that. There were a total of over 5,000 images captured in the process. Most were right in my backyard. Some were even good enough to share (at least I thought so…some of my Instagram followers may say otherwise).
I learned a few things over the course of my sunset project. Shooting regularly tends to do that. Perhaps most important was how to utilize the gear that I have to capture the sunset image that I want. Trying many different compositions and experimenting with camera settings and techniques helped me to figure out what works well and what doesn't. I'll share some of those things in this article.
The camera settings that Improve Photography recommends for a beginning photographer are:
- Shoot in aperture priority mode (A or AV on your mode dial)
- Put the camera on a tripod (The YoTilon is my favorite cheap tripod, the Mactrem is my favorite mid range tripod, and the Cayer is my favorite higher end tripod. All of these are from Amazon)
- Set your aperture to f/16
- Set your ISO to 100
- Let the camera set your shutter speed
- Put the focus point 1/3 into the scene
Those general settings should give you a good starting point.
Step 1: Clean Your Lens
Ah, the bane of landscape photographers everywhere! Dust, dirt, sand, water spots…you name it. When we take our photo gear out into the elements, it gets dirty. Nothing seems to attract dust as much as the front element of a lens. Just take a look at it after you've been outside shooting for a while. Point that dirty lens toward the sun and even the tiniest specks of dust will be accentuated in the resulting images. This has happened to me more than I care to admit, so learn from my mistakes. Sure, the dust spots can be cloned out in post-processing, but a quick cleaning before a shoot can save a lot of time in front of the computer later.
Although not necessarily a camera setting, this is an important first step, particularly when shooting sunsets. Carrying a variety of items in your camera bag will help to keep things clean when the time comes. Microfiber lens cleaning cloths, lens wipes, a Lens Pen, and small rocket blower can all come in handy and won't take up too much space. All of these products are linked to my favorite one on Amazon.
Step 2: Use a Tripod
You can probably get by a lot of times without using a tripod for sunset photography. However, there are some good reasons to get in the habit of using one. Tripods do tend to slow you down, and that's not necessarily a bad thing. When a tripod is used, emphasis is placed on developing a good composition first. Once that is accomplished, you can shift your focus to getting the exposure just right. That can be a big help when shooting in the challenging lighting conditions of a sunset scene. Of course, it is also important to not let the tripod grow ‘roots'. After you get the shot, move around. Try a different perspective. Shoot with the camera up high or low to the ground. You'll get more unique shots instead of coming home with 50 images that look virtually the same.
Another important reason to use a tripod is because as the sun goes down, the light will quickly diminish. That means your shutter speed could get too low to hand-hold the camera anyway. With the camera on the tripod, the shutter speed can be longer without the worry of camera shake. However, be aware of moving foreground objects, such as blowing trees. A slower shutter speed could introduce motion blur, which may not be the desired effect.
The YoTilon is my favorite cheap tripod, the Mactrem is my favorite mid range tripod, and the Cayer is my favorite higher end tripod. All of these are from Amazon
Step 3: Shoot Wide (then zoom in)
For sunset photography, and landscape images in general, wide, sweeping vistas are typically what you will want to capture. A focal length range of 14 mm to roughly 24 mm is a good starting point to compose the image and get everything in the photo that you want. Shooting at a wider angle will also accentuate the starburst effect for more dramatic sunset images. More on that to follow.
After getting that wide angle shot, try switching lenses and zooming in. Try different focal lengths and isolate different parts of the scene with the sun in part of the image. Try making a silhouette of a tree or some other object against the sun. The only limitation should be your own creativity. There's no rule about what focal length is right, so do what you want and have fun with it.
Step 4: Shoot RAW!
There are a few exceptions where shooting JPEGs may be desirable, but for sunset photography (and landscapes in general), it makes a lot of sense to shoot in RAW image format. The one exception is if you do not intend to edit your photos on the computer. For me, however, post-processing (or editing) my images is half the fun. It also allows me to explore some more creative aspects of the images that were captured. Shooting in RAW file format preserves all the image data and provides much more latitude for the editing process. That can be very important, especially when shooting in such a high dynamic range scene as a sunset. If you are unsure of what it means to shoot RAW, much more information can be found in Jim Harmer's Photography Start training.
Step 5: Put Your Camera in Aperture Priority Mode
This may get some debate, but let's start by saying you don't have to shoot in manual mode to be a ‘real' photographer. That's not to say that you shouldn't shoot in manual or that shooting in manual won't improve your understanding of exposure and camera settings. However, Aperture Priority mode is a good place to start and will work well for sunset photography.
For most cameras, Aperture Priority mode is set by turning the mode dial to “A” or “Av”, but your particular camera may be different. The way it works is the same, though. Aperture Priority means that you set the aperture where you want it and the camera will automatically change the shutter speed for the correct exposure. The aperture won't change unless you want it to change. That's important because the aperture will determine how much of the scene is in focus and will also help you achieve the starburst effect if that's what you're going for.
Step 6: Set the Aperture to a Large Number
Aperture is oftentimes a confusing concept to grasp. Particularly because the aperture numbers (or f-numbers) are actually fractions. So, even though the f-number may be higher, it is actually a smaller number. Like I said…confusing. There are a number of articles on the Improve Photography website that discuss aperture in more detail. Try this one or this one, or watch the Photography Start video training for more information.
The aperture setting is what controls the depth-of-field, or how much of the scene is in focus. For landscape photography, you will generally want everything in focus. That means the aperture will need to be set to a large number, such as f/11, f/13, or f/16. The lens opening gets smaller as the f-number get larger. A larger f-number is also what is needed to give the sun the starburst effect. Note that an f-number larger than f/16 will likely start introducing diffraction, which may make the image appear less sharp. I sometimes use f/18 or f/22 anyway and don't worry too much about it, but the severity will depend on the lens you use.
Step 7: Keep the ISO Low
A lower ISO setting usually means less grain (noise) and results in a cleaner image. Set the ISO to the lowest native setting for your camera, usually either 100 or 200. Try to keep the ISO at the lowest setting, if possible. There are some exceptions to this, which we'll cover later.
Step 8: Watch the Shutter Speed
With the aperture and ISO set, the third leg of the exposure triangle – shutter speed – is all that is left. If you're shooting in Aperture Priority mode, the shutter speed will be set automatically by the camera. However, you still need to keep an eye on the shutter speed to make sure it doesn't get too slow for the situation. You may need to increase the shutter speed to prevent motion blur of foreground subjects or camera shake if you happen to be hand-holding the camera.
In order to increase the shutter speed in this situation, one or both of the other parts of the exposure triangle needs to be changed. Since the aperture is giving you the depth-of-field that you want, leave that setting alone. Increasing the ISO will make the shutter speed faster. For example, if the shutter speed is at 1/15th of a second, increasing the ISO from 100 to 200 will make the shutter speed 1/30th of a second. Doubling the ISO again, to 400, will make the shutter speed 1/60th of a second (assuming the light in the scene isn't changing). It's a good idea to zoom in and review the images on your camera's LCD screen to be sure everything you want to be sharp is sharp.
Step 9: Use Exposure Compensation
After shooting a few images, it's a good idea to review the photos on the camera's LCD and to also look at the histogram. If the exposure is not what you want, a quick and easy way to make an adjustment is to apply exposure compensation. If the image looks a little too dark, apply some positive exposure compensation. Conversely, if it's a bit too bright, a bit of negative exposure compensation should tone down the image. Experiment with it to see how it works and the amount of exposure compensation you need.
Some cameras have a dedicated dial for adjusting the exposure compensation. Others require you to press a button while turn one of the command dials to make the change. Check the manual for your particular camera to see how to use the exposure compensation feature. Note that exposure compensation will work if you are shooting in Aperture Priority mode, but not in manual mode. If you are shooting in manual mode, exposure changes are made by independently adjusting aperture, shutter speed, or ISO.
Step 10: Shoot Bracketed Exposures
Sunset photography, especially when including the sun in the frame, is a very high dynamic range (HDR) in which to shoot. In other words, there is a huge difference in tonal values between the brightest and darkest parts in the image. A lot of times, the dynamic range is too high for our cameras to capture everything in a single image. If you expose for the brightest parts, then the shadows become black. When exposing to bring out the shadows, the sky will likely be blown out and that detail will be lost. This is a situation where shooting multiple exposures of the same scene may help.
Shooting bracketed exposures is usually pretty easy to do. I believe that most all modern DSLRs and mirrorless cameras have automatic exposure bracketing. Check your manual to see how to do this with your camera. The default is typically set to shoot 3 exposures. One will be the correct exposure, one underexposed, and one overexposed. The amount of under- or over-exposure can be set in-camera. Some cameras even allow for 5, 7, or even 9 bracketed exposures, but 3 is generally enough. After the bracketed exposures are captured, they can be combined into a single image using Lightroom's Photo Merge HDR feature or other HDR software. More about using this feature in Lightroom can be found in this article.
A more advanced technique for pulling the full dynamic range out of the bracketed images is the utilization of luminosity masks in Photoshop. You can learn more about luminosity masking in Nick Page's video training at Improve Photography Plus.
Step 11: Use the LCD to Compose and Shoot
Sunset photography may involve pointing the camera/lens directly at the sun. You don't want to look through the viewfinder because of the possibility of damaging your eyes. Therefore, take advantage of the LCD to frame up your shots. If your camera happens to have a tilting LCD, it is awesome for getting low angle shots without laying on the ground. All cameras should have that feature!
Step 12: Be Patient
This isn't a camera setting, but is just as important. After the sun goes down below the horizon, don't leave right away. Keep watching the light and colors in the sky and keep shooting. Quite often the best color will happen well after the sun has set. This is especially true if there are a few clouds in the sky near the horizon. I've learned my lesson from giving up on a scene way too soon only to see an explosion of colors after the camera is packed away and I'm heading home. Now I typically stick around until all color is gone and the sky is turning dark.
Examples of Sunset Photography Settings

This sunset image was taken along the Oregon coast. Placing the sun in the notch of the rock formations helped to create the starburst effect.
- Shutter speed: 1/13th of a second
- Aperture: f/22
- ISO: 100
- Focal length: 28 mm
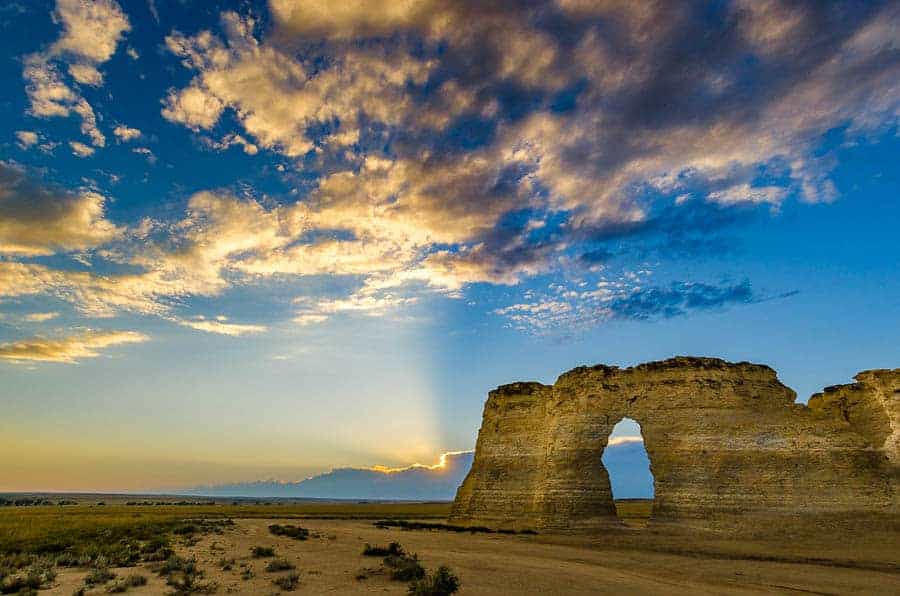
The above image was shot at Monument Rocks in west-central Kansas. Thick clouds on the horizon were blocking the setting sun, but I got the shot while it was still lighting the edges of the clouds.
- Shutter speed: 1/200th of a second
- Aperture: f/11
- ISO: 100
- Focal length: 12 mm (18 mm equivalent)
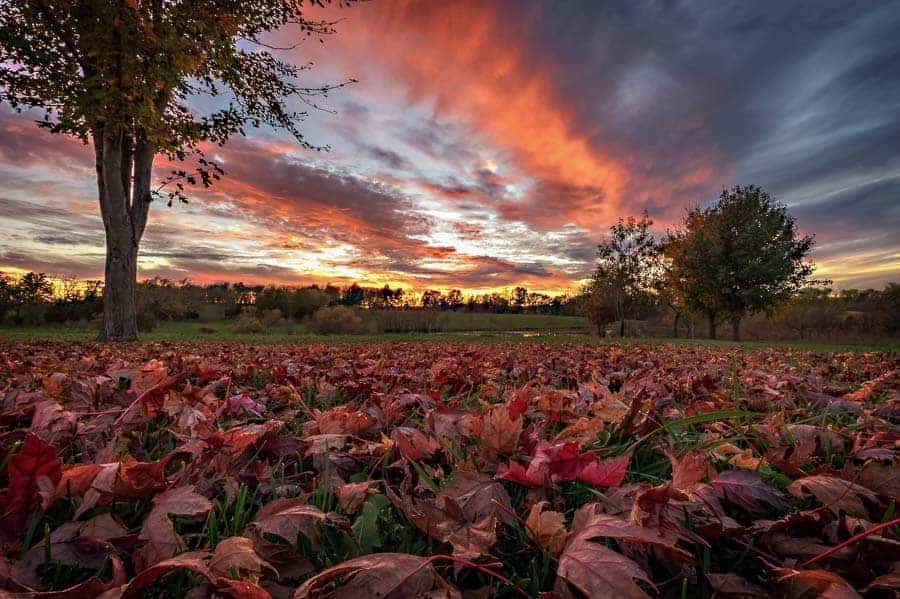
I made the above photo in my front yard last Fall. The camera was set up on a tripod very low to the ground to get the blanket of leaves in the foreground. This was shot after the sun had set and the colors were really starting to pop.
- Shutter speed: 1 second
- Aperture: f/22
- ISO: 200
- Focal length: 10 mm (15 mm equivalent)

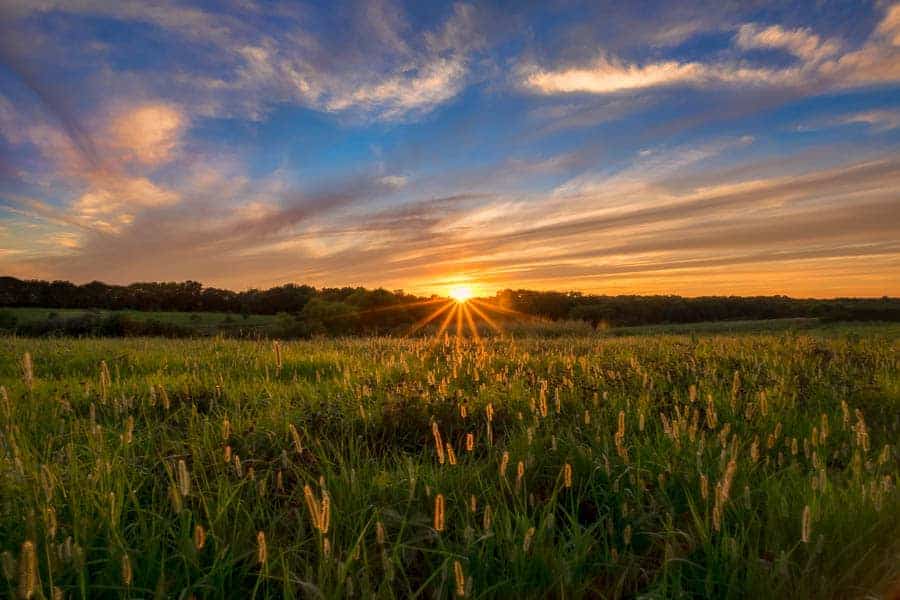
Don't be afraid to try something different with your sunset photography. I zoomed in and silhouetted this plant against the setting sun for this image.
- Shutter speed: 1/500th of a second
- Aperture: f/8
- ISO: 400
- Focal length: 400 mm
Conclusion
Sunset photography can be a lot of fun to do. The nice thing is you don't have to travel far to do it. There is a sunset every day and it can be captured from virtually anywhere. Even in your own backyard. Not every day will have a great sunset, but many will. Get out the camera and give some of these tips a try. As with any type of photography, the more you do it, the better you will be. Plus, mastering sunset photography in your own backyard or neighborhood will give you tons of confidence that you can nail the shot when you do travel other places.
We would LOVE for you to post your best sunset photos in the Improve Your Photography Facebook Group! Click here to join! If you want constructive criticism on your photo, just add CC to your post!
Disclaimer: Improve Photography is a participant in the Amazon Services LLC Associates Program among other affiliate programs, an affiliate advertising program designed to provide a means for sites to earn advertising fees by advertising and linking to Amazon.com and other websites.
Very cool article, thank you!
Thanks for reading, Craig, and glad you enjoyed it!
I know I’m a bit “l8” ..but I just upgraded and purchased a new multi lens camera. So, I’m looking forward to trying out your suggestions since I’ve taken so many on my I-phone previously.
Thank you so much for the article and for making it so easy to understand! {:
alexandra ????
Thanks for reading, Alexandra, and glad you found some useful tips. Good luck with the new camera!
New to this game so Just googled sunset photographing and came across your article. Really useful and thanks for sharing. Now just to capture the picture.
Thanks I hope that some of the information in my life will be helpful
Interesting article, however, I am curious why you didn’t mention the use of split neutral density filters, which are relatively inexpensive (not Lee or Heliopan). I much prefer split ND filters to using HDR and dealing with all the pitfalls inherent with that process. Plus the fact that you can immediately see the results and adjust if necessary.
To be honest, I’ve never used a split neutral density filter. Maybe I should try it, but have been happy with the results without the added piece of gear.
Thanks for reading!
What kind of camera is best for sunset photography ? I am just starting out. I want to invest in a good camera, but do not know where to start. I am planning a trip this winter for anchorage so I’m trying to learn lots of new things to try before hand. Thank you
Hi Melissa,
The “what kind of camera…” question is a tough one. Honestly, most any interchangeable lens DSLR or mirrorless camera can give great results. I would suggest an entry-level camera body and investing in better lenses. Good glass makes all the difference. You can always upgrade the camera later.
Enjoy the trip and thanks for reading!
Hi my name is Sandra loved your article espbeing a senior lady I have Sony A7 riiiand love it I love sunsets but usually shoot in manual but now going to try Aperture. You hear so many different things about how to shoot I love your style straight forward and to the point using everyday wording.
Thanks a bunch again Sandra
Sunset photography used iso 100
Great article. Thanks for sharing
Peter, indis