
The first thing to understand is that Lightroom does not have the ability to do HDR tonemapping without the use of a third party plugin. Photoshop has this ability, but Lightroom does not.
But this doesn't mean you can't create HDR images in Lightroom. It only means you can't do HDR tonemapping in Lightroom. What's the difference? Allow me to explain…
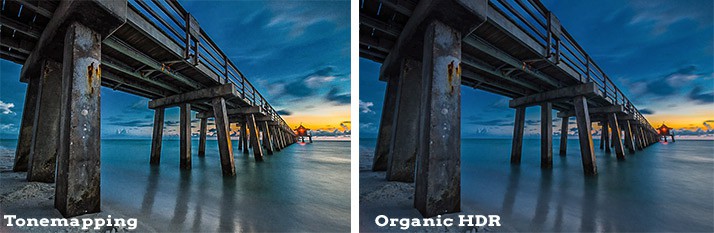
Tonemapping vs. Organic HDR
Tonemapping means that a computer algorithm runs through the photo and selects which pixels should show through from the different exposures you've taken. While it need not always look this way, this is usually what photographers associate with the “cartoonish, painterly” look of HDR.
Organic HDR simply means bringing a raw file into Lightroom and bringing up the brightness of the shadows and bringing down the exposure of the highlights. It gives extremely natural results and can bring out just as much detail as tonemapping.
This article is a starting place to walk you through the process of creating an organic HDR photo in Lightroom.
Step 1: Shoot RAW
While you may be able to get and HDR style look out of a photo show in the JPEG format, it is a format that is not as flexible as RAW. Not only can you do a lot more in the way of adjusting the exposure of your image, but Lightroom happens to be one of the best RAW processors available. Meaning that when you import and manipulate your RAW photos into Lightroom and then export them to another more usable format like JPEG or TIFF, Lighroom does a very good job in making those resulting files look just like you thought they would.
In fact, Lightroom does such a good job of processing RAW files that even if you have the very popular Photomatix Pro software for more complicated HDR processing you should use Lightroom to convert your RAW files to TIFF before bringing them into Photomatix Pro.
Photomatix Pro is very capable of processing RAW formats from many camera models, but I have had much better results using Lightroom to do this. Do all you can to get a good exposure in the camera while shooting RAW, and you will have a lot you can do in Lightroom to take something that looks relatively drab or flat into something you are proud of.
Step 2: Highlights Slider
My first stop in Lightroom to add a bit of an HDR effect and get the most out of the details in the brightest and darkest part of a photo is the highlights slider. I think this is especially true if you use the Expose To The Right (ETTR) method for setting exposure.
I usually like to bring down the highlights in my shots so that the brightest brights will darken up a bit and show more detail. You can really see a dramatic change in a landscape photo with a bright sky and clouds. The detail in the clouds really starts to show as you move the highlights slider to the left (bring them down). Lightroom does just a great job of only touching the very brightest parts of the photo with this slider, leaving everything else just as it is.
You can certainly take things too far here, so you will want to play around with things, but start off by lowering them until the detail starts to look unnatural – unless that is what you are going for with the shot. You can think of this slider as trying to replicate the -1 or -2 EV shot in bracketed photos when doing full HDR processing.
Step 3: Shadows Slider
This is exactly the opposite of the highlights slider. And you are really looking to do exactly the opposite by moving the slider to the right (bringing them up). Again, Lightroom does a fabulous job of picking only the darkest parts of the photo and slowing increasing the brightness there to expose some of the details that would previously have looked very black.
So start moving that slider to the right and watch how it affects your shot until it starts to look unnatural. You can think of this slider as adding the information you would get out of a +1 or +2 EV shot in bracketed exposures.
Step 4: Clarity Slider
T0 me the Clarity slider is one of my favorites in Lightroom. It is amazing that way this slider can find and enhance the detail in your photos. It could be compared a little with the sharpening sliders, but it isn't quite the same thing. It is my next stop as I start to process a photo and want to add a touch of HDR to just bring the most out of it.
While I frequently take the highlights nearly all the way down (too the far left) and the shadows all the way up (to the far right), moving the clarity slider all the way to the right usually doesn't look good for what I want out of my photos. While I do adjust the highlights and shadows sliders differently with each photo, I find the way I set the clarity slider to be one that is more drastically different from photo to photo.
I usually take it to the right on landscapes, but on portraits I may even choose to go to the left with this one. It all depends on what you want to get out of the shot. If you are after making the shot look more like traditional HDR then you will want to try taking it to the right first.
Step 5: Vibrance Slider
There are two sliders in the basic section of Lightroom that deal with the strength of colors, vibrance and saturation. I prefer to use vibrance over saturation most of the time. Vibrance tends to just turn up the strength of the colors without adding a lot of color casting.
Saturation seems to change the colors more as it strengthens them. I use both of them, but usually saturation is just a little bit, and I make take vibrance up (move it to the right) quite a lot. Strong colors are usually associated with HDR shots, so play around a little with vibrance and raise it until it looks like it is changing the colors too much or looks completely unnatural.
Can't Camera RAW Do This?
Yes, the Camera RAW functionality in Photoshop can do this, in fact all the same controls mentioned here in Lightroom are in Camera RAW. The biggest difference is that the changes you make in Lightroom are non-destructive. Meaning that when you move these sliders in Lightroom you don't have to save anything and your RAW photos are exactly as they were when you took them off the camera.
None of these settings are actually applied until you export the photos out to JPEG or TIFF. Photoshop has added a Camera RAW smart filter so that you get a lot of this same benefit, but you still have to save a PSD file when you are happy with things.
As a really fast and easy way to add HDR effects to a photo and really pull all you can out of it, these sliders in Lightroom have proven to be an invaluable tool for me.
Thank you. I am a 86 year old who regrets the demise of Kodachrome with its 12 stops EV, more than the eye can see.
When film became ‘obsolete’ I purchased a Sony point and shoot. It did a reasonable job but not as good as film.
I did tryout some Canon and Nikon DSLR’s from Amazon but returned them. They just did not cut the mustard.
Then two years ago I tried Panasonic’s Lumix FZ200. Here was a inexpensive camera with a superb lens which was much lighter than my Minolta with three lenses and which was capable of taking extreme telephoto shots, and although the results were acceptable were still not up to film quality.
Enter HDR photography .
I have read your tutorial, and I have Lightroom, and I have tried your method out. It works! And far better, IMO than Photomatix, which I have but now regret purchasing . Photomatix can produce surreal images but not up to the natural standard of Kodachrome. Your methods is darned close.
I wish you well on your journey through life.
Dennis Clarke
I just discovered a similar tutorial on youtube and they describe everything you did, but I prefer your explanation. This method that you are showing works wonders on images and it’s fun working with lightroom now.