
If you've read my previous articles, you will know that I am a big fan of mobile phone photography. Or, perhaps you have seen some of my iPhone photos in those articles and not even realized that they weren't taken with a “pro”, interchangeable lens camera. The “camera in your pocket” can be a very powerful tool that should not be overlooked, especially now that most of the newer cell phones can take photos in the RAW file format.
Since the release of iOS 10, iPhones with 12MP cameras (anything newer than the 6s and SE models) have the capability of taking true RAW photos in the DNG format. Many models of Android phones have had this ability for a couple of years now, but this article and the examples therein will be referring specifically to the iPhone because that is what I am using. In this article, I'm going to explore the advantages and disadvantages of taking RAW photos with your mobile device, and show you some real world comparisons to demonstrate the differences.
iPhone RAW photos, this time it's for real
Over the past few years, a number of apps have claimed to give RAW capability to your iPhone. Some, like 645 Pro offered the ability to save TIFF files while others, like Digital Negative, allowed saving as DNG files. The problem was, these apps resulted in very large file sizes but offered limited benefits because Apple's iOS didn't allow the developers access to the real, unprocessed data on the image sensor. Since September of this year (2016) and Apple's release of iOS 10, that has changed. Although the native camera in the iPhone is still only capable of taking JPEG photos, the RAW sensor data has been made available to app developers, giving us access to all of those delicious, unadulterated ones and zeros.
Why Shoot RAW, Anyway?
Let's just dial it back for a moment, for those who aren't yet on the RAW bandwagon. If you are already a convert, you can skip this section without missing anything, I promise. All digital cameras (at least, all cameras that I'm aware of) can save photos in JPEG format and that is almost always the format that is required for sending photos to the printer or posting them online. JPEGS work great most of the time, but they are a bit of a compromise. Many photographers will tell you to think of a JPEG as a “developed” photo, but I'm going to tell you to think of them as a piece of toast.
You see, a camera's sensor doesn't record a photo in the same, literal way that an old film camera did. The sensor records a ton of information that has to be read or interpreted into an image. The JPEG file, much like a developed negative, has had some decisions made for it already. In the film days, you might ask the processing lab to “push” or “pull” your negatives in the developing, meaning you wanted them developed for more or less time to make the exposure darker or lighter. Once those negatives were developed, you couldn't go back and change your mind. Sure, you could change the amount of time you exposed the photo paper to try to compensate, but any areas that were pure black or white in the negatives contained no information and there was no getting it back. JPEGs are like that, you can darken them or lighten them, but you can't recover detail that has been lost in the extreme highlights and shadows because that information has been discarded in order to compress the file into a convenient size. That's why I say they are like toast because to quote OITNB, “toast can't never be bread again”. (Yes, Grammarly, I realize that's a double negative, thank you).
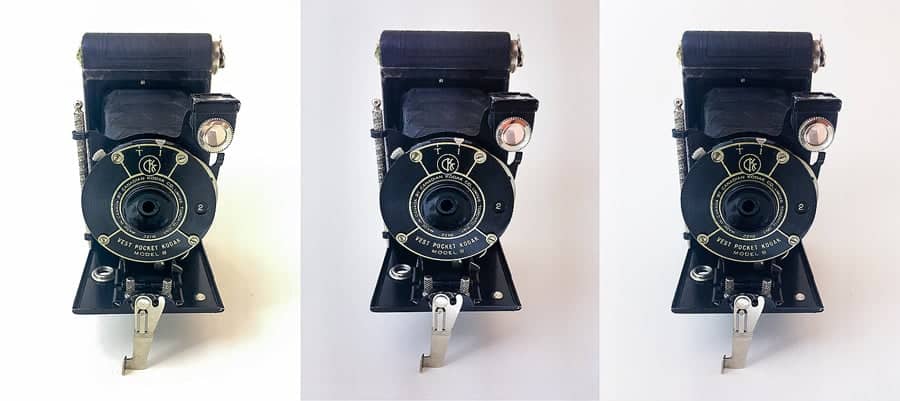
A RAW file isn't really a photo, it is just a bunch of computer language that specialized software (like Adobe Lightroom and Camera RAW) can interpret into a photo. It contains a whole bunch of information that we will never see in the finished photo, but that info is there. A blown out, solid white sky can be darkened and lo and behold, there are all the details in the clouds. Those black shadows can be brightened up and instead of going from solid black to solid gray, they can turn into a richly detailed scene. Some other advantages include being able to change white balance after the fact and less of the “artifacts” that can occur in a compressed photo.
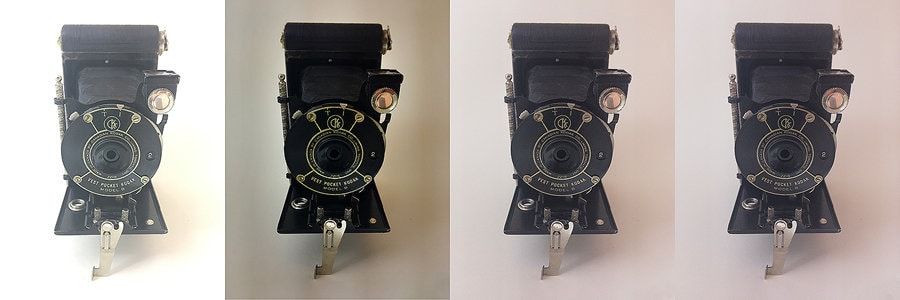
The main disadvantage of the RAW file format is that it is much larger than its red-haired stepchild, the JPEG. This is less and less of an issue as storage becomes more and more affordable, but storage space on mobile devices, in particular, can still be at a premium. The other drawback is that, without any editing, the photos just don't look as good as JPEGS. They contain so much information and they don't know what you want to see, so they just present you with a dull, lifeless image that needs contrast, saturation, and sharpness added in post processing. If you don't want anything to do with post processing your photos, then stop reading NOW (actually, you could have stopped reading a long time ago, sorry).

How Can You Take RAW Photos With Your iPhone?
Although Apple have finally loosened their stranglehold on your RAW sensor data, you will still need to use a third party app because it is not yet supported in the native camera app. Some of the apps that currently support the RAW file format are
When this functionality first became available in September, I began using the Lightroom app to take RAW photos. To be honest, I had always been rather underwhelmed by the Lightroom app so it was great to see some of the updates I had missed, like the addition of some faves from the desktop app like dehaze and graduated filters. Having said that, I still don't love using it. For one thing, the sliders aren't always very responsive, so sometimes there is a significant lag between you moving the slider and the changes appearing on the screen. You know, the same old problem we've all been complaining about with desktop Lightroom for years – it's slow. The other issue I have with using the Lightroom app to take DNG photos is that you can't export the photos to edit in another iPhone app in their RAW format. Once you export them to the camera roll, they are JPEGS. This is frustrating to me because I have a preferred workflow for editing photos on my phone and sorry, but…ahem…Lightroom isn't it. I edit most of my photos in Snapseed, an app that has the capability of editing DNG files, but there just isn't any way to open DNG files from the Lightroom app in Snapseed.
So, on to the next. Right now, I am using the Manual app and I am very happy with it. It has a simple, straightforward interface that pretty much stays out of your way and doesn't have much of a learning curve. Perfect. Best of all, it saves your photos to the camera roll as DNG's so you can edit them in Lightroom or Snapseed or any of the other apps that have the ability to process RAW.
SHOULD You Take Raw Photos With Your iPhone?
Well, there's the million dollar question and my answer is “that depends”. First of all, it depends on how much storage you have available on your phone. Secondly, it depends on whether you want to spend time editing your mobile phone photos. Lastly, there are certain shooting scenarios where the RAW file format is going to be more useful to you than in others. If you have a scene with a wide dynamic range (a big range between highlights and shadows), then that would be one scenario where the RAW format will shine. Of course, in those scenarios, you can also create an HDR photo and the iPhone has some very capable apps for that. If you've ever used those apps, I'm sure at some point you have come up against the problem of having a scene with high dynamic range and a moving subject. Leaves blowing in the wind, an animal in the frame, taking photos while in motion, all of these scenarios lead to disappointing results with HDR, but by shooting a single frame in RAW, you just may be able to recover enough of those highlights and shadows to save the photo.
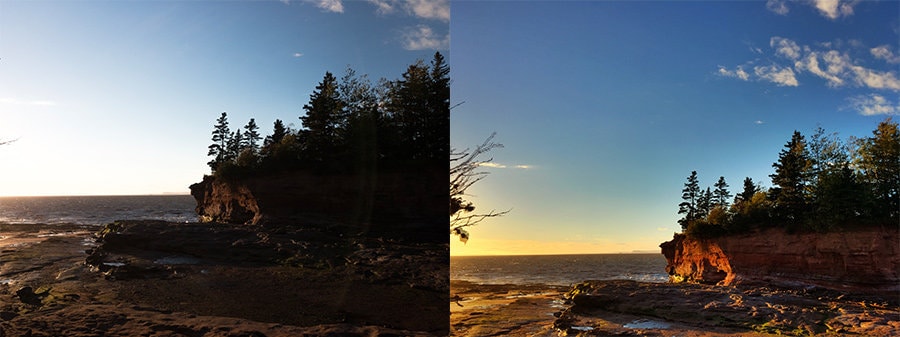
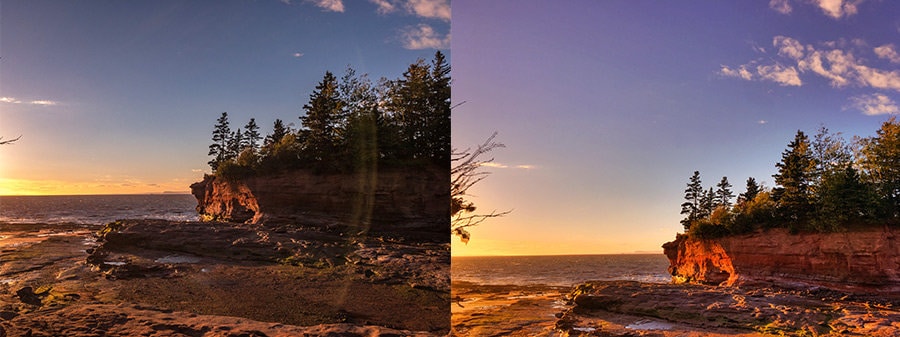
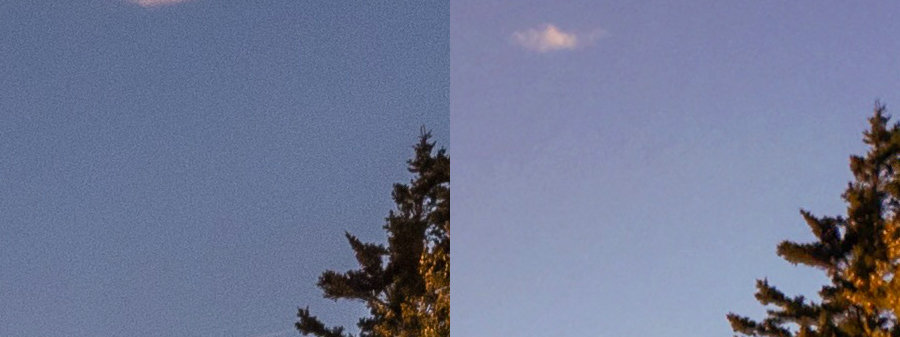
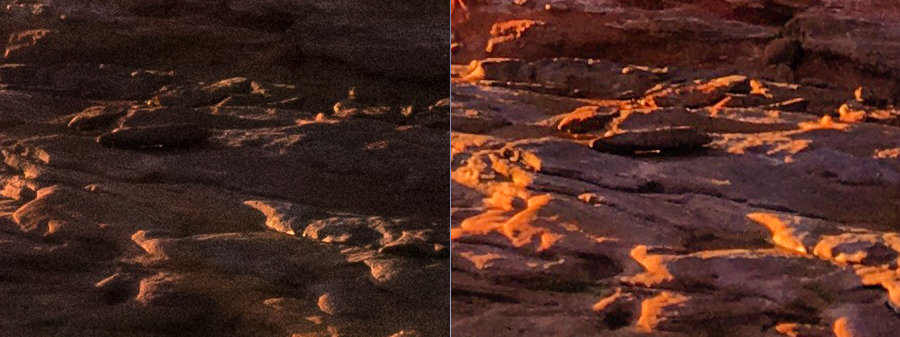
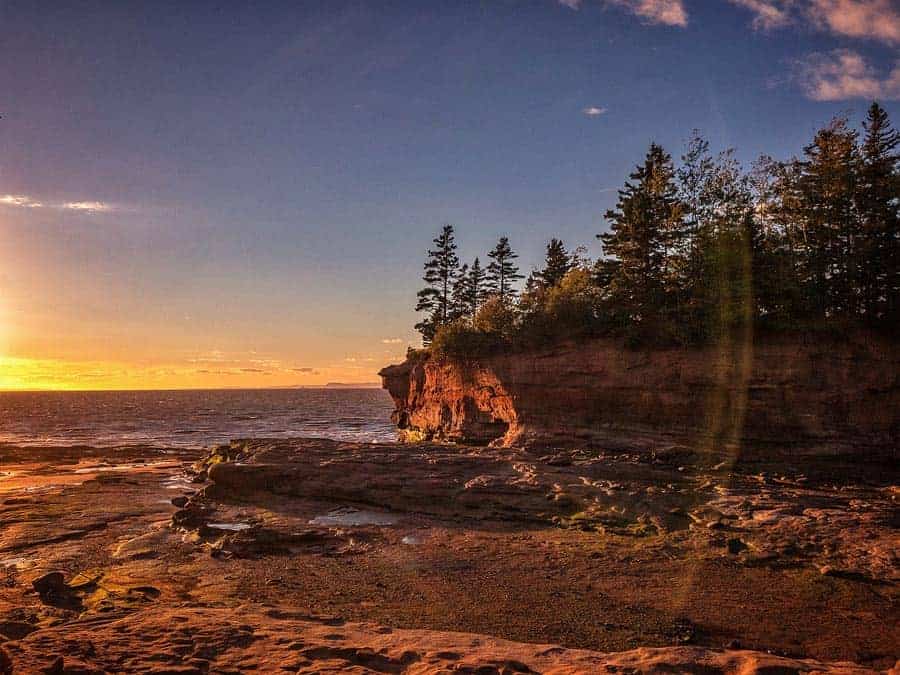
Below are some examples comparing the same scene photographed with the Lightroom app (left) and with the Pro HDR app (my personal favourite) on the right. You will see that the RAW photos have more noise (only because they don't have noise removal “baked in”), but also more detail and fewer artifacts in areas of the sky. I was able to recover way more detail in the highlights with the RAW photo, BUT the HDR photo has better detail in the shadows, at least at first glance.
For photographers who sometimes find themselves in front of a spectacular scene without their “big camera”, the ability to shoot in RAW format with a mobile device is a pretty awesome solution. It is especially so when you consider the possibilities of editing those RAW photos at home on a big screen, using the more powerful desktop versions of RAW processing software. For a diehard pixel punisher like myself, well let's just say I'm glad I got the 128GB phone.
Both 650 PRO Mk III and PureShot also shoot Camera RAW.
Good stuff! Thanks ?
Excellent article. I’ve since removed most of the camera apps from my iPhone and replaced them with ProCam. It shoots RAW, has all the manual controls of Manual app, shoots HDR, does auto exposure bracketing, long exposure capture, time lapse, 1080p video, and slow shutter for motion blur photography.
ProCam combined with Polarr image editing app, and Filmborn are the only image apps I’ve needed for mobile photography.
YMMV
ProCam 4 – Manual Camera + RAW by Samer Azzam
https://appsto.re/us/zLCJR.i
Thanks, Khürt
ProCam is another good one. I’m quite attached to some of my apps (like ProHdrX), but maybe someday I’ll switch to something that does it all.
Very interesting article having just gotten a 7plus that is always with me when my D7100 isn’t. Thanks!
It’s a very capable device, that’s for sure Jason. I’ve sold prints of photos taken with my phone.
Another experiment that is extremely telling: Use an app that simultaneously takes a raw and a jpeg, and take a picture of an indoor-lit scene. Then take the photo and increase the exposure by 2+ stops (or just move the slider all the way to the right) for both the RAW version and the JPEG version. You will be amazed at how the JPEG falls apart, while the RAW holds together (albeit being overexposed).
Definitely, Jordan. The difference is huge.
Do any apps shoot raw with both lenses on iPhone 7 plus? If no, why not?
Hmmmm…great question, I will have to look into that!
Snapseed now supports RAW to.
From what I can tell, Snapseed supports editing RAW files but I can’t find any evidence to indicate that the camera within Snapseed supports taking RAW files. If you have found a source that says otherwise, I’d be interested to know!
The content here looks really helpful, but I can barely read it. The font is so light and so small as to be illegible. Too bad. I urge you to make a change.
I’ve never been happy with extreme artefacting of iPhone pics, and it seems to be even worse with my 6s+, so I’ve tended to use it just for documenting or snaps, or even just gps data. The ability to save raw shots looks promising, but what’s the simplest/fastest way to get them into Lightroom?
Looks like I’ll have to remove all the videos from the camera roll to make room for these suckers though, even with the 128gb model.
Congrats on being able to capture sale worthy material with your iPhone! Was it off a raw file, or are you so skilled that they you could make the smeary, fringed crap that comes of the phone presentable? Are you the person that makes the Mac iPhoto demo demo library look so good?