
My previous article, “A Beginner's Guide to Using Light Painting in Your Photography”, introduced some of the basic gear and techniques for light painting your images. That article was intended more for those who may be new to light painting and want to give it a try. This article is for those who have experimented with light painting and are ready to try some different techniques to add even more drama and interest to their images. The essential gear will remain the same, but more advanced gear and techniques will be explored.
As photographers, we know how important light is for an image. It's really what makes or breaks an image. In a lot of photographic situations, we have to take the light that is given and make the best of it. When photographing at night, there obviously isn't much light. Therefore, adding your own is such a great way to step up your game and create night photography with impact. The big advantage with light painting is that you have total control of the light. You can add it where you want and completely change the look of an image.
There are so many different methods for light painting an image, that we couldn't possibly cover them all here. This article will highlight (pun intended) just a few of the more advanced techniques. Like an artist who has numerous different brushes, each for a different aspect of placing paint on canvas, you have a wide range of tools available to create your artistic vision. I covered this in my previous article and will say it again. You are only limited by your imagination.
Using Multiple Lights
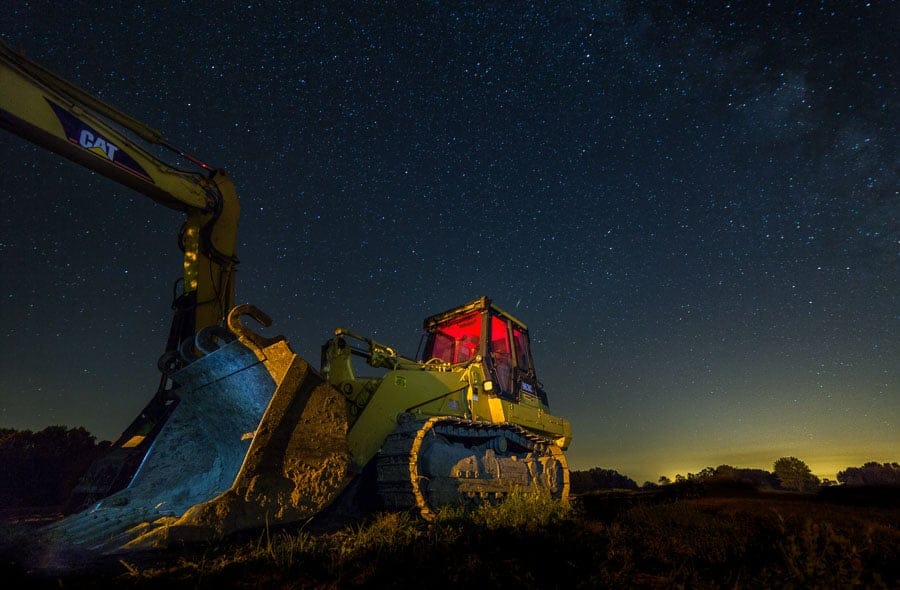
There is no need to limit yourself or your image to just one light. Experiment with using different colored lights, different types of lights, and place them in different areas of the image to really add depth and dimension. In the image below, I used a small LED light to illuminate the bucket of the bulldozer. Then, a speedlight with a red gel attached was popped behind the glass of the cab to provide some backlighting and color. A yard light behind me provided some additional light to the image. This image was created with a single 30-second exposure. Care was taken in moving around in the dark to prevent tripping or possibly knocking the tripod over. Additionally, I made sure that lights were shut off as I walked through the frame to prevent unwanted light streaks.
The Layered Approach
Sometimes a single image just won't cut it. If you are light painting a larger subject or just want to complexify (is that a word?) the light, multiple images may be necessary to get the result you want.
There are a number of ways you can light the object. Speedlights can be used to provide a burst of light in each image. Or, you may choose to use a longer exposure and light each part of the image with an LED or other light source. Whichever method you choose, experiment with the lights to make certain areas of the image brighter than others. This will give the image more texture and accentuate contours, while also preventing it from looking too flat.
After you have all the images you need, you can harness the power of layers and the blend modes in Photoshop to create the image you want. If you have questions about what blend modes are or how to use them, check out this great article to learn all about them. Using the Lighten blend mode on one of the layers will show the brightest parts of the layer right below it.
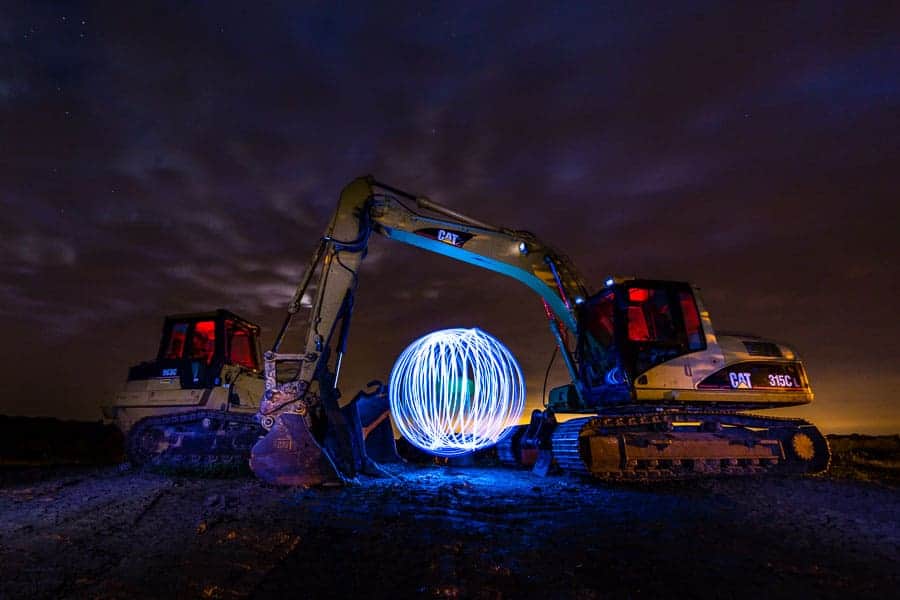
In the image below, I shot three separate frames, lighting different areas in each one. The images were imported into Lightroom, then sent to Photoshop as layers. The top layer was the excavator and bulldozer, which was lit with a small LED flashlight. The second layer has the red flash of the speedlight behind the cabs, which helps to provide some separation from the dark sky. The third layer was the light orb. Selecting the top layer and switching the blend mode to Lighten allows the red to show through the image. Selecting the second layer and switching to the Lighten blend mode brings the light orb through. This method also brought out some of the light of the moon through the clouds. Any portion of the layers below that you don't want showing can be masked out using the brush to hide them.
Light Drawing
Painting with light typically involves lighting up an object in the scene by shining a light on it to make it the main focus of the image. Light drawing is a little different. This technique uses an external light source that is shined directly into the camera. While light is generally used subtly to paint an image, there is no subtleness to this method. The actual light source itself is visible and is what makes the image. This technique can also be pretty complicated, but it's still lots of fun to do.

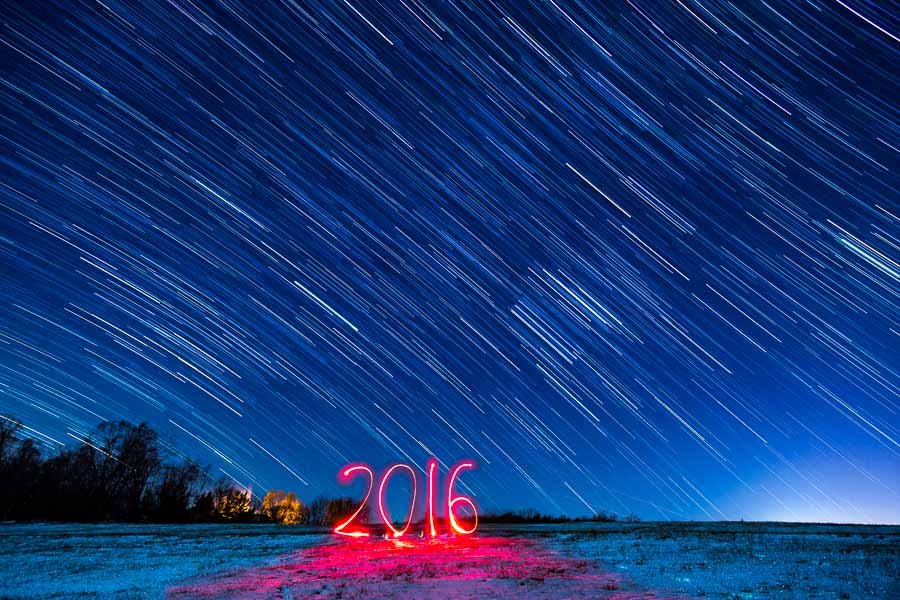
Light drawing is the actual use of an external light source to draw something in front of the camera while the shutter is open. It could be letters, numbers, shapes, or sketches of any kind. It could be as si

mple as writing your name, or maybe a much more complex drawing. Regardless, there are a few things to keep in mind that will help you pull off these types of shoots.
It takes time to draw with light. That means you will need to have the camera set up for a long exposure. After you have focused on the area where you will be drawing, set the shutter speed to 30 seconds. That's where I like to start, and is usually enough time for most situations. You can start the exposure one of three ways. Use the 2- or 10-second self-timer, use a wireless remote shutter release, or have someone push the shutter button for you. I like to use the self-timer because it is easy to use, doesn't require any additional equipment, and because I usually can't talk a family member into spending an hour or two out in the dark while I make images.
If you need more time than 30 seconds, you will need to set your camera to bulb mode. That way, the shutter will remain open until you are finished drawing and close it. To do this, I prefer to use a wired shutter release and the camera's
self-timer mode. Once focused and ready, I press and lock the button on the cable release, walk into the scene, and begin drawing when the shutter opens. After finishing, I will go back and release the shutter lock button and check the image on the LCD.
I have found that a small LED flashlight is the easiest tool to use for light drawing. You want to be sure that whatever light you use is easy to turn off and on. This will allow you to shut off the light and move to another position in the image without leaving light streaks. If you want to add some color to your drawing, place colored gels over the light using gaffers tape or rubber bands. I have also used sparklers for light drawing, but once they are lit, there is no turning them off. However, the smoke that they create makes for some interesting atmosphere in the image.
Light drawing can be very tricky and takes some practice. It takes a lot of trial and error, too. In fact, you most likely won't get your shot on the first try. Keep in mind that you are writing or drawing in mid-air…in the dark. It's not easy to keep track of where you have been with the light and where you need to go next. One thing that helps me is to place something on the ground where I need to start. That way, each image is consistent and I can adjust the spacing of my drawing as necessary.
Also, remember that if you are writing letters or numbers, they will appear backwards in the image. You can try to write backwards so they show up correctly, but that can be difficult to do. An easier method is to write normally, then flip the image horizontally in post-processing so the characters are correctly oriented.
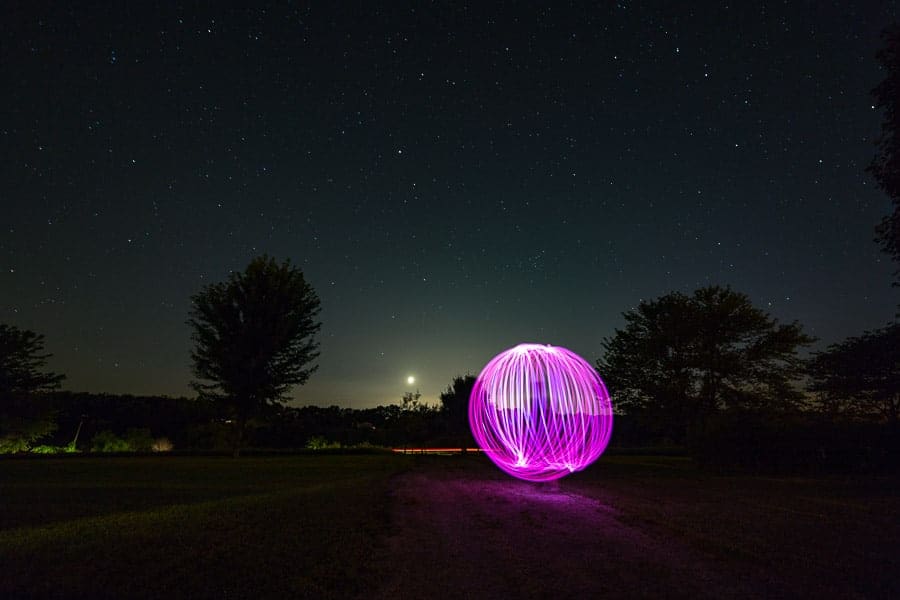
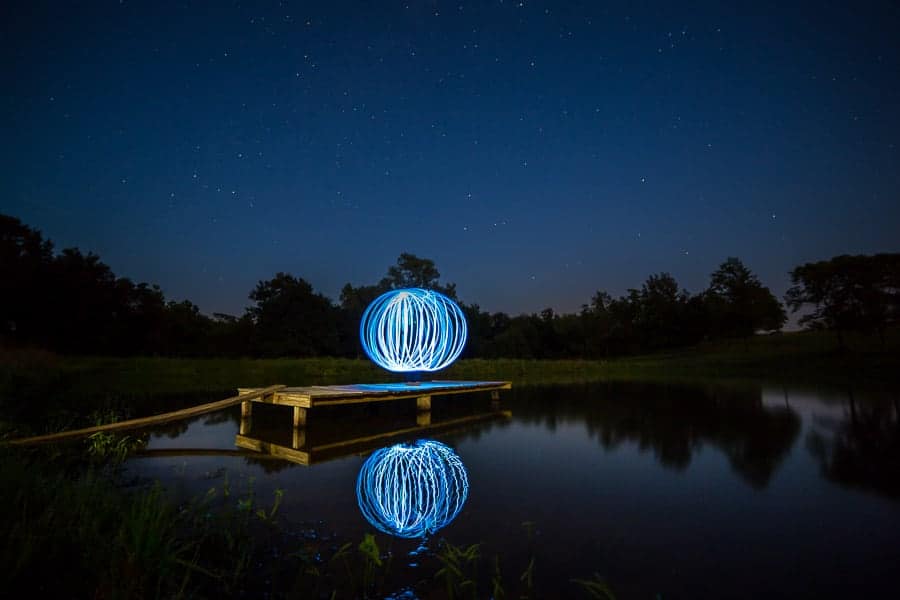
Light Orbs
Light orbs are tons of fun to make and, with the right tools and a little practice, aren't all that difficult. You may recall that late last year, the Improve Photography team beat the previous world record for the most orbs in a single exposure. You can read about it and watch the awe-inspiring video here. While you may not be out to break any world orbing records, you can still have a lot of fun making these images.
Making light orbs will require some of the same basic tools used for other light painting techniques. You will set up your camera on a tripod since the exposure time will be up to 30 seconds or longer. Use the 10-second timer or a remote shutter release to start the exposure. The one main difference is the light source. Or, more accurately, the contraption that is used to create the orb. There are a number of ways to construct a light orb-maker. The heroes of the Improve Photography team built special orb-making devices consisting of a PVC frame and LED lights. My setup is much more low-tech and can be made using some pretty simple items that you either have around the house or can be bought rather inexpensively at a dollar store or Walmart.
Here is what I use:
- Small LED flashlight with an eyelet on the end for attaching a keyring. Make sure it is an inexpensive light (see below).
- String or twine, cut to the right length so that the light will be close to the ground without hitting.
- A lint roller, with the sticky roll removed (like I said, low-tech). This serves as a handle and will spin easily with the light attached.
- Some type of colored, translucent ball to attach to the end of the flashlight. I used the plastic ball from a cheap toy and hot-glued it to the end of the light.
Here's how to do it:
- Set up the camera on a tripod.
- Determine where you will stand to make the orb. Use something to mark your spot so you can find it easily each time.
- Auto-focus on the area where you will be standing, then switch to manual focus on the camera or lens.
- Try a test exposure to get the look you want. Depending on how dark it is, I may start with a wide open aperture (f/2.8 on my lens), 30 second shutter, and ISO 400.
- Set the camera to the 10-second timer mode.
- Start the timer and walk to your spot.
- Turn on the light and begin spinning it as you slowly rotate your body. Try to keep your hand in roughly the same position so the orb will be more spherical.
- After the shutter is closed (I usually keep count mentally and go a few seconds longer to be sure), check the image on the LCD.
- Make any necessary exposure adjustments, and try it again.
There is certainly no exact science to doing this. You may think of other ways to make an orb-maker. Make sure the light is securely attached and that the string is securely attached to whatever you are using to hold it. On one occasion, the string broke in the middle of an exposure and my flashlight created a streak of light like a shooting star as it fell to the ground some distance away (shown in the feature image for this article). I prefer to use a handle to hold the string, as it is easier than holding the string in your hand. The lint roller was my inexpensive solution, but I'm sure there are many other options.
Steel Wool
I was hesitant to mention this one, as some reckless photographers have caused some real problems using this technique in recent months. In April of this year, some photographers burned down an historic building in Florida as a result of doing steel wool photography. This technique uses a device much like the orb, except that instead of a light, burning steel wool is spun around, throwing sparks in all directions. The images that can be created are really interesting. However, it must be done safely and in an appropriate place. Or not at all.
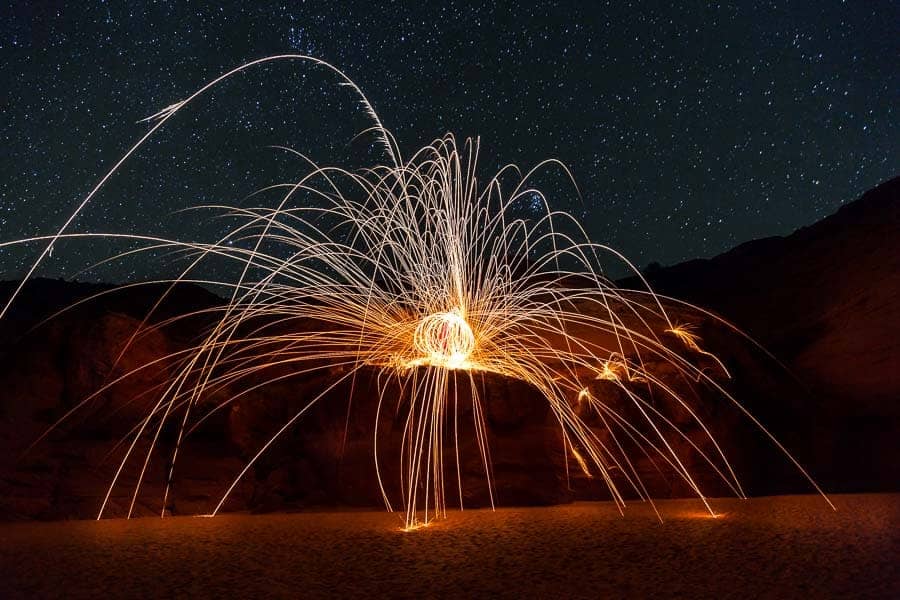
There are numerous tutorials on how to do steel wool photography on-line, so I won't go into much detail here. Basically, fine grade steel wool is placed into a metal kitchen whisk and lit using a lighter or 9-volt battery. The whisk is attached to a chain that you hold and spin around as the steel wool burns. Spinning the burning steel wool causes it to burn hotter and throw sparks. The camera captures the circular motion and a shower of sparks.
If you do try this, be sure to wear eye protection, gloves, and clothing to cover you body. Most importantly, make sure you are well away from anything that could burn, and also aware of where other people are in the scene. Ideally, this would be done on a wide open area of concrete, a sandy beach, or bare earth. It just takes a little common sense and the realization that sometimes just because it can be done, doesn't mean that it should.
Wrap Up
In my opinion, light painting is one of the funnest things you can do with photography. Not only that, but it also gives you a better understanding of how light impacts an image and how your camera's settings can be manipulated to totally change the look. Each image is unique. Even if the composition and subject is exactly the same, the light can be changed dramatically. Not only does painting light into an image give it more interest and depth, but it is also a great way to express your artistic vision. You are the artist and light is your paint. There is an expansive world that is your canvas, so get out there and give it a try!
Amazing article!
Wow, Rusty, thank’s for the great article!
So good Rusty! Great article
Thanks for reading, Pete! I appreciate your comment.