
Discussions abound concerning the pros and cons of a crop sensor dSLR versus a full-frame dSLR. Whether you’re considering features like low-light capabilities, depth-of-field, the “crop effect” of the sensor, or simply the cost differences, the choice between a crop or a full will inevitably be a big choice you make when buying new gear. What gets lost in many discussions of crop-versus-full is what it’s like to actually make the transition.
In case this whole crop-versus-full is foreign to you, what I'm talking about is the size of the image sensor in the camera. Chances are, your entry-level camera, perhaps your first dSLR, has a crop sensor. That means it's smaller than the traditional 35mm size of a full frame professional camera. Essentially, a full frame sensor gives you a bigger canvas on which to capture your image.
I made the transition from crop to full ten days ago. For perspective, my trusty Canon T3i Rebel, an entry-level crop sensor, has been my workhorse since March 2011. For the first four years with my T3i, the camera was just for personal use–vacations, my family, randomness. For the last year or so, my T3i was also the camera I used for my weekend warrior family portrait business. After a year in business with a steadily-growing client-base, I invested in a full-frame Canon 6D.
A quick note about lens compatibility: prior to purchasing the full-frame, I had already invested in three lenses that would work with the full-frame when I decided to upgrade. I had purchased a Canon 50mm prime, a Canon 85mm prime, and a Tamron 28-75mm zoom. The podcast hosts give this advice, and I agree: buy lenses first, then buy an upgraded body. You'll want to have lenses already so that you don't have to purchase both the body and the lenses all at once. Plus, if you don't have any lenses besides your kit lens, you will be amazed by the jump in quality when you purchase your first professional or pro-sumer lens.
Another quick note about my perspective: this article is one person's transition from an entry-level crop sensor camera to a full-frame camera. The article isn't a debate about which is better, crop or full, only about my experience making the transition to a more professional-level camera. I imagine many readers will be in my exact position, wanting to take a step up in the quality of your camera technology. I am quite proud of the images I created for clients using my entry-level crop sensor. I just knew I could use the capabilities of a better camera to my advantage; thus, I bought a new camera. Furthermore, as you've heard on the podcasts and read on the site before, there are plenty of high-quality crop sensor cameras out there. Jim talks about his experience with a pro-quality crop sensor and switching to one from a full frame here.
If you’re wondering what it might be like to make the leap from entry-level crop to full, here are eight things I’ve learned during the short time I’ve had with a new full frame camera.
1. Be prepared for a physical change
The first thing you’ll notice is that the full frame camera is big and heavy. The 6D is a solid piece of technology. Holding it for the first time made me think, “This is a professional’s camera. This was worth the money paid.” With that rock-solid build comes a little discomfort. I could hold my crop sensor for hours in one hand with a clutch strap and not care. Not so with the full frame. While I still use the Peak Design Clutch on my full frame, I am fairly certain that I’ll need to invest in a different type of strap for longer sessions like weddings or nature walks. Essentially, everything you hear the podcast hosts talk about is true: you are committing to a significant weight increase when you go full frame.
2. The viewfinder is huge
Looking through the viewfinder on that first day was a little jarring. I couldn’t quite put my finger on what was so odd. Only when I put both my crop and my full frame to my eye one after the other did I realize just how much bigger the viewfinder is on the full. It’s like going from peeking through a keyhole to opening the door and seeing the entire room. There’s just so much less black space around your view through the lens. If I had thought about it for a minute, I should have expected this change. After all, when you look through the viewfinder, you’re essentially looking down into the camera at a reflection off of the mirror. I should’ve realized that a bigger sensor would give me a bigger reflection with which to view the scene.
One difficult part about the larger viewfinder is that the AF focus points are still the same distance apart as they were on the crop. (Both the T3i and the 6D have the same focus-point layout.) That means that the focus points take up a smaller amount of the view through the viewfinder. With so many years shooting with the crop, I could use the focus points almost without thinking about them. Now I have to do a little more visual searching just to make sure I’m using the focus point in the way that I want to.
Along with this new, large view, I'm also finding that I'm shooting portraits a little farther away than I should be. I'm not as tight on my subject straight-out-of-camera as I’d like to be. Granted, the larger sensor is saving my post-processing cropping with its amazing resolution and detail. But I do need plenty more practice viewing the scene through this larger space in order to maximize the resolution of the amazing full frame sensor. In the end, the bigger viewfinder is amazing, but it definitely takes some getting used to. I’m still not quite there yet.

3. There are so many useful wheels and buttons
The full frame 6D body is more user-friendly than my entry-level crop T3i thanks to much more logical buttons and wheels. My entry-level crop has its share of buttons, but they aren't laid out well, nor are they nearly as functional as the full frame. The full frame 6D is a dream to use when keeping your eye in the viewfinder and changing settings by feel alone.
The 6D has a physical wheel near the shutter button to allow you to change shutter speed. This is not a revelation–the T3i has this, too. But my mind was blown when I discovered the wheel on the back of the camera that changes aperture. On the T3i, you have to hold the “Q” button on the back and use the same shutter speed wheel to then change aperture. With the extra wheel on the back of the body for changing aperture, adjusting these two parts of the exposure triangle is a breeze. It’s so much more intuitive and fluid to use one finger for shutter speed and a thumb for aperture. If you use the viewfinder to adjust for exposure when shooting manual–which I imagine many of you do–then having a dedicated wheel for each function is pure exposure triangle bliss.
Beyond the two wheels, the full frame also has dedicated buttons for AF mode, Drive mode, ISO, and light metering mode. Once again, being able to press each button and change the mode without taking your eye out of the viewfinder makes things that much more user-friendly. The bonus, too, is that the ISO button is different than the others, so finding your way by feel is easy.
Lastly, the LCD screen on top of the camera is a great resource for double-checking your settings without using the screen on the back of your camera. One thing I wonder with all of these amazing buttons is why they aren’t just standard on all dSLRs. The full frame is easier to use because of these buttons. Entry-level cameras should have these buttons, too, if only to make things easier on a beginner trying to learn how to shoot with a dSLR.
4. The crop factor is totally true
One of the things I was most curious about was the “crop effect” of the sensor. Does a 50mm lens on a full frame function like an 80mm on a 1.6x crop? To test the crop effect, I'd need a 50mm on a crop and an 85mm on a full. I know this isn’t a perfect comparison. Ideally, I’d have an 80mm lens on my full frame, but an 85mm is close enough. Practically speaking, these two lenses might be in many amateurs’ gear collection, so the comparison is useful enough.
I put my Canon 50mm f/1.8 on my crop sensor T3i, and I put my Canon 85mm f/1.8 on my full frame 6D. At first glance through each viewfinder, the scene is basically identical. Just to be sure, I set up a scene and took two photographs of it, one with each camera-lens combination mentioned, standing in the exact same spot, using the exact same settings. I didn't do any cropping in Lightroom, only small exposure adjustments to make things look a little better for you. Here's what I got with both cameras set to f/1.8, 1/200, and ISO 400:
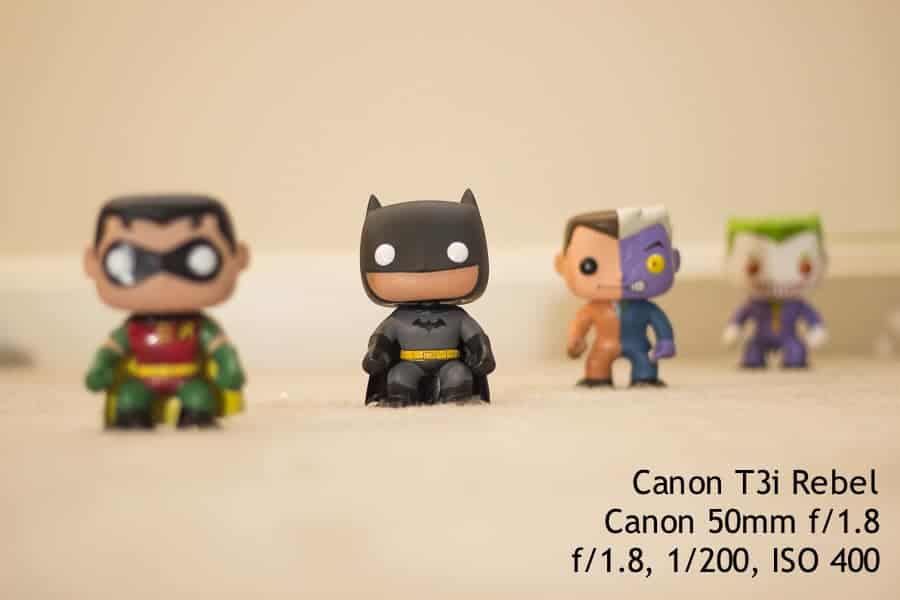
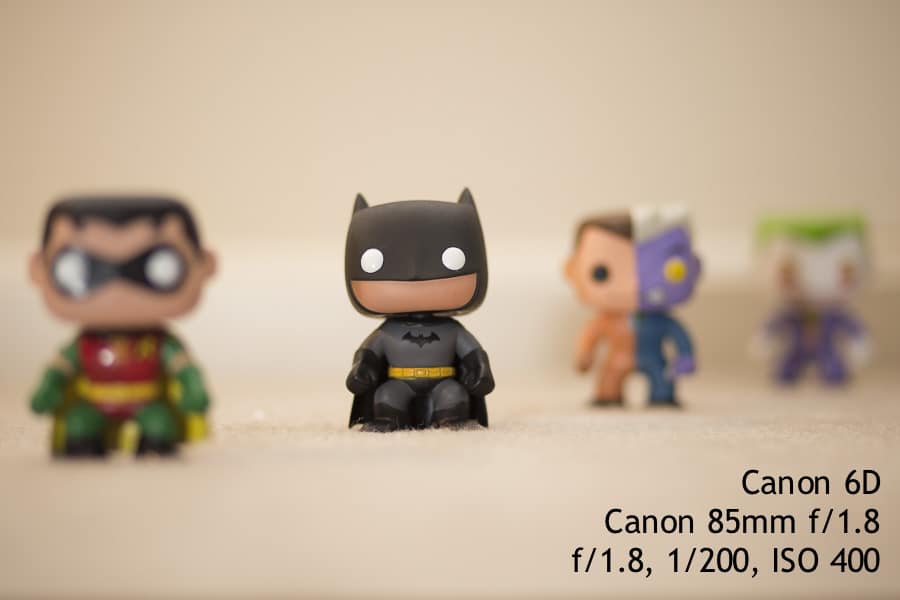
As you can see pretty plainly, the images are not exactly the same perspective, but it’s pretty close. The crop version is slightly zoomed out compared to the full. The full also compresses the scene a bit more, though not by much. As I mentioned above, this might be due to the comparison not being entirely perfect. The real reason I wanted to see this comparison was to make sure I could duplicate with the full the look I crafted for so many years using my crop and 50mm. I wanted to know if I’d be able to put my 85mm on my full and not have too steep of a learning curve during the transition period. Looking at these images should prove that the crop factor is basically true. More usefully, if you like a certain look with a certain lens on a crop, you know roughly the lens you’ll need to have to maintain that look on a full.

While the perspective might be pretty similar, what’s significantly different is the depth of field. Remember, I used the exact same f-stop (f/1.8) in both photos. The crop-sensor photo has a much deeper depth of field than the full-sensor sensor photo. In both photos, look at the figure to the right of Batman (the one with a face that’s split in half, otherwise known as Two-Face). Notice how much more detail Two-Face has in the crop version compared to the full version. With the exact same f-stop and a relatively identical perspective, the full gives a much shallower depth of field than the crop. Take a look again, this time at the figure all the way to the right (the Joker). In the crop version, you can still see the cartoon teeth lines; in the full, the Joker is almost a complete blur. For those who like to shoot wide-open (i.e. at smaller aperture numbers like f/1.8 or f/2.0), you really have to be spot-on with a full frame. The margin for error is razor thin. My recommendation? Stop down a bit and don’t shoot so wide-open if you don’t have to. Give yourself that wiggle room.
In the end, here are the two things to remember about the “crop factor”: 1.Your focal length perspective really is a direct result of the crop multiplier. Whether your crop sensor is a 1.5x or a 1.6x, the correlation really is what you’ve heard all along. A 50mm lens on a crop sensor gives essentially the same perspective as an 85mm lens on a full. 2. A full frame sensor gives you a significantly shallower depth of field than a crop sensor. Adjust your aperture setting accordingly, and be careful shooting wide open.
5. A full frame still doesn’t guarantee amazing photos
If you’re anything like me, you probably have this thought: “I know I take good photos with my crop, but my photos will be amazing with a full. I just know it.” With that thought in mind, I was promptly disappointed by the first hour or so with the full frame. The photos looked just like what I was getting from my crop. It was such a letdown.
After a few deep breaths, I realized that, as always, it was my fault, not the camera’s. You see, I was just taking random photos around the house. I was testing the ISO capabilities, the auto-focusing, and the depth of field. After so many podcasts and articles, I knew the full frame would far outshine the crop, so I wanted to see just how much it could outshine. The problem was that I was taking boring photos. In fact, I was taking ugly photos with no consideration for light or composition or anything, really.
Lesson learned: seeing the world through a full frame doesn’t make the world any better. You still need to be a good photographer to get good photos.
6. Your first photos with a speedlight will blow your mind
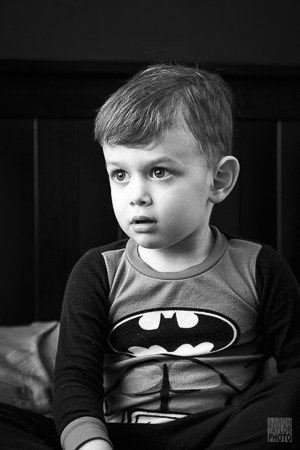
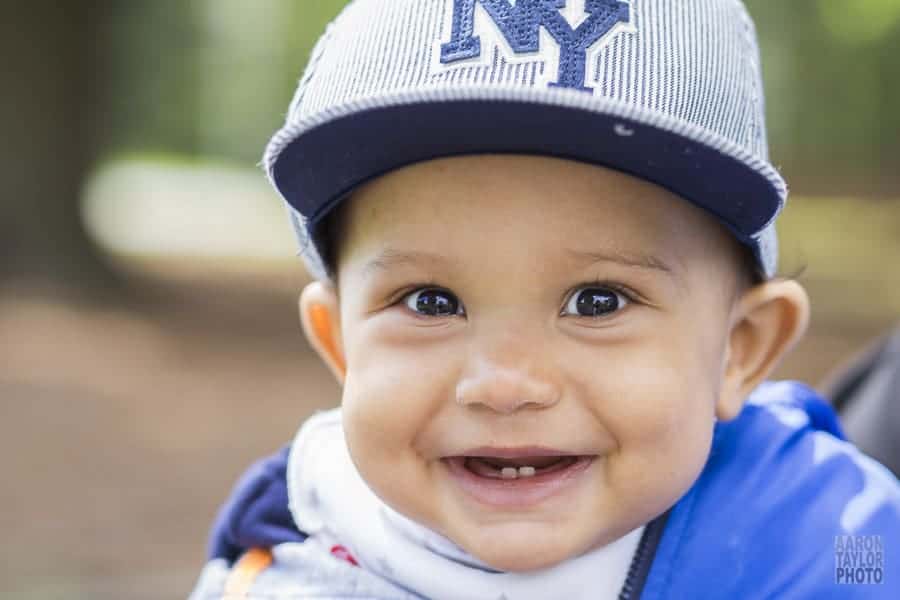
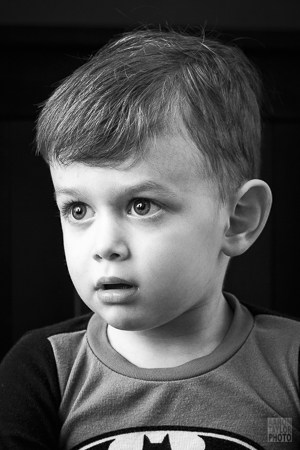
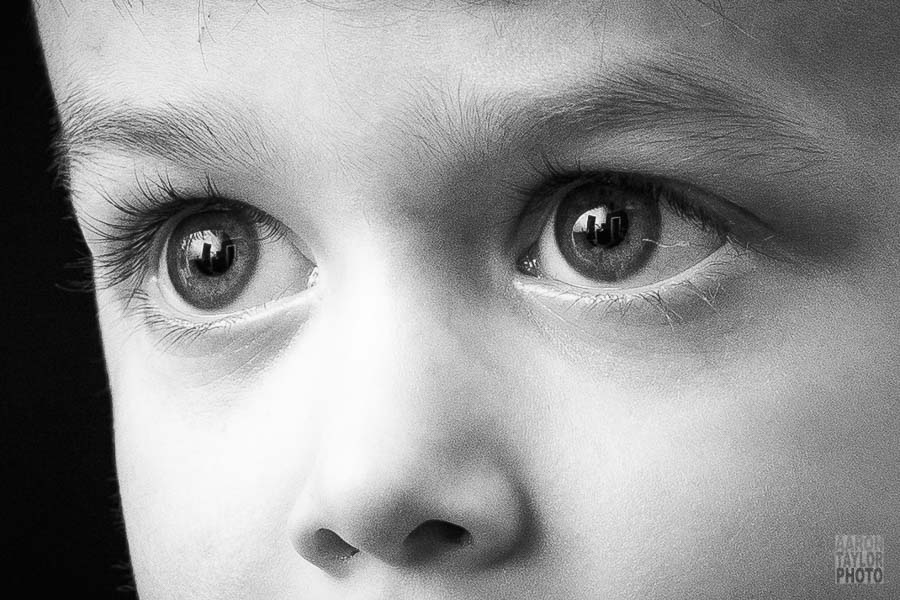
Maybe my initial hour wasn't amazing, but then I got out my speedlight. With a simple bounce flash and solid focusing technique, I was floored when I zoomed in to see that I got every eyelash, every pore, every you name it. BAM! That was some serious detail. My first shot with a speedlight was what really impressed me. To have a clear photo at 3:1 resolution was just plain impressive. If there's ever been a reason to learn how to use a speedlight, a full frame sensor is it. (Look at the three black-and-white images for an example of just how much detail can be capture with the full-frame and a flash.)
As a loyal listener to the Improve Photography podcasts long before I started writing here, I thought that all the talk about flash photography may have been overkill. Then I began to learn with a speedlight on my crop. I am glad I learned. While my crop sensor and flash shots are great, I really see a difference on the full frame. Go learn how to use a flash and be amazed, especially on a new full frame.
7. You’ll want to understand AF microadjust/fine tune
Prior to purchasing the full frame 6D, I had only barely paid attention to this feature. I had committed it to memory enough to know that it existed, but I thought that maybe AF microadjust (fine tune on a Nikon) was for photo nerds or someone looking to blame the camera instead of themselves for a softly-focused photo.
Then I did a little test. My son was sitting still as a statue while watching Sesame Street. I propped my arm on the couch, making sure to hold my camera still, and snapped a few shots of my son at a wide-open aperture. (I was using my Canon 50mm at f/1.8.) I looked at the first shot, and I saw a fuzzy eye, not the tack-sharp eye I had focused on. I tried again, making sure that my technique was spot on. I got another fuzzy eye. I did this a few more times, changing what I focused on, ensuring solid technique–I still got fuzzy photos.
After a few messages on Improve Photography chat groups and some Google sleuthing, I decided to print a do-it-yourself lens calibration sheet. You can buy more expensive (and more exact) instruments with which to calibrate, but I thought I’d give the piece of paper a try. Sure enough, my 50mm was back-focusing, which is to say that it was focusing clearly a little farther behind where I had my auto-focus point locked on. After a quick adjustment in the opposite direction, my problem was solved. My 50mm now focuses exactly where I want it to. (My Canon 85mm f/1.8 doesn’t seem to have a problem, so I’ve told my camera to microadjust separately for each lens. I haven’t yet tested my zoom lens, though I hear a zoom lens comes with its own set of problems adjusting both zoomed out and zoomed in.)
In the end, I now believe that the AF microadjust function is totally useful and worth it. It's easy to do and just might give new life to lens you thought to give up on.
8. The ISO capability is no joke
I mentioned earlier that I wanted to test the always-talked-about ISO capabilities of a full frame, especially compared to what I was used to on an entry-level crop. Just to review: ISO is how sensitive your sensor is to light. The higher the number, the more sensitive it is. That means high numbers help in low light. High ISO numbers also introduce ugly noise (colored specks that detract from the quality of your image) into your images, so you have to be careful how far you push the sensitivity of the sensor.
Invariably, when the podcast hosts talk about gear for weddings or other low light (indoor) sessions, they boast about needing the full frame's ability to crank up the ISO without losing image quality. Just like the “crop effect” validation above, the ISO ability of the full frame 6D is crazy good. With my entry-level crop T3i, I would never go above 800 with a client. The image would just have too much noise.
(A quick note: A professional-level crop sensor, like the Canon 7D Mark II, will have much better ISO performance than my entry-level crop T3i. My goal for this ISO section isn't to compare a professional camera to a consumer camera. That'd be silly. I’m really just interested in seeing how amazing a professional full frame camera performs.)
To test the full frame 6D’s ISO capabilities, I set up a simple scene: two superhero toys sitting on my printer lit by one tungsten bulb in a lamp. Below are a few tests with various ISO settings. I only edited the exposure levels in each to make the comparison easy to see. I did not touch any detail or noise reduction settings. Take a look:
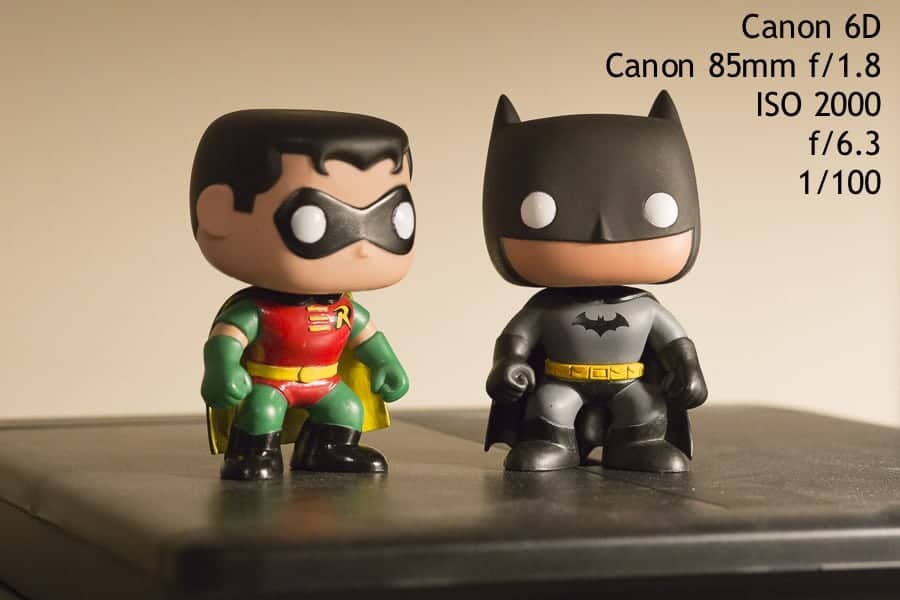


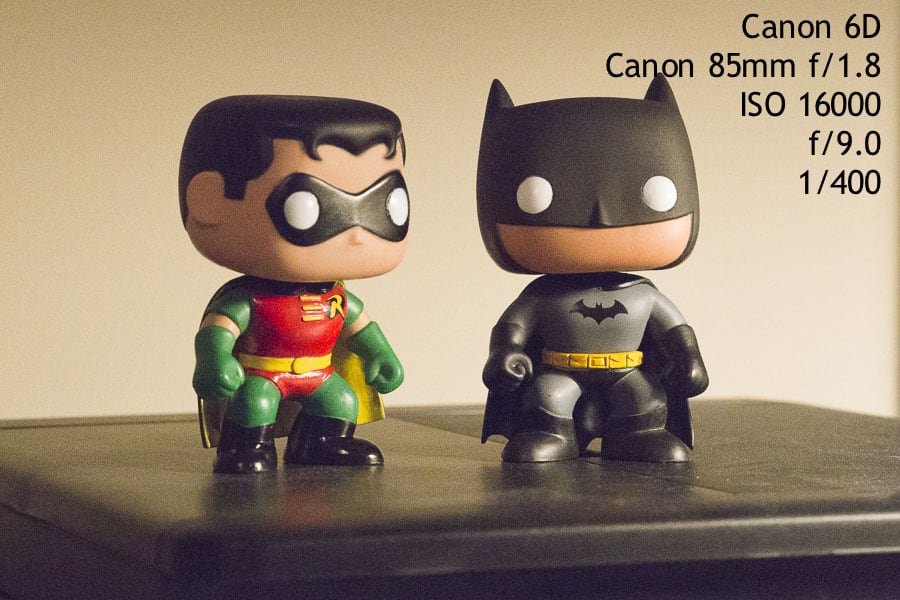
The ISO 2000 image looks clean to me. I’d be more than comfortable giving that image to a client without any noise reduction applied. ISO 2000 is more than a full-stop of light higher sensitivity compared to my entry-level crop T3i. (Remember, a full-stop of light means that the sensor is now sensitive to double the amount of light than before. In other words, ISO 1600 lets in double the light as ISO 800.) The ISO 4000 image begins to show some fairly noticeable noise–just look at Batman’s head or the wall behind. Without much scrutiny, you can see little colored noise specks. But it’s still not terrible, and nothing that a little noise reduction couldn’t solve. I’ll take the significant increase in light sensitivity that I get at ISO 4000 even if I do have to apply some noise reduction. The ISO 8000 shows noise, and the ISO 16000 shows a ton of noise. Also worth noting is how difficult it will be to adjust the dynamic range of the highest ISO images, especially in the shadow levels. The lower ISO images will simply have better, cleaner dynamic range (the range from blacks to shadows to highlights to whites). To play it safe, this test leads me to believe that somewhere between ISO 4000 and ISO 8000 is where I’d start to get worried. Think about it, though: ISO 8000 is over three stops of light more sensitive than what I was comfortable with on my crop. That is a significant upgrade, especially for anyone who often needs to shoot in low-light situations.
What the ISO ability gives you is so much flexibility. You can shoot comfortably in so many more situations and scenes. It also gives me peace of mind. I don't have to worry nearly as much about a noisy photo as I used to.
There you have it. Eight things I learned after ten days with a full frame camera after years with an entry-level crop sensor camera. I’m impressed by how much more user-friendly the camera is to use. I’m equally impressed by the amount of fine detail the sensor can capture. If you have more to add to the crop-to-full conversation, comment below–and if you have questions about my on-going experience with the camera, post those, too. Happy photographing!
For my thoughts on making this switch after six months of experience with the Canon 6D, click here.
I made the leap from Canon to Sony just this year. I had a 7D MARK II and a 6D and now I have a a6300 and the 6D. Since I bought the Sony I’ve barely touched my 6D even though it’s full frame and my Sony in a crop. The Sony bodies are just amazing. I had invested over the years a ton of money into Canon glass and didn’t want to sell and buy new lenses, I wasn’t sure about the metabones mark IV adapter at first but after talking with two of my friends who owned one I purchased it and just in case you were wondering the metabones mark IV adapter works like a charm for using Canon glass on my Sony body. Now I’ve got the best of both worlds going on.
Cheers.
Good article. The only thing I would disagree with is getting the lenses first, unless you are shooting zooms only maybe, as they cover a similar range, at least the mid/long zooms… (and match it with a crop ultra wide)
If you are a primarily prime shooter though, it doesn’t make sense to invest in the same focal lengths. For example, I shot 24/50 when I shot on aps-c body, knowing full well that I was emulating the 35/85 lengths I liked (I had previously shot film).
So when the time came to change to full frame, I just sold all my equipment at once on ebay.
If you were used to that 50/85 as a portrait shooter on crop (and it seems like you were having some trouble with framing), you really should have just kept the 85, sold the 50, and bought the 135 L on upgrade. Just my opinion though.
On the other hand, if you really want to go full frame and on a budget, I’d definitely say spend more on better lenses and get a cheaper/older body.
Awesome article, I shoot the 80D and often wonder if I should have gone full frame. Really helped me think about the practicality and learning curve of making the move. I wanted to point out (let me fist say I am NOT an expert here) but on point 4 I’m lead to believe that both compression and DOF are a function of the lens only, the crop just gives you a zoomed in version of the same pic. So at the same focus distance the 85mm will have the same DOF (and compression) on either body, the picture itself though will be more zoomed in. So I think (not 100% sure) the razor thin DOF is a function of that awesome 85mm that you have more so than the full-frame sensor. Also thanks for the reminder on the micro adjust. I’m going to look at that tonight!
Aaron. Have only just read your article (but have subscribed now!)
I’m about to make the jump myself…5d Mk iv…and was excited to read your experience, and blown away by the quality difference., especially with the speedlite. I have always shied away from using flash…I will be dusting it off before my new toy arrives so at least I have some idea how to use it.
Great article, very very helpful!
I’m using a beginner-level camera, the Nikon D3300, and am thinking on switching to a higher level camera because of the detail capabilities you mentioned. Capturing eyelashes, freckles, and all that is very important for good portrait photography. Also the ISO capabilities are very interesting. Do you know of any full-frame Nikon camera you’d recommend for portraiture as of 2017?
Are you sure the difference in depth of field between the crop and full-frame sensor cameras is not due to the lenses? I understand that you used the same settings for both cameras, but maybe your 50mm and 85mm lenses are causing this difference? Great article and examples! I have been considering switching from my 50D to a full-frame and this was very helpful!
Thanks for a well written article. This has helped me with the decision to get a 6D. I appreciate your thoughtful approach. Your photography is quite wonderful and so is your writing!
I tend to disagree with Jquizzie as l am a paid photographer with clients more than happy with images taken on my Nikon D7200 as this DX produces great images, sharp and comparable to other available Full Frame cameras. This being said l am a big believer in buying good glass over upgrades continuously to bodies. I shoot with a Nikon 70-200 2.8, 50mm 1.4 and occasionally a 18-140mm. I have considered a change to FF like alot of people but the specs on my D7200 are very similar if not better when doing a comparison to (some) available FF cameras so not worth the investment in my eyes. It’s not the camera body that makes a good photographer, learn your craft and learn your style.