
This last week while teaching a workshop in Chicago, I got a bunch of questions about the light stick that I use for shooting with speedlights, rather than using light stands. In this post I want to show you exactly how to make one of your own, for cheap!
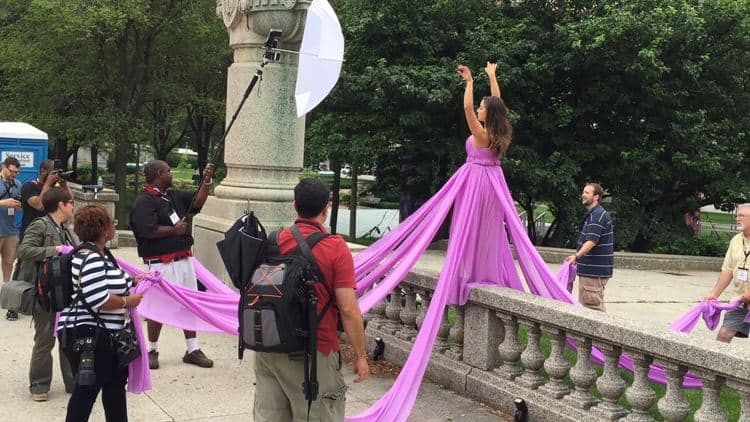
I hate light stands. They are a pain to work with, so I usually just have an assistant hold the flash. “Assistant” usually means my wife, a teenage kid I pay $10 to hold the flash for an hour, or a friend.
Shooting this way makes flash photography so much easier. Instead of hauling around light stands and sandbags and constantly setting down the camera to move the flash, it's just a quick “Hey you, lift the flash higher.” It has been at least two years since I have done a photo shoot without using a light stick for my main flash.
Shopping List
- A cheap monopod. This one is PERFECT for a light stick because it's very light weight at .64 pounds (.29 kilos), folds down very small to fit in a camera bag (15 inches or 38cm), and extends to 57 inches (1.4 meters). Plus, it's super cheap.
- This specific umbrella bracket. There are tons of umbrella brackets, but this one has a cold shoe AND the exact right stud size we'll need to connect to the monopod. It's the only good umbrella bracket I've found that includes the stud adapter as well. Get this specific one.
- A speedlight flash (This is my favorite speedlight flash in the world and it only costs $70)
- A flash modifier (umbrella, softbox, etc)
- OPTIONAL: A triple flash bracket if you want to put more than one flash on the end. I often put three YN-560 IV flashes (my favorite inexpensive speedlight) on the monopod so that I can get a fast recycle time or overpower the sun any time of the day.

Next time you're on a shoot with a lightweight light stick instead of a clunky light stand and sand bag, you can say something like “Boy, that Jim Harmer sure saved me a lot of work today. He's a genius.” Or not. You decide. Either way–enjoy your photography light stick for under $50.