
I recently had a client order a very large 7’ (2.1 meter) print of a night photo I took in Iceland. The project really tested my post-processing skills because making a very large print of a high ISO photo is difficult to do without noise ruining the shot.
I want to share with you a few techniques I’ve learned that help me to dramatically reduce the noise in my night photos—including one slider (and no, it’s not the noise reduction slider) that makes all the difference.
Stop Using Noise Reduction!
Noise reduction has improved significantly in Lightroom, Photoshop, and third party plugins over the last two or three years, but in my opinion, it’s still not good enough to use much without destroying the quality of a photo.
I rarely use more than the slightest amount of noise reduction. There’s a better way, which I’ll show below! But before we get to that, let me show you why noise reduction should, in my opinion, be used with great care or avoided entirely.
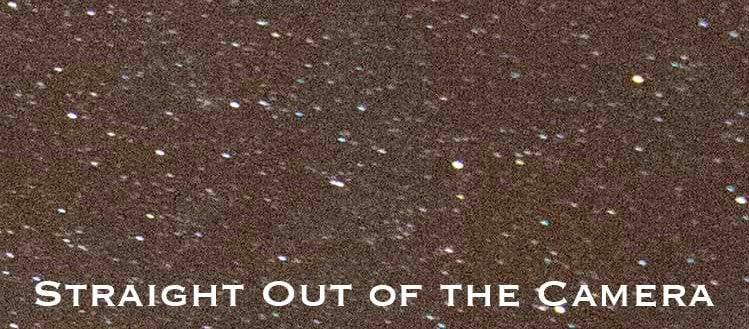
This image straight out of the camera looks like sandpaper (shot on ISO 6400 on a D800). It’s completely unusable.
Next, let’s look at the same image, straight out of the camera and just one adjustment—noise reduction.

The noise reduced image, however, is probably even worse. It takes noise and trades it for smudginess (it’s a word—trust me). Obviously this is too much noise reduction, but I have to apply this much before the noise is removed!
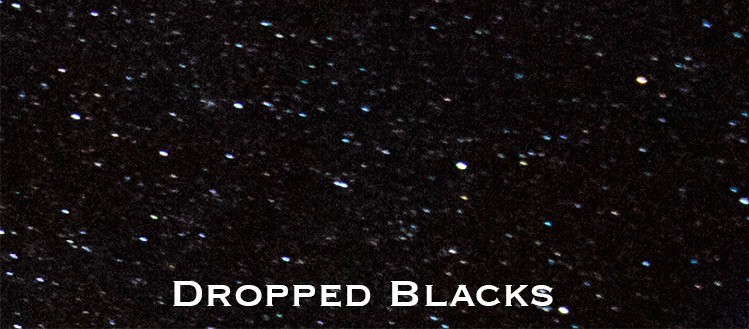
There is a better way, and it’s the blacks slider in Lightroom (or camera raw). Dropping the blacks kills the noise faster than noise reduction, and doesn’t hurt the sharpness of the image.
This photo has blacks set to -40, a slight white balance correction, and just the tiniest hint of noise reduction before it starts to impact sharpness.
Not to mention, dropping the blacks also provides much better contrast and makes the night sky look more… nightish. It looks more like what we really see when we look into the sky—darkness sprinkled with stars.
Sometimes, however, dropping the blacks can make the foreground too dark. If that happens, simply use an adjustment brush to apply the dropped blacks only to the sky, or only to whatever areas of the photo it looks good in.
Stop Using Long Exposure Noise Reduction!
Long exposure noise reduction, in theory, is a magnificent technology. When it is activated in camera, the camera takes a normal exposure and then goes blank as it takes a second, invisible exposure that you never see.
Since the shutter never opens for the second exposure, it should be entirely black. But since the sensor is still producing heat, it will produce noise in the dark image. This noise pattern is then subtracted from the noise in the normal image.
For years I used long exposure noise reduction in my night photography on the insistince of photographers who told me it would cut down the noise in the photo.
Then, I tested it and found absolutely zero difference. So I stopped using it.
Mark Gee confirmed my suspicions when he was on the podcast, and explained that long exposure noise reduction does absolutely nothing unless you use the software from your camera manufacturer to process the image (View NX from Nikon, for example).
Shooting a photo with long exposure noise reduction and then processing the photo in Lightroom or Photoshop will yield no benefit.
Long exposure noise reduction is a valid method and can be helpful, but not unless you’re ready to adjust your workflow to incorporate a new piece of software. No thanks.
Increase Your ISO
Yes, it’s true that a higher ISO does indeed produce more noise in a photo. However, as I have shot with hundreds of photographers at our completely free photography workshops all over the world over the last year, I’ve found that too low of an ISO—not too high—is often the noise culprit.
If you have ever been blinded by the light of your cell phone after waking up in the morning, you already understand why this is.
When shooting at night, your eyes naturally adjust to the darkness and allow you to see. The LCD screen on the back of your camera, however, is made up of light bulbs. It’s bright! This leads photographers to think the image they are capturing is far brighter than the file actually is.
Recently at a workshop I walked down the line of 20 cameras as we were doing night photography. I asked each of the photographers to check their histograms. 100% of them were underexposed.
It’s easy to fall into his underexposure trap when shooting at night. I only no about it because I’ve made the mistake dozens of times myself.
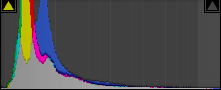
Part of the problem in properly exposing a photo at night is understanding what a good exposure looks like on the histogram.
The histogram above is perfectly exposed, but it would be easy to think the photo is too dark.
Night photos often have large areas of very dark tones. So it’s normal to see data piled up toward the left side of the histogram. As long as the data does not touch the left side of the scale, it still has detail.
Also, look at the tiny amount of data extending almost all the way to the right of the graph. This is a small amount of data because only a small part of the photo is bright, but if I were to increase the exposure at all, the whites would clip.
As proof, look at the image below, which is the photo that produced the histogram. You’ll see that it’s properly exposed.

The fact is that you’ll always have a photo with less noise when you properly expose the photo, rather than underexposing the image in-camera and then trying to brighten it in Photoshop.
Increasing exposure in post-processing produces a large amount of noise. Expose properly in camera to avoid it, and that often means a higher ISO.
Very nice article and a wonderful little trick and I agree it works far better than any noise reduction in camera or in post processing. Beats the hell out of the smudgy (as you so rightly put it) appearance created trying to tackle this problem with Photoshop’s NR.
Why the reflected image is not equally as sharp? (I guess why, but still… why?)
I always shift/double click the blacks (in Basic) as the last of my LR post processing. My photos look sharper and more ‘finished’ that way. Never thought that would make a difference in NR but looking at ‘blacks’ in this way makes sense, even in daytime shots. Thanks!
My Nikon d750 is very noisy at the best of times ?
Long exposure noise reduction works on raw files. High ISO noise reduction doesn’t. So it does has effect. Try two 3 minute shots with and without Long Exposure Reduction, open them in LR, you will find huge difference! It only has obvious effect for exposure longer than 60 seconds, so for most night sky shots, your exposure time is less than 30 seconds, you don’t see effect, But if you take a separate exposure for the ground, say longer than 2 minuets, you’d better use LENR!
There’s some misinformation in this article on Long Exposure Noise Reduction.
At least on current Nikon models and recent versions of Photoshop / Adobe Camera RAW, LENR is embedded into the photos. I’ve tested this extensively.
When a photo is taken under warm conditions, where hot pixels would show up, turning on LENR will completely remove them. This can be seen in Adobe Camera RAW when two images (with and without LENR) are examined side-by-side.
LENR should be turned on if Hot Pixels are a concern. If you are photographing the Milky Way on a warm, summer night and using Live View frequently, the sensor will heat up rapidly. As the sensor temperature increases, more hot pixels will show up in the photo. LENR will automatically find and remove all of the hot pixels.
Great tips, many thanks
Night photography is my “1st love” So I can’t wait to put some of these tips into practice! Thank you so much for the information, Jim!
Orion55. Thanks for the tips on night/star photography. As a beginner I got lucky & produced some decent star photos. Pure luck as I could reproduce. Thanks to you I know what I did right & wrong . Can’t wait to practice
Pure luck as I could not reproduce these photos weeks later