

Rembrandt lighting is a well-known lighting setup that is used for portrait photography. To achieve this ‘look’ one half of the models face will be in full illumination whilst the other half, usually the side furthest away from the camera is in partial shadow, with a very distinct illuminated triangle under the eye on the shadowed side. Rembrandt lighting was “coined” after the master himself, Rembrandt, the famous Dutch painter in the 17 century, who used this lighting technique to such great effect in his works of art. The setup at its most basic uses just the one light source.
To be a true Rembrandt lighting setup, the triangle of illuminated light should be no wider than the eye, and no longer than the nose. But photographers often fudge on this rule and accept anything with that triangle of light on the cheek as Rembrandt Lighting. Another key feature of Rembrandt lighting is the triangular catch lights that can be found in the eyes of the model. The image of the model above shows this to great effect. Without these key features, the setup is not technically Rembrandt lighting but in fact what s called ‘short’ or ‘long’ lighting. Rembrandt lighting is often muddled with these other lighting techniques due to their similarities in setup and style. Rembrandt lighting is one of 4 common lighting setups that can be achieved with relative ease and only the modicum of equipment. Read this detailed article, if you want to know what the 4 easy to remember lighting setups are.
Rembrandt Lighting – One Light Setup:
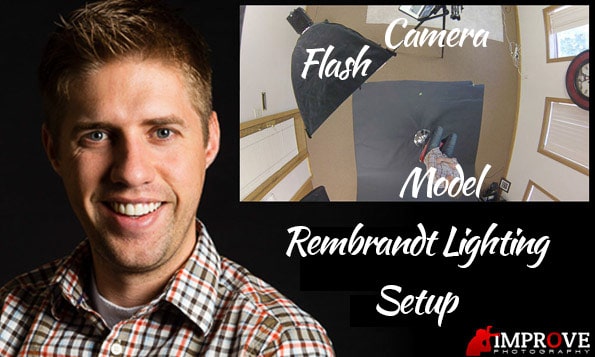
Rembrandt lighting can be achieved with one key light that is placed approximately 5 feet from the model at an angle of 45 degrees to the side of the camera and roughly 2 feet above their eye level angled downwards. Position the models body so that it is facing this key light, somewhere between the camera and the light. Take a couple of test shots and adjust the models facing position until you are satisfied with how the light and shadows fall onto the models face. If you are looking for a much harsher dramatic look with lots of contrast, then using the one light source will be a good starting point. You might want to check this article for more a detailed explanation on hard and soft light.
As this one light source will need to be off camera, an on camera flash won’t work in this setup, unless of course it’s being used to trigger the off camera flash in slave mode. You’ll need to adjust the power of your built in flash to make sure it doesn’t interfere with the key light. This flash power adjustment is normally called ‘flash compensation’ or similar and you’ll find most modern cameras will have this functionality. If you’re not sure your camera has this function, check online or go dust off that manual up in the loft. It’s a good idea to fire a couple of test shots with each adjustment until you see the flash no longer illuminates the model in anyway.
Rembrandt Lighting – One Light, One Reflector Setup:
Although Rembrandt lighting is perfectly achievable with one key light, as a minimum one light and one reflector or fill light is recommended for a more natural, pleasing look. Place the key light as you would for a single light setup. The reflector or fill light should be placed on the opposite side of the key light at a 45 degree angle to the model and approx. 3-4 feet distance from the model at eye level. Ensure that the fill light is illuminating across the models face. If you’re using a fill light, the power should be approx. half that of the key light.
If you don’t have a second light, using a reflector will help to soften the shadows on the ‘shadowed side’ of the models face, giving a more natural look. As we all know, anyone who’s serious about portrait photography has a reflector, right? No? A budget, well made 5 in 1 reflector can be purchased for $15-$20. Another option is to make your own reflector out of card. Any hobby store will have a plethora of shapes and colours. There is a lot to be said for DIY photo gear. It’s usually cheaper and it’s rather satisfying to make your own stuff. However, in this case in my opinion the 5 in 1 store bought variety wins hands down for convenience and storage. It never gets old twisting that 43″ disc into 15″, but then again I'm easily pleased! It will be one of the best investments you make and will greatly improve your portrait as well as your flash photography.
So far I've only listed the first two lighting setups. The fun of any endeavour is challenging your own boundaries through experimentation. Try experimenting with the distances of your subject to the light. If you are using a two light setup, adjust the power of both the fill and key light in relation to each other. Try experimenting with the background lighting. To provide a greater contrast between your model and the background point your second light close to and at an angle to the background. You’ll achieve a look similar to the below.
Adjusting these contrasts of light and dark on a three dimensional subject in this way is a technique that has been successfully used for over 600 years. Some of the greatest artists to ever walk the earth used what is known as chiaroscuro. A technique that manipulated the contrasts between light and dark (hence it’s Italian name) to separate the subject from the background and add depth and mood to a portrait. The overall look can be one of subtly or stark contrast.
The wonderful thing about Rembrandt lighting is that you don’t have to be a Rembrandt to achieve this great dramatic look. If done correctly, no one looks bad in this light! One thing to note is as everybody’s face is unique, what worked for one person may not work for another. That’s where the fun and experimentation's comes into its own.
This setup on the whole is very simple and if you’re a keen photographer you’ll most likely have all if not most of the gear you need already. With a little practice, trial and error, you can achieve professional looking portraits without the need for the professionally priced equipment! It will help to raise your game in portrait taking to a new level. If you decide to try your hand at this truly amazing and simple setup, don't forget the most important thing….to have FUN!
Some Useful Tips
If you have a dedicated studio setup or room that you use for your portraits, a good tip, once you have achieved the desired setup that works for you, is to place markers where your key elements are positioned. i.e light(s), camera, model. This could be as simple as using some masking tape or pieces of string marking distances from a known point. This will save you setup time the next time you want to use this great lighting technique. If you don’t have a willing model who’s prepared to sit for you as you practice, then a cheap Styrofoam manikin head could be your answer. You can pick them up from fleabay for less than $10. The added bonus of course is they won’t feel slighted if you capture them in a less than flattering light!
I also recommend using a wireless off camera flash triggering setup. When considering buying camera gear I always try to put them roughly into two categories, either gear that is niche specific or gear that is essential. I consider a wireless flash trigger setup, which is explained here in less than 10 minutes, to be of the later kind. You will reap the rewards in all styles of your photography with this sound investment.
Flash Photography Gear Needed for This Setup
- Camera
- Off camera light source. E.g Yongnuo YN-560 III
- Light Stand (1 or 2)
- 32” – 42” 5 in 1 Reflector or similar.
You can get all of this gear (minus the camera) for less than $150 if you go with Jim's recommended flash photography gear.
Nice detailed write-up! Every portrait photographer should study the classic portrait lighting. What is your favorite? Rembrant, butterfly, split, broad or loop? I must admit I am a bit partial to butterfly.
I believe we can use a reflector on the another side 45 degree, so part of light to be set up to another half of the face.
FOLLOW @lol_._random ON INSTAGRAM!!!
You say five feet from model what if you don’t have that room my studio is very small 12.5ft x 8.5ft.
So is it 45 degrees???
ASAAASASSSSSSSSSSSSSSSSSSSSSSSSSSSAAAAAAAAAAAAAAA
Interesting…… I learnt something
Get a Spacious studios