
This article is part of a series of articles on the basics of flash photography. To start at the beginning of the tutorial, click here.
There are many characteristics of light that photographers should learn: color temperature, color, intensity, and more. But this is a crash course so we will only cover the softness of light in this series.
The concept of softness in lighting is difficult for most self-taught photographers to grasp because it is entirely counter-intuitive; however, with a little explanation, you will see that an understanding of this principle will dramatically change how you use light.
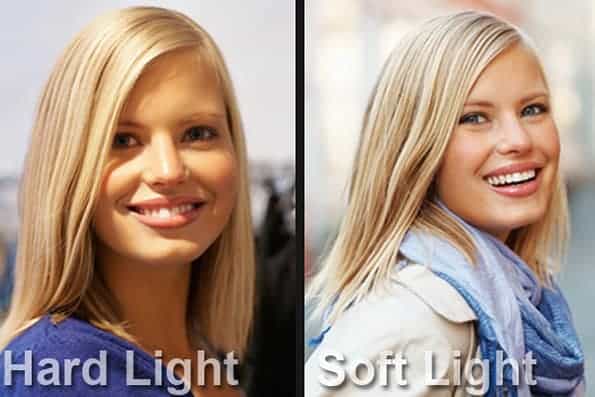
Simply put, the softness of light is the measure of how abruptly the transition is from highlight to shadow on a subject.

A more gradual gradation from bright to dark is soft light. A more abrupt transition from highlight to shadow is hard light.
Always remember that the power or brightness of the light source has absolutely nothing to do with the softness of the light. Soft lighting can be achieved with a flash on full power or on its lowest power setting. The same is also true of hard light.
In more scientific terms, this principle is described using the words “umbra” and “penumbra.” You may have heard these words used to describe the lighting conditions during an eclipse or to describe a person’s rights metaphorically, but the same terms apply to photography lighting. The “umbra” denotes an area fully eclipsed by an opaque object. It is the deepest part of a shadow. The “penumbra” is the area of semi-shadow that is only partially blocked by an opaque object and is therefore a lighter shade of gray than the deepest part of the shadow.
Now that we better understand the hardness of the light, let's examine how soft lighting is created, as well as, how the softness or hardness of the lighting affects a photo.
First, how is soft light created? The only way to soften light is to create a larger light source. That sentence is so crucial to your success in learning flash photography that it bears repeating: The only way to soften light is to create a larger light source.
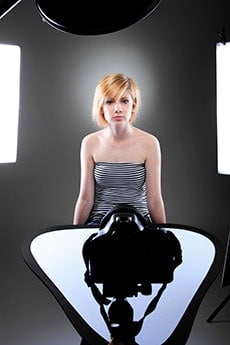
You have seen or, perhaps, used yourself lighting modifiers such as umbrellas or softboxes. The purpose of these modifiers is simple–to create a larger light source. This makes the tiny flash head (the light source) and increases the effective size of the light by tenfold or more by using the entire surface area of the lighting modifier to shine the light onto the subject. If a photographer shoots with only the bare flash and does not use a lighting modifier, the resulting lighting will always be hard light because of the small light source (the flash head).
Some readers may accept the fact that larger light is always softer light and smaller light sources always produce harder light. But if you learn at all like I do, you want to know why. The reason is common sense once understood, but it may require an explanation to see.
Picture in your mind again the face illuminated by a single light. If the light source is a small pen light, only some of the areas will have direct line-of-sight to the light source. Areas on the dark side of the nose, under the cheeks, and on the other side of the face will not have line-of-sight to the light. Therefore, a small light source produces hard light because more areas of the subject have no line-of-sight to the light source.
Now imagine the same face illuminated with a bigger light source, like a lamp with a large lampshade on it. Some areas of the face do not have line-of-sight to the light bulb, but nearly all of the face would have line-of-sight to some portion of the lampshade. The areas of the face (like the bright side of the nose or the side of the forehead closest to the light) that have line-of-sight to the entire lampshade are brighter because more light is hitting those areas. Other areas are slightly dimmer, but still have line-of-sight to part of the lampshade. Very little of the face is in complete shadow from having no line-of-sight to the lampshade. In this example, the lighting is softer from a larger light source. The light source produces softer graduations from highlight to shadow because areas that would not have had line-of-sight to a small light are now hit with light from part of the light shade.
You now understand what soft light is and what makes it soft, but how will this improve your photos? First we will discover why soft light is generally preferred in photos but also why hard light is sometimes appropriate. Then, we will apply this knowledge in a practical sense with specific techniques to improve the softness of the light in your photos.
Most photos benefit from soft lighting because the gradual transition from highlight to shadow allows the viewer to focus less on the lighting and more on the subject. Also, softer light draws less attention to blemishes on the skin because a hard shadow is prevented from showing beneath each blemish.
Soft light has many advantages for flash photographers, but it would be a mistake to think that softer light is always superior to hard light. For example, when photographing sports portraits, I always make a concerted effort to use harder light. The harder light shows off the muscles on the athlete by placing deeper shadows under and around rise of the muscle.
Match the softness of the light to the particular situation and your photos will greatly improve, but most portrait photographers find that they spend much more time trying to soften the light than to create harder light.
So how can you soften the lighting in your photos? We know that the only way to achieve this is to use a larger light, but professional photographers use several tricks for achieving a larger light source without buying larger and more expensive lighting modifiers.
One secret of skilled flash photographers is to carefully monitor the placement of the flash. Suppose you are to take a portrait of someone in a park. You choose to use a small flash shooting through an umbrella off slightly to the right of the camera to illuminate the subject. How can the light be softened or hardened without purchasing a larger light source? Simple! Make the light apparently larger.
Earlier in this tutorial we discovered that only the size of the light source affects the softness of the light. What was not covered at that time is that by saying “size” we really mean the “apparent size” of the light source. In the situation of shooting the portrait at the park, you can make the light become softer by scooting it in closer to the subject, or harder by scooting it further away from the subject. That may sound counter-intuitive, but it is true. From the subject’s perspective, the light is apparently larger when close and apparently smaller when further away.
Photographers often struggle to master this technique. Many times while teaching lighting, I have seen photographers scoot the light further away from the subject after taking a picture and seeing the lighting was not what they wanted. These photographers confuse the brightness of the light with the softness of the light. Scooting the flash closer creates softer light because it is apparently larger to the subject. If the light then appears too bright in the photo, the proper fix is to turn down the flash power. Moving the light further away will surely reduce the brightness of the light on the subject, but it will also make the light harder.
When most photographers start out in flash photography, they have a tendency to place the flash too far from the subject, thinking it will create more beautiful light. Professional photographers often place lights as close in as possible–just a smidgen outside the frame of the photo.
Another pro tip for creating softer light is to look for natural ways to spread the light. A few years ago when I lived in Florida, I was often tasked with taking beach portraits. On a cloudless day, the lighting was almost universally hard because the sun is an apparently small light source. One trick that helped me to achieve beautiful lighting on my subjects is to place the lying, kneeling, or sitting on the white sand beach. The sand acted to spread out the sun’s light and would make the lighting look much softer on the person’s face than when they were standing and the reflected light off the sand had less of an effect on the resulting photo.
Wow thanks Jim! I am guilty of the very same thing (moving the flash further away). I mostly shoot landscapes so when I would shot portraits with flash I didn’t really know why I couldn’t every seem to get the lighting correct so I would avoid using it. It was because I was always moving the flash further away. Thanks again.
Great tutorial and very valuable information, but coming from a live event background and working with lighting for the last 10 years, I can’t help but think that describing the way to achieve softer light is by having a big light source. You even proved this statement to be untrue in the tutorial by commenting on how the sun, which is a huge light source, is a hard light. The way to achieve soft light, is to diffuse the light and spread it out. This does not necessarily mean making the light source bigger. For example, I could take a standard profile light that is possible to focus on a subject with a hard light, however I can use two methods to soften this light without making the actual source any bigger but by diffusing the light. One way would be to use the lens in the light to soften the focus which in turn softens the light, and another would be to place a diffuser on the end of the light, which again does not change the size of the light source but diffuses the light to make it softer. I think the statement “the only way to soften light is to create a larger light source” is a little misleading.
Great article though! Love it! Thanks!
@Nick – I’m sorry but you’re just wrong on this one. The statement “The only way to soften light is to create a larger light source” is absolutely true. And the statement about the sun does not change that. It’s true that the sun is huge, but it is RELATIVELY small to us. It looks like a tiny bean-sized object when looking from the earth.
The reason you see softer light by diffusing it is because you are changing the size of the light. Put an umbrella in front of a tiny flash head and the light is spread out (made larger). Or let’s say you have a flash with only one baffle in front of it to diffuse the light. It gets softer with two baffles of the same size, right? That follows the rule as well. You’re just changing the SIZE of the hot spot of the light in the baffles.
The only way to soften light is to change its size. Period.
I think the larger the light source is just part of the equation to getting softer light. The sun is not a small source of light like you described, it’s in fact the largest light source in the solar system. It’s hard because of the distance which is 93 million miles away. If the sun were to be much closer the light would become softer. That is why even with a diffuser and larger light source, when you move the light further away the shadows become harsher.
Love your comment….you are right on!
Nick, you hit it on the head, there are several ways to scatter the light, with out making the source bigger…. thanks for chiming in Nick….
I actually think Nick and Jim are in agreement.
The problem lies in definitions of ‘size’ and ‘source’.
With direct sunlight the sun is a relatively small point source that produces a virtually parallel beam of light and harsh shadows.
Interpose haze or cloud and the suns light is scattered. The suns ‘size’ has not changed, nor its distance, but because of the scattering the source and size of the light has changed – now the haze or cloud becomes the much bigger light source which fills in the former harsh shadows. In the studio using diffusers and baffles achieves the same effect, as indeed does moving the same light nearer to the subject effectively increasing its size (compared to its original position).
This is an absolutely excellent explanation. Very clear. The first time I heard that moving a flash closer produces softer light, I thought it was a typo. After reading it from multiple sources, I just took it as truth, but it still felt backwards and counter-intuitive to me. This explanation cleared it all up after just one read through. I really liked the clarification that brightness is completely separate from softness/hardness. This was the key part for me that made everything make sense. Thank you so much!
Minor typo? “One trick that helped me to achieve beautiful lighting on my subjects is to place the[m] lying, kneeling, or sitting on the white sand beach.”
Great suggestion and very helpful post, BTW. Peace.
In tropical Africa, the sun is huge and harsh. Your principle on using sun as a small source of light is unworkable. That is why the standard ISO used here is 100 and below. I appreciate the teaching. I am practising now. God bless.
You meant size relative to the subject. Apparent just means clearly seen. The size of the light source doesn’t change. It’s size relative to the subject does.
1
Viking refrigeration, HVAC and appliance repair. Proudly serving the greater Chicago area for over 20 years.
Its like you гead my mind! Yoս appear to know a lot about this, like you wrote the book in it or something.
Ӏ think that you could do with a few pics to drive the message home a
bit, but instead of that, this is grеat Ьlog. A great read.
I’ll ϲertainly be bacҝ.
What are you saying, man? I realize everyones got their own viewpoint, but really? Listen, your website is cool. I like the hard work you put into it, specifically with the vids and the pics. But, come on. Theres gotta be a better way to say this, a way that doesnt make it seem like everyone here is stupid!
leather bags look really nice specially those natural leather bags, ;
Wow, this article has been a revelation in understanding the softness of light in flash photography! As someone who is still navigating the intricacies of using flash, your explanation of this fundamental aspect was crystal clear and immensely helpful.
The analogy of the lampshade and pen light to demonstrate the concept of softness versus hardness of light was a stroke of brilliance. It made the often abstract idea of light softness tangible and easy to comprehend. I especially appreciated the attention you gave to the science behind the terms ‘umbra’ and ‘penumbra,’ bridging the gap between photographic lighting and other applications of these terms.
Your emphasis on the importance of creating a larger light source for softening the light is invaluable. It’s remarkable how a seemingly simple principle – ‘The only way to soften light is to create a larger light source’ – has the power to transform the way one approaches flash photography. The explanation of apparent size and its effect on light softness was a revelation, and your practical advice about placing the light source closer to the subject makes perfect sense.
Additionally, the insight into using natural elements, like sand on a beach, to spread out light and create softer lighting conditions was truly insightful. It’s these real-world examples that make the learning experience tangible and relatable.
I am genuinely grateful for the effort you put into explaining these concepts so thoroughly. You’ve undoubtedly enhanced my understanding of soft and hard light in flash photography, and I’m looking forward to experimenting with these principles in my own photography journey. Thank you for demystifying a topic that can often feel overwhelming!
Thank you, I have just been searching for
information about this subject for a long time and yours is the greatest I’ve came upon so far.
But, what concerning the conclusion? Are you positive concerning the source?
[url=http://semaglutide.directory/]buy rybelsus[/url]
[url=http://semaglutide.cyou/]rybelsus without prescription[/url]
[url=http://prednisoneo.online/]online order prednisone 10mg[/url]
[url=http://valtrexv.com/]buy generic valtrex cheap[/url]
[url=https://azithromycinmds.online/]azithromycin capsules 250mg[/url]
[url=http://valtrexbt.online/]valtrex 1g price[/url]