
Today's post is the result of a question from Eric Thant, who asked “How do I shoot the bulb mode?”
What Is Bulb Mode on a Camera?
Bulb mode simply allows the photographer to take a picture for as long as the shutter is depressed (that means pushed down, not sad…). You can use bulb mode by choosing manual mode or shutter priority, then start scrolling your selector wheel all the way to the end of the shutter speeds. After 25″ (25 seconds), 30″, it will show “bulb” or simply the letter “b” on some cameras. Now you're in bulb mode. This means the camera will keep taking a picture until your finger comes off the shutter button.
Bulb mode is mostly used for long exposures at night. The main advantage is that it allows the photographer to achieve shutter speeds longer than the 30 seconds (displayed 30″ on the camera) that is allowed on most DSLRs.
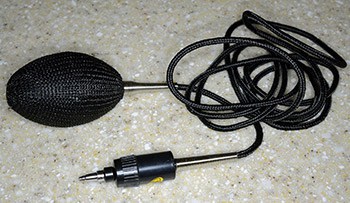
No one in their right mind would stand next to the camera with their finger pressing down the shutter button for an ultra long exposure. Bulb mode is usually used in conjunction with a cable release. You can pick up a cable release for about $10 for most DSLRs on Amazon. It is simply a wired remote control that allows the photographer to lock the shutter button to take LONG exposures without actually standing there and holding the button down.
Why Is It Called “Bulb”?
On the old school cameras, there was a pneumatic valve bulb that was used as a cable release for the camera. It looked somewhat similar to the little pump on a blood pressure cuff.
It worked by sending a blast of air from the bulb. As long as the bulb was pressed, the shutter would stay open. When the bulb was released, the shutter would close.
Nowadays, cable releases work differently. It would be a real pain to have to stand out in the cold all night holding down a bulb for the shutter to stay open, so modern cable releases have a “lock” function that allows the photographer to press the button that starts the bulb exposure and then lock it for as long as you want. When you're ready to stop the exposure, you simply slide off the lock and the shutter ends.
4 Situations Where Bulb Mode Rocks!
Bulb Mode Idea #1: Taking pictures of lightning. Bulb is great for shooting lightning because it allows the photographer to stop the exposure when needed based on changing conditions, without being locked into a 30 second exposure. When I shoot lightning, I set up the camera on a tripod, set the DSLR to bulb mode, plug in my shutter release, and start an exposure. The camera keeps taking a picture as I watch the lightning and imagine how the different lightning bolts will appear on the final image. Once the picture in my head of the different strikes looks about right, I stop the exposure. This way I can end right after the last lightning bolt instead of waiting around for the 30 seconds to end and hoping another bolt doesn't strike in the same place as another one did.
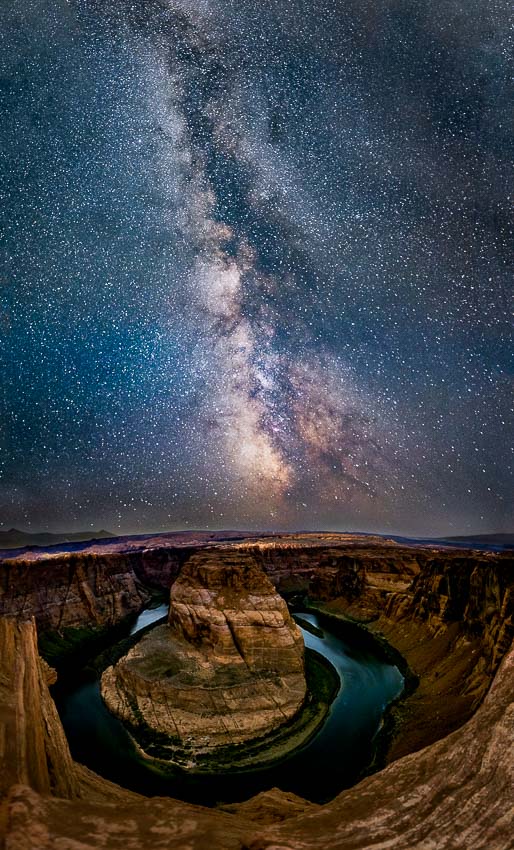
Bulb Mode Tip #2: Star trails. Shooting star trails is really fun. Since the Earth rotates, the stars change their position in the sky. By using bulb mode and an exposure of 20 minutes or more, you can capture beautiful star trails at night. The stars look like they are all streaking falling stars.
Bulb Mode Situation #3: Light Painting. Light painting is when a photographer sets the camera on bulb mode and then paints light with flashlights on the subject in a dark location. For more on this technique, check out my night photography book or read this old post.
Bulb Mode Tip #4: Shooting fireworks. For the same reasons as for shooting lightning, it's nice to be able to control when the picture will stop.
How to Get a Cable Release For Your Camera, so You Can Use Bulb Mode
The good news is that cable releases are usually quite inexpensive. They usually cost less than $30. However, you have to get the right cable release for your specific camera. They are not universal.
The best way to find one is to go to Amazon and simply search the model of your camera and the word “cable release.” You'll see that the Canon, Nikon, Fuji, or other name brand releases typically cost more. In my experience, they are NOT worth the money. A cable release is a very simple device, so just get the cheapest one that has decent reviews.
Bulb mode can be useful when photograping lightnings.
Hi jim,
How do you actually paint the light? I’ve read your books but they don’t explain how exactly it is done. Do you point the torch and click it on for a second, 2 seconds, 3 etc…..? Do you switch it on at a certain position and drag it to another quickly or slowly? Does the camera record the beam of the flashlight? Where do you position yourself from the camera?
Thanks and kind regards
You just hold the button on the torch down and draw.
Hi there. It is actually very simple, you just have to plan it out a little bit.. when you use a torch for example i press the release buton then you turn on the torch and move normali from one end to another.. you can do it fast too.. the camera will capture it but the light line will be thinner if you do it fast.. just do it in normal speed and see the results.. it is pretty amazing what you can do with that effect. Anyways I think I am a little bit late, aint I? haha
I use iPhone flash light to paint the light, so the light appears not very thick and not very thin on the final picture
Amazing tips! I’m gonna try this out today evening!
Super cool information… Thank you so much…
I was wondering if anyone knew how to use the BULB mode on a Fujifilm HS20EXR past the 30s mark. Even when holding the shutter button, it still closes after 30s…
I’m out of ideas and in dire need of help… so, help?!?
at the moment i am doing experiments with the infrared remote and bulb settings and hav2 so far succesfully taken a 20 min exposure so tonigtht i will try to shoot star trails without gaps in the stars track my exposure will be bulb @f22 and i will leave it switch on till the battery runs flat….im using a nikon d5100 and a 18 mm .
On my Fuji xt1 you have to take the aperture lock off ‘auto’ – this will allow longer exposures. If the aperture lock is on auto the longest exposure is 30 secs. Patsy
Would it work with a remote shutter release or just with the cable one? I can’t find anything about that…
i would like to know too
Yep – That’s what I use. You obvioustly need to make sure the beam hits the sensor to actuate the shutter, but otherwise works fine!
I believe you explanation for bulb mode is close to being correct. Certainly the era is right. In the old days (long before my time, film emulsions had very low sensitivity and long exposures were the norm. Often the camera lacked a shutter; the photographer just removed the lens cap and counted out the number of seconds required for an exposure, then replaced the lens cap.
Later cameras had shutters but often wanted to stand a distance from the camera. A pneumatic valve bulb was used to activate the shutter and as long as the photographer held the bulb squashed, the shutter stayed open. Cable releases (mechanical) were a later development but bulbs remained useful for situations when the photographer would be a long distance from the camera. Back in the 70s I actually had and used one of these devices. If the shutter speed was set to a defined time such as 1/30 s compressing the bulb was just like pressing the shutter release. Actually it mechanically pushed the release. Bulb mode, denoted by a B allowed the photographer to manually open and close the shutter as described in the article.
im one o those who used to use flash quite a lot…..ie; to photograph a long factory , inside we would set up the camera at one end and wait till nigtht time so we would not be in our own photo and then we would open the lens to bullb and walk down the full length of the factory…both sides and fire the flash across the building as we went highlighting the important parts of the building and making sure not to cast a shadow into the picture.
there are many interesting uses for flash off the camera for instance captain frank hurley once laid a trail of gunpowder all around their snowbound sailing vessel , open the camera shutter and then set alight the gunpowder ,thereby lighting up the whole ship in the middle of the ant-artic winter
So helpful! Thank you!
can i use ND filter in bulb mode and what would be the effect?
I haven’t used Bulb mode enough in my photography. Thanks for this great tutorial which was a wonderful refresher for me.
Do you mind if I quote a couple of your posts as long as I provide credit and sources back to your webpage?
My website is in the exact same niche as yours and my users would certainly benefit from some of the information you
present here. Please let me know if this alright with you.
Thanks a lot!
Jim Great website !! When I finish doing my Exposure on Bulb ..is it okay to turn the camera off right away or do you have to wait a certain period
Any help appreciated
Can you suggest me some cheap point and shoot cameras with bulb mode?
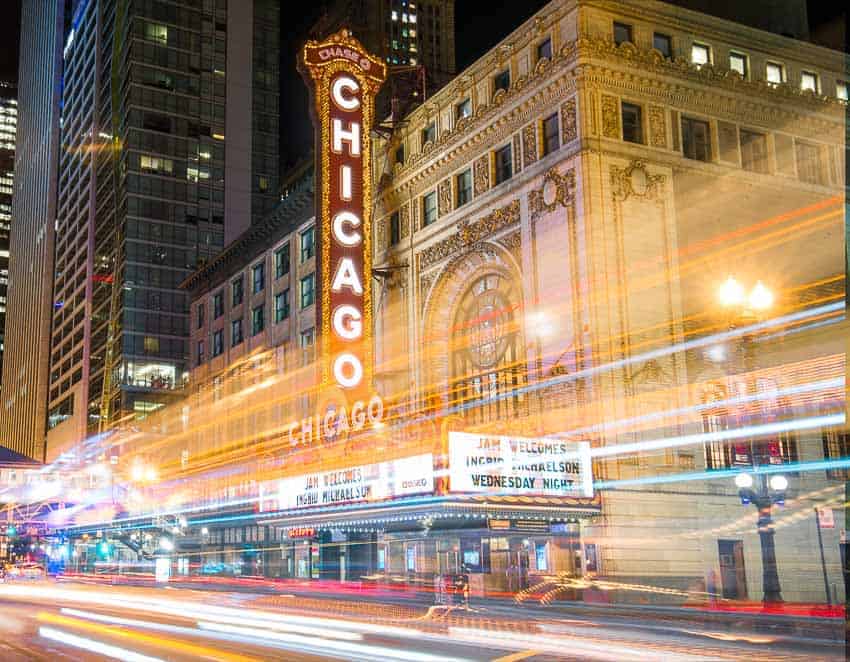
Bulb mode is also great for streets at night (creating streaks from moving cars).
What you do is put camera in 10 to 30 second shutter speed then you basicaly draw with thee light source
Hey, it was a wonderful presentation. I just have one query regarding the star trails. I have got bulb mode in the camera, but i have Canon RC6 wireless remote with no option of shutter lock. So can I use that in night photography by setting camera to bulb mode?
I use a Nikon D5100.
When in Bulb Mode, I can set my camera to be triggered by an IR Remote.
When I press the button on the IR Remote, the exposure begins and will not end until I press the button on the remote again.
When taking long exposures, it’s a good idea to use a “Dummy Battery with an external power source.
Just and FYI, bulb mode actually refers to the old style shutters that were actuated by an air bulb much like the type on a blood pressure cuff i.e. you would squeeze the bulb and it would keep the shutter open until you release it http://en.wikipedia.org/wiki/Bulb_(photography) Thanks for the info on the remote!
do you have any suggestion about bulb model for women photogrpahy,.. i took somes pictures but i could not got clear image of the model… thank you
Last year my wife and I traveled across Canada and the train had vista domes on it. I would set my camera on bulb mode while we were sitting at the front of the dome and rest it on the little flat area in front of me, when nearing crossing lights and rail lights that turn red when the train gets near them. With the shiny metal of the top of the train reflecting the lights, I would press the shutter down when getting close to the light source and release after about five to ten seconds. Some of the images I got were incredible. No one I showed the images to could figure out how I got them. If your ever in that situation as we were I recommend trying it, you won’t be disappointed.