

In part 2 of this photography basics series, we learned about aperture, ISO, and shutter speed. Now, you need to learn how to apply these settings on your camera to take advantage of your new-found knowledge.
The Great Flaw of Shooting “Icon Modes” on Your Camera
Whenever I teach shooting modes, I always get the same question from members of my class. “Why do I need to learn how to set my camera’s settings manually when my camera already has built-in modes for sports, portraits, landscapes, etc?” By the way, these are referred to by photographers as the icon modes because they have icons of the shooting situation on the mode dial.
This example will help to explain why these icon modes won’t work for those who want to become a “real” photographer.
With your new photography skills and your new fancy camera, your family members nominate you the official photographer at your family reunion. It comes time to take the giant group picture with over 60 people in it. What mode do you set the camera to? The little portrait icon, because it’s a portrait, right?
There is a problem with that; a really big problem. The portrait mode on your camera automatically makes the aperture really low, because it thinks you want shallow depth-of-field in your portrait. But in this instance, it’s such a large group of people that you need full depth-of-field so that the people in the back aren’t out of focus. The camera doesn’t know your intentions with this portrait, so half of the group looks blurry.
And thus we see why the little automatic icon modes (the landscape, portrait, sports modes, etc), simply will not work for photographers who want to learn to take professional-quality photos.
What are Creative Modes?

The Creative Modes on your camera are Program, Aperture Priority, Shutter Priority, and Manual Mode. On most cameras, they are marked “P, A, S, M.” These stand for “Program Mode, Aperture priority, Shutter Priority, and Manual Mode.”
If you use a Canon DSLR, then you’ll see that your camera company likes to feel “special” by changing up those names. Canon cameras will show “P, Av, Tv, M” for the same exact modes. “Av” is Canon’s version of Aperture Priority, and “Tv” is Canon’s version of Shutter Priority.
It may feel a little bit intimidating to move to these creative modes on your camera, but I’ll walk you step-by-step through each of the creative modes, how to use them, and what they do.
Program Mode (P)
Just trust me on this one–you don’t want to use it–ever.
But just in case you’re curious, program mode usually (it is slightly different on each camera model) sets the aperture and the shutter speed for you, and allows the photographer to set the white balance, ISO, and flash.
This mode is not a great choice for serious photographers because you can’t set the shutter speed to make sure the picture isn’t blurry. Also, you can’t set the aperture to control the depth-of-field.
Aperture Priority Mode
(“A” on most cameras, “Av” on Canon)
I’d love to see you use aperture priority for 95% of your shooting for the next several months. It is the mode that most hobbyist photographers and even many pro photographers shoot in most of the time.
When you shoot aperture priority mode, you set the aperture (the f-stop) and also the ISO. The camera will then set a shutter speed for you so that the picture is properly exposed.
Aperture priority mode is powerful because it is amazingly simple to use, and still allows the photographer a lot of creative choice. In fact, most competent photographers use aperture priority mode every single day.
Suppose you’re shooting friends and family at a party. The background is really busy with people and things around the house, so you decide you want a blurry background in the photo (shallow depth-of-field). To achieve this, you set the camera to f/3.5 which is a low aperture and which will blur out the background.
The first picture you take is of a person sitting on the couch next to a lamp. The lamp is bright, so you want a fast shutter speed to get the correct exposure since your aperture is wide open. Using aperture priority mode, the camera would automatically set that shutter speed for you. Then, you want to take a picture of someone in a darker corner of the room. You wouldn’t have to fiddle with camera settings at all, because the camera will automatically see that it is dark and choose a slower shutter speed. All the while, you’re able to keep the aperture set to use creative depth-of-field.
If I could only teach you one thing in this photography basics series, it would be to set your camera in aperture priority for the next six months.
When you want full depth-of-field, choose a high f-stop (aperture). When you want shallow depth of field, choose a lower f-stop. Your pictures will DRAMATICALLY improve when you learn to control the depth-of-field.
Shutter Priority Mode
(“S” on most cameras, or “Tv” on Canon cameras)
Shutter priority mode sounds very useful, but the truth is that I have never found a professional photographer who uses it. It is a bit difficult to explain why that is.
At first blush, it sounds convenient to have a mode where you could choose the shutter speed and ISO and let the camera choose the aperture for you. For example, when shooting a school basketball game, you might think you’d want shutter priority mode because you could set the shutter speed fast enough for the quick-moving sports situation.
However, you might be surprised to learn that nearly all professional sports photographers I’ve worked with shoot in aperture priority mode. Why? Because the depth-of-field is key. We want to control depth-of-field in our sports pictures and we just keep an eye on the shutter speed to make sure the camera isn’t picking one that is too low. If it does, then we boost the ISO so that the camera will choose a faster shutter speed.
Manual Mode (“M”)
When I was 16 and drove a car for the first time, my teacher took me to a large parking lot. He asked me to floor it as fast as I possibly could across the parking lot. This was my first time driving! So, I went for it. I felt like I was FLYING! Then, he told me half way across the parking lot to look at the speedometer. I was only going 10 miles per hour (16 kilometers)! The point is, the first time you try anything, it feels intimidating and like you’re out of control.
The first time any of my students use a camera in manual mode, I can see them terrified to try it out. However, shooting in manual mode really isn’t as difficult as it may seem.
To understand manual mode, the example below will be helpful.
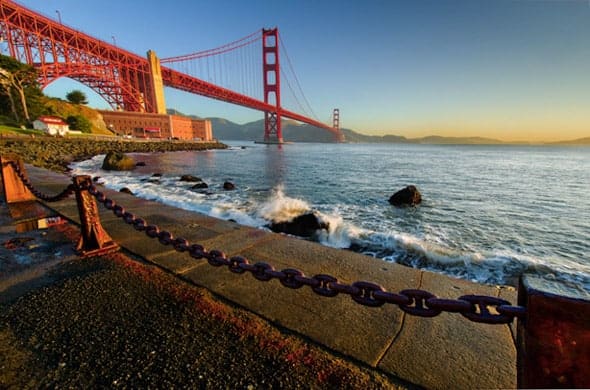
I took the picture above while at a photography conference in San Francisco. In a situation like this, the bridge isn’t going anywhere, the bay isn’t going anywhere, the chain in front of me wasn’t going anywhere. I had a captive audience to say the least.
In situations like this, I always use manual mode. I then set my shutter speed to 1/100. I set my ISO to 100 because I wanted no noise in the picture and I knew if I needed more light, I could just slow down the shutter speed.
After taking the picture with the settings above, I realized that the picture came out a bit too dark with 1/100 shutter speed. So, I slowed it down to 1/60 and it looked just how I wanted.
The point is that, eventually, you’ll find yourself wanting to shoot in manual mode for situations where you aren’t rushed to get the shot. If you’re shooting sports, outdoor portraits, or other things, then aperture priority is simpler and faster than shooting in manual mode.
But since you’re still learning, the best option for the next few months is to get comfortable shooting in aperture priority mode 100% of the time.
In the next lesson in this series, you’re going to learn how you can dramatically improve your pictures by using creative compositions. We’re past most of the technical stuff for now.
Next, I’m going to teach you how to develop strong compositions in your photos.
Thank you for the auspicious writeup. It in fact was once a leisure account it.
Glance advanced to far delivered agreeable from you! By the way,
how can we keep in touch?
Willingly I accept. In my opinion, it is actual, I will take part in discussion. Together we can come to a right answer.
It is appropriate time to make a few plans for the long run and it’s time to be happy. I have learn this put up and if I could I desire to recommend you few attention-grabbing things or advice. Perhaps you could write next articles relating to this article. I want to learn more issues about it!
play
Hot blonde girl with a gorgeous smile, come and see!
When someone writes an paragraph he/she
keeps the image of a user in his/her mind that how a
user can understand it. Therefore that’s why this piece of writing is perfect.
Thanks!
Thanks for the diverse tips shared on this site. I have observed that many insurance agencies offer shoppers generous discounts if they favor to insure more and more cars with them. A significant number of households have got several vehicles these days, particularly those with mature teenage young children still living at home, along with the savings with policies might soon mount up. So it will pay to look for a good deal.
The information shared is of top quality which has to get appreciated at all levels. Well done…
I’m gone to tell my little brother, that he should also go to see
this website on regular basis to take updated from hottest
news.
I have discovered that costs for online degree authorities tend to be a terrific value. For instance a full Bachelors Degree in Communication in the University of Phoenix Online consists of 60 credits with $515/credit or $30,900. Also American Intercontinental University Online gives a Bachelors of Business Administration with a full program feature of 180 units and a tuition fee of $30,560. Online studying has made getting your diploma far less difficult because you can easily earn your own degree in the comfort of your dwelling place and when you finish from work. Thanks for all the tips I have learned from your web site.
Thank you for the auspicious writeup. It in fact was a amusement account it. Look advanced to more added agreeable from you! However, how can we communicate?
Be assured.
Fine way of explaining, and good paragraph to obtain facts regarding my presentation subject,
which i am going to deliver in college.
It’s remarkable for me to have a web page, which is good designed for my
knowledge. thanks admin
Thank you for the auspicious writeup. It in fact was a amusement account it. Look advanced to more added agreeable from you! However, how can we communicate?
Great website you have here but I was wanting to know if you knew of any forums that cover the same topics talked about in this article? I’d really like to be a part of online community where I can get responses from other knowledgeable people that share the same interest. If you have any suggestions, please let me know. Many thanks!
Thank you for sharing most of these wonderful discussions. In addition, the right travel and medical insurance plan can often reduce those issues that come with traveling abroad. Any medical emergency can in the near future become too expensive and that’s guaranteed to quickly decide to put a financial problem on the family’s finances. Setting up in place the great travel insurance program prior to setting off is well worth the time and effort. Thanks a lot
Hey! Do you know if they make any plugins to safeguard against hackers? I’m kinda paranoid about losing everything I’ve worked hard on. Any recommendations?
Hi, i feel that i saw you visited my website thus i came to ?return the choose?.I am trying to find issues to improve my web site!I guess its ok to make use of some of your ideas!!
}