
This article is the ninth installment of my Flash Photography Basics Series–a crash course in using flash. To start at the beginning of the tutorial, click here.
Now that you have seen what each of the light modifiers do, you can begin working with the flashes to create lighting setups. To help you get started, I’ll show you four common light setups.
At this point, you are ready to actually get shooting and learn your flash. I’ll get you started here, but if you would like to watch video tutorials of exactly how I set up my lighting for portrait photography, you should really consider my online flash photography class.
Whether you are in the studio or on location, you can achieve different lighting styles to complement your model. It is important to remember that different lighting styles will look better depending on the shape of your model’s head. Go ahead and start with your go-to lighting setup and see how that looks on the model. If it is a winner, then keep working with it. If you aren’t completely satisfied and believe something could be better, it’s probably the light.
4 basic, easy-to-remember lighting setups to get you started:
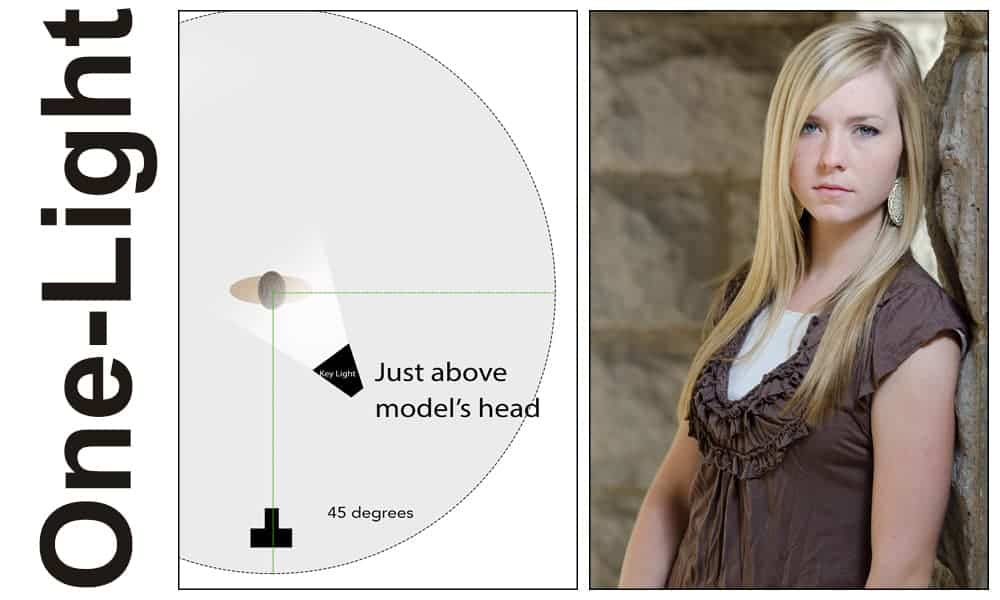
One Light Portrait
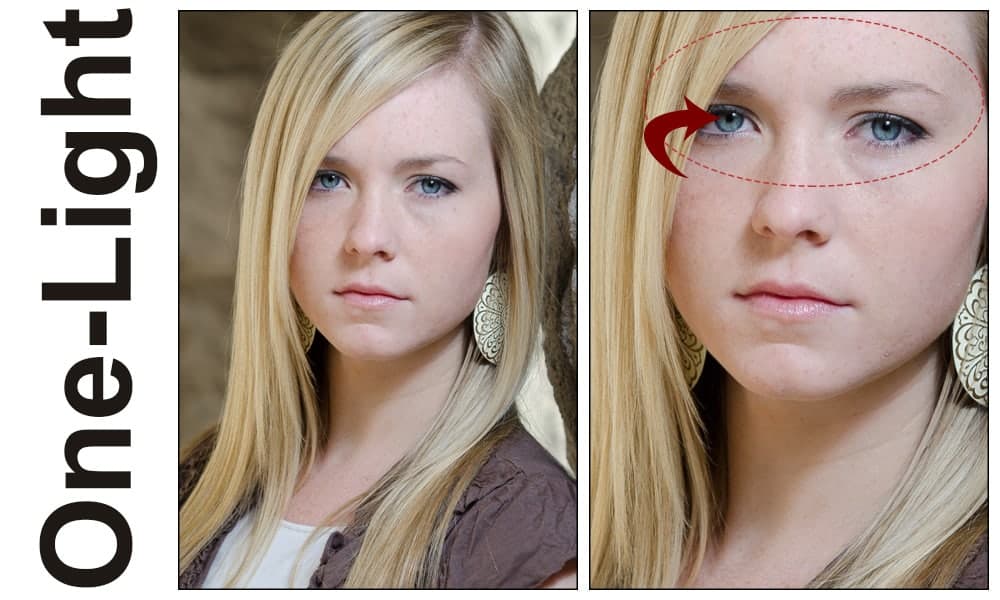
What to Look For
One Light portraits can be difficult to detect, unless you were the one taking the photo. One way to know if there was light involved is to look at the catch lights in the model’s eyes. Seeing the catch lights gives you an idea of where the light was placed and if there was more than one light.
Using one light will work best when you have other ambient light in the photo. Your flash becomes the key light. It is easier to expose for the background when you are adding the light to your model.
The Setup
|
Some Tips
|
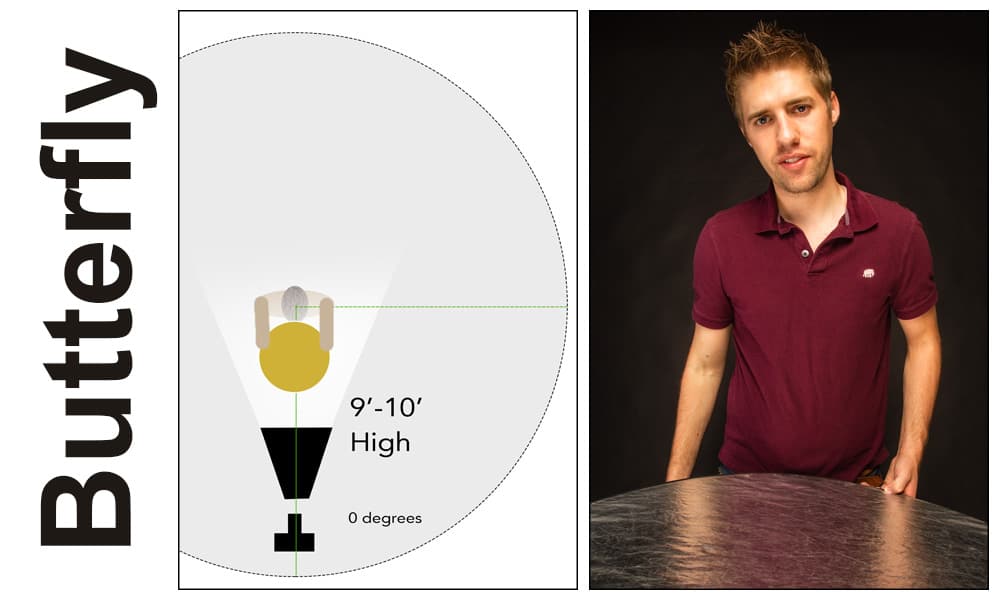
Butterfly Lighting
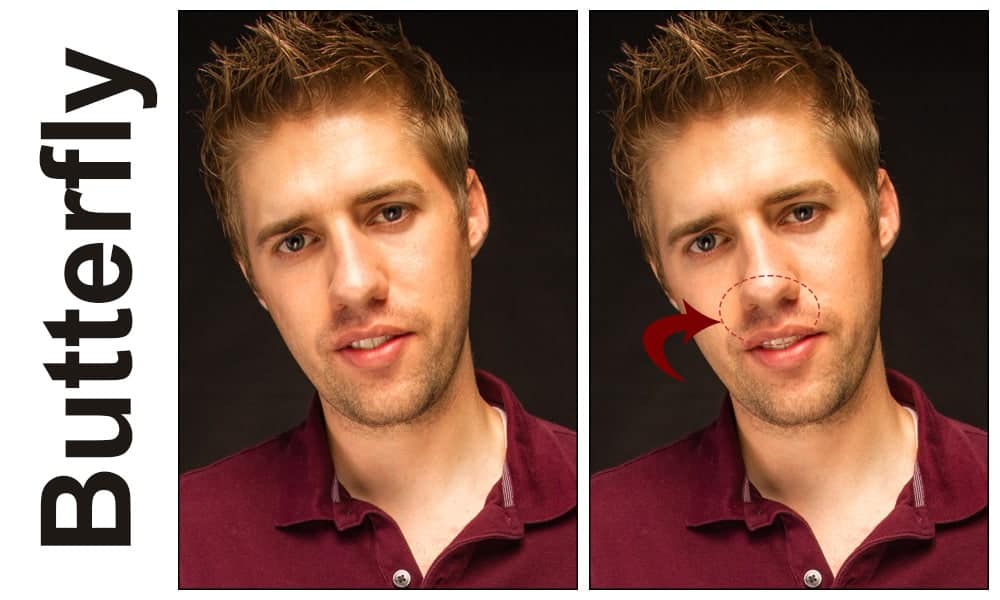
What to Look For
You can easily identify butterfly lighting by the small shadow that appears under the model’s nose. To fill in the shadows a little, you will most likely need a reflector or second flash pointed up. This makes it so the shadows aren’t so long on the face.
The Setup
|
Some Tips
|
Rembrandt Lighting
What to Look For
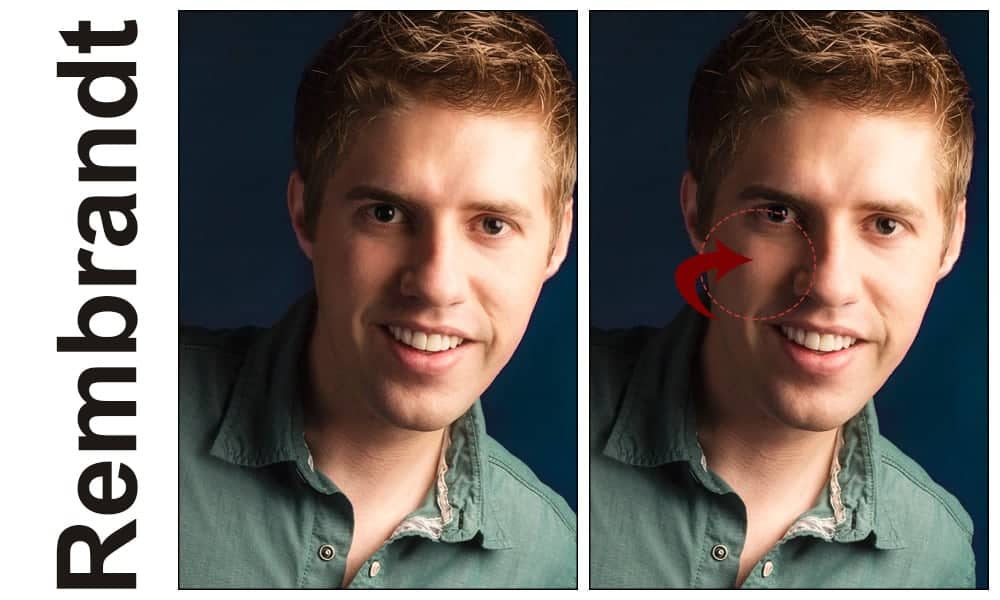
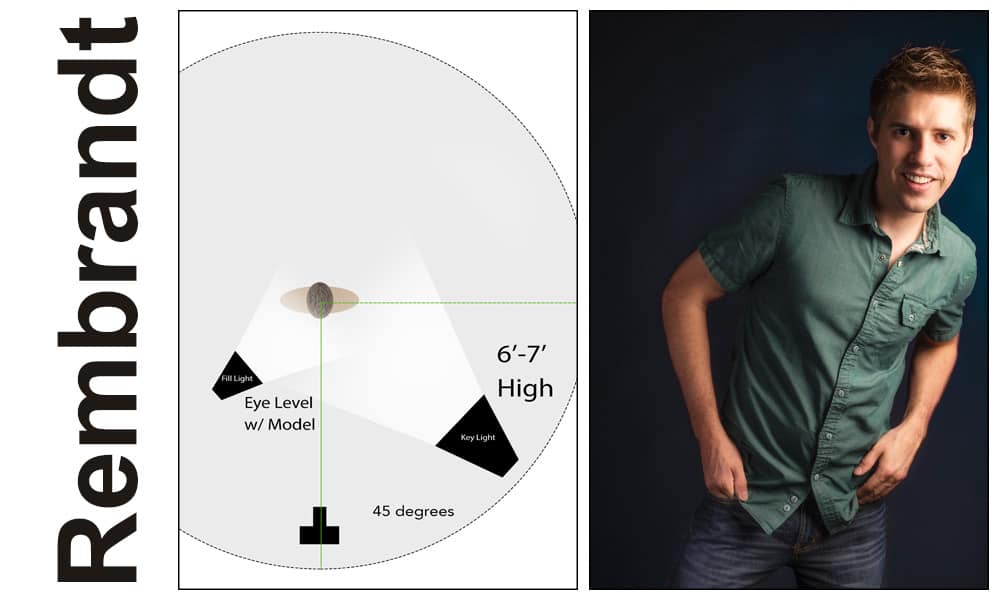
In Rembrandt Lighting, you’re looking for a small triangle of light that appears on the opposite cheek from where the flash is placed. This is a very common lighting style and will look flattering on almost anyone you try it on. A good rule of thumb when placing lights is to always place the light on the side where the model parts their hair — particularly with female models. Otherwise, the model’s hair will cast a big shadow across their face.
The Setup
|
Some Tips
|
Headshot Lighting
What to Look For
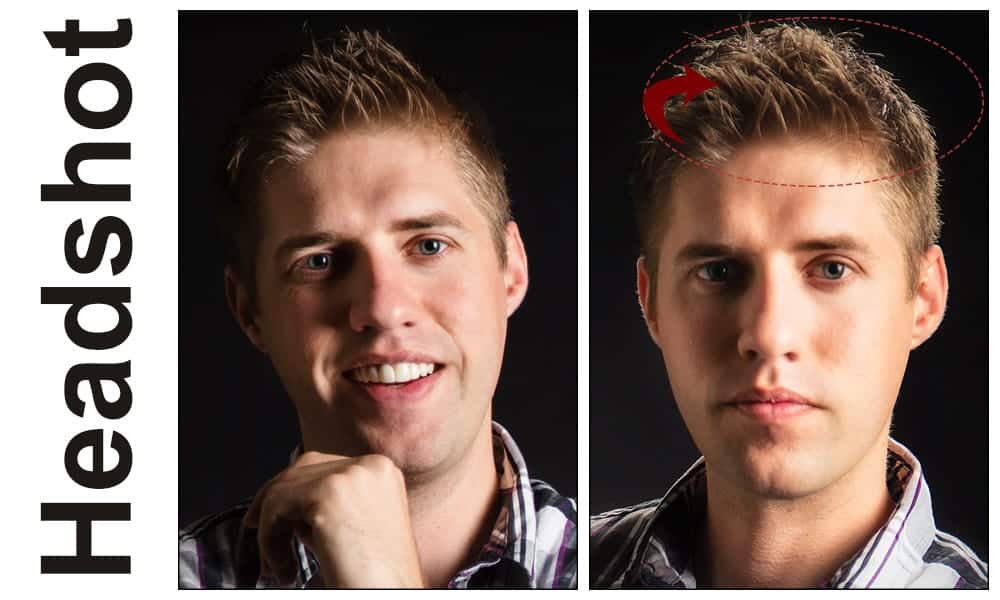
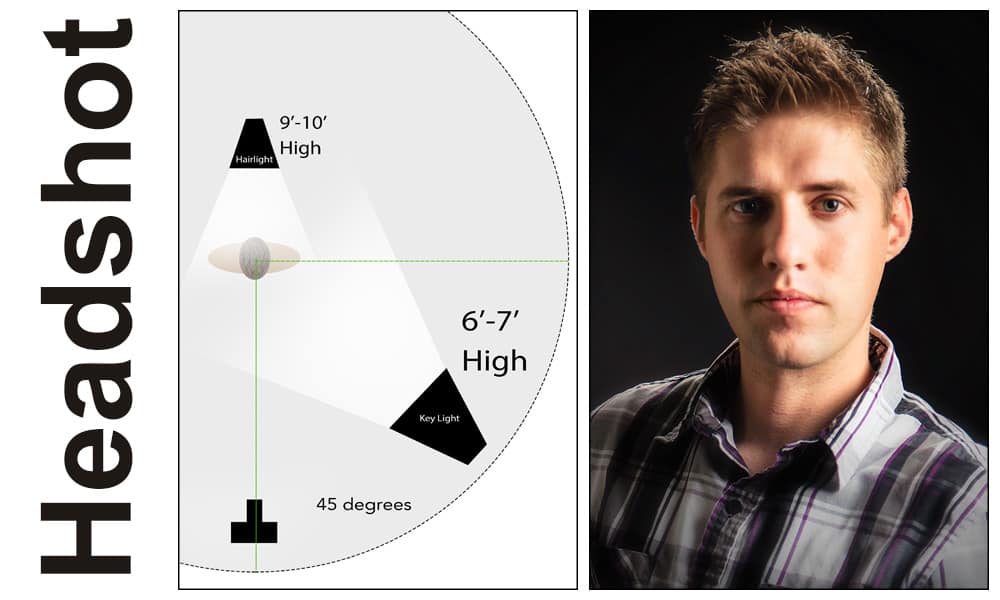
Headshot lighting is important when shooting on darker backgrounds. Sometimes, the color of the model’s hair will blend right in with the shadows and the color of the background. Use a hair light to create an outline around their head and pull them off the background. The way you can recognize this lighting style is when there are visible highlights on the person’s hair. This can be overdone, so be careful and only apply enough light to create the outline.
The Setup
|
Some Tips
|
Continue to the next article in this flash photography basics series by clicking the red button below.
Check this out: [url=https://www.medguideusa.com/guide/propecia/]Propecia guide[/url]. Highly recommended!
More details can be found at [url=https://medguideusa.com/guide/propecia/]Propecia guide[/url]. Good luck!
What’s up, everything is going perfectly here and ofcourse every one is
sharing information, that’s really excellent, keep up writing.
This is the right web site for everyone who hopes to find out
about this topic. You understand so much its almost
tough to argue with you (not that I really will need to…HaHa).
You certainly put a fresh spin on a topic that has been written about for many years.
Wonderful stuff, just excellent!
I was reading about this here: [url=http://www.medguideusa.com/guide/nolvadex/]MedGuide USA[/url]. Highly recommended!
Check this out: [url=http://medguideusa.com/guide/doxycycline/]MedGuideUSA[/url]. Good luck!
I was reading about this here: [url=http://www.medguideusa.com/guide/prednisone/]Prednisone guide[/url] – very detailed.
More details can be found at [url=https://medguideusa.com/guide/propecia/]MedGuide USA[/url] if you need exact steps.
This guide explains it well: [url=http://medguideusa.com/guide/cytotec/]Cytotec guide[/url]. Good luck!
п»їFor more information, visit [url=http://www.medguideusa.com/]Medical Guide[/url] for complete instructions.
This guide explains it well: [url=http://www.medguideusa.com/guide/cytotec/]How to take Cytotec[/url]. Highly recommended!
More details can be found at [url=http://medguideusa.com/guide/prednisone/]Prednisone guide[/url]. Highly recommended!
The crux of your writing while sounding agreeable at first, did not really settle very well with me after some time. Somewhere within the sentences you actually were able to make me a believer unfortunately only for a while. I still have got a problem with your jumps in logic and you might do nicely to fill in those gaps. In the event that you actually can accomplish that, I will surely be impressed.
This guide explains it well: [url=http://medguideusa.com/guide/prednisone/]MedGuideUSA[/url]. Highly recommended!
This guide explains it well: [url=https://www.medguideusa.com/guide/zithromax/]How to take Zithromax[/url] – very detailed.
Check this out: [url=https://www.medguideusa.com/guide/propecia/]MedGuideUSA[/url] to avoid side effects.
I found a great guide here: [url=https://www.medguideusa.shop/]MedGuideUSA[/url] to read the full manual.
I highly recommend this site: [url=https://www.medguideusa.com/]MedGuideUSA[/url] for complete instructions.
Check this out: [url=http://www.edguideusa.com/guide/clomid/]MedGuideUSA[/url]. Good luck!
This guide explains it well: [url=https://www.medguideusa.com/guide/zithromax/]MedGuideUSA[/url]. Highly recommended!