
This is part 4 of a 10-page series on the basics of flash photography. To start the tutorial from the beginning, click here.
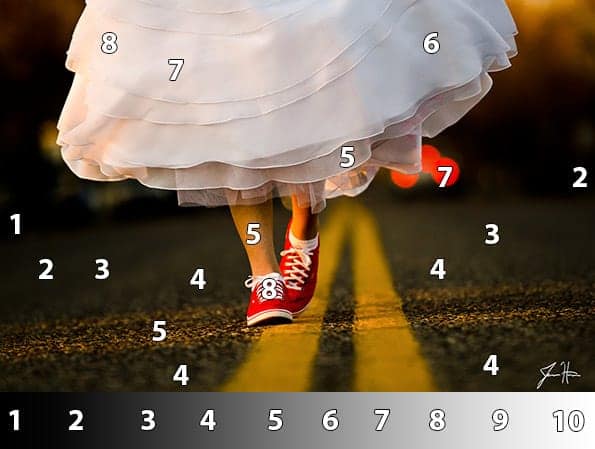
Intensity of Light and the Zone System
One technique for gaining the skill of quickly evaluating the light in a scene is to become acquainted with the zone system. The zone system is a method of categorizing the intensity of light in various areas of the frame according to a value of 1 through 10.
In this system, if the shadow in an area of the photo is so dark as to be completely black, it is called zone 1. Areas that are completely white are zone 10. Each of the other areas of the photo are placed on a scale between those upper and lower limits. In general, the face of a person being photographed with flash will be between a six and an eight on the zone system scale. The face is often the brightest area of the photo so as to draw the viewers attention to it.
Even understanding this basic approach to the zone system can be tremendously useful in flash photography.
When photographers begin learning flash photography, they usually think on more of a general scale than professional photographers. A new photographer may shoot a photo of a person’s face, look at the photo, determine it to be a seven on the zone system scale, and be pleased with the lighting.
A more knowledgeable photographer knows that more attention to detail can produce a far more attractive result. A knowledgeable photographer will look at the same photo that a beginner called a seven and evaluate it with more detail–”the cheeks are at a seven, I like the shadowy fours under the cheekbones to bring out the nice shape of the face, but the forehead is a nine due to some oil on the skin. Perhaps tilting the softbox down a smidgen would take the focus off the forehead and bring that light level back down to a six.”
As you begin working with flash, do not feel frustrated with yourself if you cannot yet control the exact light level on every area of the photo, but with practice you will eventually find that you can make every single area of the photo the exact brightness level you desire. This precise, location-specific control over lighting is what makes a professional photo look professional.
As your study of flash photography continues and includes mixing flash with natural light, you will find that your knowledge of the zone system and your ability to quickly analyze light sources will help you tremendously in working with multiple light sources.
Directionality of Light
One of the most common questions I get from new flash photographers is “where do I put the light?” It should surprise no one that the answer to this question is not as straightforward as the question would suggest, but the question itself hits on a key to successful flash photography.
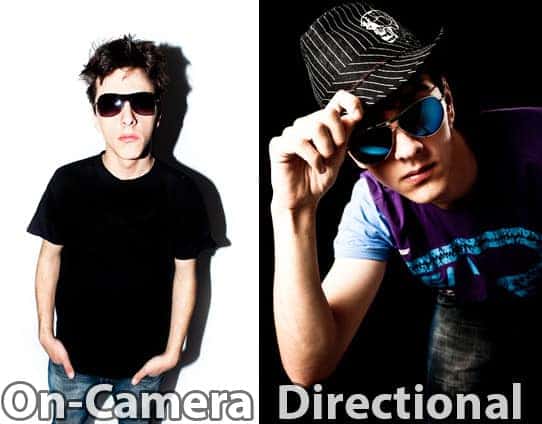
Imagine a face. In a lamp illuminating that face in a room that is otherwise entirely black. When the lamp is placed directly in front of the face, the shaded area in the photo is minimized.
At first blush removing shadows from the face seems to be a benefit. However, truly great photography almost always places heavy emphasis on shadowing. For example, the black and white work of Ansel Adams was noteworthy because of the extreme contrast in his landscapes showing deep rich shadows as well as bright clean highlights. The same is true of professional portrait photography today. I generally find new flash photographers talking about shadows only in the context of how they can be eliminated, yet professional photographers spend far more time creating shadows than creating highlights.
The reason shadows play such a vital role in a successful portrait is because they add dimensionality to an otherwise flat photo. Unlike video which can show dimensionality by movement, still photographers can only give the viewer the experience of “being there” by showing depth as a person sees when he or she is actually “there.”
The photographer’s principal tool for developing a sense of dimension in a photo is highlight and shadow. Now that you have imagined the lighting and shadows of a face with a lamp directly in front of it, change the scenario to place the light to the side. As the light moves, shadows grow on the dark side of the face.
These shadows show shape and size because the human eye is adept at determining size by seeing the shadows that we see everywhere in life.
Now imagine if you could manipulate the light in such a way as to convince the eye it were seeing a face more pleasing than reality, or to minimize the appearance of flaws on the person. Or, even if only a realistic look was desired, imagine if you could shape the light in a way that could tell a story only through shadow.
This skill of manipulating and shaping light and shadow to create interesting light that tells a story and portrays people in the way photographers intend is the key to becoming a master at flash photography.
Little imagination is required to see how this could be done. If the lamp in the aforementioned example is placed low under the chin, the light would come up on the face and remind the viewer of a storyteller surprising his audience with a ghost story in a tent. Every child has heard a ghost story told by the light of a flashlight under the chin of the storyteller, so this pattern of light and shadow on the face immediately conveys in the mind of the viewer that the mood of the photo is scary, mysterious, or even creepy.
The mind has millions of these light and shadow patterns logged away that tell the mind to view a scene in a certain way. If a photo is shot straight on looking at the subject and tall shadows appear on the sides of the head, it is a signal to the mind that the person is skinny because otherwise a heavier dish-shaped face would catch more light on the sides of the face.
The examples of lighting patterns the mind recognizes are endless. Now that you understand this principle, you must constantly think of what light and shadow patterns convey to your mind. Once you have this sense, you will soon be armed with Part Two of this book, which will teach you how to use your flash and flash modifiers and natural light in a way that you can create these light and shadow patterns at will–no matter the conditions.
For the next few weeks, consciously analyze the lighting you see everywhere you go–outside, in a room, in the grocery store, etc. Instead of merely thinking of a room as bright or dark, label it with one of the zones in the zone system, determine if it is warm or cool in light temperature, the direction of the light or lights, and think about the hardness or softness of the light. Not only will this solidify your standing as a hopeless photographer nerd, it will be a tremendous asset to you as you begin working with flash.
As I site possessor I believe the content material here is rattling excellent , appreciate it for your efforts. You should keep it up forever! Best of luck.
We’re a group of volunteers and opening a new scheme in our community. Your website offered us with valuable information to work on. You have done a formidable job and our whole community will be grateful to you.
Thanks for giving your ideas. The first thing is that scholars have a selection between government student loan along with a private student loan where it is easier to select student loan consolidation than with the federal education loan.
I believe this is among the so much vital information for me. And i’m happy reading your article. But should remark on some common things, The web site style is ideal, the articles is truly excellent : D. Good activity, cheers
Great work! That is the type of information that are supposed to be shared across the net. Disgrace on the seek engines for no longer positioning this publish upper! Come on over and consult with my web site . Thank you =)
Excellent site. Lots of helpful information here. I?m sending it to several friends ans additionally sharing in delicious. And obviously, thanks for your effort!
Spot on with this write-up, I actually think this web site needs way more consideration. I?ll most likely be once more to learn far more, thanks for that info.
Thanks for discussing your ideas here. The other thing is that if a problem comes up with a computer motherboard, people today should not take the risk with repairing the item themselves because if it is not done correctly it can lead to permanent damage to the complete laptop. It is almost always safe to approach any dealer of that laptop with the repair of the motherboard. They have technicians who have an skills in dealing with laptop computer motherboard problems and can carry out the right prognosis and undertake repairs.
I have really noticed that credit score improvement activity must be conducted with tactics. If not, you might find yourself destroying your position. In order to grow into success fixing your credit ranking you have to make sure that from this minute you pay any monthly fees promptly in advance of their planned date. It is really significant for the reason that by not accomplishing this, all other moves that you will decide on to improve your credit positioning will not be useful. Thanks for expressing your strategies.
Fantastic website. A lot of useful info here. I am sending it to several friends ans also sharing in delicious. And certainly, thanks for your sweat!
Today, with the fast life-style that everyone leads, credit cards have a huge demand in the economy. Persons throughout every area are using the credit card and people who not using the credit cards have made arrangements to apply for even one. Thanks for discussing your ideas about credit cards.
Wow, this article is mind-blowing! The author has done a tremendous job of delivering the information in an captivating and enlightening manner. I can’t thank him enough for sharing such valuable insights that have undoubtedly enriched my understanding in this topic. Hats off to him for creating such a gem!
Music started playing any time I opened up this web-site, so irritating!
I’m in awe of the author’s ability to make complicated concepts accessible to readers of all backgrounds. This article is a testament to her expertise and dedication to providing useful insights. Thank you, author, for creating such an captivating and enlightening piece. It has been an unforgettable experience to read!
Thanks for another informative website. Where else could I get that kind of info written in such a perfect way? I have a project that I’m just now working on, and I’ve been on the look out for such info.
Looking for the Best Drive School of Motoring? Get expert driving lessons at best driving school for affordable and quality driving instruction.
Looking for the Best Drive School of Motoring? Get expert driving lessons at best driving school for affordable and quality driving instruction.
Looking for the Best Drive School of Motoring? Get expert driving lessons at best driving school for affordable and quality driving instruction.
Thank you, I’ve just been looking for info about this subject for ages and yours is the best I have discovered so far. But, what about the bottom line? Are you sure about the source?
Definitely believe that which you said. Your favorite reason seemed to be on the web the easiest thing to be aware of. I say to you, I definitely get annoyed while people consider worries that they plainly do not know about. You managed to hit the nail upon the top and also defined out the whole thing without having side effect , people could take a signal. Will likely be back to get more. Thanks