
Recent updates to Adobe Lightroom came with at least one major benefit…additional camera RAW profiles. Now here's the cool part…You can create your own camera RAW profiles! And this doesn't just apply to Lightroom. If you avoid Lr like the plague and you prefer to stick with Adobe Camera RAW (ACR), good news: this applies to you as well and the process for creating them isn't really any different.
Now, you're probably already thinking “That sounds hard” or “I just use presets”. I understand these thoughts but let me address them one at a time. It's actually not difficult at all. The process is about the same as for creating a preset but with the help of that all magical “Alt/Option” key, which is useful for so many things in Lightroom, ACR and Photoshop. (Pro Tip: as you're going through your normal workflows, try holding that key down for each task you complete. Trust me on this.) If you've never created a preset, no worries still. I'll guide you through it all. I'll address the second statement in the first full section.
Presets vs. Camera RAW Profiles
Presets
Chances are, you have probably had some experience with presets in your photographic workflow. If not, you really should give them a chance. Different photographers have different takes on presets. Some are adverse because they feel as though they're giving up control. Others use them to automate identical adjustments that are made to a large batch of images in order to streamline the process. Still others use them as a “starting place” to give their initial edit of a photo some direction.
Presets work by telling Lightroom or ACR exactly where to place every slider for an image. They are applied without any discrimination. Of course, one can go in and make adjustments to any given slider after the preset is applied to fine tune the look. Furthermore, if a preset is applied after adjustments are made, it will generally overwrite any previous changes (with limited exceptions).
Profiles
Profiles are altogether different. They work at deeper level within the program and act as a key to tell the program how to interpret the RAW file. When applied on import, they can serve as a starting place or can be applied after adjustments are made to further the processing workflow. Anytime a given profile is applied within Lr or ACR, one will notice that the sliders remain in their default locations. The fact that the sliders haven't moved is not the main benefit however.
So, Which is Right for Me?
The real benefit of camera raw profiles lies in the added control they offer. I am not suggesting that you ditch presets in favor of profiles. While they appear to achieve the same effects, the way in which they do so is so different that one is not a replacement for the other. In fact, it is likely that many photographers will see a benefit in using both simultaneously.
An Example
Say you are a photographer who is in love with the look offered by a certain favorite film stock from back in the day. You shoot primarily digital now and you have tried to create presets that emulate the look of that classic emulsion. However, you become frustrated at the fact that your carefully crafted preset works for some images and fails miserably with others.
A custom profile may be exactly what you are looking for. Your preset worked by forcing sliders into predetermined locations based on the fact that you put them there. You put them there because they worked for that one test image. A profile however, will simply tell the program how to interpret each individual RAW file to emulate that certain look. As a result, it will work with a very wide variety of images, always producing similar and predictable results.
From that point you can apply your preset (if you wish) or make any additional adjustments to the image to make it share-worthy. OR you can take an old, already processed image and slap your new look on top of it, without destroying previous edits and see how it works. If it is too under or overstated, you can use the amount slider that is attached to your profile to dial in the exact amount of effect.
How to Make the Profile
First things first, you may need to update your software for this to work. Most of the major functionality that I will take you through was brought to the Adobe ecosystem in early April, 2018. If you can't seem to follow this process, you may simply just need to update your programs.
One more thing…If you're using Lightroom, you may need to go into your preferences menu and under the presets tab, ensure that the box next to “Store Presets with this Catalog” is UNCHECKED. Otherwise, it is possible that your profiles (and presets created with ACR) won't show up in Lr.
I will utilize each of the following programs from Adobe:
- Lightroom Classic CC 2018 Version 7.4
- Camera Raw CC Version 10.4
- Photoshop CC Version 19.1.5
- Lightroom CC Version 1.4
- Lightroom Mobile CC Version 3.3.1
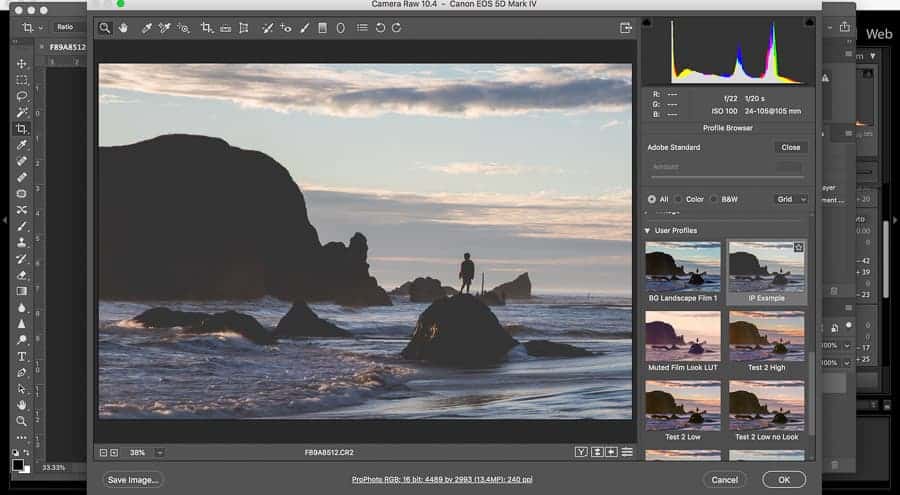
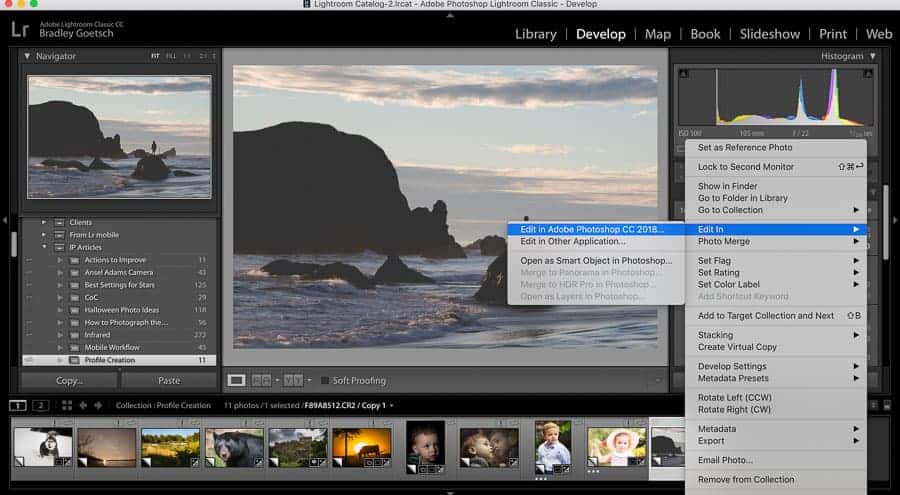
Step 1: Open an Image into Adobe Camera RAW
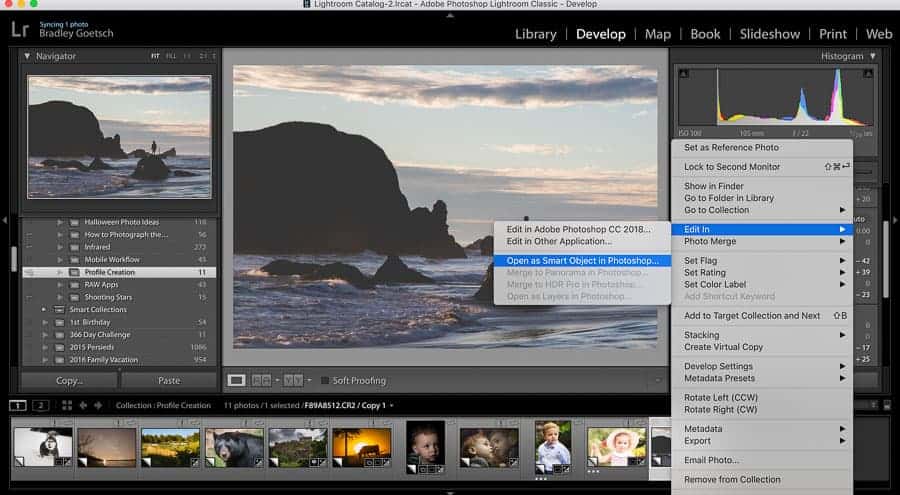
This can be any image really, but ideally it will be an image where you will use the end product. The simplest way to do this is to open the RAW file directly into Photoshop. When opening a RAW image into PS the ACR program will launch first so you can make your starting adjustments.
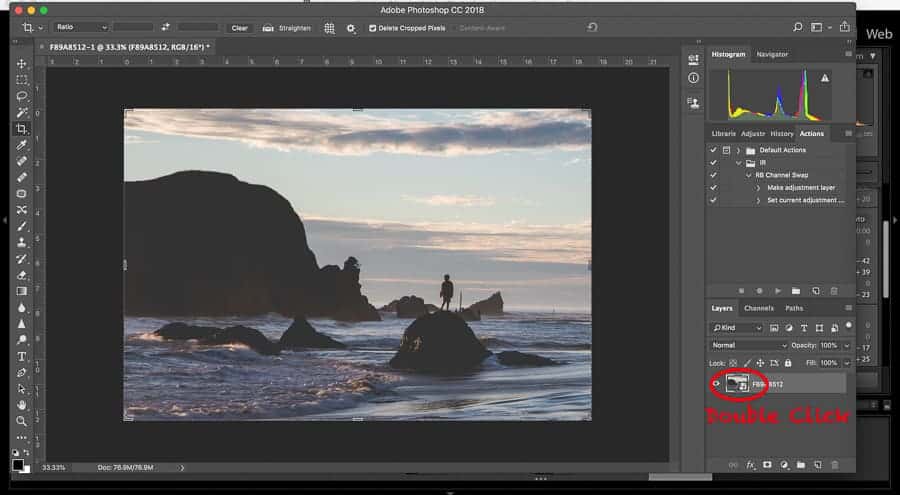
If you're a diehard user of Lightroom, you can make your edits in that program and then move over to ACR through Photoshop. Just make sure that when moving from Lr to Ps, you open the image as a SMART OBJECT in Ps. If you choose to simply edit in Ps, this will not work. Once in Photoshop, double click the small thumbnail of your image in the layers panel and the ACR program will open.
Some photographers will mention that they prefer ACR over Lr or vice versa, but if you do it both ways, you will notice that with identical inputs each program offers the exact same output. This is because they use the same rendering engines. From there, which you prefer is just a matter of user interface preference. As of now, however, I am unaware of a way to create a profile solely within Lr, so ACR becomes a necessity.
Step 2: Make your edits
If you've already made them in Lr, this part is done. Or perhaps you wish to tweak it a bit. If you brought your image over from Lr, you will notice that your exact edits are preserved and show up in ACR. Otherwise just start editing from scratch.
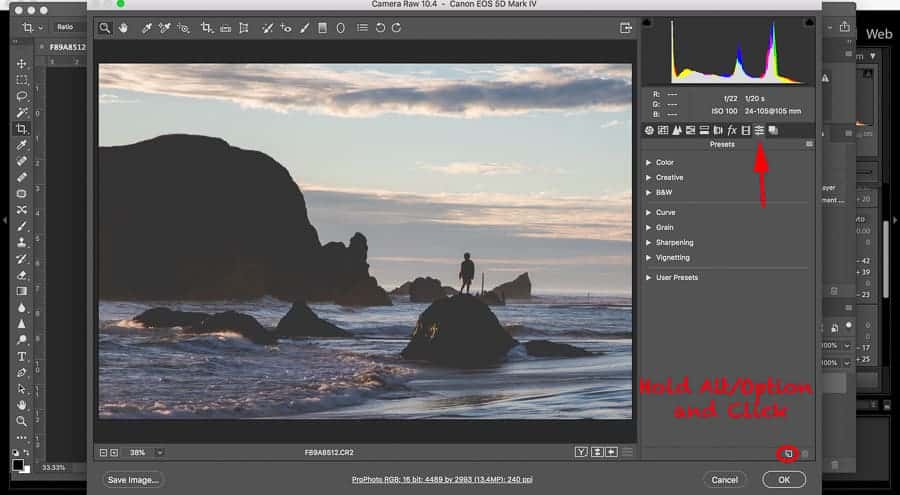
You'll want to carefully select a profile at the start before you do anything. A natural question at this point would be; “But, aren't I creating my profile now?” and the answer is yes, but to work on an image, the computer still needs some idea of how to render the RAW file in a way in which you can see it. The technical “cleanest” starting point in Lr or ACR is to use the “Adobe Standard”. I, however, like to start with “Adobe Neutral” as it looks a little flatter to me and allows for what I perceive as a true baseline start. But you can select whichever you like and build on top of it.
From here, most any edit you make within either program will be built into your new profile. Think of it as teaching your computer how to read your RAW file the way you want it to. Pretty cool right? The only edits that should probably not be made are local adjustments. You can technically include some of them, but they are so image specific that it would be unwise. A baseline is really what is being created.
Step 3: Save your profile
This is where that magic “Alt/Option” key comes in handy. From within the “presets” panel in ACR, you'll see an icon at the bottom that looks like a page with a folded corner. This icon is what you would click to create a new preset based on your settings. In order to go beyond the level of preset and into the world of profiles, just hold that Alt/Option key and click the icon.
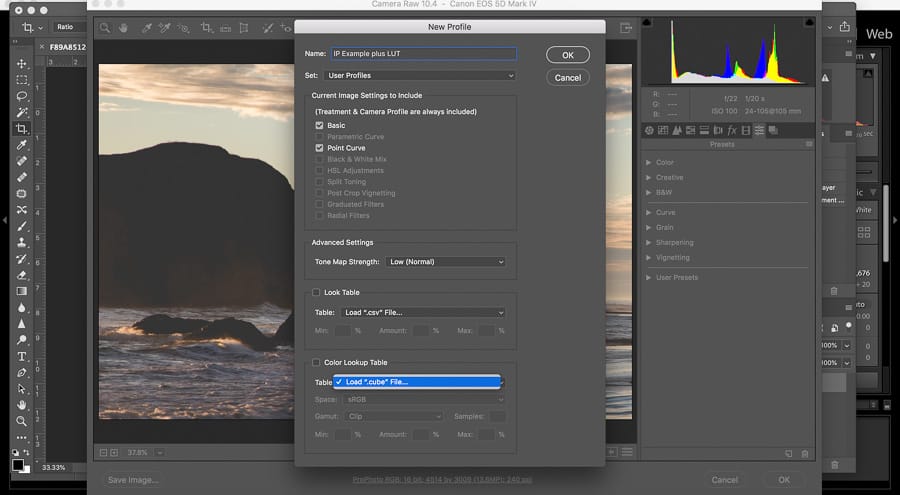
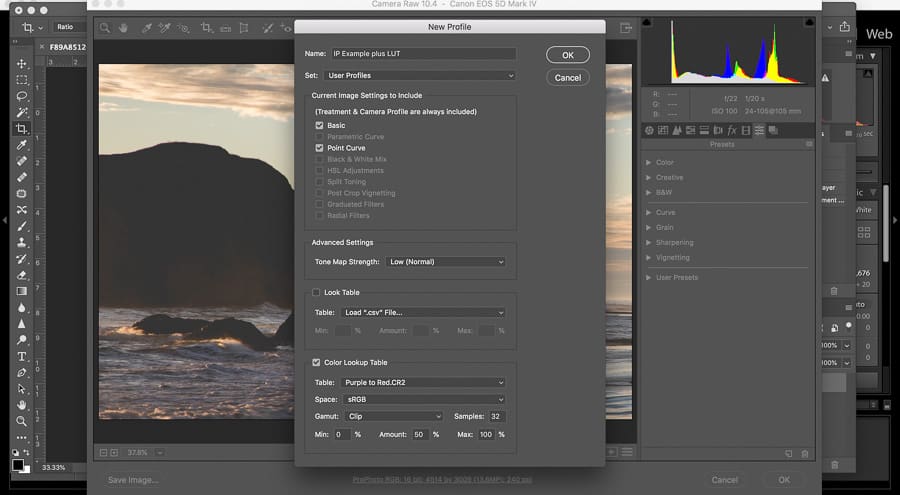
This will bring up the dialog box to save your new profile. You can name your profile and select which image settings to include in the profile. By default, any changes you've made to the image in Lr and/or ACR will be included. If, for some reason, there are any you do not want to be included, just uncheck the box.

Advanced Settings
Under “Advanced Settings” you'll see a single option for “tone map strength”. This simply compresses the dynamic range a bit and adjusts the contrast at the light and dark ends of the histogram to lift the shadows more and drop the highlights a bit. It's pretty easy to create versions of your profile at each setting to see how it is impacted. To get the exact look you created, just use the “low” setting.
Look Table
Next up is a “look table”. The look table is simply the starting profile you used. The sort of “base language” of your new profile. Leave this be to get the exact look you created in Lr or ACR. If you used Adobe Standard as the base profile there won't be a look table included. If you deselect the look table it will act as if you used Adobe Standard. Any look table included will be embedded within your new profile.
Color Lookup Table (LUT)
Finally, there is the section for “Color Lookup Table”. If you do a lot of video editing, you are probably familiar with these. Commonly referred to simply as “Lookup Tables” or “LUTs”. LUTs are a method of creating a sort of preset for color grading. While they're most common in video, they can be a powerful tool in your editing workflow.
In short, a LUT is basically a way of telling your software exactly how you want to shift the colors in your image. LUTs can be created a number of ways, but Photoshop is probably your most likely program of choice for creating a LUT. Specifics on creating a LUT will be included later, but this last part of the new profile dialog is where you would include the .cube file you create when you export a LUT from Photoshop. From here, the LUT will be embedded right into your profile.
Then just click “OK” and the profile is created and live!
Finding Your New Profile
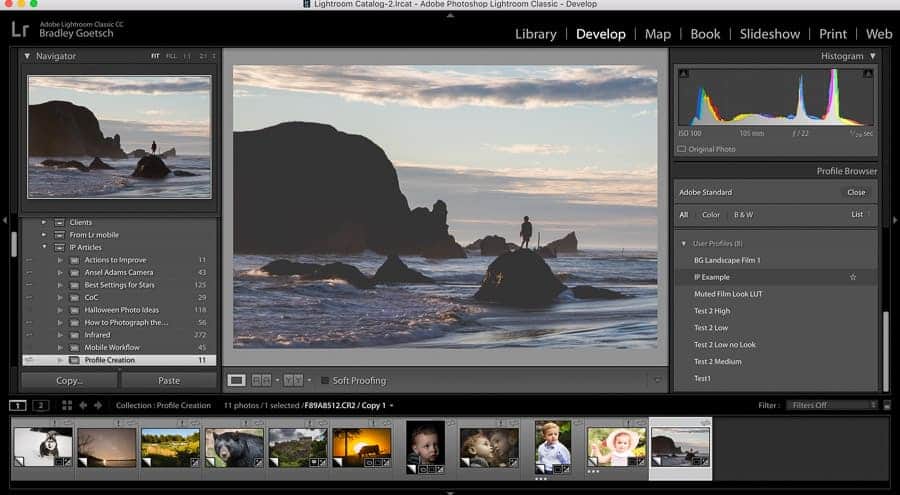
If you're working in ACR, the profile will be available immediately. It will show up with all of the other profiles in the basic panel at the bottom under user profiles.
If you're wanting to use your new profile in Lr Classic CC you will notice that it may not be there. All you have to do is fully quit Lr and re-launch it. Once it opens back up your new profile will automatically be imported and will appear. Just as in ACR it will appear with the other profiles in the basic panel. Scroll to the bottom of the profiles to user profiles to see yours.
Things are a little different in the New Lr CC. Getting your profile into this program is a little bit tricky at first but may be well worth the work.
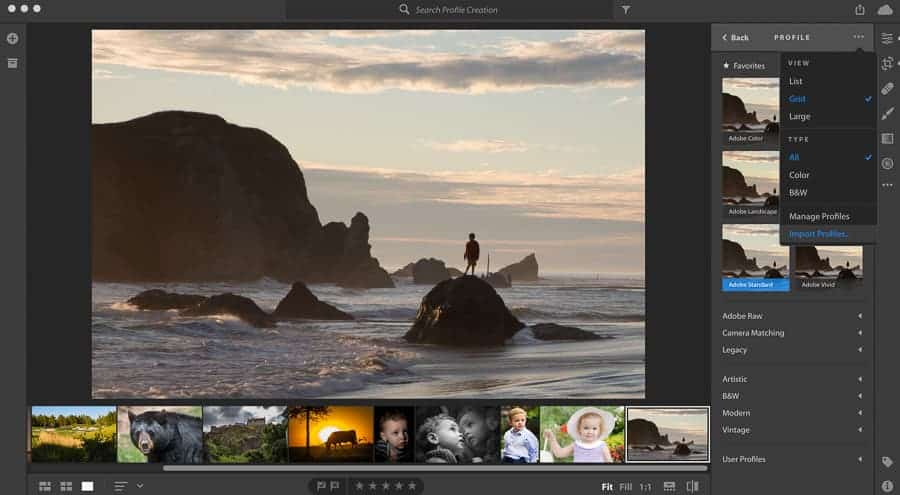
The “All New” Lr CC
Debating the merits of this program are beyond the scope of this article. If Lr Classic (or even just ACR) is all you use, then you may not need to read this section. However, if you use Lr mobile at all and you would like to have access to your creative profiles on your mobile devices, installing and using Lr CC may be a good idea. At least in this very limited capacity. Lr CC serves as the import portal for getting your profiles onto your mobile platform.
In the edit panel of Lr CC, at the very top is the profile selection option. Clicking “browse” opens the profiles that are available within the program. In the top right corner, is a 3 dot ellipses which can be clicked to open an options pane. At the bottom of these options is “import profiles”.
When the profile was created, it was saved as a “.xmp” file. The file is stored in a program folder dedicated to ACR. The default file location on a Mac is: /Users/{your name}/Library/Application Support/Adobe/CameraRaw/Settings. On a windows machine check C:\ProgramData\Adobe\CameraRaw\settings. Sometimes these can be difficult to find. If you do this a lot, I recommend creating some sort of shortcut (alias on Mac) to the folder.
Having an alias folder or a shortcut on the desktop or in some other convenient location makes finding the files much easier when importing them into Lr CC.
Using The Profile
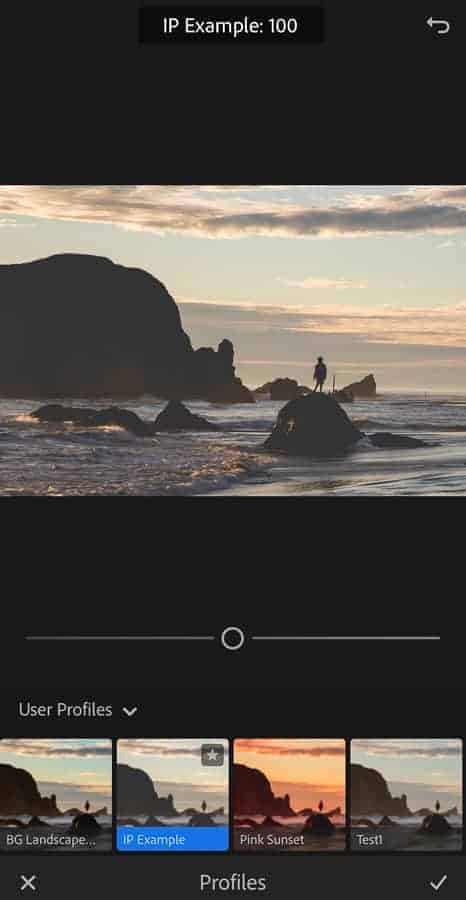
Upon opening an image into Lr or ACR, look for “profiles” somewhere near the top of each workflow. By hovering over each profile option, you will see what that profile will look like when it is applied to the image. With all creative profiles the amount or strength of the effects of the profile can be adjusted. The slider always starts at 100 (base line) and goes down to 0 or up to 200.
Apply the profile and then make additional adjustments to the sliders as needed. OR, and this is a big or as many will chose this route, make adjustments and then test different profiles to give your images an added kick. This is the main thing that separates profiles from presets for most people. With a preset, if adjustments are made and then a preset is applied, the preset will overwrite most or all of the adjustments made. The profile will preserve any adjustments made making the workflow less destructive.
Creating a LUT
This section of the article was saved for last because it is not at all required for the creation of a profile. However, it does provide a sort of next level of creativity and it is so closely related to the profile that it deserved a place here. Plus, if you do any video work and you're looking for an easy way to add looks to your videos that you've created you can apply these same looks to your video within your video editing software of choice. If you're not interested in creating LUTs at this point, you can shelve the article for later reference at this point.
Step 1: Open an Image in Photoshop
If the ultimate goal is to apply a LUT to a video you can utilize a single frame of video as your source image. Really, any image will work. The image must appear in Ps as a background layer. The easiest way to tell if an image is a background layer in Ps is to look for the “lock” icon at the right of the layer in the layers panel.
Step 2: Add Adjustment Layers
Now adjustment layers are added to create the effects. Make all adjustments using adjustment layers on top of this single background layer. ANY adjustment layer can be added and many can be used simultaneously. Do not flatten the image after adding any adjustment layers.
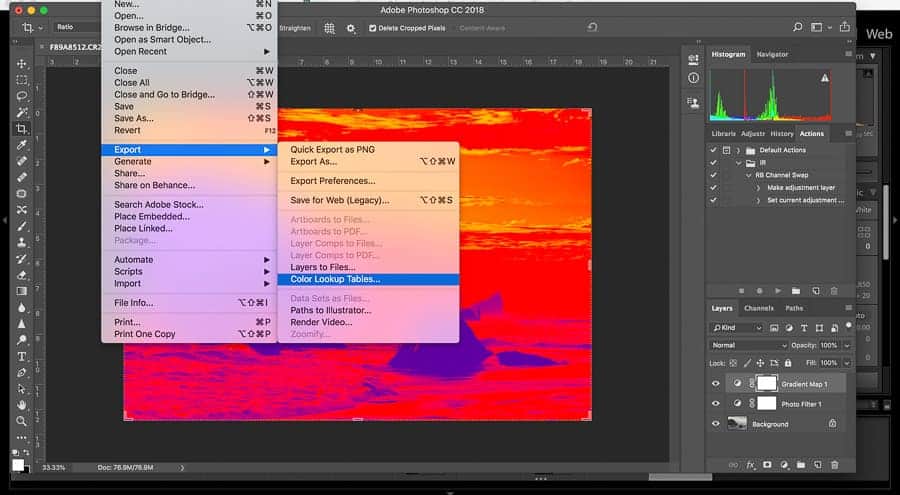
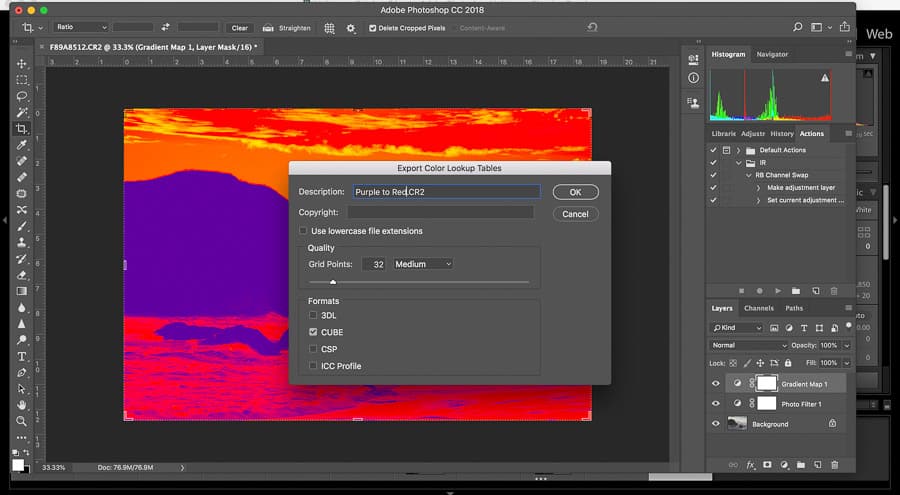
Step 3: Export and Save
Within Photoshop go to file>export>color lookup tables. Within the dialog, you can add a description and copyright to your LUT. The quality portion of the dialog box is where you set the number of grid points referenced in your LUT. The default is 32 (Medium) and by most accounts this is perfectly adequate. Going higher (up to 256) will most likely just slow your machine to a crawl no noticeable increase in quality. Finally, there is the section on formats. For the use of LUTs in photography and videography, the .cube file is all you will need. Click OK and save your LUT to a location where you will be able to find it. I have a folder dedicated for LUTs.

Adding your LUT to a Profile
The dialog for saving the profile, referenced above, has a section for Color Lookup Tables (the last element in the save dialog for a new profile). Simply click where it says: “Load “.cube” File…”, search for your .cube file that you just saved and attach it. Now you will have some added options. At the bottom of the dialog, you will see “Min: 0% Amount:100% Max:200%”. These values can be adjusted to control the default and range of the amount slider for the profile. 100% will be the exact effect seen in Photoshop. If these limits are adjusted, the slider will start in the middle at the “amount” value and move up and down to the limits. In Lr and ACR the slider will still be labeled with 100 as the middle starting point and 0 and 200 representing the edges.

Conclusions
An entire world of creativity opens up with the creation of profiles and LUTs for photography. These tools have tremendous power to streamline a workflow and help a photographer to create a specific style that is consistent. Perhaps these tools will be embraced, or perhaps good old presets are good enough. It's up to you to decide.
This type of real tips helps to improvement in the performence. But it is accessible from anywhere which is the biggest benifit with it. Now why you are left your chance only few steps are you have to follow.