
If you’re looking for something completely new to add to your photographic endeavors, this guide to getting started in infrared photography is exactly what you need. Perhaps you’re in a rut or perhaps you just want to try something new or do something that not a lot of other people are doing (yet). The ethereal and almost otherworldly look of an infrared photo can be an addictive art to produce and at the end of this article, the hope is that you start to look around for a camera that you can convert to infrared for your own use.
I will go through what infrared photography is followed by some of the reasons you should at least try this approach and finally, some of the considerations you need to make before you jump right in.
What exactly is infrared photography?
In short, infrared photography is capturing infrared (think redder than red) light. Infrared light exists in a part of the electromagnetic spectrum that is invisible to humans. The electromagnetic spectrum includes all electromagnetic radiation from Gamma Rays at the short end with wavelengths that are VERY short (think the nucleus of an atom) to Radio waves which can measure hundreds of meters.
The human eye is generally capable of perceiving light (electromagnetic radiation) with wavelengths from around 380 nanometers (Violet) to 760 nanometers (Red). Everything we see falls within this tiny sliver of the spectrum. This means that there is an entire world out there that is unseen!
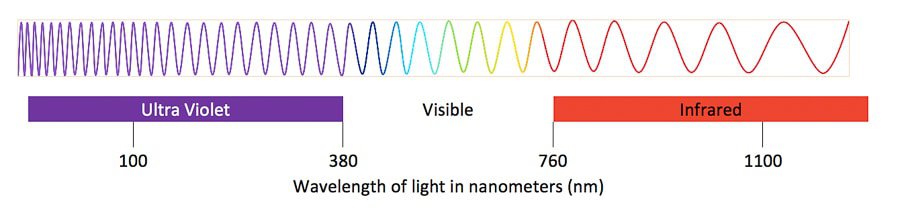
The good news is that our digital cameras are capable of capturing radiation beyond what we can normally perceive. They can capture well into the range of Ultra-Violet (shorter than 380 nm) and into the range of Infrared (longer than 760 nm).
Ordinarily, a digital camera will have a glass filter positioned directly in front of the imaging sensor. This glass filter is designed to block UV and IR light leaving only the visible spectrum, which is what we are usually interested in.
Specifically, on this topic, we are interested in what is known as the “near infrared” range. That is, those wavelengths starting around 760 nm or so and extending to around 1200 nm or so. All of this technical detail might seem unimportant but it can have a significant impact on the types of images you create in the end. More on that later.
Note: Infrared photography as outlined here is not the same as thermal imaging. Thermal imaging happens at much longer wavelengths of 3,000 to 15,000 nm.
5 Reasons to Try Infrared Photography
-
It is an unseen world that is 100% real.
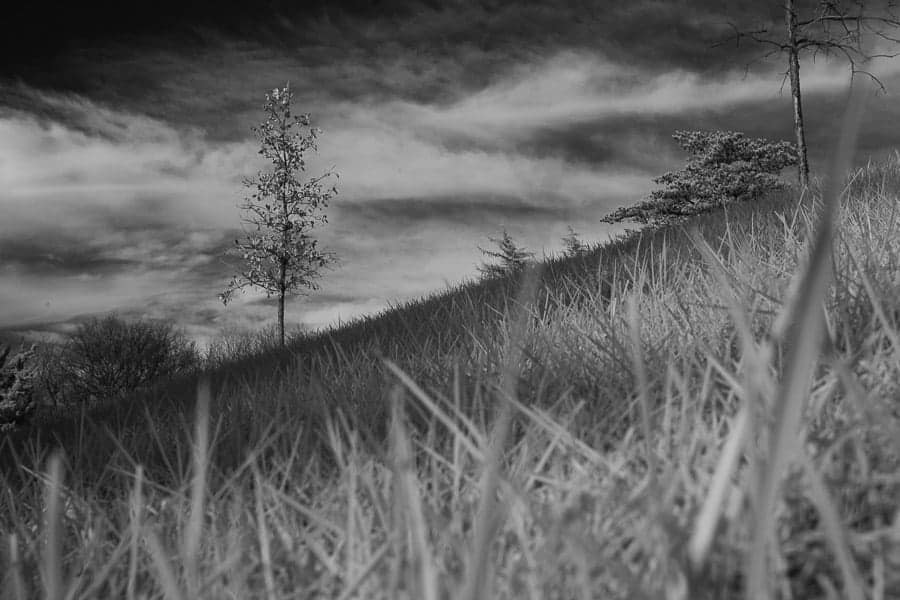
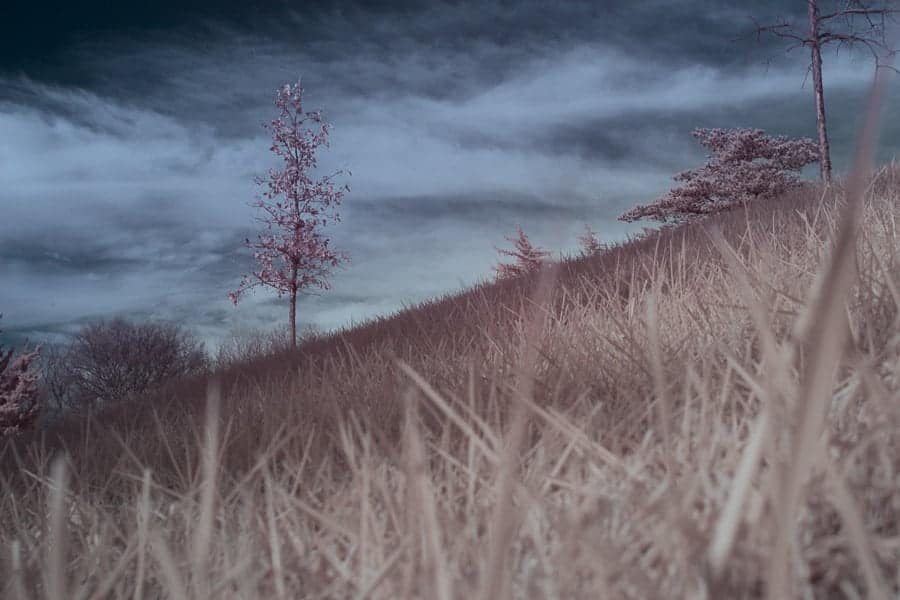
Infrared exists where it cannot be seen by the human eye. Think beyond red. Sometimes color IR images are described as “false color”. This designation as “false” is due to the fact that the camera has represented invisible light in a visible way. This results in an image that displays unnatural colors. There are some tricks in post that can be done to “correct” the colors. However, with color in IR it is just an interpretation of reality. By definition, IR light does not have a color. This is part of the reason many people prefer the black and white renderings of IR photos and also the reason some people are drawn to color IR. It's different.
-
You can create a look and feel that isn’t possible any other way.
Black skies in the middle of the day with bright white clouds and amazing white foliage is a very interesting look. It’s true that some of this can be accomplished in post processing, but the look just isn’t quite the same.
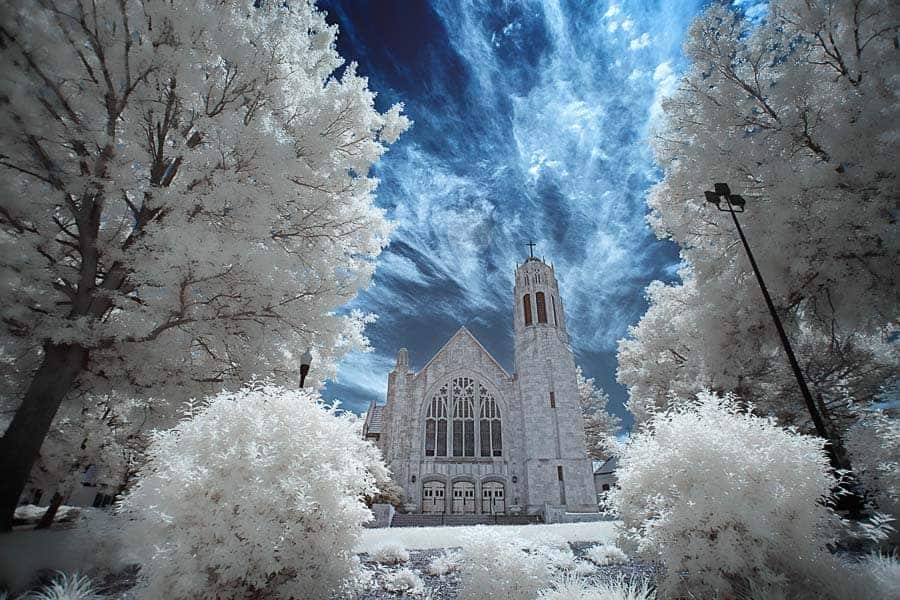
This is especially true when shooting color infrared images. If the look of infrared is something you are after, the best way to accomplish it is with an infrared camera system.
-
“High noon” lighting that would usually not be useful for most forms of outdoor photography is actually quite desirable in infrared.
The qualities of infrared light are just different. This means that different rules apply in the area of lighting. If you are shooting indoors under many types of artificial lighting, you will find that infrared really doesn’t work out all that well.
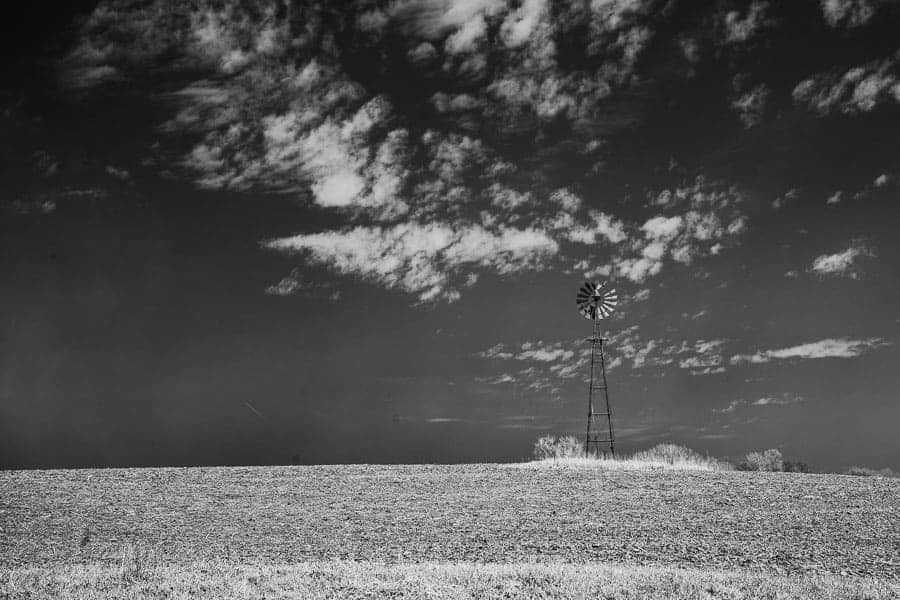
This means shooting outdoors will be the norm. Typically, the harsh “high noon” lighting is to be avoided as it creates those harsh shadows and the light is generally flat and not all that interesting. Because IR light bounces around your scene in a totally different way, that midday light works very well. Give yourself a means to get out and do some great landscape photography on your lunch hour!
-
It’s niche and an opportunity to set yourself apart from the crowd.
I’ve pointed out several times that IR photography is just different. Being different can be a real asset. In a day where there is a cacophony of photos flying around, it can be VERY difficult to set one’s self apart from the crowd. If you find that you have an eye for good IR images, this can be a fantastic way to do just that.
-
It’s FUN!
This one speaks for itself. It’s just fun. Give it a try and if you don’t agree, at least you’ll know it’s not for you. I’m betting that you’ll enjoy the experience.
If you need to see some more details or reasons on why you should try IR photography, check out this article published right here on Improve Photography!
Things to consider before you make the leap
Modification
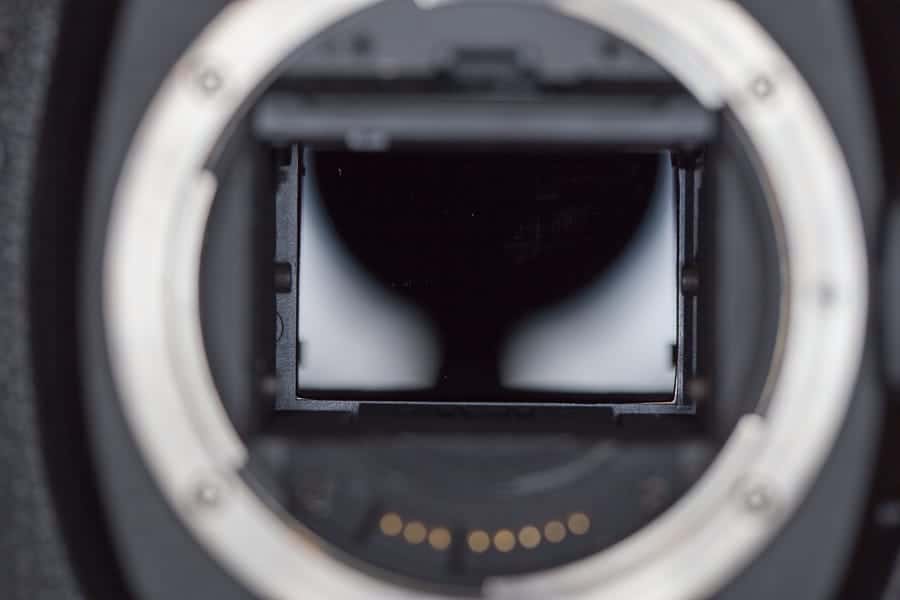
Infrared photography requires a significant camera modification. A typical camera sensor is sensitive to UV and IR light as well as visible light. In order to only capture the visible light, the sensor design relies on a special filter that is positioned directly in front of the sensor (the IR/UV cut filter) With this filter in place, IR light (and UV light) will not pass and thus cannot be recorded. Ordinarily, this is what we want and what allows us to be able to capture a scene with the color and appearance that represents what our eyes see.
In order to make a camera ready for IR (or UV) photography, the camera needs to undergo a significant surgery. The sensor assembly is removed and the IR/UV cut filter is removed and replaced with one of many possible replacements.
Modification is not really permanent, though to do it correctly it isn’t very inexpensive so careful thought should be put into what kind of modification will be performed. Cost ranges from around $250 up to around $400 USD depending on which company you select to make the conversion, which conversion you select and what kind of camera you are converting (mostly dependent on sensor size).
Conversion Service Providers
I do fully recommend having a qualified company do your conversion for you. There are a lot of resources out there on how to do this your own, but it is more likely than not that you are destined for a pit of frustration should you take this path. Even if you are successful and you swap you hot mirror filter (the standard one) with some sort of IR glass without damaging any sensitive electronics or losing any of those itty-bitty screws AND you manage to reassemble the whole kit and get it to fire up, you will probably find dust spots in your image. That dust will probably be stuck between your sensor and the newly installed filter.
So, if you want to save yourself a lot of pain and misery doing and redoing it yourself (quite possibly bricking your camera) or cloning the dust spots out in Lightroom or Photoshop go ahead and have a professional service do this for you.
Most of the images in this article were shot on a camera that was modified by LDP LLC with their standard 715 nm conversion. I will be sending in one of my own cameras to be converted in the very near future and I am most likely going to send it to Life Pixel. If you’re wanting to shop around, Kolari Vision is another alternative that seems to have a good reputation.
I have found some others out there that offer the service but I would be very hesitant to use any of them as negative reviews abound. Most people seem to gravitate toward Life Pixel and Kolari Vision and I think you will be satisfied with either one.
Modification Options
If you’ve decided to go ahead with a modification, you will have to decide which one to do. Typically, when converting for IR a glass filter will be installed that allows for infrared light to pass, possibly along with a small sliver of the visible spectrum. Filters that allow for all wavelengths beyond 720 nm are quite popular. These allow for the passage of the reddest light visible to the human eye.
Another popular option is a filter that is at or higher than 800-850 nm. These are popular for photographers focusing purely on black and white work and want the very dark skies with lots of contrast. The drawback to these filters that start at the longer wavelengths is that because they block more light, they require longer exposures. Think full 1 stop + reduction or a doubling of exposure time.
In the other direction, some are drawn toward filters that allow for more visible light to pass. These are sometimes called color IR or “Super Color” IR filters. They have a very unique look in terms of a final image with lots of interesting color that can add a unique touch to an image. Filters start around 550 nm through IR.
Specialized filters also exist allowing for the passage of multiple, specific bands of light. For example, a blue+IR filter (usually used in agricultural research) can be used to create some unique effects with very blue skies straight from camera. Another is one that allows for the passage of visible light plus a very small band in the IR range known as Hydrogen-Alpha (Ha). The visible+Ha filter is used for night sky photography enhancing the reds that are prominent in nebulae but are otherwise difficult to capture with an unmodified camera.
Camera
As stated in the previous section, for IR photography, you will need to modify a camera. This modification should be considered (at least) semi-permanent and will drastically alter the way your camera works. It is for this reason that you should not modify your daily driver system (unless you have multiple bodies and can afford to).
Most people will convert one of their older camera bodies or buy an older used body to have converted. This is a perfectly sensible approach and what I would recommend for most people.
In terms of image quality, dynamic range, etc., the camera you convert will have the same characteristics before and after the conversion. The images will just look drastically different due to the fact that you’re capturing a completely different part of the electromagnetic spectrum.
DSLRS (Full Frame, APS-C, Micro, etc.) are all suitable as are mirrorless and even point and shoot cameras. Whatever image quality, etc. you had before the conversion will carry over. Now you will have the IR look though!
There is a strong case to be made for selecting a mirrorless camera for conversion. The reason lies in the way that auto focus is achieved. Most DSLRs use phase detection for their auto focus while mirrorless cameras primarily rely upon contrast detection. There is a distinct benefit to contrast detection and the way a mirrorless camera works because the actual imaging sensor is what is used to achieve accurate focus.
The reason this is such a huge benefit is due to the fact that IR light focuses differently than visible light. Have you ever wondered what those little red numbers and lines or that red dot on your lens’ focus distance scale mean? Well, wonder no more. Those are reference points for the shift in focus needed for sharp images with IR!
In the days of film and even digital before live view, one would have to focus on their subject then adjust focus based on those markings for the focal length they were using. If one were using even a modern DSLR and phase detect auto focus, the process would still be the same. Focus, look at scale and adjust based on scale then take the shot.
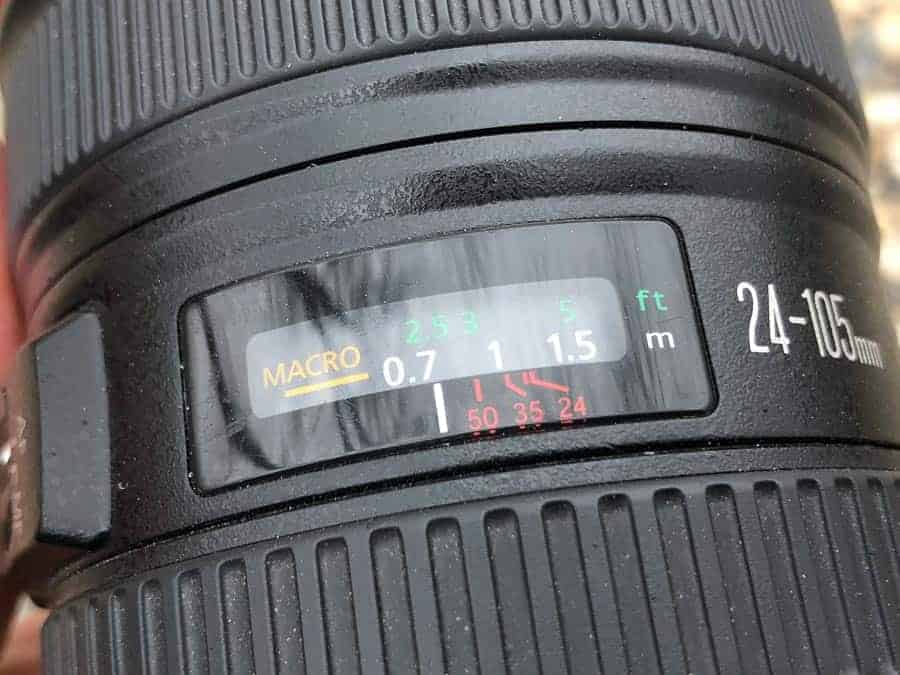
If your camera is capable of focusing in live view using contrast detection as some DSLRs and all mirrorless cameras do, auto focus will be unaffected by this shift as the adjustment is made based on what the sensor sees. It is for this same reason that no auto focus micro adjustments (AFMA) are needed with mirrorless cameras. No calibration required!
If your selected camera uses phase detection, depending on which service provider you use for your modification, you may need to send in your lens with your camera so that they can calibrate the focus system to work with it.
Lens
One fact of life for those of us who dabble (or more) in IR photography is that we can’t use just any lens. This is unfortunate, but just the way it happens to be. The reason is that many lenses display undesirable traits when gathering IR light. Things like flaring, ghosting, and hotspots are common in some otherwise very popular lenses. True, this also happens with visible light photography but happens in very different ways with IR.
The most talked about problem with some lenses is the dreaded “hot spot” effect. This effect shows itself as a bright spot, usually circular but sometimes taking the shape of the aperture blades in the lens, centered in the image. While it may be possible to remove this artifact in post, most seasoned IR photographers will just stay away from the lenses that are known to have problems with hot spots.
Sometimes special anti-reflective coatings are offered as an add-on to the new filter in front of the sensor. These are designed to try to minimize or eliminate the hot spot issue, though some sources point out that these coatings are not all that effective and in some cases, may even make things worse. Probably best to just stick with lenses that work well.
For more info on hotspots and which lenses do and don’t work well, check out Life Pixel’s page on the topic as well as Kolari Vision’s extensive lens hotspot database.
Full Spectrum
There is an alternative to selecting just one specific part of the spectrum to modify your camera for. A full spectrum modification replaces that IR/UV cut (hot mirror) filter with a completely clear optical glass filter. This allows for the passage of the entire spectrum that your camera is capable of recording, from UV through the visible spectrum and on through IR!
The benefit of this is that you can then add filters that can easily be swapped to capture just the part of the spectrum that you’re interested in. Want that super color IR look? Just throw on your 590 nm filter. Want to then take a shot at 850 nm for that very contrasty black and white look? Just swap the filter. Want to use the camera for normal visible light for a few shots? You get the idea. Even UV photography becomes a possibility!
The most popular filters for this use are of the circular, screw on variety that live over the front element of your lens. There are a few of the “clip in” types that can be placed in or in front of the mirror box or sensor behind your lens as well. Life Pixel and Kolari Vision each offer the external circular filters. For the clip in variety, I would suggest checking out the filters from Astronomik. They have options for Canon as well as for Sony Alpha 7 and 9.
Astronomik is highly focused on astro-imaging and many of their offerings are highly specific and specialized for that use. The ProPlanet 742 and ProPlanet 807 (742 and 807 nm respectively) will be your main options for IR use.
Shooting in Infrared
Because you're shooting something you really can't see, shooting in infrared can be a bit of a challenge at first. Depending on which wavelength your filter is allowing to pass, you may or may not need a tripod. In many situations, if the Sun or a bright IR light source is anywhere near your frame, you will probably get significant flare, which you may or may not like. Your light meter in your camera will be somewhat less than useful in a number of situations as it is working with visible light (much less of an issue when shooting in live view or with a mirrorless camera system).
Built into these challenges is a lot of fun. You will adjust quickly and find yourself “seeing” in infrared light! You will seek out that green foliage knowing that it turns into a brilliant white in IR. You will experiment with that sometimes nasty flare and find ways to use it for good. It will make photography feel new to you.
Custom White Balance
I've specifically chosen not to dive into the world of processing IR images in this article, but know this… A custom white balance will help you if you're wanting to work in color with IR. The easiest way to do this is to go into your menu setting and set your custom WB based on a shot of a patch of nice green grass.

Now, it's true that you can adjust WB in post (with incredible power to do so if you shoot RAW) but you will find that even when moving that slider all the way to the blue end of the spectrum in Lightroom or a similar processor, your image will still look very red. This can be a problem as it squashes detail and contrast in your photo and makes things like the “blue sky effect” very difficult to pull off.
Camera profiles can help or using the raw processor that came with you camera can alleviate the problem as well. I usually go the route of camera profiles and I also shoot RAW+JPEG (one of the few times I do this) and apply styles in-camera to those JPEGs. The style is usually monochrome but color works well too. Then when taking that JPEG into Lightroom or Photoshop, the photo is close to where I want it already.
Subject
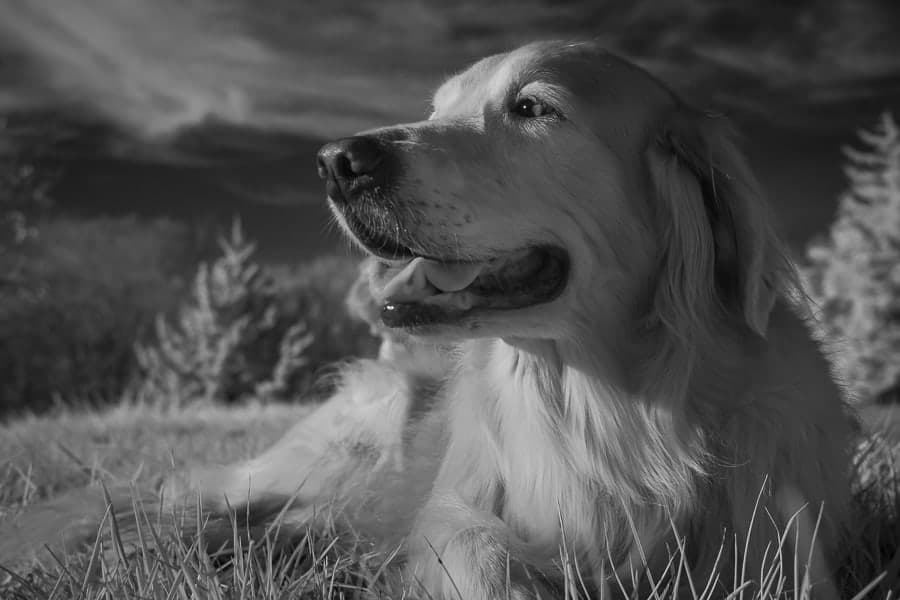
A couple of quick notes on subjects. Landscapes work very well in IR. Green foliage turns white and skies turn black in monochrome (and can be a very dark and moody blue with a Red/Blue Channel swap in Photoshop). A rising or setting moon will show up sharp even against a hazy or light sky.
Portraits can work well but you might have to shoot differently than normal. Think “environmental” for your portrait shots and you can get very cool results. A tight face shot might look a little off to you. Your subject's skin will be smooth and nice (because of the way that it reflects IR light) but their eyes may show up black. This can be a bit jarring, so be ready for it. I lean toward the look of a person in the ethereal light of their environment when going for portraits in IR.
Conclusions
Hopefully, by now you’re at least intrigued by the idea of trying out IR photography. If you’re not sure you want to take the leap just yet, I’ll give the same advice I give to anyone thinking on new gear. Rent it! Lensrentals.com offers several different Canon and Nikon camera systems that are converted for IR (of the 715, 720, 830 and 850 nm variety). Perhaps you’ll find a new genre you love (or not) or you’ll find that you’re happy just renting one from time to time. Make sure you pair it with a lens that’s good for IR!
Along these lines, I have to give a shout out to my good friend and print master, Timothy Wright of Timmy's Treehouse Print Studio. Not only does he do a great job of bringing my work to life, he also inspired me to try infrared and loaned me the 720nm converted 5D Mk ii and the 17-40 f/4L lens used to create the images in this article.
If you’re curious about how you might handle an IR file in post processing, Life Pixel has a page with highlighting the various filter choices they offer along with sample RAW and JPEG sample files for each. You can download them and play around.
Get out, shoot some IR and have some fun!
wow cant wait to try it out 😀
yep so cooool 😀 😀 😀 😀 😀 😀
Like it!