
I’ve been using Adobe products since roughly 2005. I started off with Photoshop CS3 and then I bought the CS4 Creative Suite. That was a bit expensive but I could use it for as long as I wanted, and I did. I kept using it for several years, and eventually I broke down and bought the CS6 Creative Suite and a year or two later Lightroom 5. For the past 3 or 4 years I’ve been using a combination of Lightroom 5 and Photoshop CS6, and I had no intention of switching over to Adobe CC.
Well, something changed. I photograph a few events and schools throughout the year, and I always tether. Everything was great until about 6 months ago. All of a sudden Lightroom 5 stopped finding my cameras. I did a lot of research and tried several different fixes, but nothing worked. This made no sense because it has worked previously. The only thing that had changed was my Mac’s operating system. My best guess is that the combination of the Mac OS update and the lack of Lightroom 5 updates has made the tethering stop working.
With all of that said, I had a decision to make. Do I bite the bullet and jump into the CC world or do I find a different solution? After looking around I found another option that is very similar to Lightroom but isn’t the subscription model: On1 Photo RAW.
An Adobe Lightroom Alternative for Photographers: On1 Photo RAW Review
Before I jump into my review of On1 Photo RAW, I want to point something out again. I am coming from a CS6 and Lightroom 5 prospective. I’ve tried Photoshop and Lightroom CC briefly, but I’m not expert, so there might be some new amazing features that I am unaware of. I’m also only really comparing it with the Adobe Photography Plan. I know there are other plans that include way more, but that plan is the closest thing to On1 Photo RAW. With that said, I still think the comparisons and information below are still valuable.
Pros
-one time payment and not expensive
-similar to Lightroom so there’s not a lot to learn
-lots of built in features like the clone stamp, masking, and layers
-fast previews while sorting
-do almost everything in one program
Cons
-doesn’t have as many features as Photoshop
-not great built in presets and lack of high quality presets
-doesn’t export in the background and slower than Lightroom
-some issues with tethering
Price
For me, one of the biggest differences between Lightroom CC and On1 Photo RAW is the price. The Photography plan includes Lightroom CC and Photoshop CC, which is awesome, but it is a subscription, so you pay $9.99 a month, and you have to commit to a whole year. That’s $119.88 a year. On the other hand On1 Photo RAW is a one time fee of $119.99, but right now it’s on sale for $79.99 or you can upgrade for that price if you’ve owned a previous version. That’s a $40 saving right now, and then a $120 saving every year you continue to use it. After 4 years you would save around $400 if you bought it while it’s on sale. That’s a pretty big difference.
The thing that really bothers me about the subscription model is that once you stop paying you are left with nothing. The software no longer works. You can only start using it again if you start paying again. With On1 Photo RAW, you basically have the software for life.
On1 Photo RAW Features
On1 Photo RAW almost appears to be a clone of Lightroom. It has many of the same modules, features, and even keyboard shortcuts. The biggest question though is does On1 Photo RAW work as well and can you do all of the same things that Lightroom does and can it be the go to program for photographers.
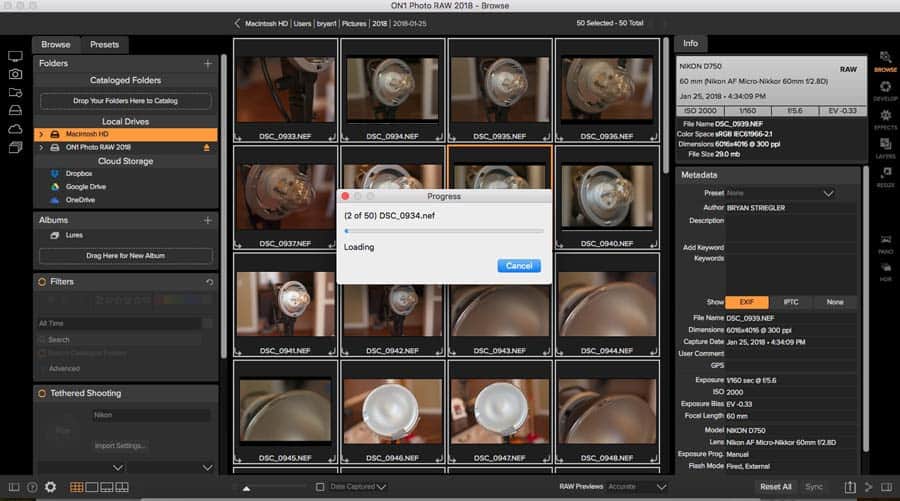
Browse Module
The first step in my workflow is to get the images into my computer, organize them, and then rate them. All of this is done in the Browse module

File Structure and Importing
One thing that annoyed me about Lightroom 5 is the Catalog system. Some people make one Catalog and use it for everything. I would always make a new Catalog for every shoot or client. This means a file is created for each Catalog and to work on a different shoot I’d have to close one Catalog and open up another one, wasting time. On1 Photo RAW does it completely different. It doesn’t actually make a file. You just use the program and you can view all the photos at once.
The next big difference is getting the photos. With Lightroom 5, you have to import files before you can view them or really do anything with them. Depending on the size of the preview you choose, this importing can take some time. With On1 Photo RAW, there is no importing. You browse to the photos location and that’s it. There is the option to Catalog Folders in On1 Photo RAW. This is similar to Importing with Lightroom in that it saves previews for faster viewing and allows you to get to those folders easier. It does take time like Importing, but you can always skip it and go straight to viewing the photos.
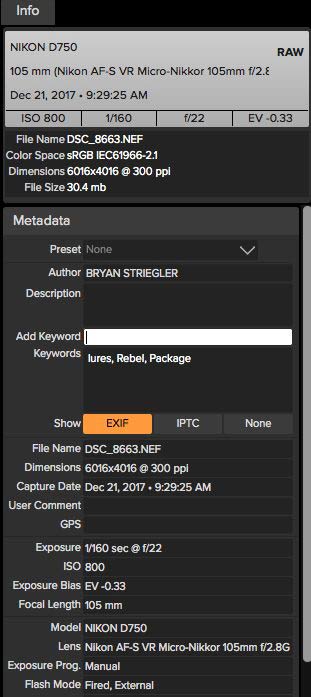
Most Lightroom users will add metadata while importing or later in the Library module. This allows them to search for particular photos later. With On1 Photo RAW, you can do the same thing. You simply select the photos and add your keywords.
The only real downside with the way On1 Photo RAW works is that I have to be connected to the photos. If they are on a hard drive and I unplug, I can’t access them. With Lightroom, I can still view the photos and even make changes. Often I will throw the Catalog file on a hard drive and bring that home to work on. That’s a lot easier than bringing the entire set of photos. With Lightroom you can also share Catalogs with other people so they can work on them for you. To do that with On1 Photo RAW, you’d have to send them all the photo files.
Rating and Organizing
Once photos have been imported and tagged with metadata, the next step is sort and rate the photos. Again, there is very little difference between the two programs. They both allow you to rate them or color code them, look at the photos individually or as thumbnails, compare two photos side by side, and group photos into collections (Lightroom) or albums (On1 Photo RAW).
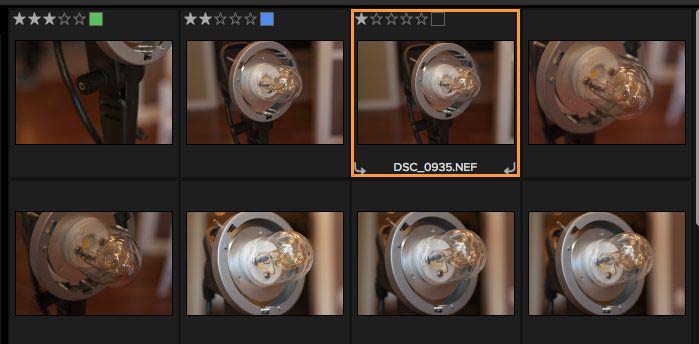
When I got to this part of my workflow, the main thing I wanted to see was the speed of the photo preview. Many times in Lightroom I would have to sit and wait for Lightroom to build a preview before I could tell if the photo was in focus. It would only take maybe 4 seconds but when you’re running through 2000 photos, that’s a lot of wasted time. Now you can build the previews when importing, but that make the importing time much longer. My hope was that On1 Photo RAW would make all of this much faster.
With On1 Photo RAW, there are two modes when Browsing in the RAW preview: Fast and Accurate. With the Fast setting, the preview is ready in under a second. It takes a little longer if you’re zoomed in, but I’d say it’s still as fast or faster than Lightroom. With the Accurate setting, it takes maybe 2 seconds, but I didn’t see a big difference between the two. Both seem faster than Lightroom.
One thing I like about On1 Photo RAW’s albums is that I have access to all of them at one time. To do this with Lightroom, you’d have to import all of the photos into the same Catalog. Some people do this, but the fear of losing everything in one Catalog always kept me from doing things that way.
Tethering
As I mentioned earlier, the main reason I started looking for a new program was because tethering stopped working with Lightroom 5. On1 Photo RAW does have a tethering option and it works the same as Lightroom. You can take photos and have the program automatically rename them and put them into different folders. You can also apply presets and settings as they come in.
With both programs, I’ve had some issues with tethering. Sometimes the cameras wouldn’t connect or randomly disconnects. I’ve had the camera freeze up, and I’ve even lost some photos. Overall though I’ve been happy with both.
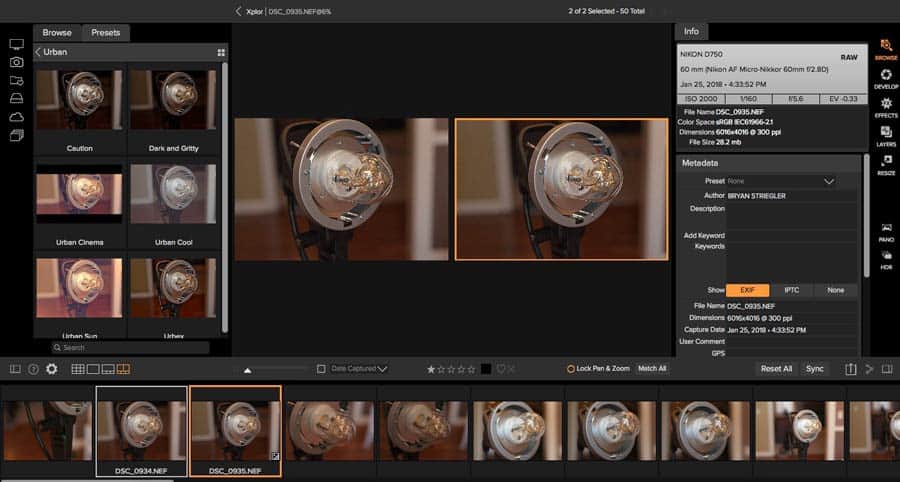
Presets in Browse
The Library and Browse modules are extremely similar. One difference I did find is that there is a Preset tab in Browse. You can apply Presets in Lightroom when you are importing, but the big difference is in On1 Photo RAW, you can see what the Presets looks like before applying them. This won’t really apply to me because that’s not how I do my workflow, but I thought it might be beneficial to some.
Develop
After you’ve done all of your sorting and rating, you move to the Develop module. This is where the basic editing is done.
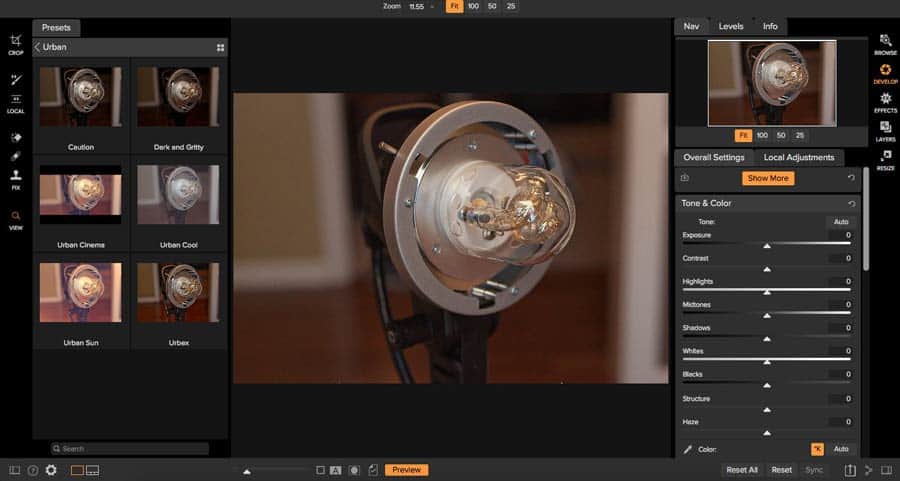
On the right side you have sliders to adjust all aspects of the photo from the exposure and white balance to the noise reduction. This setup is the same as Lightroom, and I find that it makes things much easier than Photoshop. You can do all the same things in Photoshop, but this is so much easier to understand and do quickly.

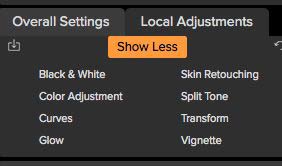
One thing I found is that there is an option to show more sections, and I didn’t see this at first. This brings up more options like curves and color adjustment. It also has a Skin Retouching section which is something that I thought was pretty interesting. You can click on a preset or adjust it manually.
Once you’ve made adjustments, you can copy all of them to other photos just like Lightroom. This saves a lot of time and keeps you from having to do the same thing over and over again.
The only thing missing is the option for camera profiles. I love using these in Lightroom to get a certain look without having to make a bunch of adjustments. I’m sure I can get the same thing by making adjustments, but it’s nice having something already made for it.
The other tab on the left is the Local Adjustments. This is like the Adjustment Brush in Lightroom.
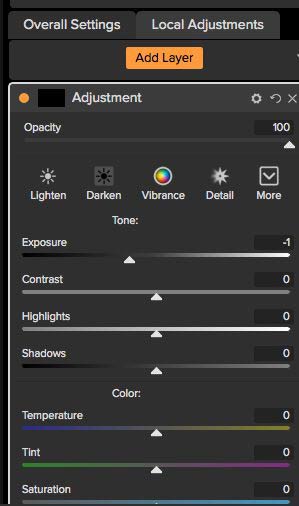
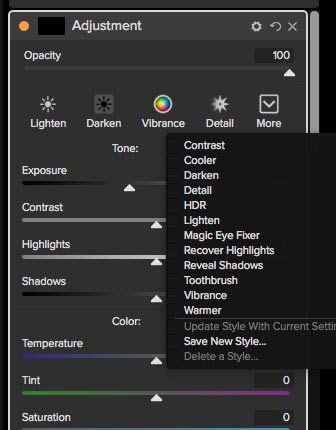
There are several presets like Lighten or Darken and then more specialized ones like Magic Eye Fixer and Toothbrush. Having these makes it much easier for beginners and just faster for people who are experts. All you have to do is click on the preset and then brush it on the photo. Each adjustment is made on its own layer so you can go back and make changes later.
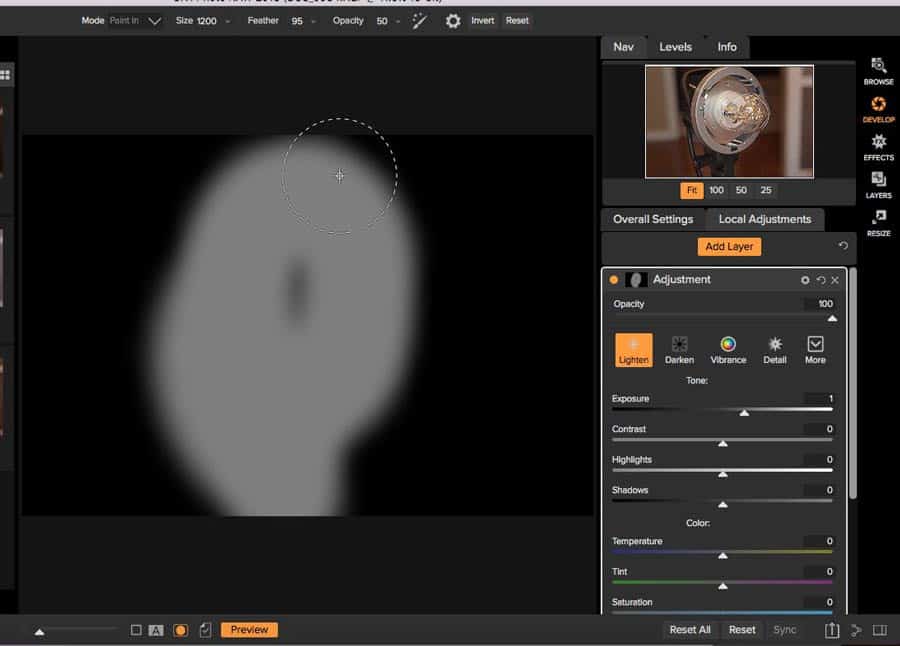
There is a way to see where you painted, but it’s black and white like a layer mask. I like that way Lightroom does it better with showing it with red over the image.
On the left side, there are all the tools for making more adjustments. There are basic tools for cropping and gradients and other tools like the Retouch Brush. The strange thing is that if you use these tools in the Develop module, there is no way to make changes after you do them. Besides the Local Adjustments (which are only in Develop), it makes much more sense to use them in the Layers module where you are applying it to a layer that you can adjust later if needed. We’ll get to the Layer module in a minute.
![]()
Effects
The third module is the Effects and it’s exactly what it sounds like. These are the presets you can apply to your photos to give them a certain appearance. It seems a little strange to me to have Effects where it is. That’s normally the last thing I do to a photo, so it makes more sense to me to have it below layers. I guess that’s not really a big deal though.
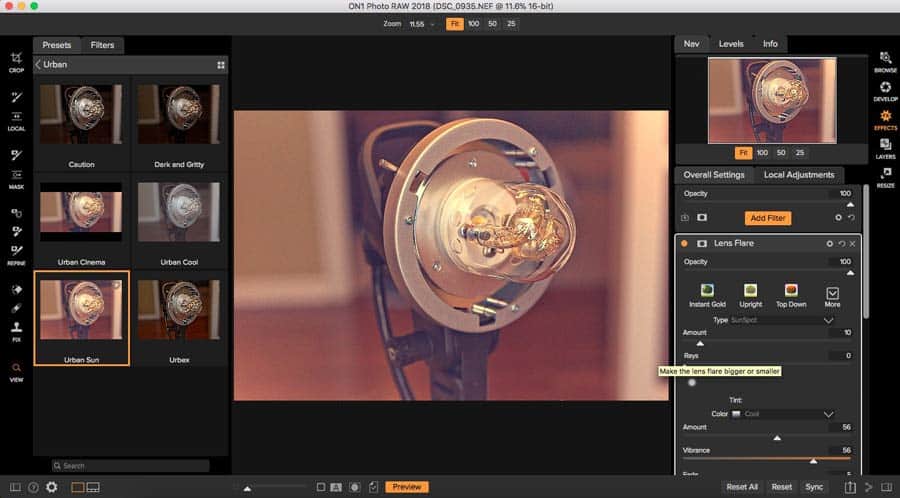
Once you’re in the Effects module, there are two tabs on the left: Presets and Filters. Filters are the basic components that you can add to a photo and the Presets are a collection of these Filters put together. For example, the Preset Dawn Treader is made up of the Black and White, Color Enhancer, Blur, and Tone Enhancer Filters. Once you apply a Preset you can go into any of the Filters and make adjustments. If you find that you keep having to tweak a Preset, you can make adjustments and then save it as a new Preset.

On1 Photo RAW comes with a large amount of Presets built in. They will also occasionally give out some for free. There are also a few photographers out there selling the Presets they’ve created, but the options are much fewer than there are for Lightroom. In general, I’m not a huge fan of the Presets. There the same ones they had 5-7 years ago when I first bought an On1 product, so they look dated. I really wish I could migrate all of my Lightroom Presets over, but that isn’t possible. Most likely I’ll have to tweak some of the included ones or make something on my own or I might send it to Lightroom and apply the Presets there.
Layers Module
The next module is the Layers module. This is where I do the majority of the editing. I use the Develop module to get the exposure and white balance right, but then I move to Layers so I can always go back and make changes later. As I mentioned earlier, if you do some of the work in the Develop module like spot removal, you can’t go back and make changes later. In Layers, you can.
On the left side, you have some of the same tools from Develop but also some new tools. The tool I use the most is the Retouch Brush for cleaning up spots, imperfections or removing objects. It works a little different than Lightroom. In Lightroom you can control where it pulls information from and make adjustments afterward. Once you do it In On1 Photo RAW you don’t have that kind of control. That is a pain but in general it still works well. If the Retouch Brush doesn’t work perfectly, there is another tool to use, the Clone Stamp. This is awesome because I use to have to go into Photoshop if the Spot Removal tool in Lightroom didn’t work. Now I can stay in one program.
![]()
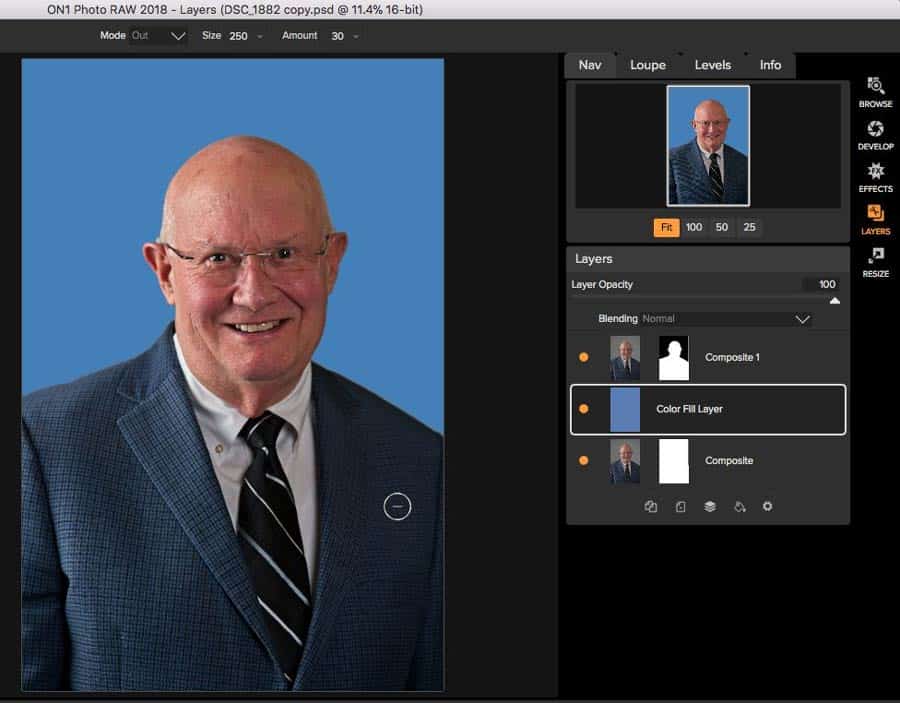
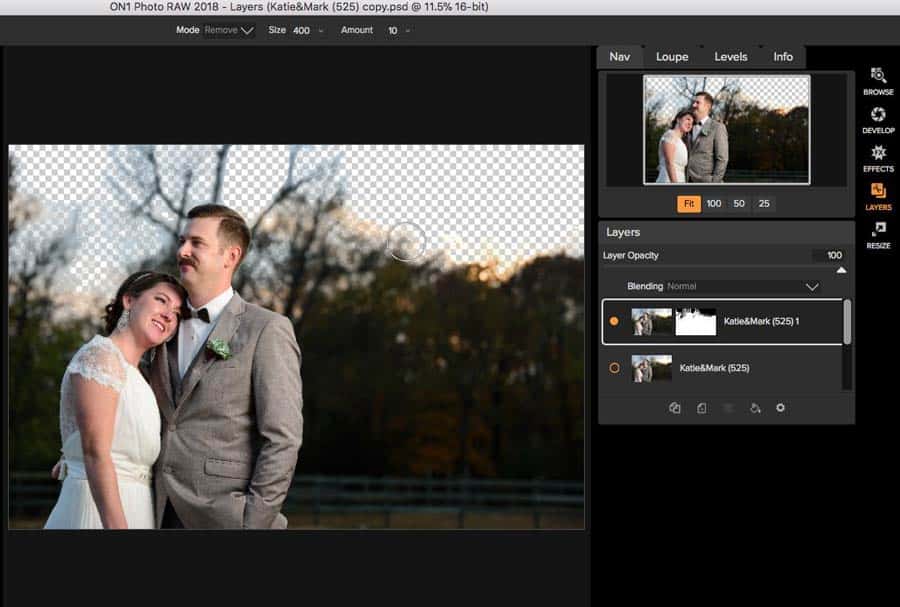
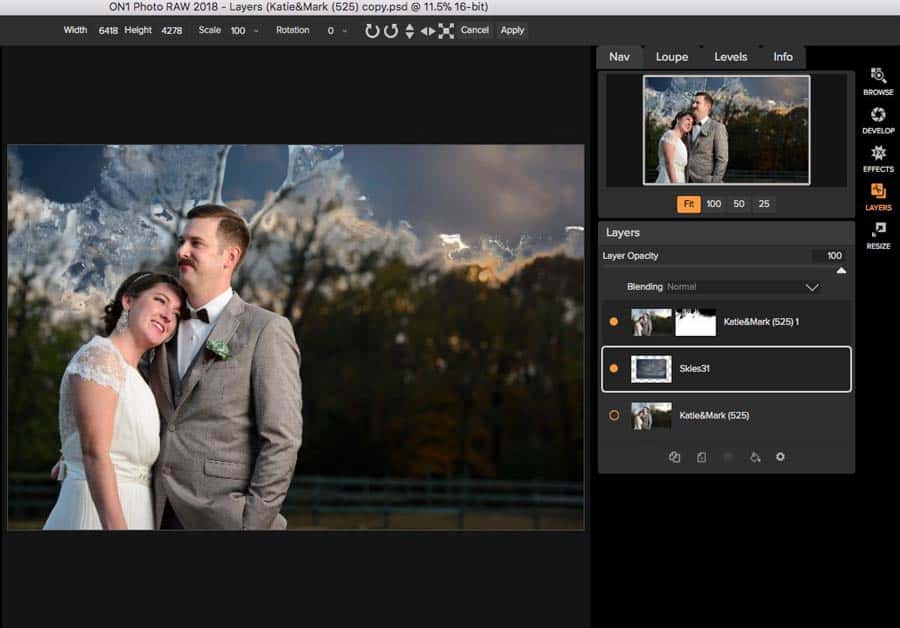
Several of the other tools are used for masking. There’s a Quick Mask you can use to quickly remove all of the background or there’s a Masking Brush you can use to paint in and out certain areas.
Once you have the area masked, you can also refine the edges with the Refine Brush, Chisel Tool and the Blur Mask Tool. Again, this is nice that all of this is built into one program, so I don’t have to jump over to Photoshop to do this.
I tried the Masking ability on a few photos to see how easily it worked. The first photo was a headshot with a simple background. This should be pretty easy to do since the background was one color and the guy didn’t have a bunch of hair going everywhere. I used the Quick Mask tool and that got rid of the background. From there, I ran the Blur Mask tool over the edges, and I was good to go. I just threw in a colored layer to show how well it did. The next photo was much more complicated. There were trees and different colors of the sky and things weren’t in focus. This time is didn’t turn out as well. I tried using all of their tools, and I couldn’t remove everything I wanted. I got some of it out, but it wasn’t good enough for a final product. Maybe I just need more practice with it.
Resize Module
The last module is Resize and this is where you can adjust things for print. On the left you have Presets for cropping and there are tons of options. You have basic print sizes like 4×6 and 5×7, but there are also presets for the web and video.
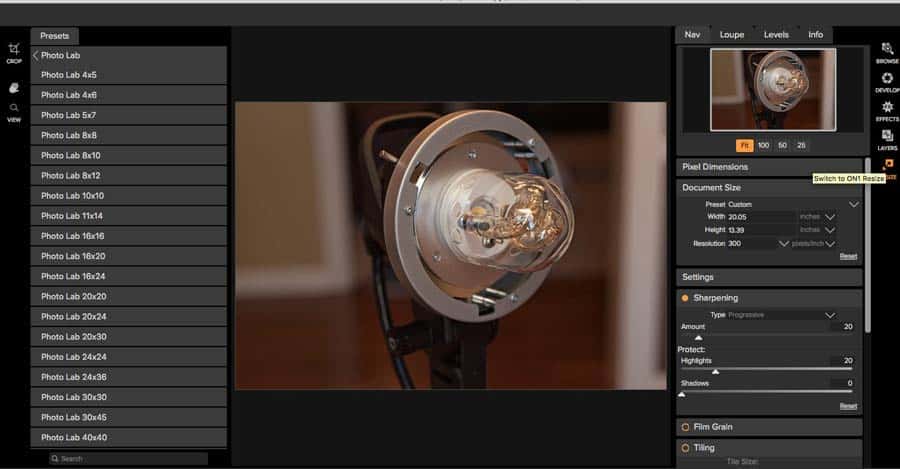
Once you have the crop, you have other options on the right. You can apply sharpening or grain for the finished look. You also have the option to divide the image up into a certain amount of tiles if you’re wanting to turn the image into a multi print collage. There’s one other option for Gallery Wraps in case you want to extend the image or create a border for that type of print.
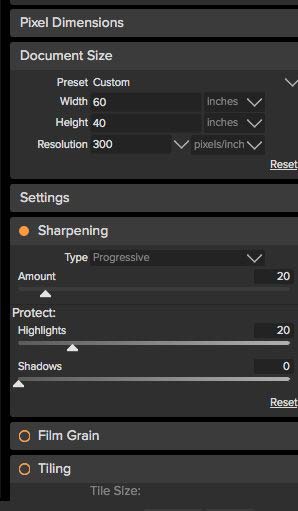
The main point of the Resize module is to what it says. When you select larger sizes, the program should enlarge the image to fit that size. In the past, there were programs that only did this, so it’s nice to have it built in with everything else.
I tried to export an image to 40×60 just to see what would happen. The resizing process took about 3-5 minutes, and then it told me it would be saved in a certain format because the file was over 2 GB. From there things froze up. A minute later I was allowed to save. I ended up choosing Jpeg because I really didn’t want to deal with a 2 GB file. The original RAW file was about 18 mb and the Jpeg ended up being around 89 mb. I don’t plan on blowing things up that large, but it’s good to have the ability.
Exporting
That’s it! That’s all the different modules and how they work. There is one other thing that I found that I need to share, exporting! As far as exporting goes, it’s pretty normal. You select the file type and the quality and you can rename things.
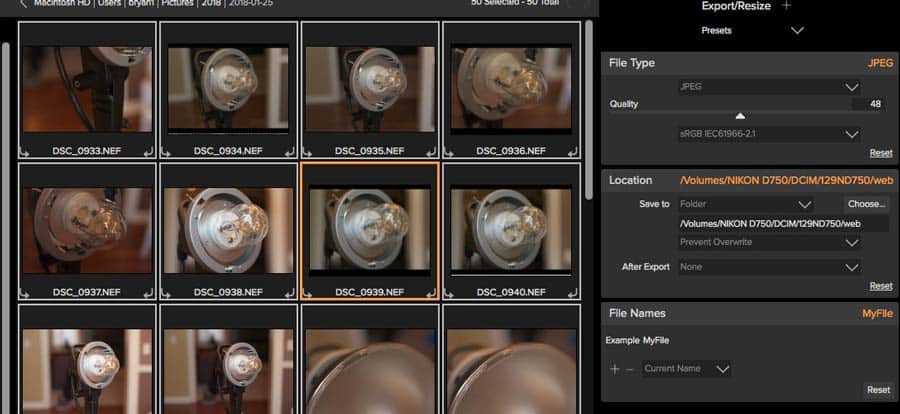
The problem comes when you start the export. There’s a progress bar on your screen and you can’t do anything else with the program. Very annoying. Lightroom does everything in the background so you can continue working while things process. I really hope On1 finds a way to change this in an update.
I compared the speed of exporting in both programs. I exported 50 images at 50 quality. Lightroom 5 took 2 minutes and 56 seconds and On1 Photo RAW took 8 minutes and 30 seconds. That’s a pretty big difference! One thing that might account for this is the DPI. I could adjust it in Lightroom but not with On1. I also exported them in Lightroom CC, and all I could really set was the Small setting on saving them. It took roughly 2 minutes. This isn’t good for On1 Photo RAW. Not only do they not let you do anything else while exporting, the process is much slower than Lightroom. In the end though, with the importing, the total time might be the same.
Conclusion
In the end I purchased On1 Photo RAW. I have several events coming up in the next month and I need to tether. Will I end up making On1 Photo RAW my main editing program? I’m not sure yet. There are several things I like about it like the speed of previews and all the built in tools, but I’m not a big fan of the Presets or having the exporting interrupting everything. Most likely I will use On1 Photo RAW for most of the process like sorting and rating and doing basic editing, but I’ll ship a few images over to Lightroom for presets and a few to Photoshop that need some heavy work.
If you’re looking to replace Lightroom and the monthly fee or maybe you’re just a new photographer and want an easy to understand editor, check out On1 Photo RAW. They have a 30 day trial, no credit card required, so you can try it out for a month and see what you think. I hope this On1 Photo RAW Review has been helpful and I’d love to hear what others think about this program. Feel free to comment below.
Thanks for the review. The current Lightroom Classic is have trouble with frequent crashes. It has become unusable for me, so an alternative welcome. I do not like the Adobe alternative of Lightroom CC. What are the possibilities of migrating a Lightroom catalog to On 1? I think that will be the biggest problem to making the change and look forward to any ideas. Thanks again for you work.
Thanks for the review. The current Lightroom Classic is having trouble with frequent crashes, especially since the last Windows 10 update. It has become unusable for me, so an alternative welcome. I do not like the Adobe alternative of Lightroom CC. What are the possibilities of migrating a Lightroom catalog to On 1? I think that will be the biggest problem to making the change and look forward to any ideas. Thanks again for you work.
Hi Tony!
Yes, I’ve actually been having issues with Lightroom 5 crashing a lot lately. I wonder if it has to do with my operating system. Anyway, it does have a way to bring in catalogs. I haven’t tried it yet, but I do remember seeing a video on their site. You should check it out.
A couple of other image editors worth checking out are Affinity Photo and Skylum’s Luminar 2018. One nice thing about AP is it is even cheaper at $50 US as I recall and updates seem to always be offered at no additional charge. I like ON1 RAW 2018 also and have done work with versions prior to this one but major updates are not free. Lots of good tutorials for all the programs by a variety of authors on youtube. Each also offer good tutorials by their creators plus forums. AP does also offer a book – more expensive than the program called Affinity Photo Workbook.
Murray,
Thanks for letting me know! Do these other programs resemble Lightroom and have all the features as well? That was the big thing that stood out for me with On1 Photo RAW. I’ve also used some of their programs in the past, but honestly, I wasn’t that impressed with them. This one seems to have more promise.
Thx for this tips about adobe photography.