
This article will take you through the ins and outs of how to photograph the Moon. Capturing images of our nearest celestial neighbor requires patience, skill and a fair bit of luck. If you know about luck, you know that you have a surprising amount of control over it.
Armed with knowledge and control, one can capture epic images of Luna. Now, sure, it’s been done. Over and over and over and over. But why not do it for yourself. It’s still a tremendous challenge to do it well. So, challenge yourself!
The Setup
Gear matters. In the case of Lunar imaging, this can be especially true. If you’re going to see what you’ve pre-visualized come together in a final image, you’re going to need the right tools.
I’ll note this here at the beginning…Lunar imaging and UV/protective filters over the front element do not get along. Odd flares, ghosting and other aberrations are common when using these. My advice, and this works for many forms of photography, get rid of those filters and buy/use lens hoods for protection instead. From my experience, they are better protection and can actually help with image quality rather than almost always degrading it.

Lens
The Moon as viewed from earth has an angular diameter of roughly 0.5 degrees, give or take depending on where it is in its orbit. A 50mm lens on a full frame camera gives an angle of view of about 39.6 x 27 degrees meaning you could fit nearly 4300 full moons within the frame!
Generally speaking, you’ll want to utilize a longer lens if you want to resolve the details. Depending on the desired outcome, I’ve used everything from about 24mm out to 1250mm with a crop sensor, resulting in an effective focal length of 2,000mm.
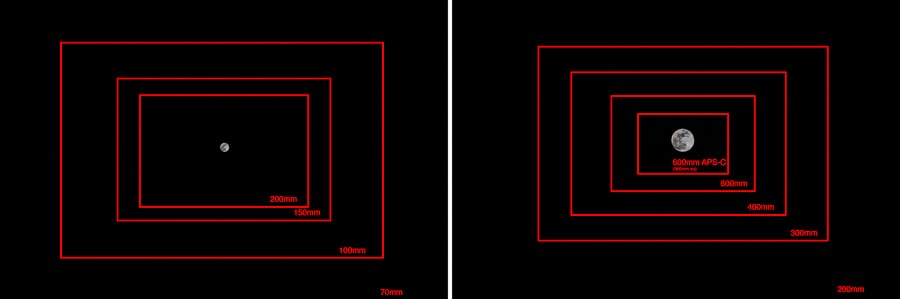
If you’re hoping to balance a low-hanging Moon with a fair amount of landscape in the scene, 70 – 90mm is probably going to produce the most acceptable results. If you want a tight shot, you’re probably going to want to be in excess of 300mm. To get the Moon to fill the frame, you need to be way out there at 2,000mm.
My favorites for the tight shots are:
Tamron SP 150-600 G2
Celestron NexStar 5Se (Telescope) with the T-Adapter and T-Ring for attaching my camera
The image at the very top of this article was captured using the Celestron Telescope, which has a focal length of 1250mm and an aperture of f/10 (fixed). The camera was a Canon 70D (crop) making the field of view equivalent to 2000mm. The image was only cropped very slightly.
Camera
In capable hands, great results can be had with almost any camera. Even a mobile device can be used for lunar imaging provided you’ve addressed the lens issue above. There is a technique called digiscoping where one simply places a camera (cell phone, etc.) up to the eyepiece of a telescope and takes an image. This can work quite well and is aided by a device that can be used to attach the camera to the optic.
It is preferable, for a lot of reasons, to use a more dedicated solution such as a DSLR or Mirrorless camera attached to a lens or telescope. The larger sensors combined with optics that are optimized for imaging (vs. observing) will produce superior results. Full frame, APS-c crop and micro four-thirds should all work very well.
Tripod
This one is pretty important. It is necessary, especially when trying to get that nice, sharp tight shot of the Moon to be shooting from a stable platform. If you’re trying to shoot with a long focal length (300mm or longer) and your tripod is not steady and vibration free, your images will come out soft.
Hand-holding is possible and can produce acceptable results in a pinch, but one will find that a solid tripod just delivers superior results a majority of the time.
The tripod I have been using lately is the Manfrotto MT190X Pro3 with an XPRO ball head and it has served me well. Any solid tripod setup will work, so use what you like.
The Settings
Appropriate settings are highly dependent on conditions and your setup. The problem exists in trying to get close to the correct exposure with a meter in your camera that is likely to let you down.
Spot metering can be useful allowing one to meter directly off the lunar surface (sounds cool right?) and ignore all of the very dark sky in the frame. From here, choosing your exact settings is a lot like doing so for a traditional landscape. Protect your highlights and capture as much light as possible.
The full Moon when high in the sky will typically have an exposure value (EV100) of 13 to 15 depending on conditions (see next section). Don’t know what that means? No problem. It’s roughly the same as a typical daylight scene under bright cloudy conditions. 1/125 of a second, f/11 and ISO 100 would be a valid setting here as well as any other setting that is equivalent.
This means there are several hundred combinations of settings that can achieve the same exposure. I will dig down into each element of exposure so that you have some direction in why you select each one.

Shutter Speed
The main consideration with regards to shutter speed is controlling motion blur. This is especially important when using a long focal length and any motion introduced by camera shake becomes very apparent very quickly.
The old rule of thumb is to place one over your focal length to determine the minimum shutter speed you should utilize to eliminate blur from camera shake. So, at 600mm your slowest shutter speed would be 1/600 of a second. Round up to 1/640 to fit within the settings typically available within camera.
Note that higher resolution sensors found in many cameras will resolve smaller imperfections brought on by these subtle movements so you might want to check your results and/or use faster shutter speeds than this for better results or rely on your camera/lens’ image stabilization to assist.
If you’re locked down on a solid tripod, as you should be, you can get away with slower shutter speeds which will be helpful for collecting lighter and producing a superior final image. With a solid enough tripod, not being blown around by wind or anything else, you’re limited by the movement of the Moon across the sky.
To make a long story short, it is safe to say that on a solid tripod at 600mm (in 35mm/full frame terms) you can get away with an exposure as long as 1/1.3 seconds. You’re only likely to use an exposure that long during something like a total lunar eclipse, but still helpful to know what’s possible.
I generally find my best results in the 1/125-1/250 of a second realm. It seems to strike a balance between light gathering and making sure to freeze any motion down to the pixel level.
Aperture
Obviously, depth of field is a non-issue when zoomed in on the Moon. At an average distance of 238,855 miles / 384,400 km, it is well into the infinity range for any lens. So, just shoot wide open, right? Not necessarily… Lenses are almost invariably sharper when stopped down a little from their widest aperture. Also, just like any other shooting situation, stopping down too much can lead to softness caused by diffraction.
I find with my Tamron SP 150-600 G2, the range of f/8-f/11 works quite well. My sharpest shots have been shoot at 600mm at f/11. Your own setup may differ, so play around with it.
If you’re including a foreground element in the shot, the narrow apertures drastically help with depth of field and keeping the elements sharp. Another factor to keep in mind when shooting with a foreground in the frame is the fact that the atmosphere will distort and soften the features of the moon.
When the moon is low on the horizon, you’re shooting through the maximum amount of atmosphere. You will find it impossible to achieve a tack sharp image of the moon next to or behind your subject. Therefore, if you are trying to balance focus between a foreground element and the Moon, it’s often best to favor the foreground element so at least something is in sharp focus. Stopping down can help but may still be futile and opening up may even lead to a cleaner image.
ISO
Don’t be afraid to bump up the ISO if you need it. ISO can be your friend, especially in low light situations. If you are shooting a landscape shot with the Moon and you elect to keep ISO resulting in an under-exposure, you are likely to find the image will actually have significantly more noise when you brighten it up in post…That is, unless you have a camera that is ISO invariant.
With that being said, it is true that camera sensors have a greater capacity for photographic dynamic range (PDR) at lower ISOs. Colors can also be much more pronounced, naturally saturated and accurate at lower ISOs, so if you can achieve the necessary exposure through Aperture and Shutter Speeds to keep your ISO at base, you will see optimized results.
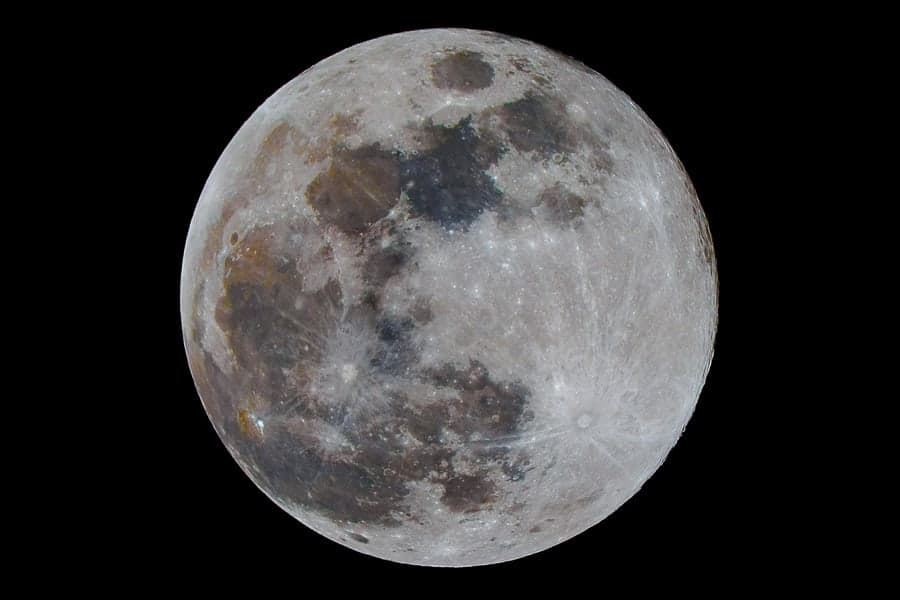
Especially when shooting tight zoomed in shots of the Moon, I often shoot for exposures that allow me to utilize base ISO (100). Gathering enough exposure through these natural means allows me to resolve much more detail and even pull out the subtle coloration of the Moon. That’s right, The Moon is colorful!
Now it’s not exactly a vibrant artist’s palette, but there are clear warm and cool tones present in various areas on the Lunar surface. Again, it’s the quality of the natural exposure (shutter speed and aperture) that allow for the collection of this data. In order to boost your ability to capture this data, make sure you are shooting in RAW format.
Timing and Conditions
As with other forms of nature and landscape photography, timing and conditions are everything. It’s very difficult to take an image of the Moon that hasn’t already been taken, so make it mean something to you. Use it as a subject for which you try to push yourself to make it more and more perfect and/or use it in unique ways.
Timing
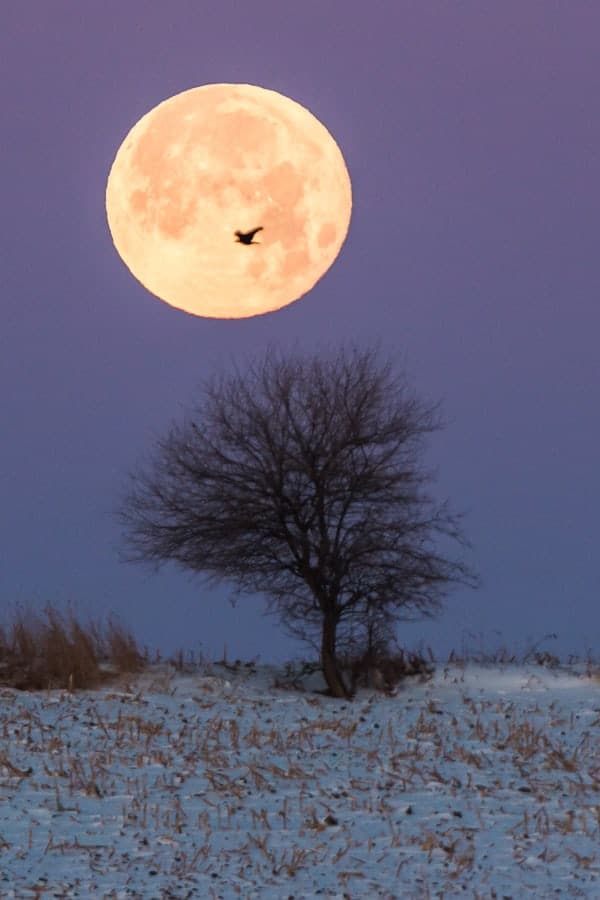
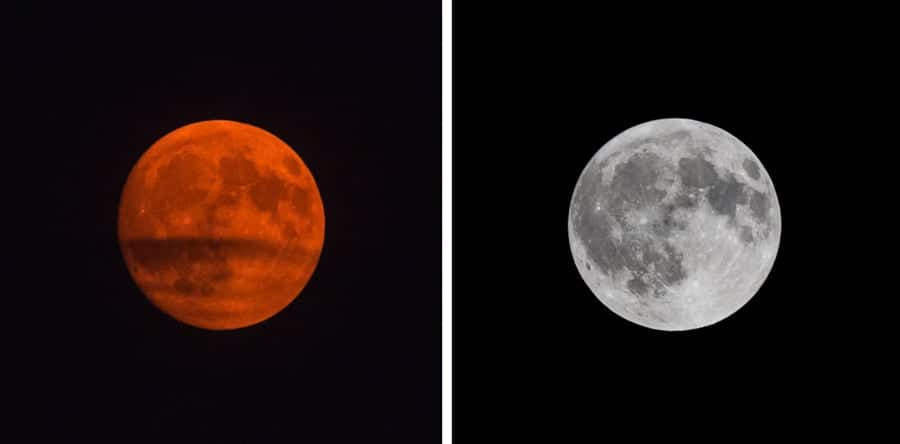
It seems that whenever there is a large, bright full moon, social media is flooded with images of it. This is especially true when we get one of those events known as a “Super Moon”. During the evening of November 14, 2016, the world witnessed one of the “largest” Super Moons in recent history. At a distance of “only” 221,519 miles / 356,500 km, the moon appeared 7.9% larger than its mean size. It’s unlikely that you noticed any difference from a typical full Moon, but it was intriguing nonetheless.

I would wager that more images were made of the Moon on that evening than any prior. That is, until the silhouette of the moon crossed the disk of the Sun on August 21st of 2017.

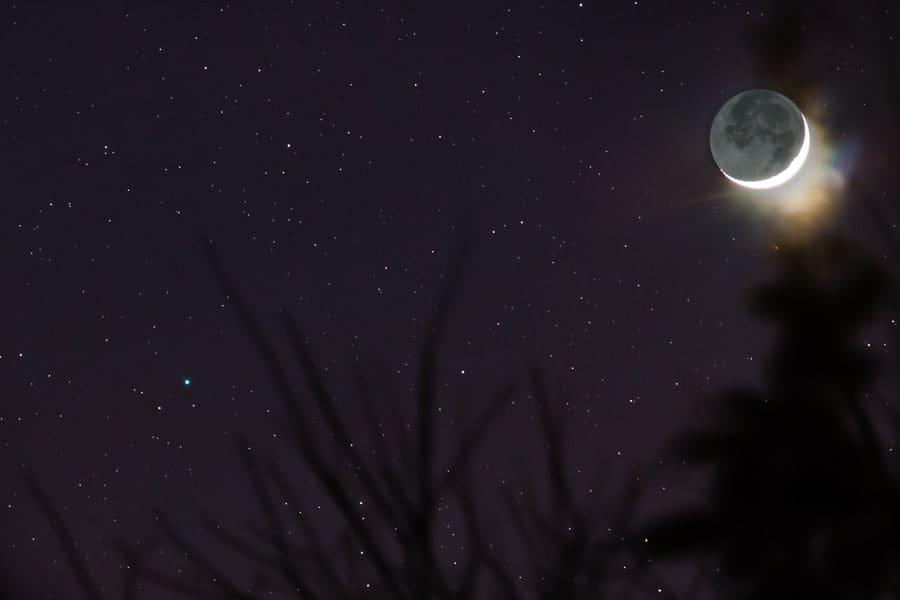
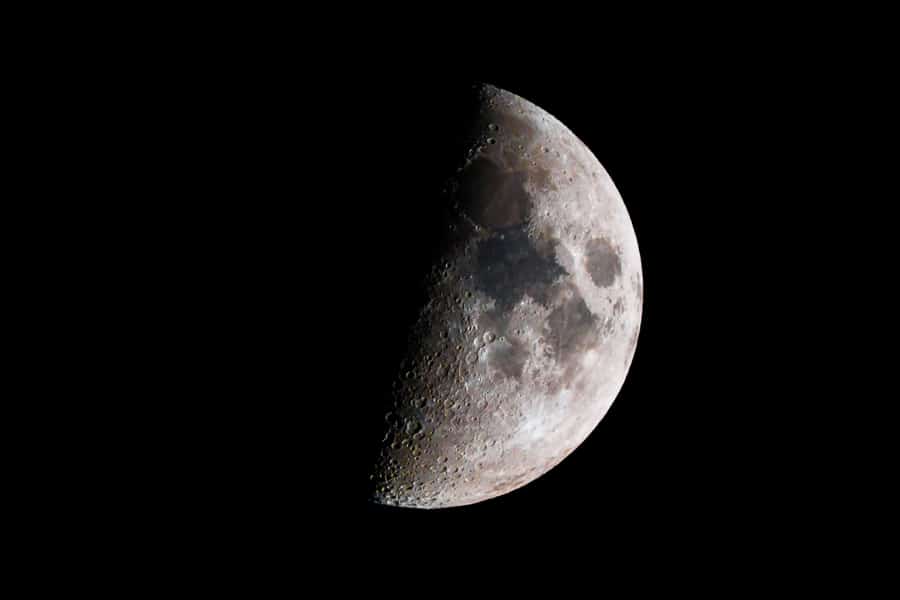
While the Full Moon seems to get all the love, the partial phases are often the most interesting and three dimensional. Think of it as moving your flash off camera. When the Moon is full, your light source (the Sun) is directly behind you resulting in a rather flat light. Shooting partial phases moves your light source way off to the side. In the case of shooting the eclipse, we were shooting the Moon backlit. Take advantage of these movements in the light and you will see all the craters of the Moon in their full glory!
Conditions
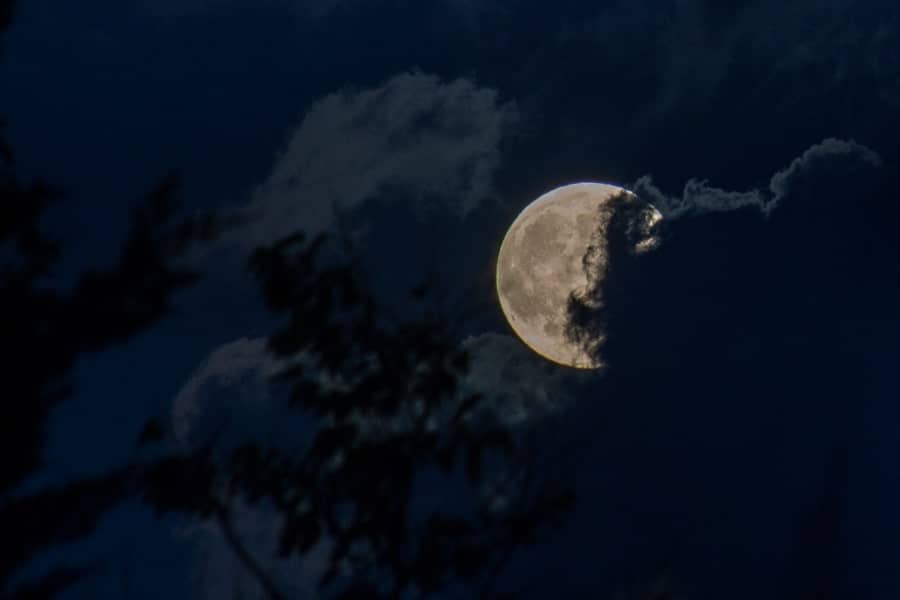
Again, as with other photographic endeavors, conditions are critical. With Lunar photography, I speaking specifically of the atmospheric conditions here on Earth. Of course, with thick cloud cover, getting out and trying to photograph the moon is completely futile. However, if there are breaks in the clouds, they can add some mystery and drama to your image. So a perfectly clear night is not required.
Atmospheric turbulence (a.k.a. “seeing”) is the real enemy, especially when trying to get those ultra sharp images of the Moon. If you take a look at the Moon when zoomed way in on live view on the back of your camera, you are likely to see the effects of this phenomenon. The finer details will “dance” around and this movement will cause your image to blur.
There are two ways to combat the effects of seeing. One is to try to shoot when the effect is less pronounced. This generally happens on those cold clear nights. Take a look at the stars. The more they “twinkle” the more seeing there is. If the stars are very still and not blinking, the seeing conditions are good and your images will be sharper. This is why observatories are often located at high altitudes and in dry climates. These are ares where good seeing conditions are common.
The other way to combat seeing is more of a workaround and utilizes the blending of multiple exposures and specialized post-processing. This practice is known as “stacking”. It works very much like focus stacking where images are carefully aligned and then only the sharpest parts of each image are utilized in the final product. One program that I know is popular among those that photograph the Moon on a regular basis is called Registax. It's a free program with a robust UI and a steep learning curve but it's quite powerful and can even utilize video to render a very sharp image of the Moon.
Post Processing
General post processing of a photograph of the Moon is usually fairly straight forward. Adding contrast and sharpness can really help the details pop. The Moon is a pretty high dynamic range target so make the dark areas dark and the light ares light. Sharpness is often overdone in lunar images. Be careful not to fall into this trap. It might look decent viewed on a small screen at a distance but it doesn't take a real close look to notice over-sharpening. Use it in moderation and use masking to target the edges of the details.
Composite Images
Creating quality composite images of the Moon can be a lot of fun! It can open some doors to creating images that wouldn't be possible any other way. So long as you don't aim to deceive, go ahead and put that Moon into that landscape. Want to make it HUGE? Go for it. Do whatever you find to be fun and keep in mind that transparency of your process when working with composites will go a long way.
Conclusions
Hopefully this article helps to answer your questions on how to photograph the Moon. Experiment, try new things and keep shooting. Even though the Moon has been photographed countless times, it's still a fascinating subject and a lot of fun to shoot. I can't wait to see all the great images you capture!
it’s such a fascinating and elusive subject to photography properly. Most of my better shots of it have been taken when the moon is low in the sky, and magnified by the curvature of the Earth’s atmosphere. But I still lust after the thought of doing it with an ultra-tele lens.
Thank you for sharing your knowledge and experience. I hope you don’t mind, Brad, but I’ve taken a copy of the article for my photography “library” – slotted in with other stuff on astronomy.
Thanks also for sharing some of your photographers – awesome!
Oops – sorry about the typo in the last para – “photographs” !!
It is a lot of fun indeed! I’m glad you found it helpful enough to add to your collection :). Can’t wait to see some of your work!
Cheers,
Brad
Thanks for all your help. Here’s an interesting article about the perceived magnification of the Moon (or Sun) when near the Horizon. The atmosphere does not enlarge, but can distort, the image.
https://en.wikipedia.org/wiki/Moon_illusion
Nice shots, Gonna try this out thanks for sharing
Thanks Frank! Be sure to share what you get :).
Thank you.
Of course Rexx…Thank you for reading!
I’ve recently begun exploring my interest in astrophotography. Is there an older model DSLR that you would recommend? Or is the newest technology worth its value?
Also, the ISS photo is quite remarkable.
Astrophotography in general will benefit from later technologies. However, some older cameras hold their own. My original 6D is a little long in the tooth (2012) and it does quite well at night. I wouldn’t have any problem recommending that camera body. Lunar photography is generally less demanding on equipment as compared to capturing something like the Milky Way. Resolution does help if you’re going to be doing any significant cropping of the image to try to get a tight shot of the Moon. In that regard, I’d recommend something in excess of 20 or so megapixels.
The ISS photo was thrilling to capture :).
It’s a very informative article and beautifully explain the whole thing about how to photograph the moon and how to set up everything related to the (Timing and Conditions, lens, camera etc) would surely share it with my colleagues.