
I am an architectural photographer living and working in England. I use Lightroom every day in my commercial photography work, and in this article I will explain how you can get started using Lightroom.
Lightroom is an application for importing, managing, editing and sharing digital photographs.
Lightroom has different modules for organising and developing your photos. You can edit photos in Lightroom using the very powerful processing tools. Once you have edited photos you can use Lightroom to export files as Jpegs with all the editing baked in. Lightroom is a very powerful application which has been designed by photographers for photographers.
This article is based on my own workflow, which in English translates to how I use Lightroom. This workflow has evolved over the years I have been working in Lightroom, ever since version 1, which Adobe released in 2007.
A couple of points before I go on. I am in England, and am using a windows PC. The images I work on are all captured using my Canon 6D. I take photographs using RAW format, not Jpeg. The photographs I take are architectural, landscape and travel images.
This is not a technical article, this is me trying to explain how you can start using Lightroom. Don’t worry too much about all the technical stuff – I did for years before I learnt one important thing – the only thing that anyone cares about (who is not a photographer that is) is what a photograph looks like. There is plenty of time for technical stuff if that is what you are into, but for now lets get some photos in Lightroom and get you all playing with the sliders and creating great images.
What is Lightroom?
As I said in the introduction, Lightroom is an application for importing, managing, editing and sharing digital photographs. Lightroom is produced by Adobe, and there are three different versions of Lightroom currently available.
Lightroom Classic
This is the version of Lightroom where the photographs are stored locally on the hard drive on your PC/ Mac (or an external hard drive if you have one). Lightroom Classic is the full featured version of Lightroom.
Lightroom CC
This is a new version of Lightroom, where the photographs are imported to the cloud where they are stored. Adobe looks after backups and all that stuff in the cloud. Lightroom CC does not have all the features that Lightroom Classic has at the time of writing.
Lightroom Mobile
Lightroom Mobile is an application for iPhone/ iPad/ Android devices. Lightroom Mobile compliments the PC based version nicely, giving you Lightroom on the go.
What about Photoshop?
Photoshop is a powerful image editing application. Photoshop is standalone software, but integrates with Lightroom. Think of Photoshop as a place to go to do finishing off and complex editing work that Lightroom cannot do.
If you are new to Lightroom I suggest you stick with Lightroom to begin with – there is plenty of time for Photoshop later.
I use Lightroom for 90% of my commercial photography work – I only ever go into Photoshop to do finishing of images, which is normally removing things that I do not want in an image. If I can edit a photograph in Lightroom without using Photoshop I am happy.
How much does Lightroom cost?
Adobe have recently stopped the perpetual license, whereby you could buy and own a copy of the software. New users to Lightroom have to accept that they will be paying a monthly subscription fee, and will need a Creative Cloud account. Don’t worry – it is cheaper than buying Lightroom and Photoshop ever was so no need to be put off by the subscription model.
Check out this page for all the info from Adobe about pricing.
I recommend the Creative Cloud Photography plan, which I have, which costs £9.98 per month. With this plan you get Lightroom CC, Lightroom Classic, Photoshop CC and 20GB of cloud storage.
This gives all the editing power and cloud storage space that I need.
Lightroom Mobile is free, but to sync photos from either Lightroom CC or Lightroom Classic you will need a Creative Cloud account.
Which version of Lightroom should I choose?
I suggest that you start with Lightroom Classic, which is basically the new name for the software that has evolved since version 1.
As you are reading this article I assume you are at the beginning of a journey with Lightroom, which also suggests that you have aspirations in photography in some shape or form.
How do you get Lightroom Classic?
To get Lightroom Classic you have to sign up for a Creative Cloud account with Adobe, and agree to pay £9.98 per month, which is exactly what I do.
Once you have signed up for the Creative Cloud, you can download Lightroom Classic and Photoshop. You can also download Lightroom CC but I would not recommend this. I would leave Photoshop for a while too.
Where are the files kept? Very important point.
Lightroom Classic creates a catalogue. The photographs are not stored in the catalogue in Lightroom. The files are actually stored in a separate folder on your hard drive. The Lightroom catalogue links to the files in these separate folders, and the Lightroom Catalogue remembers all the things that you have done to an image.
I have all my photographs in a single catalogue. This is what it looks like.
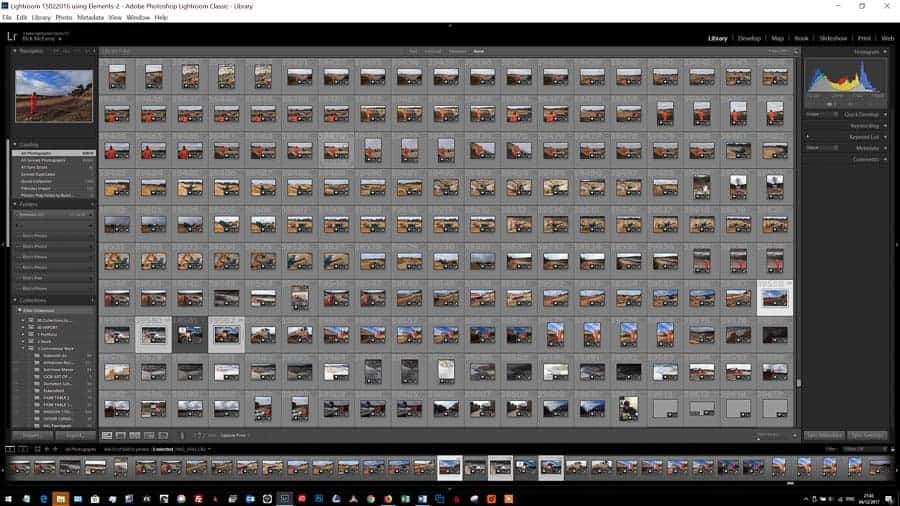
As you can see I have 60,819 images in my Lightroom Catalogue
- The folder containing all my images is huge – 1.34 TB. This folder is located on my external hard drive.
- My Lightroom Catalogue however is much smaller – 3.11 GB. My Lightroom Catalogue is located on my PC hard drive.
This is a fundamental point with Lightroom.
Once you have imported images into Lightroom, all you need to do to find the folder where the images are stored is right click on an image and select “Show in explorer” from the drop-down menu and the location of the folder where the files are will appear in a new explorer window. Let Lightroom look after this for you to begin with.
Another important point – any work that you do to a photograph in Lightroom can be undone. Only when you export an image out of Lightroom are the changes irreversible – to the exported file that is.
The modules in Lightroom Classic
There are seven modules in Lightroom Classic
- Library – This is where all the images are stored.
- Develop- This is where the fun stuff is – this is where you edit images.
I use these two all the time. On every shoot.
- Map
- Book
- Slideshow
- Web
I don’t use the other modules at all really, so will confine this article to the two important modules, Library and Develop.
How do I organise my images in Lightroom?
There are two ways of organising your images in Lightroom. You can either get Lightroom to do this for you, or you can create a file structure of your own, which is what I did.
You can see my file structure in the screen shot above. I am not saying my way is correct, but it works for me, and is nice and simple.
I recommend that you let Lightroom sort your images for now though – it is pretty good at this.
How do I get my images into Lightroom?
On my PC I can insert SD cards into my PC. You might need a card reader to do this, depending on your computer.

The left-hand panel shows where the images are being imported from, the middle panel the images that are being imported, and the right-hand panel shows where the images are going and what is being done to them.
The left-hand panel shows the SD card I put into my computer. That is all fine.
In the middle panel note the two highlighted options.
- Copy
And
- New photos.
I leave these selected for every import. Basically, I am asking Lightroom to copy the files from the memory card, not move them, and to only do this to new photos. If there are photos on a card I have already imported I do not want to import them again.
The right-hand panel is a bit more involved.
VERY IMPORTANT POINT – Build Previews – select Embedded and Sidecar. Don’t worry too much what they mean – all we need to know here is that if you select this option choosing and working with images will be a lot quicker.
- Build Smart Previews – I always do this, so I can edit images in Lightroom Mobile.
- Don’t Import Suspected Duplicates – keep this checked.
- Make a second copy to – I make a second copy on import to my PC hard drive.
- Add to collection – because of the way I work I do not check this box, but suggest that you do if you are starting out in Lightroom. You can add a new collection, which means that the newly imported images will be available to view and edit in Lightroom Mobile, as long as you sync them. To do this right click on the collection you have created and select “Sync with Lightroom Mobile”.
- File renaming
I do this later.
Apply during import.
This is big time saver, but one for later.
Hit Import and let Lightroom import the files into Lightroom.
Well one last thing before you get started editing. You can apply picks, flags and stars to images. For an initial sort I use Picks (keyboard letter P) and rejects (keyboard letter X) to make an initial selection of images I like/ don’t like and want to delete.
Changing settings in Lightroom.
This is the screen where you can change settings. Just go to “Edit > Preferences”.

Editing images in Lightroom
There are numerous ways that you can edit an image in Lightroom. I will go through the adjustments in the order I use to edit images on a daily basis.
To get to the develop module from anywhere select an image and press D for Develop – I know – how utterly logical!
Basic panel
I am going to start with the basic panel, which is the most important panel. I will come back to the stuff above the basic panel later.
The general idea is that you start with the basic panel and work through the sliders from top to bottom.
The first set of adjustments are global adjustments which affect the whole image.
White balance.
As good a place as any to start.
I always start by getting the white balance correct.

If you are new to Lightroom try auto first. Quite often Lightroom does a great job with auto. If you take photographs using RAW rather than Jpeg, you have a range of presets available, which are self-explanatory.
- Auto
- Daylight
- Cloudy
- Shade
- Tungsten
- Fluorescent
- Flash
- Custom
If you have taken the photos in the Jpeg format you have the following options.
- As shot
- Auto
- Custom
Auto will get you going. You can move the temperature slider if you want to tweak the white balance more – move to left to make the image colder, move to the right to make the image warmer. Have a play with the sliders and get the image looking as natural as you can.
Exposure
Slide to the left to reduce the exposure, which darkens the image, and slide to the right to increase the exposure, making the image lighter.
How much should you move the sliders? This depends on the image and the image capture exposure. Just move the sliders until you like the adjustment – these are all visual things.
Contrast
Images need contrast, or they look flat and dull. Contrast is the difference between blacks and whites in an image. Slide the contrast slider to the right and you will see what it is doing. I never slide to the left. Just move the slider until you like what you see. I normally add between 20 and 50.
Highlights
I tend to move the highlights shadow to the left to darken the highlights. The amount varies by image, but don’t be afraid of going all the way to the left.
Shadows
Next, I will move the shadows slider, normally to the right, to lighten the shadows.
Whites and Blacks
I let Lightroom set the black and white point for me. I do this by holding down the shift key and double clicking the whites slider. Lightroom moves the slider to maximise the whites in an image. Repeat this for the blacks slider.
Clarity
Clarity is an interesting one. I use this on every photo without exception. Move the slider left and right and see what it does. I usually move my slider to the right somewhere between 25 and 75. Don’t worry about the numbers – it depends on the effect on your image. And nothing else!
Clarity adds contrast to the midtones in an image. And it also brings out textures in an image nicely. Try it on something with texture and you will be amazed at what it does.
Vibrance
I adjust the vibrance on every commercial image I produce. What is the vibrance slider doing? It increases the intensity of the more muted colours in an image, doing less to the more dominant colours. Try it and see what it does. I rarely slide to the left, and for most images will use a range of + 10 to 35.
Saturation
I do not like this slider, and never use it. Don’t use it and you will be fine.
Tone Curve
This is a great tool for fine adjustments of the highlights, lights, darks and shadows. The basic panel in Lightroom is so powerful these days I don’t use this panel any more.
HSL/ Colour/ B&W
These are more advanced selective adjustments which are something to try later.
Split toning
Another more advanced technique that I never use.
Detail
Very important. This is pretty much what it says, the detail slider. Slide to the right to bring out more detail. I have a default of 75 for my detail, which I apply to every RAW image in Lightroom. I don’t bother with it much after that. Find a level that works for you and stick with that for now – don’t worry about this too much
Note – Lightroom applies a default 25 to RAW files.
Lens Corrections
I always check the lens corrections option “Enable profile correction”. This adjusts any errors that a lens might have and makes a picture technically correct.
Transform
This is the panel where you can correct the verticals in an image, if for example you have a building which is leaning. Try auto first, and see what this does. Vertical makes things vertical, level makes things level.
The sliders below are useful manual adjustments. I use vertical, horizontal and rotate all the time.
If you click on the pointer on a slider you can use the left and right arrows keys to make the adjustments – this can work better than dragging sliders. Again, this is a visual correction, and when you start making an adjustment a grid appears to help you get things looking right.
Effects
Here you can add a vignette. I use this on most of my photographs, unless the subject means a vignette just won’t work. It gives you a subtle darkening around the edges, which makes the centre of an image brighter and stand out more.
I leave this in highlight priority, and just slide to the left somewhere between -10 and -30. A vignette needs to be barely visible to work.
Grain I do not use.
Dehaze I do use.
Slide it to the left and you add a misty look to an image. Slide it to the right and it will remove and haze in an image. A very powerful tool.
Camera calibration.
The profile tab is related to the camera profiles in your camera. I sometimes use this on images taken on my Canon 6D. You can leave this for now though.
There are a few other features top right.
Histogram
That graph top left. It is very important, and tells you lots of things about the range of tones in an image. To be honest I rarely use it – lets just park that for now. If you stick to the principle that if something looks ok then it is ok you will be fine to start off.
Under the histogram graph are the local adjustment tools, which are, from left to right;
Crop Tool
This is quite straight forward, and allows you to crop an image. This means selecting part of the image, getting rid of things that you do not want. You can also straighten the horizon with this tool.
Spot healing brush
This tool removes spots from an image, which in my case is sensor dust spots. Select this tool, check the “Visualise spots” box and then click on any white spots. Lightroom does a pretty good job of dealing with spots on an image. I do this to every image without fail.
Red eye reduction
Use this of you have taken a photograph with flash and have that annoying red eye. This works a treat. I do not use this as I photograph buildings and scenes without people!
And finally in the Develop Module
With the next three tools, you select the tool, and then from the drop-down box select the effect. There are many options in the drop-down menu, but two I will mention here are dodge and burn. These are terms that come from the days of the darkroom, where dodging and burning were tools used with the image being projected by an enlarger onto paper. I know – back in the dark ages. What you need to know is that dodge lightens, by a default of 0.25 of a stop, and burn darkens, by 0.25 of a stop. These tools are incredibly effective at selectively lightening and darkening parts of an image. You can increase the amount just by moving the sliders.
You can apply dodge, burn and all the other options to each of the tools I will mention now.
Gradient filter
This tool adds a filter, such as a graduated filter. To do this select the tool, then click and drag to add the filter. To darken a sky, start at the top, click at the top of the image then drag down. To see what is affected in the picture check the “Show selected mask overlay” and the part of the image affected is coloured red.
Radial filter tool
I love this tool. It is like the gradient filter tool, but when you select this tool and click on an image you get to add a circular selection. You can change the shape of this selection with the mouse. And Lightroom defaults to the area outside of the shape. Click invert and it changes to the bit inside the selected area.
Adjustment brush
This adds an effect to wherever you brush it onto a photo. It is like painting an effect onto part of a picture.
Play around with these tools and you will get the idea – and if you don’t like something just delete it.
Remember this – Lightroom is a visual tool – just go with what you like. And don’t overdo things.
This is a brief guide to the develop module – I could write a book about this module on its own.
What I want to get over is this – editing in Lightroom is non-destructive. Anything you can do up to the point of exporting an image can be undone.
Once you have exported an image that is that. You can of course make more changes to the file in Lightroom, and can undo anything at any time.
Don’t worry about all the technical stuff – play with the sliders and make the images look the best you can to our eyes.
But please please please remember this – if someone looks at your image and the first thing they notice is the processing then in my opinion you have failed.
I work on this simple principle – I want to make every image look the best I can, with my own style, but to be realistic and for the processing not to be the main feature of the image.
Develop module done – let’s get some images out of Lightroom for you to share or email.
Exporting images from Lightroom.
Once you have processed your images you want to do something with them. To get images out of Lightroom you export them.
To do this just select the images you want to export by clicking on them. To export one just click on that. To select more images press the Control key and click on the images you want to export. Then right click, select “Export”, and a number of options appear. To start with choose “Export for email (hard drive)”, and the images will go into a folder of your choosing. The files are small and great for posting on social media and emailing. There are lots of options to experiment with here as well.
Lightroom Mobile.
Lightroom Mobile is available for iPhone, iPad and Android devices. You need to sync collections with Lightroom Mobile to be able to use it. And if you have created Smart Previews of your images you can edit images on any connected device and they sync to all other connected devices.
Lightroom Mobile is another subject in itself – check out the information on Improve Photography to find out more about the power of Lightroom Mobile.
Lightroom Collections
What are Lightroom Collections? The best description of collections I heard was an analogy – think of collections in Lightroom as playlists in your music library. You don’t play every track in your music catalogue, do you? No, just your favourites. Collections work in a similar way.
A collection can be a collection of images of a
- Place
- Person
- Colour
- Subject
- Mood
- Weather
- Building
- Subject
An image can be in any number of collections. The image is not physically moved – all that happens is that Lightroom knows where the image is and points to it. If you edit an image in a collection this edit is applied to all versions of the same file.
To create a collection, go to the collections tab in the library module and click on the + icon. Name the new collection and you are off.
One more thing – right click on the collection and select “Set as target collection” and then to add an image press B in your keyboard and the image is placed in your target collection.
Once images have been added to collections, which can be found in the Library Module, something magical happens. Lightroom Mobile comes into play. And you can share collections.
Keyboard shortcuts in Lightroom
Here are 5 keyboard shortcuts that I use all the time.
- G – takes you to the grid view.
- D – takes you to the develop module
- E -makes an image full screen within the panels
- F – makes an image actual full screen
- B – add an image to the target collection
There are lots more available, but these will help you in the beginning.
Summary
I hope that you find this helpful in getting started with Lightroom. There are lots more things that I do not have time to write about in this article – Lightroom is a book or three on its own.
Get some images into Lightroom and learn how to edit them. And enjoy doing this. It is great fun, not that hard to use, and an incredibly powerful image editing tool.
Please ask any questions in the comments field which I will happily answer.
If I read correctly, you have all 60,819 of your images in one folder ??!! Yes, I can see having them all in one catalog, (and I do that), but what would be the rationale for having them all in one folder? Maybe I misinterpreted?
Hi Rick
There is main one folder, with lots of sub-folders. I was trying to make the point that the folder with the images in is not the Lightroom Catalogue. Does this make sense?
Thanks for the comment.
Regards from England
Rick