
White Balance is one of those photography terms that sounds intimidating at first, but once you understand a little bit about it, your photos will look more professional in no time. White Balance just refers to the balancing of color temperature in your photos. You know how some photos have that blue, yellow, or orange color cast, and others look just like you would see them with your naked eye? The ones with the blue, yellow, or orange color casts look that way because the white balance wasn't set properly in camera or adjusted by the photographer during post processing. In this article, we're going to discuss the basics of white balance, and provide a mini-guide for using it to improve your photography.
What is the definition of White Balance?
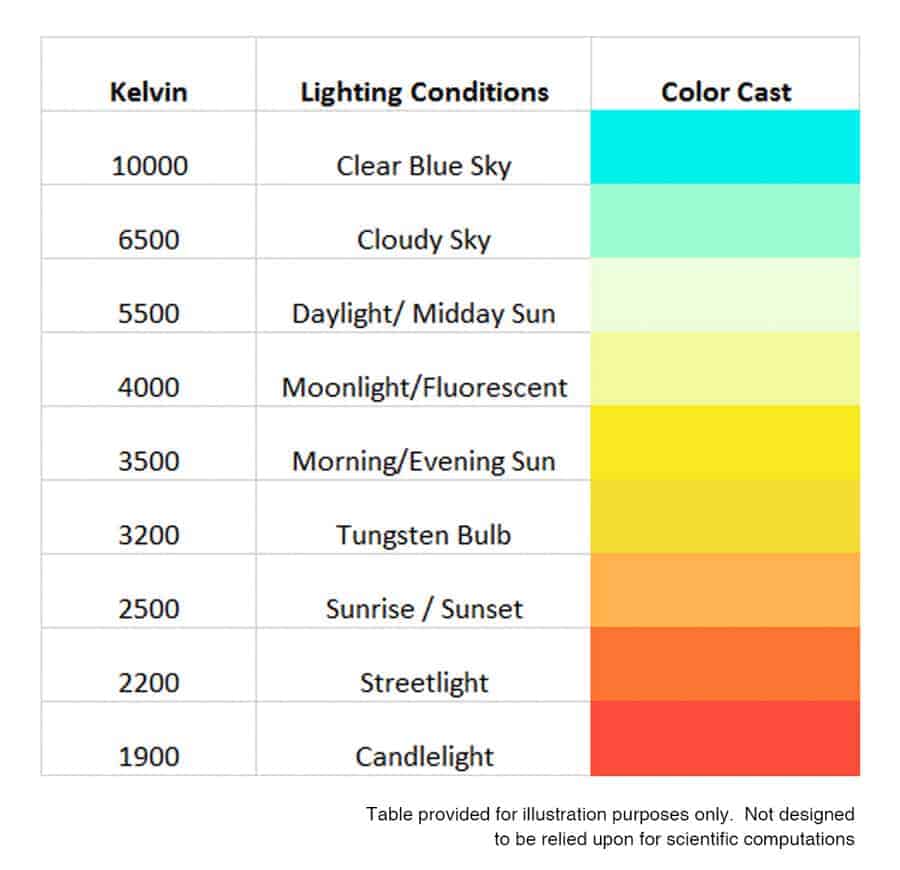
According to yourdictionary.com, in our cameras, white balance is “a setting that compensates for the differences in color temperature of the surrounding light”. So, how much do you know about color temperature? Have you ever gone shopping for light bulbs and noticed all of the different options? Soft White, Bright White, Daylight? Did you just grab one and go, and then get home and realize that the light was different than some of the other bulbs in your house? This is because of the color temperature of the bulbs. Color temperature is measured in Kelvin, and represented by the symbol K. Soft White bulbs are 2700-3000K, Bright White or Cool White are 3500-4100K, and Daylight bulbs are 5000-6500K. 5500K is commonly considered the color temperature rating for daylight. Candlelight is on the low end of the Kelvin spectrum at 1900K and a clear blue sky is on the high end of the Kelvin spectrum at 10000K.
For our purposes, we only need to know that lower light and indoor lighting conditions typically have lower Kelvin numbers, and brighter lighting conditions typically have higher Kelvin numbers. The lower the Kelvin number, the more yellow the light, the higher the Kelvin number, the more blue the light. To give you an idea of where different lighting situations you will encounter fall on the Kelvin scale, please refer to the table below. These are not exact numbers, but will help you get a general idea of where your lighting situation falls on the Kelvin scale.
Enough “Geekery”…Why should you care about White Balance?
If you want to make sure your photos don't have that nasty blue, yellow, green, or red color cast, you'll want to pay attention. In order for our cameras to capture images that look the same way as we see them with our eyes, we need to give the camera information about the lighting situation we are shooting in. Our brains have the ability to compensate for the different color temperatures that we see with our eyes, but our cameras need a little extra help. We've all seen photos where the subject is as green as the Grinch, right? Unless that's the look you're going for, that's probably not your desired outcome. Understanding white balance will help you properly set your camera for the lighting conditions you are shooting in, as well as make additional adjustments in post processing, if necessary. Very simply, the Kelvin setting on your camera should correspond to the lighting situation you are in. If you are shooting in candlelight, your Kelvin setting should be around 1900K, if you're shooting during the day with an overcast sky, your setting should be around 6500K. By telling your camera the color temperature of the lighting conditions you are in as you're taking photos, you can have confidence that the images coming straight out of your camera will look the same as what you are seeing with your eyes.
Camera White Balance Presets
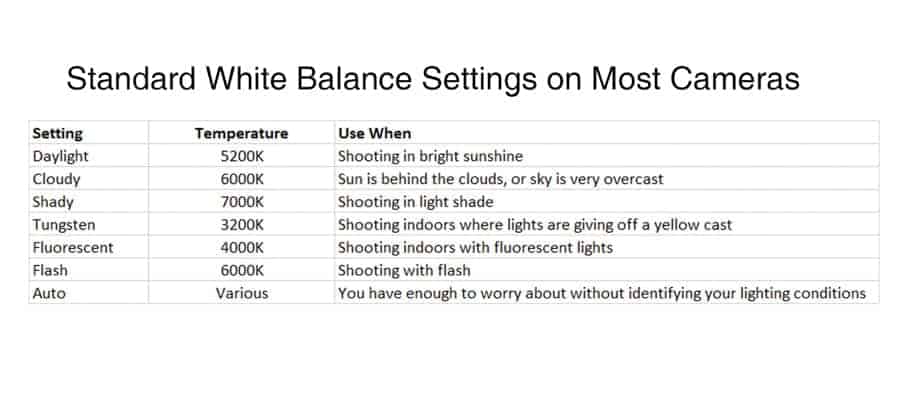
If your head is already spinning with all these Kelvin numbers, don't stress…you don't NEED to memorize the different Kelvin settings for each lighting situation! Your camera will have white balance presets you can choose from for common shooting situations you'll find yourself in – Daylight, Cloudy, Shady, Tungsten, Fluorescent, and Flash, and Auto. The table below outlines the presets found on most cameras, along with the associated color temperature rating, and when you would use each one.
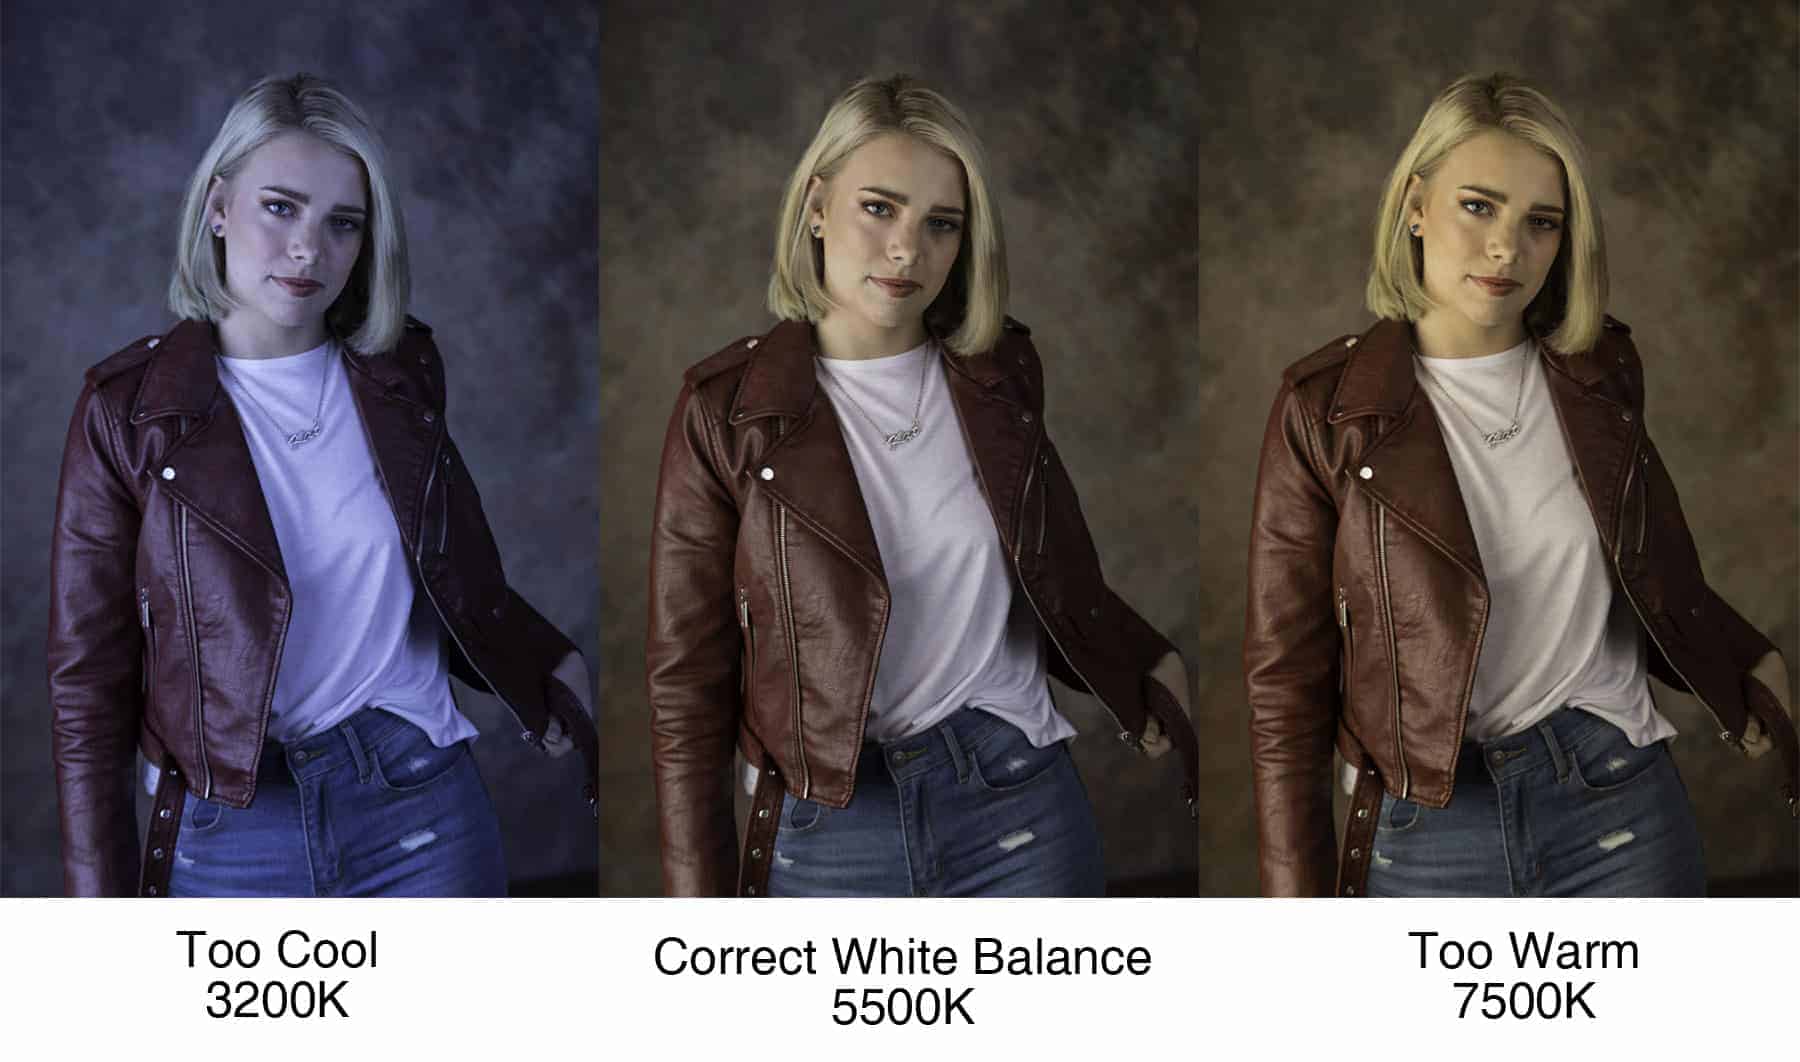
If you're just getting started with photography and have enough to worry about with aperture, shutter speed, and ISO settings, you might just want to choose the Auto White Balance setting for now, and let your camera do the work for you. If you are shooting in pretty straightforward lighting conditions, the camera will do a good job of adjusting white balance for you. But, if you're already familiar with your basic camera settings, and just haven't played around with white balance settings yet, you might want to start by using your camera's white balance presets. Play around with the different white balance settings in your camera, and see what happens to the color cast of your image if you choose a setting that doesn't match your actual lighting conditions. For example, if you're shooting in daylight conditions, change your white balance setting to Tungsten. See how your image is too blue? That is the camera trying to color correct for the Tungsten (more yellow) lighting it thinks you are in, based on what you've told it with your white balance setting. The camera thinks it needs to add blue to the image to achieve white balance. Since you are REALLY shooting in daylight conditions, which is more blue than tungsten to begin with, adding blue to the image makes the image too blue. Or, if you are shooting in Tungsten lighting (which is more yellow than daylight), change your camera to the Daylight setting, and you will see that your image is too yellow. This happens because your camera is attempting to “balance” the color in your image, but it isn't able to do so because you gave it the wrong information about your lighting situation by choosing an incorrect white balance setting. The good news about this is that white balance can be adjusted quite easily after the fact in your post processing, but that doesn't mean you shouldn't make your best attempt to get it right in camera. If you're shooting in daylight, choose the Daylight setting, if you're shooting indoors with tungsten lighting, choose Tungsten. You can always tweak it in post, but you'll have a better starting point.

Custom White Balance Settings
Once you have spent a little time shooting with your camera's white balance presets and are comfortable with that, you might encounter some lighting situations where the presets aren't doing the best job. This is when it's time to set your own custom settings by choosing a Kelvin rating to achieve white balance. To do this, set your Kelvin number based on the general lighting conditions you are in (use the Color Temperature table above as a starting point if you need direction), take a shot, review it, and adjust your Kelvin setting up or down depending on whether your image needs to be more blue or yellow. If your photo is too blue, then you've set your temperature too low, because the camera is introducing more blue than it needs to color balance the image. To counteract this, you should move your Kelvin rating to a higher number to match the actual lighting situation you are in. If your photo is too yellow, you have chosen a Kelvin rating that is higher than your actual lighting condition, and the camera is adding more yellow than it needs to color balance the photo. In this case, decrease your Kelvin rating to a lower number to more closely match your actual lighting conditions.
Warmer = Higher , Cooler = Lower
An easy way to remember which direction you need to move your Kelvin rating is to think of it in the same way as air temperature – higher numbers on the thermometer mean warmer temps, lower numbers mean cooler temps. When it comes to making the Kelvin adjustment for white balance in your camera, if you need to “warm up” the image, move the number higher; if you need to “cool down” the image, move the number lower. Trust me on this…if you overthink it, it will drive you a bit crazy!
Base your Settings on your shooting situation
If you're going to be shooting in a stable lighting situation, e.g. your studio or outside on an overcast day, you might be able to just set your camera's white balance setting and leave it for the rest of the shoot. However, if you're shooting in a variety of lighting conditions that require different white balance settings, you may want to choose auto or one of the other presets to handle the main white balance settings and then tweak the settings in your post processing software if needed. While it isn't necessary to adjust your white balance settings every time the lighting situation changes during a photo shoot, understanding the impact of color temperature on your photos will help you get more consistent results straight out of camera every time.
Adjust in Post if Necessary
Even if you did your best to adjust for white balance in camera, you may need to tweak it in post processing to get it just right. White balance is fairly easy to adjust in post processing, especially if you shoot in RAW file format. It can be adjusted with jpeg images, too, but you don't have quite as much latitude, so doing your best to get it close in camera will make it easier to achieve the desired result in post processing. The white balance sliders in most post processing programs work similarly; if your photo is too cool (blue), move your slider to the right to warm it up; if your photo is too warm (yellow), move the slider to the left to cool it down. When it looks right to you, stop. Simple as that!
Summary
To summarize, to achieve proper white balance in your images straight out of camera, you will need to give your camera enough information about the lighting situation to make your images appear as you see them in real life. When you're first starting out, using the Auto setting is a safe way to get good results. Just as you move to manual settings with your aperture, shutter speed, and ISO settings, eventually you will want to exercise more control with your white balance settings by setting your Kelvin rating. Just remember this – if you need to “warm up” the image, move the number higher; If you need to “cool down” the image, move the number lower.
I hope this information has helped you understand a little more about white balance and what your camera is doing behind the scenes with the information you are giving it. I would love to hear your feedback on how you approach white balance in your photography.
This is very informative. Thank you.
You’re welcome, Rosemary! I’m glad you found it useful.
This is a very helpful article! One question-with all the new light bulb options how should I set my camera for LED lighting? What would be the Kelvin number? Thanks!
Becky, LED bulbs are also available in soft white, cool white, and daylight, so you would want to set your Kelvin number in the same range. Soft White bulbs are around 2700-3000k, Cool White 3500-4100K, and Daylight around 5000-6500K. LED lights are more efficient, but the color temperate ratings are very similar to traditional bulbs. Thanks for the question!
If you are shooting at night around a city, for example at artistic light display, or illuminated buildings what white balance setting would you recommend?
Hi Michael, good question. I would probably start with a test shot in the 2200 Kelvin range, and tweak it from there. If it’s too cool, move the number a little higher, too warm, move to a lower number.
i have been too mystified..before..to try to do anything but ‘auto.’ Your explanation was good and I’ll begin to try different settings. Thank you.
Glad to hear it. Once you get the hang of it, it’s pretty straightforward, but it’s nice to know that you always tweak in post if necessary,too.