
As you start to learn more about flash techniques and lighting setups, you are guaranteed to hear or read about Rembrandt Lighting or the Rembrandt Triangle.
This is one of the most common lighting setups along with short and long lighting, split lighting, butterfly lighting, loop lighting, or clam shell lighting. If you are just getting started in flash portrait photography (or even the use of controlled natural light such as large windows), a simple internet search of these terms will get you started on the path to understanding light setups and how to implement them.
What is Rembrandt Lighting?
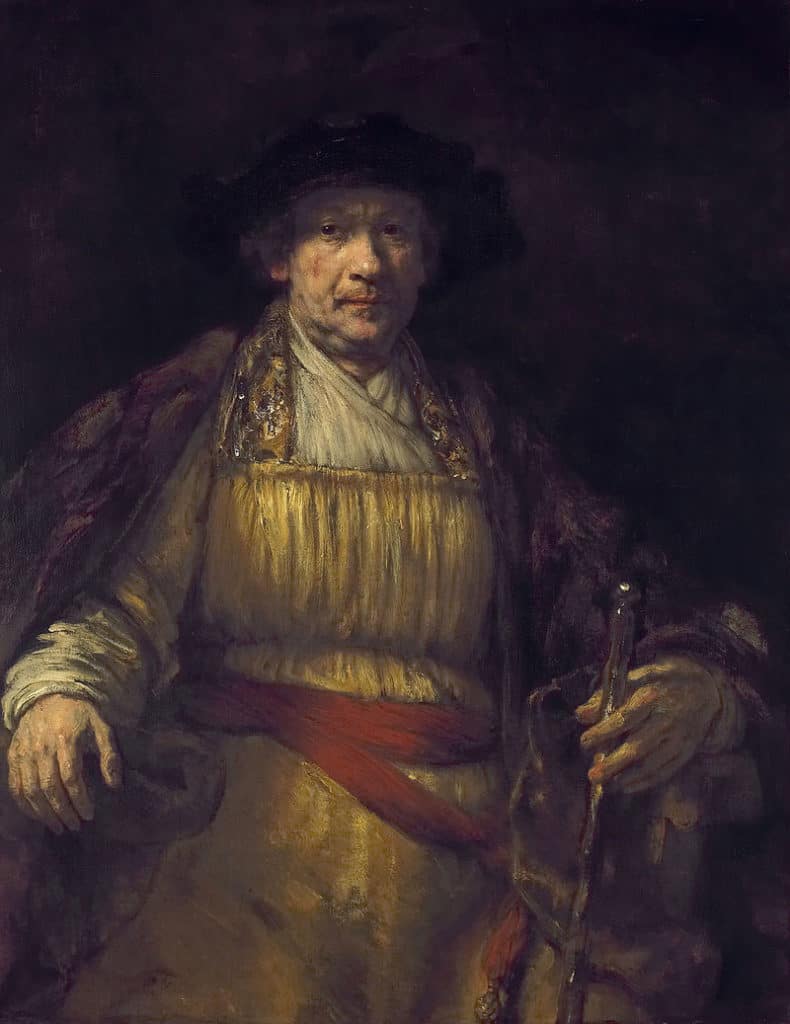
Rembrandt Harmenszoon van Rijn is generally considered one of the greatest artists of all time. His works depict a wide range of style and subject matter, from portraits and self-portraits to landscapes, genre scenes, allegorical and historical scenes, biblical and mythological themes as well as animal studies. In addition to his prolific work, Rembrandt has also come to be known by photographers as the namesake of a very specific style of portrait lighting.
It is a style of portrait lighting that was made popular by Rembrandt long before cameras were invented. Of course, Rembrandt did not invent the lighting style as there are certainly earlier artists that employed it. However, he did use it to great effect and success and as a result such lighting of a portrait gained the moniker of Rembrandt Lighting. Some accounts recall that he did many of his portraits in a location that had a window in a specific location and sat his subjects in the same place, thereby creating a consistent and distinct lighting style in many of his portraits.
Identifying Rembrandt Lighting and the Rembrandt Triangle
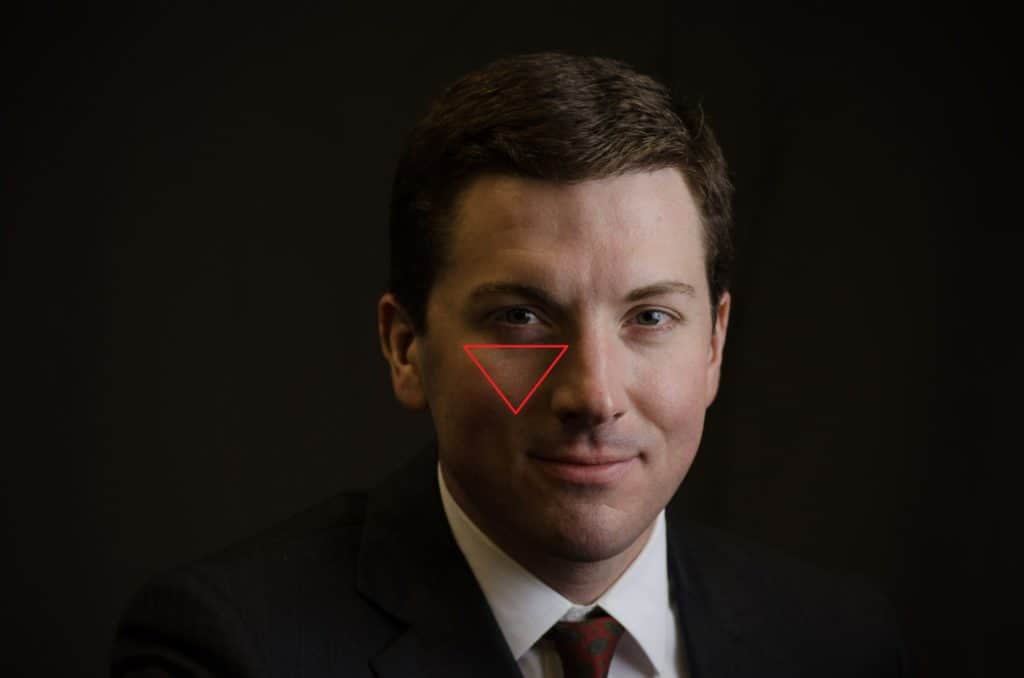
Rembrandt lighting is typically identified by the triangle of light on the cheek that is furthest from the light source. The shadow of the nose and cheek meet which creates the small little triangle of light in the middle. Technically, the triangle shadow should be no wider than the eye and no longer than the nose. The thing that distinguishes Rembrandt lighting from simple short lighting is this triangle of light.
However, there is more to Rembrandt Lighting than just this triangle. It is a very specific style that places approximately half of the subject's face in some shadow compared to the other side. It is on this shadow side that the aforementioned triangle appears. This style of lighting tends to add drama to the portrait. Compare this with something bright and airy like clam shell lighting and you can see a distinct difference.
The triangle is important as it allows the photographer to create this dramatic short lighting effect and still put light on the eye that is on the shadow side of the face. This is the characteristic that brings it just a little back from being as dark and ominous as split lighting, which puts the entire side of the face in shadow. This can allow you as the photographer to convey exactly the kind of effect that you want.
Utilizing tiny variations in light setup are important for conveying mood or personality. Let's say, for example, you are shooting headshots for a movie poster. A true villian might be shot with split lighting (with one side of his face completely in shadow) while another character who may appear bad at first but finds redemption in the story can be shot with Rembrandt light to show the glimmer of good in their character. You can convey all of that with a simple variation in the position of the light. For a more common example, you may be shooting a high school senior that wants a dramatic portrait. Split lighting may be too much and convey an evil or even sinister look. However, Rembrandt Lighting is a good balance between dark and bright for such a subject.
Why Is Rembrandt Lighting Popular
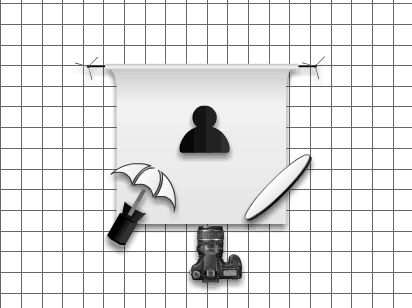
It is simple to set up. As you can see below, you don't need much gear. In fact, if you find the right location (like a window), you can get perfect Rembrandt Lighting without any gear other than your camera. If you choose to go the route of artificial light, you really only require one flash. You can modify that simple setup to get the look that you want, but at its very basic, Rembrandt lighting is a single light source setup. It doesn't get any easier than that.
In addition to only needing minimal gear, positioning the light is not complicated. As you will see below, it's hard to get the position of the light wrong if you are paying attention.
It is also easy to identify. This is in part because you are only using one light. So, if you are trying to achieve Rembrandt Lighting, you will be able to see when you have it right. The triangle under the cheek and the light in the eye on the shadow side are readily identifiable when you take the photo. You can then adjust positioning of the light and the subject to work off of that baseline to get exactly the look and variation you want.
It looks great! Some lighting setups really distinguish a professional portrait from an amateur snapshot. Rembrandt Lighting is one of them. Despite its simplicity, this type of light setup is distinctly a professional look. Your clients will appreciate your ability to create a distinct look for the image and viewers will know that it was done with purpose and a goal in mind. It also looks natural. After all, this was named after an artist that used window light to light his subjects so when done right, it gives the feeling of seeing someone lit by the natural light of a window. In my opinion, this setup has a unique blend of looking very professional and purposeful while at the same time looking natural.
This style of lighting is also very flattering in most cases. Due to the shadows on the side of the face and below the chin, you can make someone look thinner and accentuate their jaw line in a flattering way. This is particularly useful for hiding a little bit of a double chin. Some subjects may want to feature one side of their face over the other or hide a pimple on one side. This technique allows you to capture some detail in the entire face while minimizing areas as necessary. When done well, almost everyone looks good with Rembrandt Lighting.
How To Set Up Rembrandt Lighting
In its most simple iteration, the Rembrandt setup can be accomplished with a single light, or, as Rembrandt himself used, a single window.
The basic setup consists of a single light source about 45 degrees to one side of the camera pointing at the subject and raised above the eye level of the subject pointing down. There are a few reasons for this setup. First, placing the light to one side creates a light side and shadow side of the face. Without the elevation of the light above eye level, this would result in one side of the face being lit and the other side in total shadow. The more off axis (or to the side of the subject) the light gets, the darker the shadow and the more distinct the transition from light to dark becomes. It is important not to go too far to the side or you will lose the catch light in the eye on the shadow side of the face. This will give the eye a dark and lifeless look more akin to split lighting or short lighting than Rembrandt Lighting.
45 degrees to the side is a good starting point for traditional Rembrandt Lighting.
The elevation of the light source is very important because that is what creates the famous Rembrandt Triangle on the cheek. As you raise the light above eye level, the light is able to travel above the nose and reach the cheek on the other side of the nose. This is what forms the triangle and distinguishes Rembrandt Lighting from more basic short lighting.
If you have a constant light or modeling light as part of your setup, it becomes significantly easier to position this light to create the triangle in the correct spot. If not, it becomes a trial and error series of adjustments.
A good place to start for height is about a foot or two above eye level pointing down at the subject.
If you are working for a paying client, I would suggest having someone (or even use yourself) to stand or sit in position to get the light correct before the client arrives. Of course, your client may be a different height or have different features that require some fine tuning, but getting it close before they get there can save a lot of adjustment time, give you more shooting time, and simply make you look like you know what you're doing!
You may also want to add a reflector on the shadow side to soften the transition from light to dark. A reflector (or even a low powered fill light) can lighten some of the shadows and add more detail in the shadow area. Many purists will say that adding a reflector is not “true” Rembrandt Lighting. I say who cares what they think. Create the look that you want for your client. There are no absolutes in photography and just about all of the so called “rules” are made to be broken.
If you are using a window rather than a flash, then you have some other considerations to make. If it is an overcast or cloudy day or the sun is on the other side of the building from the window, then you can get your subject right up close to the window for a softer light. If the sun is shining directly into the window, then you may want to consider moving them away from the window and perhaps out of the path of direct sunlight to avoid very harsh shadows. Of course, like I said above, rules are meant to be broken, so if you want more dramatic transitions from shadow to light then do the opposite of what I just suggested. There is no right or wrong. The important thing is not what you do, but knowing why you do it and to what goal.
When You Should Use Rembrandt Lighting
We touched on this a little before, but Rembrandt Lighting is a very versatile method of lighting a portrait. I frequently use Rembrandt Lighting as a baseline setup for corporate headshots. From there I can add additional modifiers such as a reflector or a fill light. This will also work well for virtually any upper body portrait all the way to a close up headshot like the one above.
The versatility of Rembrandt light allows you to use it for more serious poses and also with smiling poses. This is one of the reasons why it can work with so many type of shoots. You can work through various looks with the subject and keep the lighting setup constant. Then you can add to it without much modification of the original key light. For this reason, it is a great setup to use when you need to work quickly. In the image above, we did the entire shoot in about 25 minutes (including setup time).
Overall, Rembrandt Lighting is a technique every photographer should have in their tool box. It is one of my go to setups in most individual portrait situations. Whether you have an off camera flash, or just a window, give it a try, then modify it and add your own style.
I would love to hear from all of you what situations you use this type of light setup and what your experiences have been. Leave your experiences in the comments below.
Want to learn more about off camera flash? Check out some of these great Improve Photography links…
Nice write up and explanation of this type of lighting. It can be nicely used with either Full Face as shown or with either 2/3 facial views while normally the light is lower when working with a profile view of the face.
Having a modelling light allows the photographer to see the pattern of light although, with digital imaging, tests can be done at no expense and with immediate results if using a strobe without a modelling light. Generally it is just too difficult to estimate the location of the light for the precision of the nose/check shadow alignment without a modelling light to see where the light actually falls on the face.
Creating a nice modified butterfly (loop lighting) is quite simple to do without a modelling light as it allows more room for a nice pattern of light on the face without the precision of Rembrandt lighting. I found the easiest method to accomplish this is to pose the subject in either Full face or 2/3 facial view to the camera and then move in front of the subject so as photographer you view the subject in FF. Next take the light and place the stand an arms length to either side of the subject depending if the subject looks better with short or broad lighting and raise the light about 18″ above the subjects head. Invariably, the result will be very pleasing to the subject.
All good advice Murray. Thanks for the comment and taking the time to write an informative addition to the article.
In the photo shown I used a rectangular soft box that was higher than it was wide. This helped me cheat a little on the height of the light because I didn’t have to be as precise. It’s also why the “triangle” is more subtle and less defined (ie softer).
I noticed most of rembrandt’s paintings have near-side keys (short light), while if I’m not mistaken, most people prefer to broad light (far-side key). At least, in the cinema world, far-side key is the default