
Backpacking With a Camera:
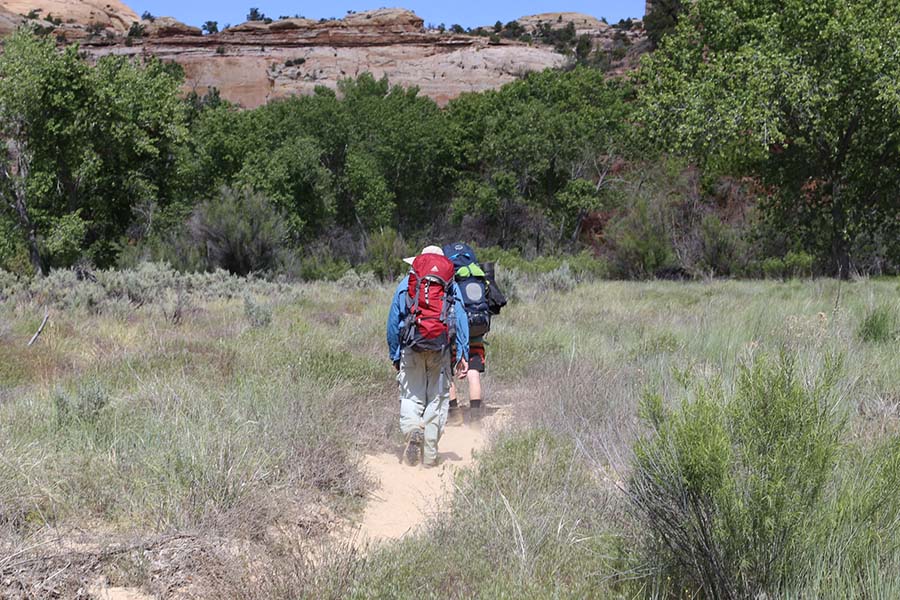
I have been doing a lot of backpacking this summer for work and for my own photography experience. For these trips I carried my camera for well over 70 miles of backpacking trails. These miles were down huge cliff faces, deep rivers and canyons and plenty of bush whacking. I gained a greater appreciation for the plight of DSLR photographers and why they complain about weight of gear so much.
With all that time on the trails I have gained a few well learned lessons that I would like to share with you today
Do You Need a Camera Backpack?
The quick and dirty answer to this question is no. You do not need a camera backpacking backpack in order to go backpacking with your camera. I don’t use one, and I have taken my camera close to 70 miles worth of trails on multiple days. I will show you a couple cheap tricks to protect your gear.
As for the question: is there a backpacking backpack designed to hold cameras and your camping/hiking gear? The answer is that they are few and far between. F-stop supposedly has one, but I have never used it nor have I seen a review on this site for it. If someone from that company wants to reach out to me collaborate, I will gladly do so. I have close to 30 miles of Zion back country I would like to backpack in the coming months to years. So you will have to make due with a regular backpacking backpack.
Managing Weight:
This will be the biggest challenge for you gear heads. Sometimes the best areas are far outside the reach of vehicles. In order to get there you will need to camp and backpack in many, many miles. If you think you will be ok with bringing 30 pounds of camera gear plus 50 pounds of hiking/camping gear, you have another thing coming.
I find the best solution is bring either one or two lenses. Since I am discussing landscape photography, bring you widest angle lens and then bring one telephoto, if you would like. I run with a two lens set up when I am day hiking, but for backpacking I run with just one. I have taken my telephoto with me on multi day trips, but I find I almost never pull it out so I have decided to just leave it home when I do backpacking trips.
Where to Pack Your Camera:
First and foremost you are camping. The things that will keep you alive need to go into your backpacking bag first and your camera should go in second. This does not mean you should not bring it, but make sure every other essential to a good trip are met. If you find that you ditched you sleeping pad for the camera, you may find yourself having many miserable nights which might cut the trip short.
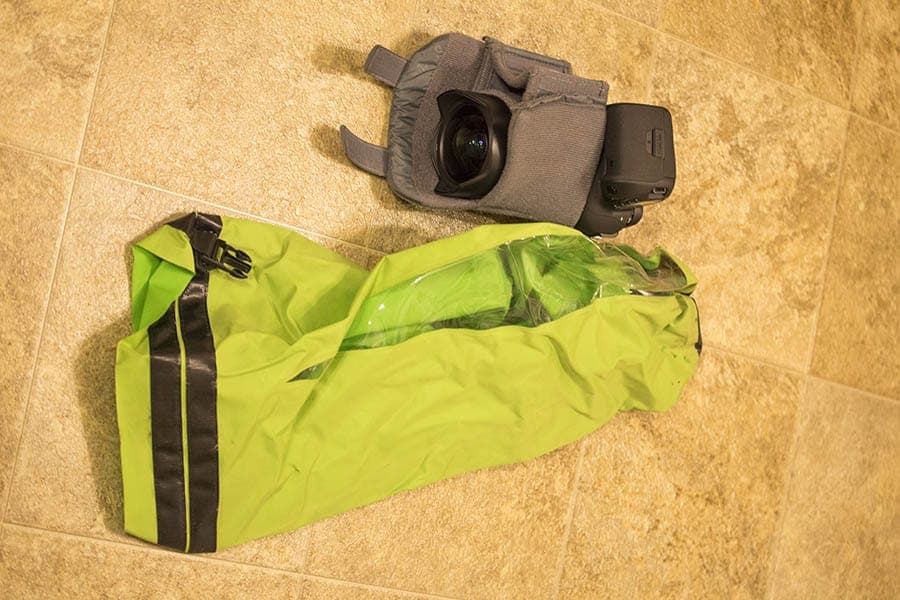
So now that you have packed you bag, how should you pack your camera into said bag? My advice is start with a dry bag. Dry bags do a couple things, they keep water out (name suggesting) but they also keep dirt out and provide a space to pack cushion around your camera and still keep it all together. If you have no idea where to go to get a dry bag, simply head over to your closest outdoor sports retailer and they should have one.
Before I put my camera in my dry bag, I grab out some of the extra walling that is inside of my regular day photo backpack and wrap it around my camera. This provides a layer of cushion while utilizing what I have. I am all about re-purposing gear for multiple different uses.
After I stuff my dry bag with my camera I place it on top of all my other gear inside my main pouch. This provides lots of extra padding and security for your camera. It also is hidden but is easy to access.
How to Arrange Your Tripod:
This sounds like it is a simple topic, but there are a few things you should take into consideration. Tripods can be placed in four basic orientations on your back pack. They can go on the sides, the back center, across the top or attached onto the bottom of the bag. I will talk about the pros and cons of each.
Sides: Side placement usually is one of the easiest. It is places vertically and is attached using one of the myriad of side straps that exist on the outside of backpacking backpacks. Usually it is good for quick accessibility. One disadvantage to this is that it often creates lop sided weight. It also has a tendency to compete for water access. I hate how camera companies build for this design when overall it creates a mis-distribution of weight. Just don't.
Bottom: Bottom access is simple as most backpacks come with straps down there to attach gear to the pack. It is nice, but every time you put your backpack down you put your tripod down in the dirt. Also as you do that, tripods get a bit loose and begin to wander from one side of the pack to the other and can risk falling out. I have had that happen.
Top: Top arrangement is a good option as weight is distributed nicely and when you take the tripod off you are already half way to getting your camera out. I find this orientation difficult as I often push through brush head first and have had so many times where the tripod grabs a branch and held onto it and threw me off balance. This can be annoying but when I was running from a thunderstorm as waterfalls were pouring off the cliffs around me in a deep canyon in Escalante back country it went from annoying to potentially dangerous.
Back Center (vertical): I like this one the most as it is quick access and keeps it safe. It in general prevents your tripod from getting dirty and it won’t snag on anything. It does provide an unfortunate issue for physics and your body. The further weight is from your body the heavier things appear to you. Hold a 5 pound weight next to your chest vs fully extended away from you. You can hold a weight next to your chest for an hour but only a minute away from your body.
Same principle here.
I like top or back center the most. If I have to I will do bottom, but never side.
Accessories:
I don’t have a lot of these, but pack your essential photo gear in a top pocket that is easy to access. If you bury it deep within your bag, you will regret it. Always keep it at arm’s length as you never know when you might need an extra battery or something to tighten the plate on the bottom of your camera. One simple solution that might be able to replace do-dads that you might have floating around is simply getting a nice Leatherman multi-tool knife. This multi-tool provides a bunch of useful things for both camping and hiking and occasionally photography. I use mine regularly when I am out and about.
Conclusion:
Get out into the wilderness this fall and do some backpacking with your gear or begin planning next summer's trip.
If you know of any good backpacks that are designed to be used for backpacking and photography let me know.
Another possibility to keep in mind is to keep your camera out of the bag. I have hiked well over a hundred miles (trails only though, no bushwhacking) with my camera on my front or my side. This is doable with holster mounts like Cotton Carrier, Peak Design, or Spider Pro. This makes the camera much more accessible than if it were in the bag (even a specially designed bag like F-stop’s), and it can be protected from water with a rain cover.
I backpack with my gear all the time. I have never found a photo bag that even comes close to what I need for a multiple day trip. I start with the most comfortable backpack you can get, Osprey in my case The comfort of a well fitting pack is the priority for me.
I whittled the weight of my camera gear down to 6 pounds. I found a very inexpensive and light weight drop-in padded compartment for camera gear which I place in the center of the main compartment of my backpack. All my other gear serves as additional padding above & below my camera plus prevents a heavy top load which throws my balance off. I don’t photograph during mid-day anyway so it’s ok to bury my camera. This padded compartment bag also drops right into my backpacks day pack too, convenient!
As for the tripod, I go with vertical on one side and use my tent as a vertical on the other side to provide proper balance. 🙂
When I climbed Mt Fuji I kept my camera around my neck and used a neoprene stabilizer strap to keep it close to my body when not in use. It was a weather-sealed camera and lens, but I mostly kept it under my rain jacket anyway.
Black Rapid makes a strap that attaches to your pack that I have used over hundreds of kilometers for backcountry day trips and backcountry multiday trips.
I do both Landscape and wildlife photography, so both a wide angle and a telephoto are a must for me. I have the Canon EF-S 10-18 superwide and the Tamron 18-400 (also for cropped sensors) which lets me get out there for long wildlife shots. I bought this new-to-the-market lens specifically to do both day hikes and backpacking. It’s light and has a nice reach. I shoot crop sensors so I can take advantage of the longer focal lengths.
I use a Peak Design Capture Pro system attached to the hip strap of my backpack and keep my camera out when the weather allows. The new Tamron lens is always on the Canon body. I want to be able to get to my camera and shoot on a moments notice when I come across wildlife. I keep my camera set on f/8, 160th sec (or faster,) and float the ISO… so ready for any light when that deer bolts across the trail.
Extra lens, the wide angle. The wide angle is always about landscapes, so doesn’t need to be fast access. A little foam and doubled, gallon, double seal ziplock bags with rubber bands around and all air pushed out is great! Far lighter than a “Real” drybag (which is what I use in a canoe or boat… that or a pelican case. They each float if you leave extra air in them.)
Agree with the back center for the Tripod. If my backpacks would accommodate, I’d stow it head down to keep the weight of the ball head lower, but that’s going to take some mods to the packs. (Day pack is a Tenba. Love it!)
Totally agree about the Leatherman. I keep a Leatherman Titanium on the other side of the belly strap from my camera on my backpack. Invaluable, and instantly accessible. You know, for when that trail angel leaves a bottle of chardonnay chilling in a stream for you!
Other things to consider non-camera related, but need to have in the pack:
Mylar emergency blankets.. They are good for groundcloths, shelter building, body heat retention, air rescue signalling, rain protection for gear, and MANY other functions. I keep at least 4 in my pack all the time.
Emergency Match Set… Waterproof matches and a fire starter or two.
Head mounted flashlight and extra batteries… Can’t count how many times I’ve used that.
LOUD whistle and if in brown bear country, pepper spray (but know how to use it correctly!)
I also keep a towel strapped over the top of my backpack. This is good for, well, drying off if dunked or sweaty, great for laying a camera on to keep it out of the dirt while setting up a shot, sometimes I put it on the ground to keep the backpack out of the dust, etc. and it’s bright orange so can use to both signal if I need to and to keep hunters from shooting at me!
Another thing I keep is a handheld GPS. NOT a cell phone GPS, but a real one. This can get you out of a bad situation, but also keeps track of your walk, enabling you to geoTag your images after your excursion.
There’s much more I’ve learned over 40+ years of hiking and backpacking.. but.
Stay safe out there… and never assume there won’t be problems.. camera or otherwise. Prepare.
I have the F-Stop Guru Daypack with the specially designed ICU for quick panel access. I hiked for over 30 miles in the Himalayas of India the Summer of 2017. So I can offer this review :)!
The access is truly wonderful, though I did have to set the pack down or swivel it on my waist. The ICU unit held all my Canon gear for the trip. Access through a zip panel against your back vs. on the back of the daypack adds a layer of safety while in the city.
My affirmation to F-Stop is the quality of the materials used, the design for camera access, and the durability of the ICU.
My mistake was to bring too much equipment! (I know, I know….Rookies!) We were climbing rock walls of 1000 feet with our gear. Porters carried our North Face Duffels, so we had less than a Rocky Mountain Backpack on our backs. Still at 15000 feet, we were sucking air.
My complaint is not so much F-Stop, but more my kinship with ergonomically designed backpacking packs. This summer we are again going to the Himalayas. And my plans have changed quite a bit. I still love that ICU, as it organizes camera gear well.
http://fstopgear.com/products/icu
However…I have purchased a Deuter ACT Trail 30, as the air flow and suspension system is more like that of a backpacker’s pack. I will report back as to how this works.
I am also going to obtain a Lowe Pro harness for one lens on my chest for quick access for some of those photos I missed while “digging” it out of my ICU. Granted, the F-stop makes pack access easier than anyone. But you still have to get your camera out. I’ve looked at the Cotton Carrier and other clip systems, but I just do not feel comfortable with my camera out in the elements of dust. Obviously rain comes, it goes away.
F-Stop is wonderful equipment for city walk-about systems. But I felt like I had a superb school daypack/camera pack on my back and not a design that felt optimized for long hikes. I will admit that I have not tried their larger systems like Tilopa, which may “ride” better on the back. Not dissing this company. They are worth a look! I’m just going to experiment with less gear and a better-for-me pack for trekking long distances.
Happy Hiking!
Scott 🙂
PS – “Only” my DSLR and the 50-85-135 and 24-105 this year 😉
It’s some trouble going on a multiday hike in the mountains! I packed my 17-40f4, 70-200f4 and 24-105f4 at the last moment. I clicked a lot of good images with the 70-200 and 17-40, took out the 24-105 only once, but that gave me a beautiful image, a composition that would not have had been possible with either of those two. I don’t shoot midday shots, so every evening I unpacked my gear into my day pack and went out scouting.
Bubble wraps, lens pouches and zip lock bags helped me keep my gear safe.