
As the title for this article is photographing box canyons I should describe what a box canyon is. Unlike canyons formed by glaciation which end up being “U” shaped or high mountain stream canyons that are typically “V” shaped; box canyons are shaped in general like boxes. They have flattish like bases with sheer cliffs on both sides. They are formed as streams cut their way through soft sand stone causing them to widen and deepen. I also separate box canyons in general from slot canyons on a few premises. Slot canyons are narrower than a box canyon, though there is no particular point where I would by definition change one to another. Box canyons can also shift and turn into slot canyons and vise versa. But for practical purposes for this article box canyons are going to be bigger and wider.
The Colorado Plateau, from what I hear from photographers around the world, is like no where else. It has deep canyons, towering temples and mesa's and giant pillars and spires. Oddly enough this is the only landscape photography world I know. I grew up here and began my photographic journey among the walls of Zion and Escalante. Because of this, I have been gaining a understanding of photographing box canyons that would rival some of the best. Though, there are still many photographers here in the southwest that have more experience, I should be able to run with the best of them. With that I hope I can take you on an educational journey in understanding photographing these beautiful treasures.
Understanding Sandstone
The Colorado Plateau is made of sandstone and is layered in what is called the Grand Stair Case. This “staircase” is composed of different layers of sandstone that stretches from Cedar Breaks National Monument all the way to the Grand Canyon. Each layer of sandstone acts differently and displays different properties. Navajo Sandstone is far more likely to box up and produce deep red canyons, while Wingate Sandstone will box up but will not produce nearly as vibrant walls nor will they be as smooth. Though each type of sandstone will produce different results, they will all produce beautiful photos in the right light. If you are looking for a particular look, try to look up some of the geological regions and find out which sandstone layers is more prominent to see if it matches what you are wanting to get.
Another note that should be brought up in this section. Red rock is not actually red. I am going to point that out right now, it is orange, yellow, gray, brown, white and probably a few other colors I can't see because I am color blind. So if you are looking for deep reds, you won't find them, you will find orange and yellow. If you are photographing sandstone in direct light of day it will be washed out. Expect gray, white brown with a bit of orange. If you are trying to photograph that “million dollar shot” don't plan on doing it in direct light of the sun.
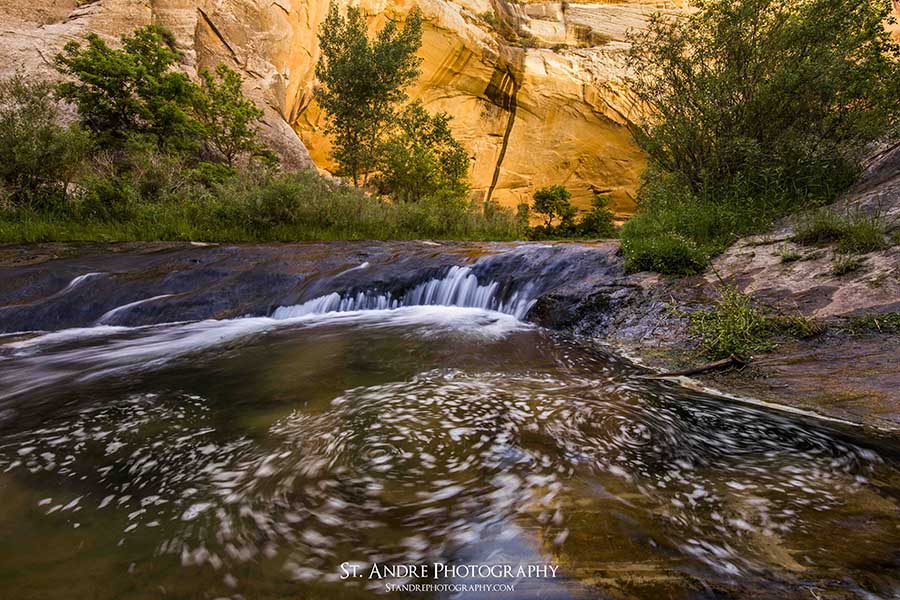
Understanding Reflected Light
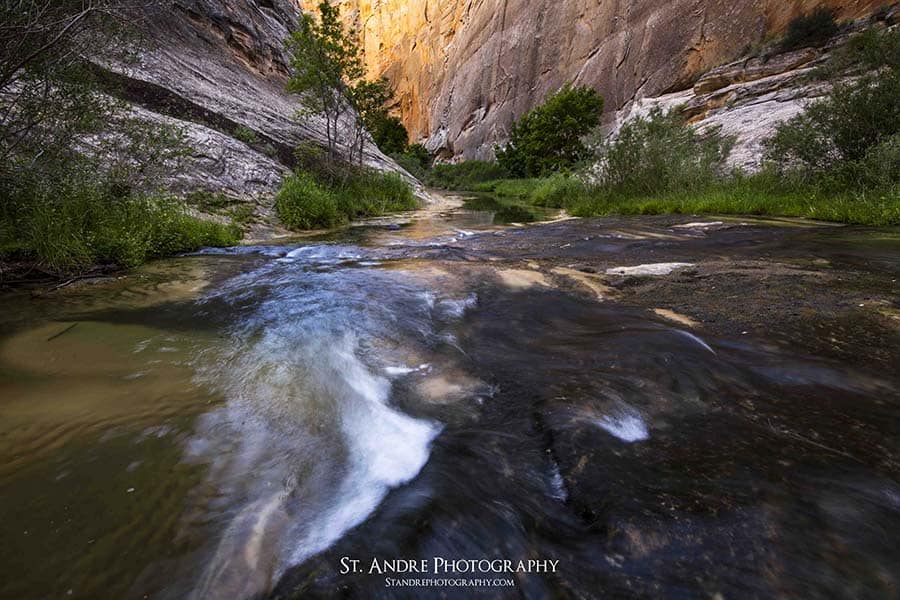
The magic of red rock comes from either golden hour light or from reflected light. Since we all should understand sunsets and how they work I am not going to bother explaining them. Reflected light is a different beast though. Reflected light is when the sun hits a canyon wall and reflects off of it and lights up a wall in shadow. When light hits red rock it produces a beautiful orange and yellow glow. When it comes to photographing in box canyons this is the light you are wanting to try to capture. It can happen at any time of day and it can be really short or last for hours. This is what makes photographing these canyons so difficult. Some canyons are miles and miles long and you can't be everywhere at once so sometimes you will miss stunning light without you ever knowing it. Often the best trick is to sit an wait for the light when you find a composition.
Orientation of Canyons
Orientation of canyons has a huge impact on photographing box canyons. In order to get reflected light, light must bounce off of one wall and hit another wall that is not lit up. This works best on north south facing canyons. This orientation plays to the fact that during half of the day, one side of the canyon will be lit up while the other side is in shade. When the canyon is east west facing, the canyon has a tendency to be lit up evenly for the entire day. There will be pockets of interesting glowing canyon walls, but they are few and far between. If you find yourself in an east west facing canyon in the middle of the day, put the camera away and keep hiking and enjoy the views. You wont find the look you are looking for very often. There are exceptions to this.
Canyon Width and Depth
Canyon width and depth plays a role in how reflected light acts. Think of a swimming pool verses a well. A well will have light hitting the bottom for only a few minutes a day, while a swimming pool will have light hitting the base for hours a day. The deeper and narrower the canyon, the more dramatic the glowing light will be. Since reflected light has to travel from the far wall before it hits the wall in shadow, the closer they are together the brighter the glow will be. Wider canyons will also reduce number of compositions and opportunities to experience great glowing light. So in your research find deep narrow canyons.
Time of Year
Time of year plays a role in gear, which places to visit and what to expect when you arrive. I have broken it down season.
Winter– Winter is fun and provides more solidarity. It also introduces falling ice, frigid cold waters, snow, lower sun on the horizon with less harsh light. If you are planning on doing canyons in winter, try to find some without water. It is safer, drier and simply easier to plan your trip when you are not battling a river. Box canyons also are frequently home to a variety of plants that will all be in hibernation. This will reduce your beautiful lit trees and will often provide disappointing results.
Spring– Since the southwest is in general a desert, this is often the best time to visit canyons for photography. Leaves are green, water is flowing high, which increases composition options. Watch stream gauges from USGS of the canyons you are wanting to visit to make sure you are not walking into a flood.
Summer– Streams will decrease in flow and water will become more clear making rocks more prominent. This can be good for compositions especially in canyons like the Narrows. You will also find yourself in flash flood country due to monsoons. Be wary of venturing into these canyons if storms are going to arise. You can find yourself dealing with 10 foot walls of water coming down upon you. I almost had a professor from my school get killed by a wall of water that hit him in the middle of night. He broke a few ribs, punctured a lung and I think dislocated a shoulder. He was lucky to be alive. Please don't take canyons lightly. Also extreme heat is a potential danger. Try to stick to canyons with water as they will be cooler.
Fall– Fall is an excellent time to visit box canyons as they are often filled with Cotton Woods and oak that turn bright yellow and red. They make for excellent contrast of the canyon walls.
Time of Day
The best time of day to photograph box canyons is mid or late morning and late afternoon. This will change based upon orientation of canyons but that is the general rule of thumb. I find 5PM to be my favorite time to photograph canyons in the summer. Early morning can be awesome as well, but since you are just waking up, it can often be difficult to get the shot you really need. Oddly enough, some canyons are better for evening shots vs morning shots. Since the walls are not uniform, some canyons favor morning light as there are more lighting opportunities on the best looking walls or vise versa. I discovered this recently as I was hiking through some deep back country canyons in Escalante a few weeks ago. I found that the best light for the canyon was in the evening, not the morning. This knowledge can only be got by being in the canyon through out the day and over multiple days.
Use of Vegetation
Vegetation is your friend when it comes to box canyon photography. It adds a splash of color, they can be center pieces of composition and they can guide eyes through the scene.

When it comes to some color theory, yellow and green are analogous. Since reflected light is often yellow, the green leaves often fit nicely together for an all around beautiful color composition. Don't neglect this.
How To Use Sky In Your Shots
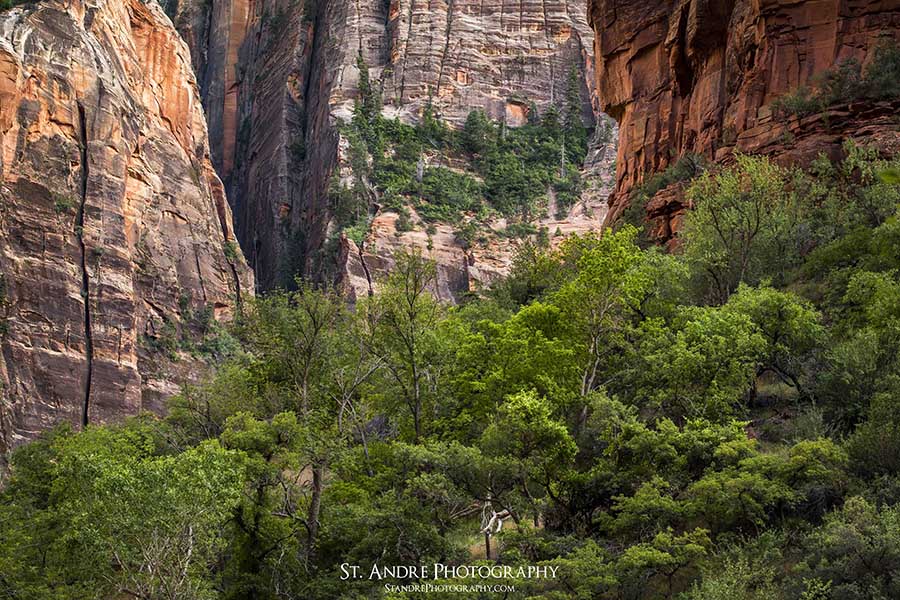
If you have noticed very few of my images of the canyons have had sky in them. There is no particular rule that says you can't have the sky in your shot, but I try to avoid it. There are a few reasons to this. The sky is really really bright and the bottom of the canyon is really really dark. There is often 3+ stops of light difference between the two and it can be really difficult to overcome that dynamic range. The best way to do that is to simply avoid adding the sky. There are a few exceptions to this that I do run by. In the shot below, the sky was necessary for the composition because as you walk under this massive undercut in the wall you find yourself feeling unbelievably tiny looking up and out the canyon. Since the undercut was so huge, it was important to get the roof overhanging you. In other words, add the sky to increase scale. Also the sky is really good for isolating subjects. If you have an impressive tree or pillar within the canyon, you can use the sky to isolate it from the rest of the canyon. This can be seen in places like the Temple of Sinawava in Zion (photo by RJ Hooper) which has two rock towers that if isolated create a sense of scale.

Lenses To Use
Now that I have taken wide angle lenses and a medium telephoto lenses into canyons I have come away with a few opinions. First, you need an ultra wide angle lens. There is no getting around this. It allows you to capture the grandeur of the canyon in one go with out having to do panoramas. Mind you panoramas work fine in box canyons, but you will be dealing with lots of changes in dynamic range if you include sky. Also having excessive warping is a pain to deal with in post process.
The other lense that would probably make for a great substitute is the ever versatile 24-70mm lens. Since I don't have one of these I can only speak on a hand full of the focal ranges. I know the ranges from 24-40mm, 50mm, and 70mm. These are my thoughts on these. The range 24-40 will accomplish 90 percent of what you are wanting to accomplish. A 50mm lens is just a bit too tight for most good shots, but has some really good moments. The 70mm lens is best used in really big canyons where you have a lot of space to work with. I have used it in places like Zion and have walked away with some great results, but struggled in tighter canyons.
Filters- Should You Use Them?
The only two filters a photographer should have are the Neutral Density Filter (ND Filter) and the Polarizer. I recommend both, even though I don't own any of these at the moment. A ND filter would come in handy when trying to exaggerate flowing water and that's about it in box canyons. Polarizers are super versatile but can ruin an image if you are not careful. A polarizer is a dangerous thing to use if you are trying to get the sky in your canyon. If done poorly it will leave skies uneven in tone and color. Don't make that mistake. Still carry one to remove unwanted glare off of rocks and vegetation and to saturate the colors.
Final Thoughts
There are many canyons in the southwest that are worth exploring. There are many popular ones but there are many more canyons that are difficult to get to but provide even more excellent photographic opportunities. I plan on visiting many of these in the future. If you are wanting to explore these canyons here in the southwest, I recommend doing it in multi day trips to truly experience their grandeur. Other final words of thought. Bring a tripod, you will hate yourself if you don't.
Great article. I have to get up there this fall and do a canyon or two with you!
Thank you for the article. The next time I get back to the Great 5, this info will be greatly appreciated. I especially like the portion about reflected light and why the sky might not work well in those areas.
Thanks