
One of the most noticeable downsides of still photography is how it limits the way motion can be captured. Blurring, panning, and light streaking, for example, certainly have their place in photography and can provide creative ways to show motion, but a single photograph can’t capture movement the way time lapse photography does. Even with technical equipment allowing cameras to rotate around an axis or creep slowly along a rail, conventional time lapse is still limited since the device supporting the camera typically stays in place. Hyperlapse photography, on the other, adds a new dimension of movement to what still photography and traditional timelapse offers.
Introduction to Hyperlapse Photography
Hyperlapse photography is a specialized subset of time lapse photography in a similar way to how time lapse photography is a specialized form of still photography. In hyperlapse photography, the camera moves between each still frame, allowing not only the movement of surrounding objects like clouds, people, or traffic to be captured, but also the movement of the camera relative to the scene it is in. Think of it as stop-motion animation with a digital camera, except you will be moving your camera each frame instead of your subject. For an intro on how to capture and process your own time lapse footage, take a look at Rusty Parkhurst’s tutorial here.
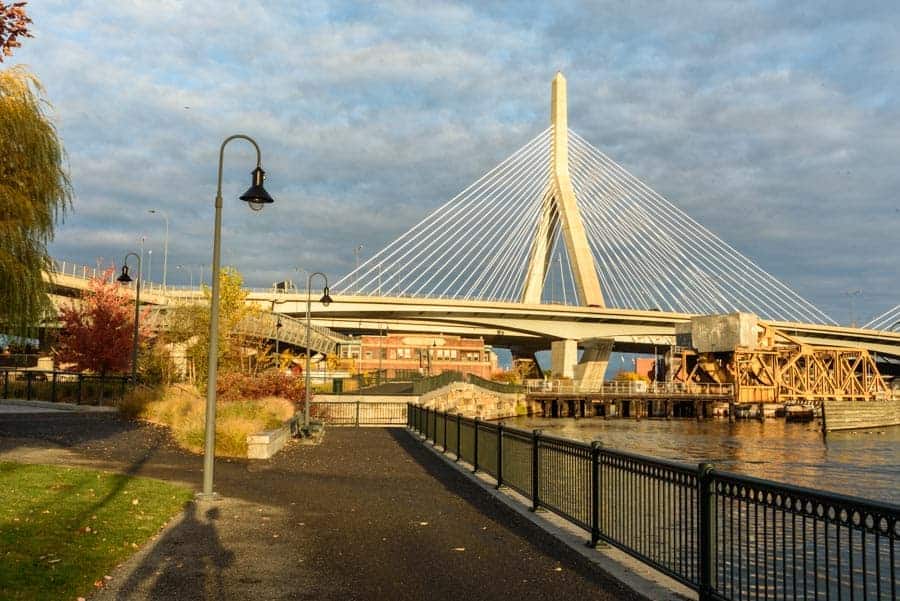
For the example hyperlapse I shot for this article of the Zakim Bridge in Boston, Massachusetts, take a look at the video at the bottom of this page.
Equipment Needed for Hyperlapse Photography
Required
- Digital camera with manual control
- Tripod or some other kind of moveable support
- Intervalometer (technically not required, but highly recommended since you would otherwise need a timer and a keen eye to time your shots manually)
- Relatively flat ground
Optional
- Measuring tape (for measuring movement intervals)
- Chalk (for marking movement intervals)
- An assistant to help with preparing and setup
- A stopwatch (if you will not be using an intervalometer)
Planning Out Your Hyperlapse
Clip Length
The key to planning out a hyperlapse clip is first deciding how long you want the clip to be. The clip length will ultimately depend on the frame rate you would like to use, meaning that you should have an idea in advance of whether you will be using 24 photos per second of video, 30 photos per second of video, or even 60 photos per second of video. Next, visualize how long you would like your hyperlapse clip to be. I typically aim for a minimum of 5 or 6 seconds. Once you have decided on your frame rate, you can multiply your frame rate by the number of seconds you have chosen for your desired clip length to get the number of photos you will need to capture. For the example hyperlapse below, I shot 150 frames knowing that I wanted my end result to be a 5 second clip at 30 frames per second (30 frames per second x 5 second clip = 150 frames).
Motion
Another step in the planning process is trying to visualize what motion you want to show in your end product. Since you will be moving your camera between each frame, you will need to consider how fast you want the movement to be, and if you want that movement to stay consistent throughout the hyperlapse. For the example hyperlapse below, I moved my tripod about 1 foot between every frame to get smooth and consistent movement. If I had wanted to speed up or slow down the movement, however, I could have incrementally increased or decreased the movement distance as I progressed through shooting the hyperlapse.
Focal Point
Another thing to consider during your planning process is what you would like the focal point of your hyperlapse to be. In the example clip, I knew I wanted the recognizable tower of the Zakim Bridge to be the focus, which meant it would have to be in the same place in my composition every time I captured a frame. Because of this, I walked the full length of my hyperlapse route before setting up so that I could check the composition at the beginning and the end to make sure I liked how each of the shots looked, and that the movement from start to finish would be noticeable in the hyperlapse clip.
Weather
If possible, planning your shoot around the weather can help you get another layer of movement in your hyperlapse. For the example below, I waited until I the forecasts called for some clouds and a bit of wind. This way I knew that the clouds racing across the frame would give the hyperlapse another dimension. It also meant that the cloud layer would keep the lighting relatively even throughout the timelapse. That is, of course, until the sun unexpectedly broke through the clouds right near the end and my shadow appeared in the hyperlapse clip… Didn’t I mention that planning is important?
Setting Up
When setting up your hyperlapse, your biggest decision has to do with the movement of your camera between each frame. Once you have determined what your movement distance will be (for example, 1 foot between each frame), you will need to decide how to mark that distance.
Sometimes when running a hyperlapse, the ground you are standing on provides a perfect guide for camera movement. Shooting a hyperlapse on a brick walkway, for example, may mean that you have 6-inch rectangles running in a straight line in front of you, making it easy to know how far your tripod legs are jumping forward between each frame. If you don’t happen to be this lucky, however, you’ll have to decide on a way to make your own measurements.
One option for planning out your movements is to take a piece of chalk and lightly mark out where you want to place your tripod leg for each frame. This will be a time-consuming process when setting up the hyperlapse, but it will allow you to be exact with your movements, leading to more consistent motion in your resulting video clip. In addition, marking out your movements before shooting gives you a line to follow each time you place the tripod in a new location, which prevents you from drifting from one side or another during the shooting process (like I did in my example). One thing to keep in mind is that if you plan to mark the ground with chalk, be sure to do it incredibly lightly to avoid having the marks show up in your photos.
If you are anything like me, measuring and marking out your movements before a hyperlapse sounds like a lot of work, so you may want to take the easy way out. I just want you to know that I’m here for you and support your laziness (I mean…confidence) 100%. For the hyperlapse clip below, I moved the camera 1 foot between each frame. Ironically, in addition to this distance being 12 inches, it was also the length of one of my feet, which allowed me to quickly and easily measure a consistent distance each time I moved my tripod. One downside to this method is visible in the hyperlapse below, however. Each time I moved the tripod I drifted a bit to the left, which made me need to compensate later on to avoid the benches and light posts along the walkway I was shooting on. While it did save me time setting up the hyperlapse, using my foot to measure also caused a noticeable side-to-side wiggle in my final hyperlapse clip.
Camera Settings
Shoot Manual
Shooting in manual mode during your hyperlapse is the best way to keep a consistent exposure across all of your shots. When setting up your camera, I suggest keeping your aperture high so that objects in your composition stay in focus as you move (assuming that keeping things in focus is your goal). For the individual frames in my hyperlapse, I shot at f/16, ISO 100, and 1/15th of a second.
Shoot RAW
Without a doubt, shooting RAW is the best way to give yourself the most leeway when post-processing your hyperlapse frames. Especially if you plan to be dealing with changing lighting conditions during the shooting process, shooting RAW files instead of JPEG files will allow you to alter the exposure and white balance in Lightroom or your preferred RAW editing software. Yes, the file sizes will be bigger, but in a shooting process that can take a half hour or more to complete, the extra wiggle room provided by RAW files could make the difference between losing a hyperlapse and saving it in post-processing.
Manual Focus
As you move your camera and tripod throughout the hyperlapse, you will inevitably change the distances that you camera is to various object in your scene. Because of this, you will want to set your focus before you begin the hyperlapse and keep the focus on manual as you move along. Otherwise, your camera may hunt for focus while capturing each frame, which could lead to inconsistent sharpness or just plain blurry shots.
Focal Length
When choosing your focal length, you will obviously have your composition to consider. Keep in mind that a longer focal length will not only exaggerate your movements, but also your errors. For reasons that will make sense during post-processing, make sure to shoot a bit wider than you think you will need. Most digital cameras will give plenty of resolution, so having the ability to crop later is a big benefit. The example clip below was shot at 35mm on a full-frame Nikon DSLR.
Intervalometer
Many newer DSLRs and mirrorless cameras come equipped with an internal intervalometer, which allows you to set the camera to take a pre-determined number of consecutive shots at a certain interval. If you camera does not have a built-in intervalometer, you can pick them up fairly cheap online. For those without access to an intervalometer, you can get by the old-fashioned way by keeping track of the interval yourself and clicking the shutter every 10 seconds or so, but your room for error may be greatly increased.
When setting up your intervalometer, the main thing you want to consider is how long you will need between each shot to move the tripod and recompose the camera before the shutter clicks again. For the hyperlapse below, I gave myself 10 seconds in between each shot, which gave me enough time to move and recompose, typically with 2 or 3 second to spare. On a few different occasions, however, I made a mistake or just plain got distracted, and those extra 2 to 3 seconds were just enough cushion to make sure I didn’t ruin all of the work I had put in so far. When setting your interval, try not to be overconfident. It is better to have a few seconds to spare then trying to fire off a buzzer beater every time you capture a frame.
Shooting Your Hyperlapse
Once you start your intervalometer, you better be ready to commit to running your hyperlapse from start to finish. Your main focus when shooting will be keeping your focal point in the same part of your frame each time you take a shot. The easiest way to do this is to pick a spot on your focal point—a corner of a building, for example—and keep it at the intersection of two gridlines on the back of your camera’s LCD screen or on the same autofocus point in your viewfinder. For my hyperlapse, I made sure the middle of the bridge support column lined up with the same autofocus point in my viewfinder throughout the hyperlapse. It will also be helpful to keep your camera level so that you do not have too much tilting of your frame between each shot.
This probably goes without saying, but remember to stay focused during those minutes while you are shooting the hyperlapse. A few seconds of mind wandering could lead to a missed photo, which could in turn result in something like the clouds in your sky looking like they are skipping ahead due to missed frames.
Processing Your Still Frames
For editing my still frames, I loaded them into Adobe Lightroom and made a few simple edits to one of my RAW files. Afterwards, I synched these settings across the rest of my photos to make sure that my exposure in each frame would be consistent. Once I finished these edits, I exported all of the files to JPEGs.
Assembling Your Hyperlapse in Adobe Premiere Pro
For how much work planning and shooting a hyperlapse can be, the editing processing is surprisingly simple. For those following along, I assembled my hyperlapse frames in Adobe Premiere. However, they can be assembled in various other programs such as Adobe After Effects, or Adobe Photoshop, as described in Rusty Parkhurst’s article in the link at the beginning of this article.
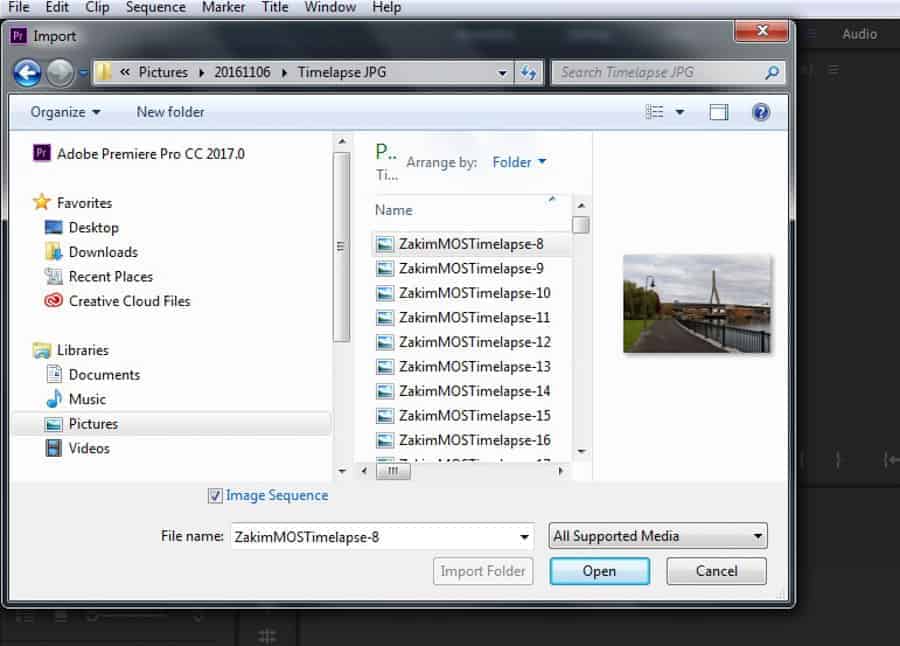
If you plan to assemble your hyperlapse in Premiere Pro, you will first need to import your footage. Do this by selecting File>Import, clicking on the first image in your JPEG sequence, checking the “Image Sequence” box in the dialogue window, and clicking “Open.”
If you wanted to alter the frame rate being used by Premiere Pro for your image sequence, go to File>New>Sequence where you can change from the default 29.97 frames per second. Once the sequence has been loaded, drag the newly loaded project into your timeline and prepare to let the magic happen.
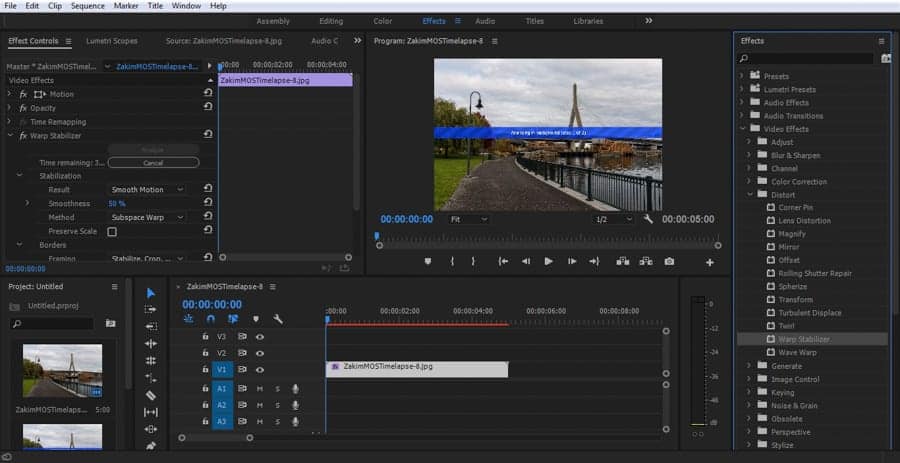
The reason I wanted to edit my hyperlapse in Premiere Pro was due to the image stabilization feature offered in the program (which is offered in Adobe After Effects as well). Once your sequence is in your timeline, head to the upper toolbar and click “Effects” to bring up the Effect panel. In the Effects panel, select Video Effects>Distort, and click and drag Warp Stabilizer onto the sequence in your timeline. At this point, kick back and let Warp Stabilizer work its magic.
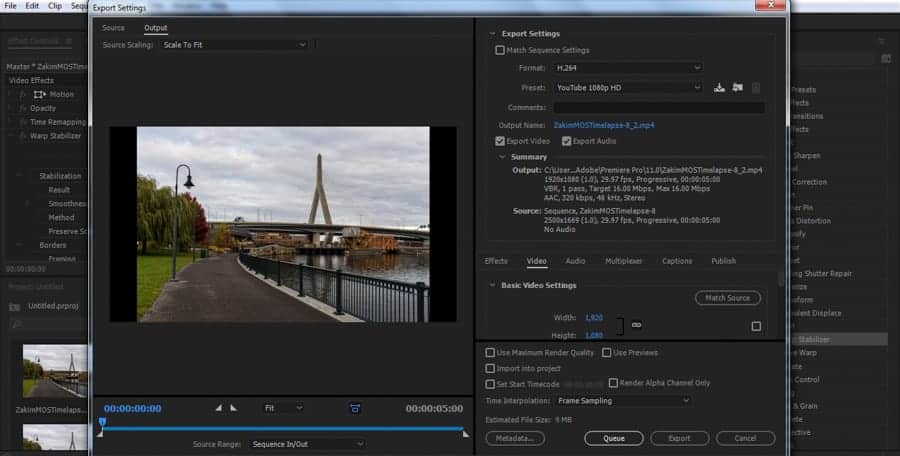
Once you have stabilized your footage, you can export the video clip from Premiere Pro by clicking File>Export>Media to get the dialogue box below. For this clip, I used the YouTube 1080p HD and H.264 format knowing that I would be displaying my clip on the internet.
For the sake of comparison, I have two hyperlapse videos below. One of the videos shows the footage before using Warp Stabilizer, and one shows the footage after applying the stabilization. As you can see, the stabilization works wonders, smoothing out all of the jerky inconsistencies that resulted from movement of the camera and tripod between each frame, making it an indispensable tool for editing your hyperlapse.
Final Thoughts
Although the planning an shooting can be a somewhat time-consuming process, hyperlapse photography, with the help of stabilization in Adobe Premiere Pro or Adobe After Effects, can help bring a new dimension of motion to your time lapse without needing much advanced knowledge to get started.
Thanks for your sharing. Your article is very useful, it gives me more understanding.
Very helpful advice in this particular post! It’s the little changes that make the largest changes. Thanks for sharing!
Wow. cool post. I’d like to write like this too – taking time and real hard work to make a great article… but I put things off too much and never seem to get started. Thanks though.
Very helpful advice in this particular post! It’s the little changes that make the largest changes. Thanks for sharing!