
You've probably heard enough photographers talk about RAW that you realize it’s a pretty powerful tool in the digital photographer's tool bag. The power of shooting RAW is unleashed when you get to the digital darkroom, and for most of us, that means using Lightroom (LR) or Photoshop (PS). Editing can be a lot of fun, but having a solid workflow can help that process stay fun, instead of becoming a burden. Shooting in RAW is an assumption that you will do some work in post, so, should you use Lightroom, Photoshop, both? Hopefully this article will help you utilize the power of RAW and develop a workflow that will manage the photo editing process smoothly. As a general rule, I do the majority of my work on RAW files in Lightroom. I generally only go into using ACR in Photoshop if I need to do something that is overly complex and requires me to be able to work on individual parts of a photo very precisely. To be clear, the camera raw engine is not better or different in one or the other. Photoshop will provide you with some further tools you can use after the fact, but in many cases this won't be necessary.
RAW in Lightroom
Let's start with a discussion about LR. The fantastic thing about LR is its ability to do non-destructive editing without having to worry about layers. Any changes you make in LR are not written onto the original photo. You can come back to a photo 2 years from now and start all over in just one click (The Reset button). This also protects hard drive space because you aren't writing a new file or adding layers when you edit in LR. For this reason, and many others, I always start by importing my files (RAW or jpg) into LR.
While Photoshop can be utilized for many different reasons, LR is designed for photo editing and management, and it does a fantastic job! For the majority of my RAW photos, I do all of my editing in LR and only go into Photoshop for minor work. If you haven't edited a RAW file in LR before, you will notice some differences. Your numbers next to your temperature slider now display Kelvin and give you much better control over White Balance. Similarly, your ability to recover areas that are blown out or too dark is much better with a RAW photo. This is just the tip of the iceberg as there is a lot more image information retained in a RAW file. Lightroom may be all you need to edit the photo to your liking. Let me put in one caveat to that statement. I am not a fan of the spot removal tool in LR. It works well to remove spots out of a flat sky, but in many cases I have found it does a poor job on anything with detail. It seems I find myself in PS when I have to remove anything complex.
Now let's consider a scenario where you will be using PS. Maybe you want to utilize some of the more powerful editing tools in PS. For my work, a good sign I'll be working PS is when I plan on using layer masks. If you utilize the process I outline below, you will find it protects and catalogs your original photo and also allows you to utilize all the powerful tools in PS.

RAW in Photoshop
Step 1: Import the photo into Lightroom as you normally would
This insures you have the original photo protected on the computer. Any changes you make after this will be non-destructive. If you change your mind about how you edit the photo, at least you can always start over. If you really want to change the exposure in LR, you can, but in reality this can be done once we take the photo over to PS.
Step 2: Open the photo in Photoshop the RIGHT WAY
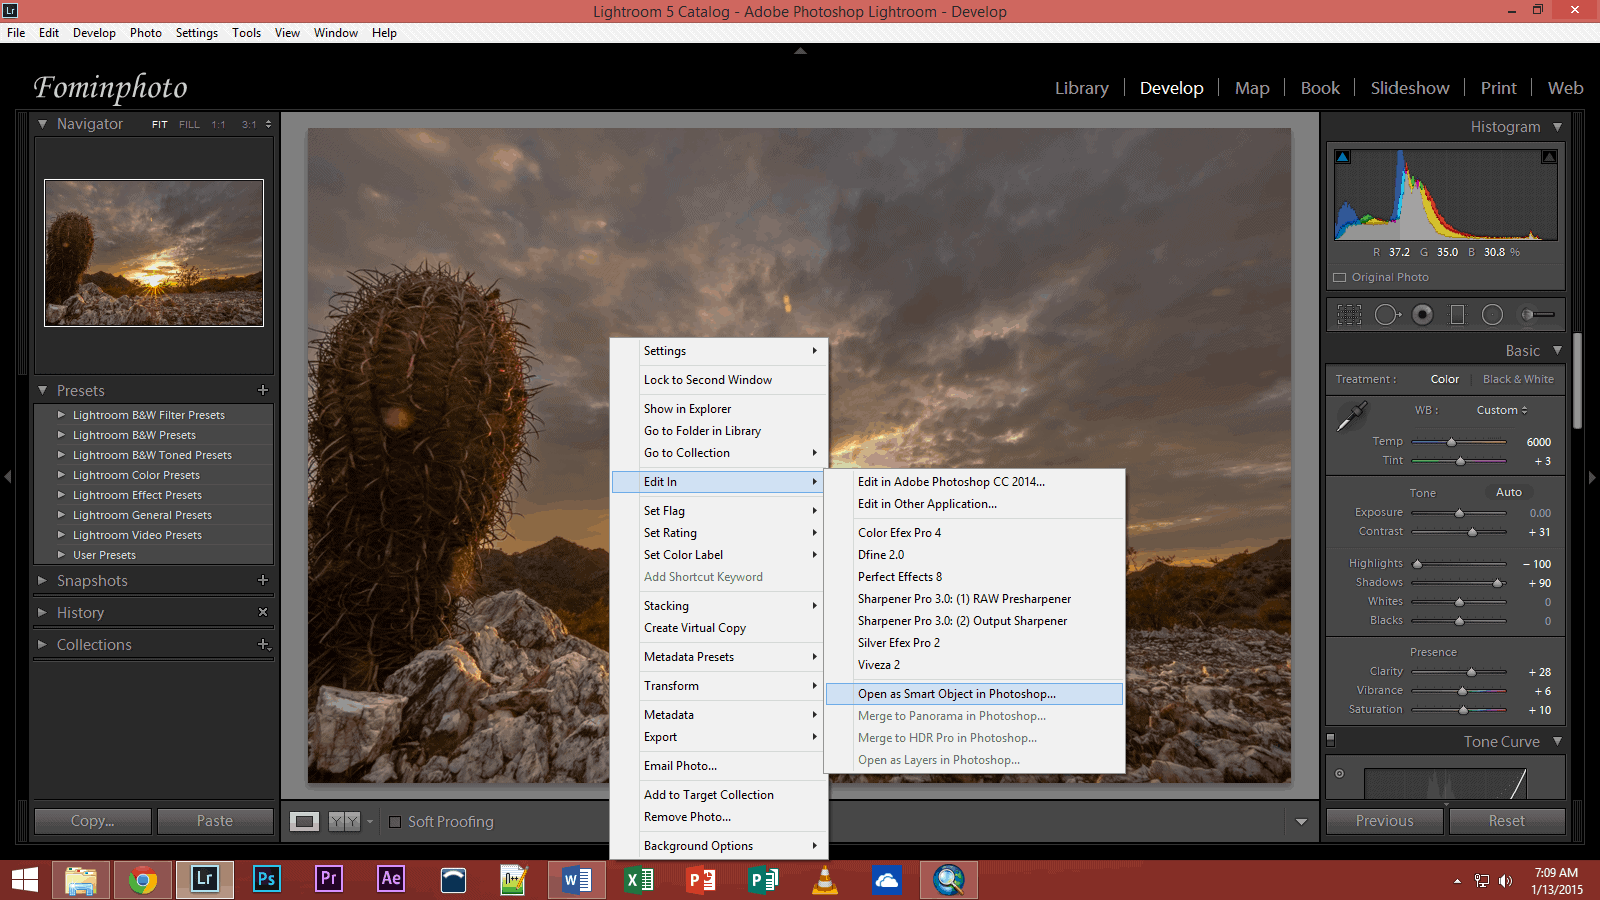
Yes, I said the right way. From Lightroom, you want to right click> edit in> open as a smart object in Photoshop (if you have a version before CC, you may have to choose edit in Photoshop). This not only opens the photo in PS, it also ensures that when you save your final edit in PS, you will get a new file in your LR catalog reflecting your PS edits. The original photo is unaffected and remains as a separate file in the LR catalog. Opening it as a smart object gives you the freedom to edit in Camera Raw and then go back into Camera Raw later if you need to. Side note: If you don't have CC, check out Adobe CC for photographers, it's a great deal at $9.99/mo.
Step 3: Edit in Adobe Camera Raw from PS
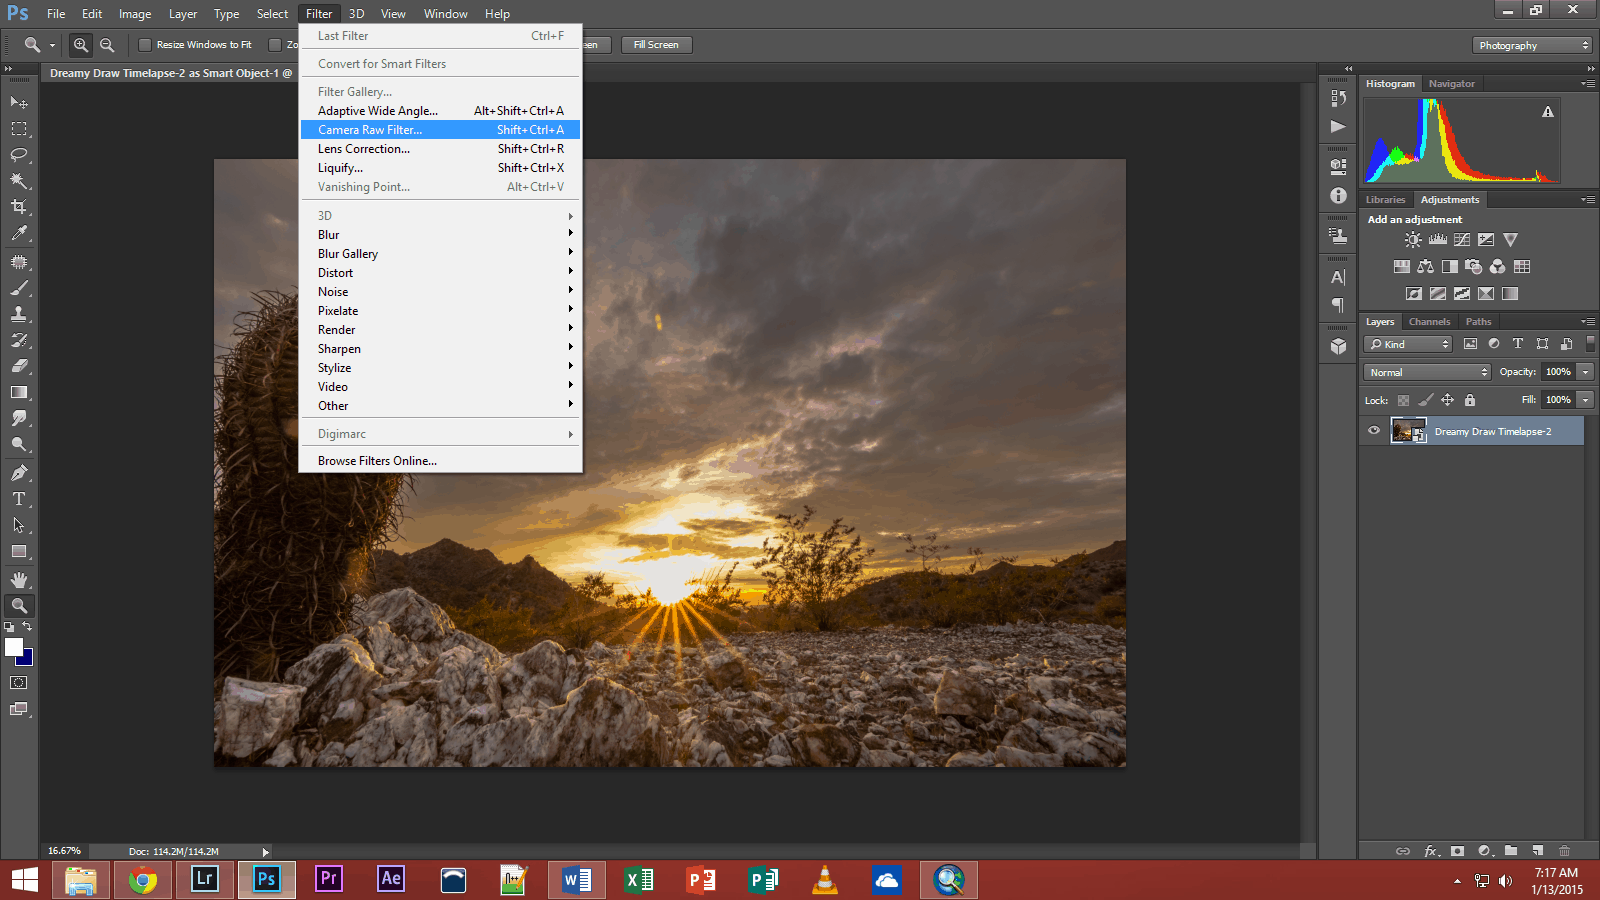
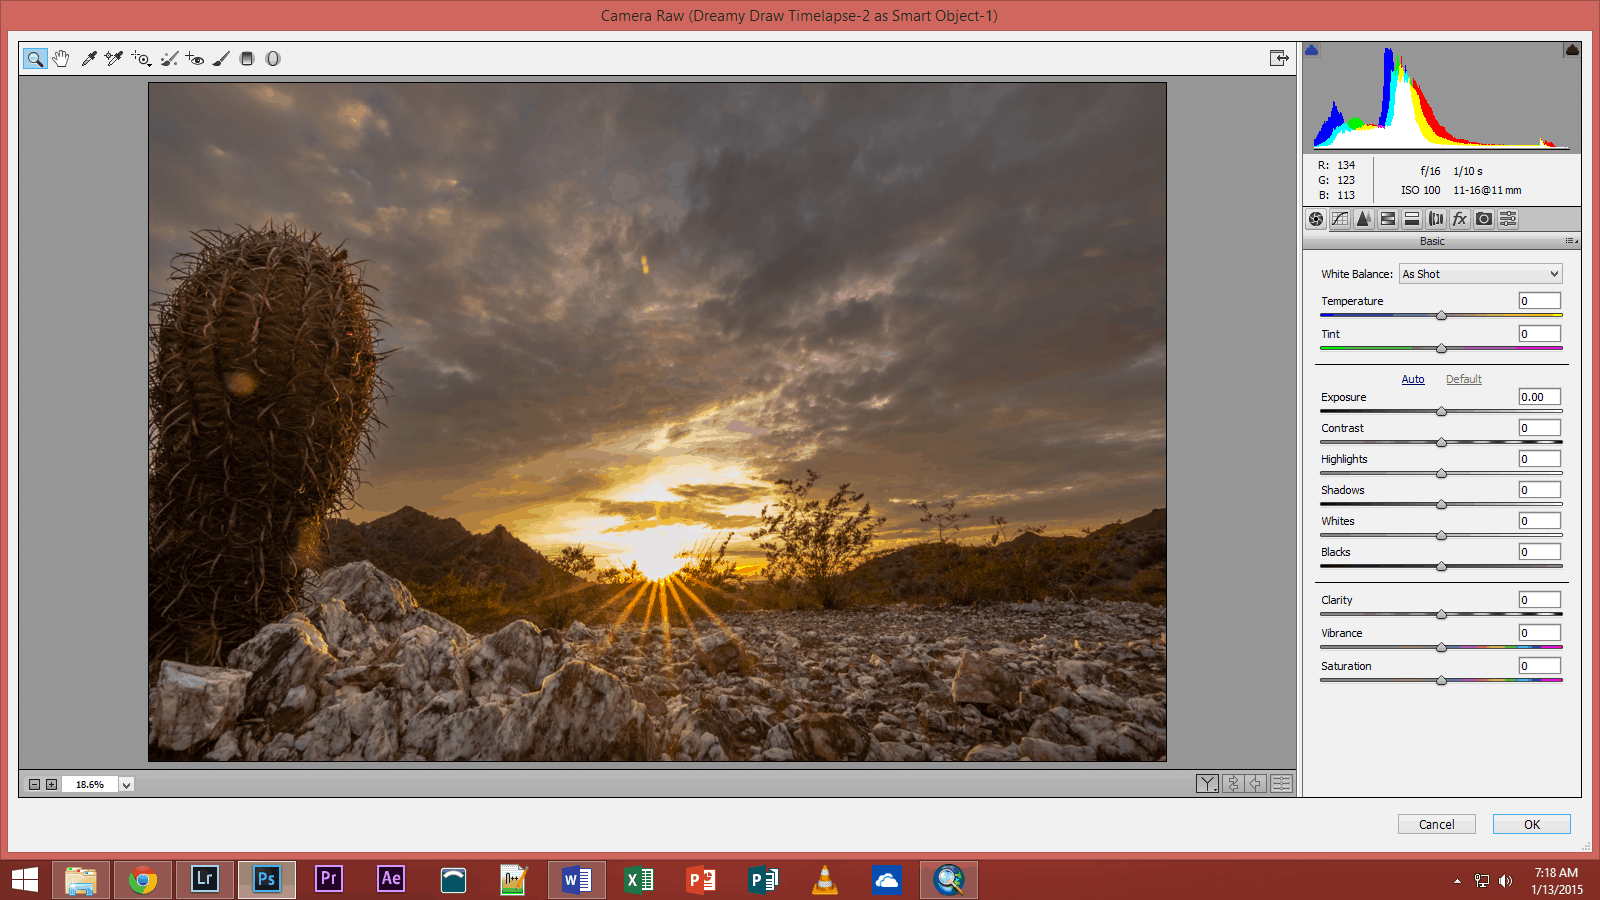
If you are using Photoshop CC, Camera Raw is now available as a Filter (in older versions you can click File> open in Adobe Camera Raw). You still want to protect your photo, so you should create a copy of the original layer before working with Camera Raw if you aren't working with your file as a smart object.
Next, open the RAW filter from the filter drop down menu. You will see the familiar sliders on the right, but some of the other items from LR are found across the top (like the targeted adjustment tool). When you are finished with the camera raw filter, click Open Image. You can complete other edits as you like from here.
When you are completely done, you can click x to close the file. PS will ask you if you want to save. Speaking from experience, you probably want to do that. Once you save, you will be returned to LR. Notice that you now have the PS edited photo and the original photo available (your personal LR settings regarding stacking can change how visible this is).
Which One to Choose?
When I first started working with LR, I felt a little frustration that every photo seemingly needed to run through LR. I came to accept this when I realized that LR is designed to organize my photos and to protect the original photo from destructive editing. After I suffered a recent loss of my primary hard drive, I was able to be back up in LR on a new computer in a remarkably short time with all of my photos and edits intact. It was as if nothing had ever happened. Beyond the safety of using LR, you harness all of the data captured in camera when you shoot RAW. Make sure you continue to protect that information when you edit RAW files in Photoshop. This means always making changes on a layer.
Which method you choose really depends on your personal preference, and how comfortable you are in each program. Personally, I do the majority of my work in Lightroom, and then move to more complex work in Photoshop. Complex work means I need to have a greater level of control than Lightroom offers such as adjustment layers, masks, and blending modes. For many images this is not necessary. Ultimately you will have to decide what you are most comfortable with, but having both options is nice.
Along those lines, I'm planning a series of video tutorials showing my work from capture through post processing, so you can keep an eye out for those in the coming weeks.
I follow this same basic route with my photos. One thing I can’t seem to find in LR is a the size, or dimensions if my image. I always put the photo in PS so I know where I am for printing different sizes. Am I blind and can’t find it, or it just not there?
Mary- I haven’t been able to find it either, (tried to look through it quite extensively) and this is something that does frustrate me. I wish they had a ruler like Photoshop has.
Hi Mary,
Lightroom is frustrating when it comes to printing. Let me give you a little insight. Your image size in many ways is less of a concern than the aspect ratio of the photo. Your photos will come straight out of your camera in a 2:3 ratio (unless you change something). This means you could print the entire photo straight out of camera without cropping as a 2 x 3, or a 4 x 6. If you want to print a 5 x 7 or an 8 x 10, you’re going to end up cropping because the photo will be in a different aspect ratio. That being said, even when printing a 4 x 6, I don’t like Lightroom’s printing options, specifically the ability to get borderless prints without a lot of fuss.
My go to workflow when doing my own printing has been to crop to the aspect ratio I plan to print in, export to photoshop, then resize the image to the correct size. I was planning to ask one of my writer’s for a printing guide, so your comment reinforces the need for that. Personally, I have outsourced most of my printing because getting ink is such a pain. The good online vendors (which Jim has reviewed https://improvephotography.com/7756/test-results-best-online-print-lab/ ) have systems which make this process much easier to deal with as it will show you the crop you need to make for the size you want.
I follow pretty much the same workflow as “non-destructive” editing is very important. I have a quick question on editing directly in PS though. Sometimes I will edit a .NEF directly in PS (always on a new layer or layers). Doesn’t it simply create an XMP file which can be deleted to remove any edits from the NEF? When saving it always asks you for a new extension as it won’t be saved as NEF.
That sounds right Tony, but I honestly don’t know. Maybe someone else can chime in that does.
Tony, you’re absolutely right. PS does create a small text file with the adjustments you make to your RAW. And this is why you can always return to your original file . And I believe, that LR Camera Raw works in the similar way. I find it very easy to open my RAW files in PS as they automatically open in ACR (Camera Raw) when I try to open them via PS. And that is just a double clicking for me on a file as I have my RAW files associated with PS. If you deal with JPG, you simply Save As your file after editing with a different name than original.
Becareful, if you are working in camera raw and select to trash the photo, it trashes the xmp file as well as the original raw file so simply deleted the xmp file will not restore what you have deleted.
I find it distracting the constant comparisons of the way LR deals with photos as compared to PS. I’ve seen dozens of comments on dozens of sights praising LR’s sidecar XMP files – which is great, but totally different to the way PS deals with files. They are 2 different beasts and 2 very different parts of a workflow. I am a full-time photographer for 12 years and have used Adobe Camera Raw (ACR) and Bridge as the most fundamental part of my workflow (which coincidentally uses sidecar non-destructive XMP files the same as LR). I then do “destructive” editing in PS only when necessary to copies of the ACR edited files. I recently downloaded the trial of LR (to see what all the fuss was about) but after processing an entire wedding (hey I wanted to give it a fair shot… we’re talking about 3000 raw files) I find that in my case ACR (combined with Bridge) is far more intuitive than LR, and in my case – waaaaayyy faster. I don’t think ACR can do anything LR can’t, and in some respects (if you’re batch posting online for example,)LR is probably superior. But for straight-out post-processing huge amounts of images, my personal opinion after trying both (and obviously there are many that would differ) is the ACR is the way to go. I wanted to post this – because of the comments I keep reading that start comparing LR to PS… which is of course – silly.
Many thanks Jim. I have been using Adobe Camera Raw for processing my raw photos and have been very happy. Because so many professional photographers and exceptional amateur photographers use LR , I started to wonder if I had chosen the wrong editing system. I am very familiar with ACR and Adobe Bridge and didn’t want to convert to LR unless it was worth it. Following you comments I’ll stay with PS CC and ACR. Thanks. Cheers Ron
Thank you for the explanation of the fundamental steps to edit Raw files. As is often the case with LR, when I search for an answer in Help, the discussion threads seem to start off assuming you know the fundamentals.
LR is a relatively simple program. It’s essentially for color adjusting. So it’s easier to learn. If that’s all you want to do.
PS is a beast. Not for the faint hearted. It basically does pretty much everything LR does and there’s absolutely NO difference in the quality of output. Also PS IS none destructive, if you know what you’re doing. That’s why layers, masks and smart objects are there.
So if all you want to do is color correct etc, then LR may be easier for you as it’s all in one place. PS is a more complex program as it does so much more. But just to repeat, there is no difference in the output quality of either programs – they are Adobe after all!
ACR and LR are the same thing. There are a few minor differences but underneath they are the same program with a different name, both are non-destructive editing and all the same modules (with different names). LR is far prettier. ACR is free with PS and confusingly is accessed via Bridge. LR is a stand alone product you can purchase. I also am an ACR user and was trained in ACR with a quick look at LR. Adobe removed the output module from ACR and I needed to do something that required it so I installed LR and had a play with it. I lasted 2 weeks before going back to ACR. The simpler way of viewing and organising files is what wins me over. There are some cool things in LR (like the history tab, but you can just make snapshots in ACR) but otherwise they are indeed the same.
Glad I read this I’ve always used ACR and was considering going to LR as I have decided to up my game and do HDR for my interiors, but I am really struggling. the HDR in Bridge and RAW seem different and I am not happy with either, especially as not all images will be HDR and these images because processed differently look different to the HDR processed ones. Most of the you tube info on HDR is done with LR and seems to be quite successful. So would welcome any comments