
 It’s been several years since I appeased my curiosity about what this whole Lightroom (LR) thing is. I’ll admit, I was a little disappointed at first. At the time, I thought it was just Photoshop Light with this catalog management thing thrown in. (Isn’t that what bridge is for?) I slowly started to embrace LR, and over time, I found I was doing the bulk of my editing there. I liked the catalog process, but the whole idea of bringing all of my photos into LR and organizing them seemed like a huge task. I started it, and never truly finished until recently. A few months ago, I had a back-up hard drive failure and finally completed a multi-year process of getting all of my photos organized. During the several intervening years, I’ve tried many different ways to manage my photos from start to finish. I’m going to share my current photo management workflow, including the backup process I have decided to use. Here is a quick overview:
- Name folders and files with an easy to understand name on import. Organize these folders under the year it was taken. Make sure to put in a couple of keywords as well.
- Whatever work you do to your photos, do it through Lightroom. This included moving files, or editing them in Photoshop. Use the export to> Photoshop function to move files in and out of Lightroom.
- Export files Into a subfolder, name the folder web or print
- Save all of your picture files as well as your LR catalog backup onto a folder that automatically backs up to the cloud
- Keep another backup on an external hard drive
One important thing to note if you are new to Lightroom, once you decide to use LR, you need to manage your files through LR. If you want to move files on disk, delete them, or change them, you should do so from LR.
Everything starts with the import. You need to start managing the files as you import them. Think of it like flossing. You want to skip over this step, but in a few months you’ll be sitting in a chair, ashamed of yourself, while a lady in a white mask fusses at you (OK, maybe the metaphor breaks down at this point).
Importing
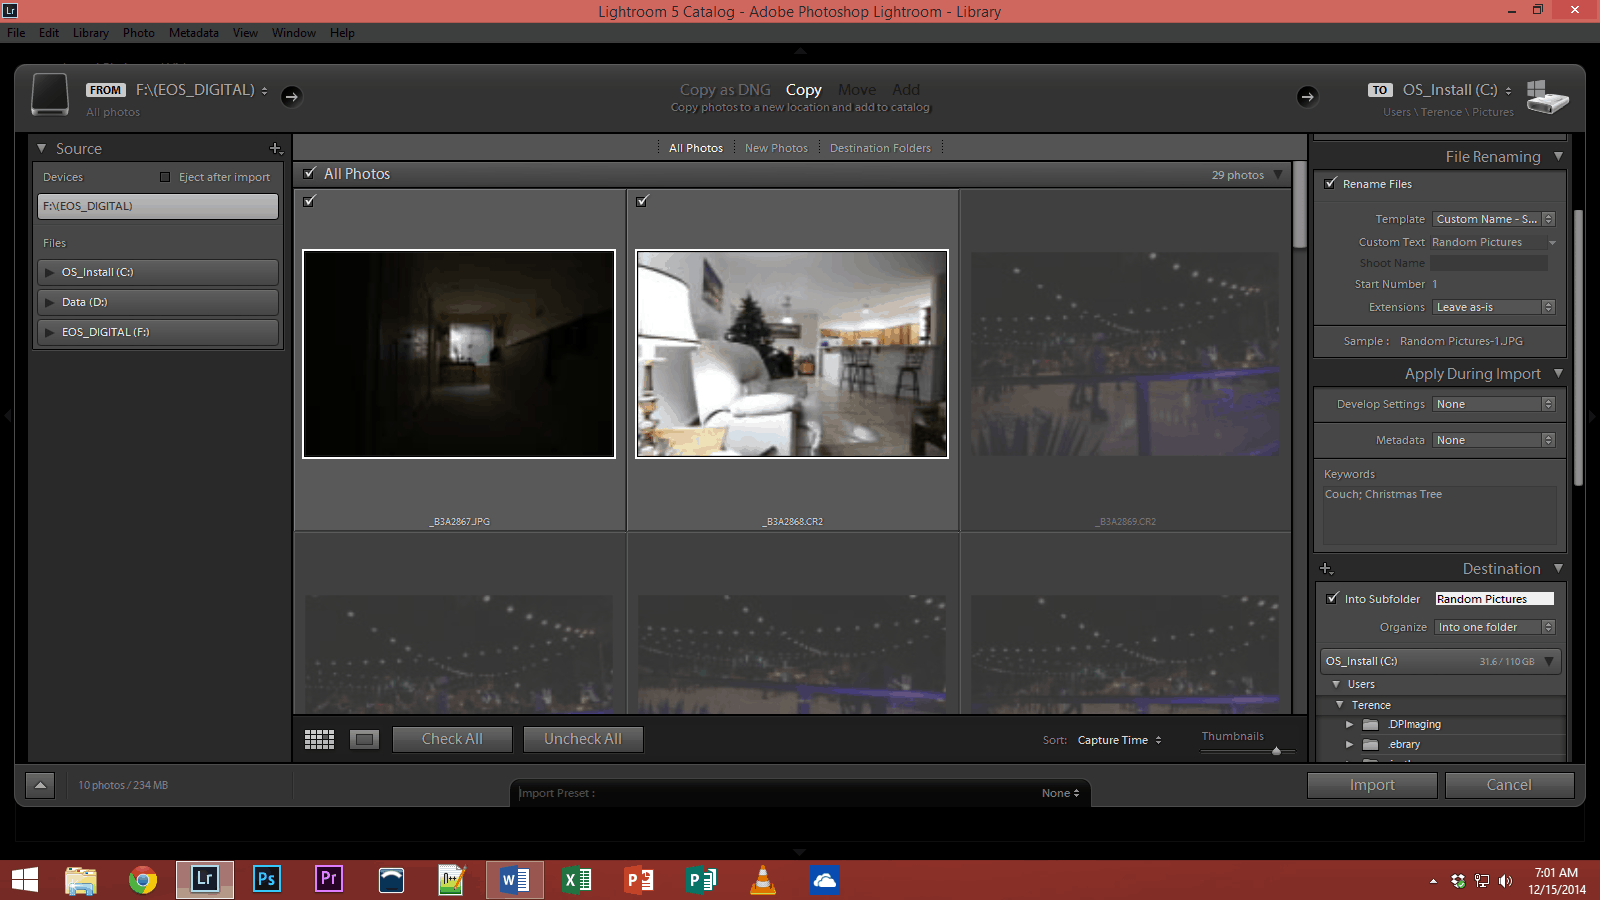
My file management starts during the import. I have all my photos organized by year in my Photo folder. I have Build Smart Previews checked, which allows me to edit files that aren’t on my computer’s hard drive. I haven’t needed this option so far, but I might due to how I archive my work (more on that later). I also click on Don’t Import Suspected Duplicates so that I don’t end up with multiples of photos because I grabbed a card that wasn’t formatted. A lot of people import a second copy to another hard drive. I don’t because I handle it a different way (I probably should though).
The most important part is next. I click the option to rename my files and using the Custom Name>Sequence option. Further down the import screen, I import into a Subfolder. I give a specific name to my files and my subfolder to help me to identify when/where I took the picture. I use the same name for my files and subfolder. Before I used to do this, I would get all my files imported by date. It was impossible to remember when I took a shot I wanted to find. I’ve found it is much easier to find files using a good folder name than trying to use a keyword search (I almost exclusively take selfies anyway, so keywords aren’t that helpful). This isn’t to say I skip keywords. I always try to enter at least one, and usually several. I have also set up a copyright preset so that my information gets attached if it isn’t already.
Now that I have everything on my computer and in my LR catalog. I generally want to go through my photos and mark my keepers and junkers pretty quickly. Part of the reason is because I do my editing on a Solid State Drive which gives me a lot of speed, but not a lot of hard drive room. I have to move my photos off to my main hard drive pretty quickly, which is a problem you may or may not have. I pick my keepers in full screen mode (click F) using the flag option (click P). I’m somewhat liberal with my keepers because I don’t want to toss something unnecessarily. When I say toss, I’m not actually deleting the files. Since I have plenty of cloud storage, I can keep all the files. I have a folder inside the parent folder for keepers and rejects.
Editing

I do the bulk of my editing in LR, but I find myself in Photoshop frequently, and it is important to handle files between LR and PS correctly. There are other third party programs I use as well, and these usually link to LR. I will use PS as an example of handling files between LR and other programs. To edit in PS, right click on the photo you want to work on and click Edit In> Adobe Photoshop CC (or whatever version you have). If you are going to do work with multiple photos, merging them for one reason or another, you will want to pick one of the options such as Edit In > Open As Layers in Photoshop. This will save you having to combine them to the right place in PS. If prompted to open a file with Lightroom Adjustments, I click yes (why would I make adjustments and not keep them). After completing your Photoshop edits, you can close your file and it will prompt you to save, or you can click Save As if you want to give it a different name. Either way, it will import a new photo back into your LR catalog. I usually import the TIFF file, then use LR’s export tool so I can save an appropriate file size.
Exporting
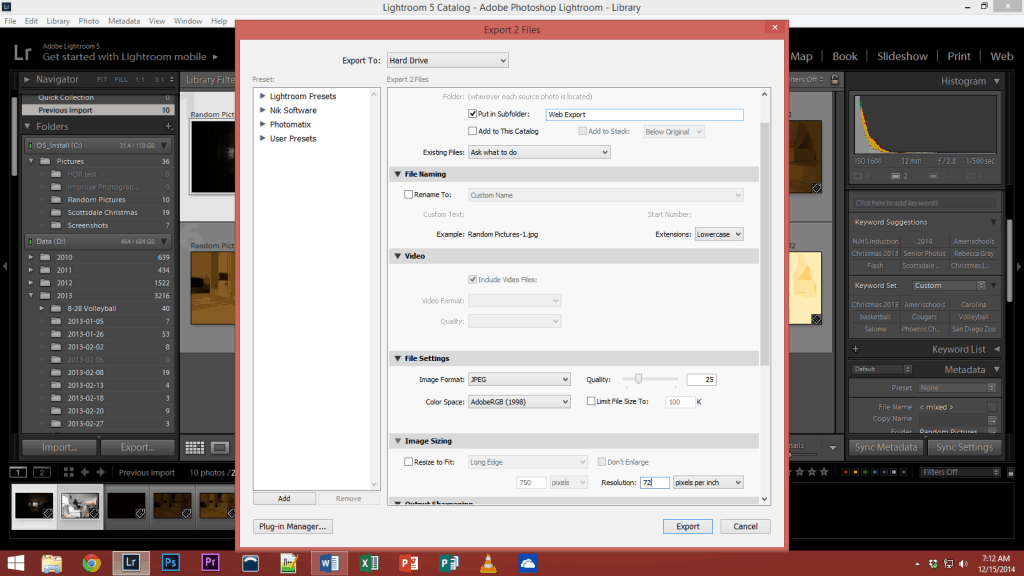
If I’m sharing photos in any way, sending them to print, sending it to my photo hosting site for sale or download, I use LR’s export tool (as opposed to saving from PS). File>Export will open the screen. I always Export To: Same folder as file location. This way I can find the export files in the same older which already has a unique name. Under this I click the box: Put in subfolder. I usually give this the name Web or Print to depending on what I am exporting. I usually save web files at 25%, and under image sizing 72 ppi. These options are found under File settings. This will usually get me a file size under 500 kb. I save print exports at 100% and 300 ppi. Print exports can be a little bit funny because of cropping and aspect ratios, but that is best left for another discussion. There is an option towards the bottom to watermark your photos.
Backup – My Move to the Cloud
As I mentioned earlier in the article, I recently had a backup hard drive go bad. Thankfully I had another backup, but I will admit, they are all in my house. If something catastrophic had happened like a fire (or angering someone with a giant electromagnet), I could lose a lot of photos, and a lot of memories. I finally bit the bullet and moved my photos to the cloud. There are a lot of options out there; I’m going to share mine, not because it is necessarily the best, but it does demonstrate one option. I pay the monthly fee to get Microsoft Office 365. This currently gives me over 1 TB of cloud storage on OneDrive. The rumor is that this will move to unlimited storage in the near future. This isn’t the fastest service, but I’m already paying for it, and it syncs with my computer in a process that is largely painless.
Running Windows 8.1, I copied my photo backup folder into my OneDrive folder. I did not cut and paste, I didn’t move the files, I wanted a new copy that would backup to the cloud which I would point my LR catalog to. After copying everything, I went in to LR, and updated my folder location by right clicking on the folders in my catalog, and clicking update folder location. I then pointed it to the pictures I had copied to OneDrive. Windows users can have their Picture folder be inside OneDrive, I just don’t do that because my main hard drive is a small SSD. At this point I had two copies of pictures on my computer which nearly maxed my hard drive space. I left it like that until I was sure everything was ok with LR pointing to my new file location. When all was well, I deleted the pictures
Next I changed where my LR catalog backed up to. I went to Edit>Catalog Settings and under the Backup tab I told it to “backup next time LR exits” (it will revert back to the original setting when it restarts next time). When I exit LR, it will give you an option to choose your backup folder. I created a folder on OneDrive called LR Catalog Backup, and told LR to back up my catalog there. This means my LR Catalog backups are on the cloud as well.
At this point, OneDrive was slowly uploading files. The whole process involved keeping my computer running for a couple weeks (for around 400 GB of files). This was a pain while it lasted, but now I’m uploading much smaller packets of files, it doesn’t take as long. This was a big downside to using OneDrive and may not work with some people’s needs. One problem I noticed is that it would sometimes hang on very large files (usually videos). If I told OneDrive to pause syncing, then resume syncing, it would right itself. An entire night of uploading was lost due to this problem. Perhaps some of the readers can speak to their experience with other services. Maybe I am just cheap and persistent.
One of the benefits to OneDrive is that you can save files online, but still access them when you are connected to the internet (remember the smart preview option at this point). You can click which folder you wish to save where by right clicking on a folder and choosing make available online only if you want the files to only be saved in the cloud. Choosing make available offline will save the file on your hard drive and to the cloud. Saving online only frees up drive space, but I would recommend keeping a backup at home.
Since OneDrive is synced to LR, when I make a change in my LR folder structure, it makes the same change on OneDrive. I keep all the files from the current year on my computer, and I will move them to offline only sometime in 2015. My files from previous years are also saved to an external hard drive.
As I stated above, I don’t share this as if it’s the best file management system out there, but it is the one that currently works for me. If others have suggestions, please share them in the comments. I’m always looking for a way to do it better.