
Sometimes I feel like I spend so much time reading photography tricks and tips online that I never see anything new anymore. So, I set out to make this useful collection of some weird and cool photography tricks that aren't your usual run-of-the-mill variety.
I hope you find some joy and learn a new tip or two. When you're done, comment below with what cool photography hacks you've learned!
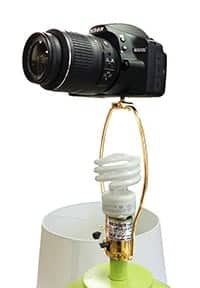
1. No tripod? Use a lamp!
Want to take a group photo but don't have a place to set the camera? Just whip the lamp shade off a lamp and screw your camera onto the lampshade-holder.
The thread size of the bolt on a lamp shade is exactly the same size as the filter thread used on tripods, so your camera will easily attach.
Not only will your party and indoor pictures look better, but you'll look like MacGyver in front of the group. Not bad. This tip doesn't come in handy every day, but you'll like the coolest photography nerd on the planet when the situation arises.
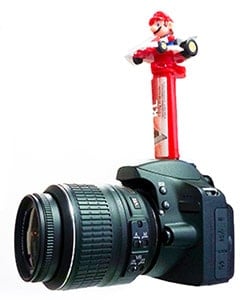
2. Hotshoe PEZ Dispenser for kids
Shooting photos of kids can be quite the feat. It seems like they are interested in looking at everything BUT the camera. I have two kids of my own, and I know that the only way to get them to smile and look at the camera is with a good bribe.
The perfect solution is to buy a simple PEZ dispenser on the hotshoe of your camera! The base of the PEZ dispenser is a tiny bit wider than a standard hotshoe, so you'll have to trim it just slightly with a kitchen knife before the shoot.
Then, when the kids are being good and looking at the PEZ dispenser, you can have them come up and grab a little candy periodically during the shoot. It's pure genius.
3. Day to night in a flash
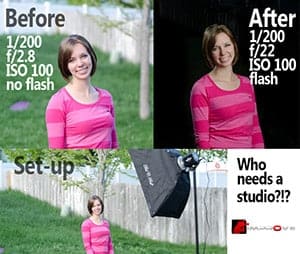
Sometimes you're out shooting portraits on a bright sunny day and the light just looks too… natural. I often find this is the case when shooting a wedding or engagement when I'm shooting at a park or other outdoor location and I get bored with the same lighting in every shot.
One trick that I really enjoy is to turn up the power on my flash to the max. This will, obviously, make the subject extremely bright. If you change your camera settings to expose for the subject, it will make the background look extremely dark because the flash didn't hit it.
This makes it look like it's night time even if it's the middle of the day. Click here to read a full explanation of this technique.
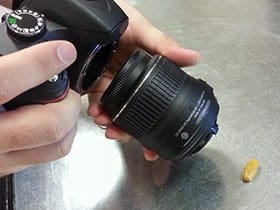
4. Remove the lens for macro
This is the coolest camera trick I've seen in a long time. If you take off your lens and hold it in front of the camera, you get a macro lens! I was really skeptical about this, but I just tried it and it worked like a charm.
There are four things you need to know about using this trick: (1) Your camera won't take a picture with the lens off unless you're in manual mode. (2) The best focal length seems to be around 50mm, so either a 50mm prime or an 18-55mm kit lens would be perfect! (3) Obviously, you lose autofocus since your lens isn't attached to the camera. Focus is achieved by simply moving closer to or further away from the subject, and (4) The camera can't open up the aperture, so you'll do it with your hand. On the back of the lens (the side you mount on the camera), move the little plastic slider piece that controls the aperture. If you look in the lens while doing it, you'll see the hole open up.
If you want to take this a step further, you can buy a reverse lens mount for $5 or $10 which should sharpen up the images quite a bit since it will hold the lens more solidly. Also, be sure to use a tripod when doing this or any other macro photography. With such fine detail, even a tiny movement can destroy the sharpness.
5. Delete tourists from travel photos
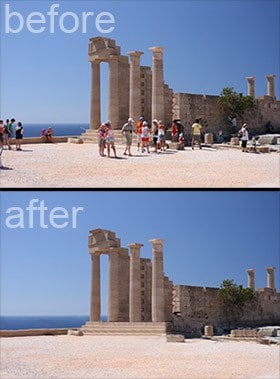
This is an awesome trick for travel photographers. Sometimes you're at an amazing location, but there are people in the way of your shot. If you want to take a picture of a landmark and people are in your shot, you will likely spend the rest of your adult life cloning people out of the shot unless you try this technique.
Step 1: Set your camera on a tripod.
Step 2: Take a picture about every 10 seconds until you have about 15 shots, depending on how fast people are walking around.
Step 3: Open all the images in Photoshop by going to File > Scripts > Statistics. Choose “median” and select the files you took.
Step 4: Bam! Photoshop finds what is different in the photos and simply removes it! Since the people moved around, it fills the area where someone was standing with part of another photo where no one was there.
UPDATE: The “statistics” script mentioned here is only available in Photoshop Extended or in the Creative Cloud version of Photoshop; however, as someone mentioned in the comments, you can get a somewhat similar effect in recent versions of Photoshop Elements by going to Enhance > Photomerge > Scene Cleaner.
This tip is mentioned in an outdated article on lifehacker.
 6. Shaped bokeh out of paper
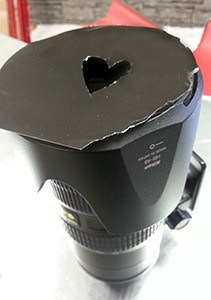
We all love to see beautiful bokeh in the background of our photos, but what you may not know is there is a really simple way that you can change the shape of the light bursts in your bokeh.
All you have to do is cut out a piece of black paper the size of the front element on your lens. Then, use a sharp kitchen knife or razor blade to cut a shape on in the middle of the paper. The shape should be slightly larger than a thumbnail or about the size of a U.S. nickel.
Keep in mind that you'll only see this effect work if you are shooting with a large aperture, so a 50mm f/1.8 would be a great choice for this project. If you're shooting at f/5.6 on a kit lens, you likely won't see the effect at all.
[callout type=”center” title=”Photography Portfolio Reviews – $55″ message=”Have the expert editors at Improve Photography review your photography portfolio in-depth and send you an audio feedback file for just $55″ button_text=”Check it out” href=”https://improvephotography.com/online-portfolio-reviews”]

7. Reflector as studio backdrop
Sometimes when I'm shooting outdoor portraits, I see a pose or an expression for the model that makes me wish we were in the studio so I could photograph them on a white background. Sometimes a white background is the best way to focus all attention in the photo on the model, and it gives the photo a bright and clean look. When I'm in this situation, I often grab a simple $25 reflector and use it as a studio backdrop on the spot!
The trick for making this technique work is to use positive exposure compensation. The camera will try and dim down the white background to a dull gray because it thinks the white is overexposed. About 1 stop of exposure compensation will make the reflector background look bright white. If you're still learning to shoot in manual mode or how exposure compensation works, you might take a look at my beginner photography class that I offer online.
8. Camera strap GND filter
This is my all-time favorite landscape photography tip because I use it all the time and most people have never heard it before. When shooting landscapes, the sky is often much brighter than the rest of the landscape so you need something to darken down just that top part of the photo. A graduated neutral density filter does exactly that.
A GND filter is a piece of glass that is darkened at the top and which gradually tapers off to clear. The photographer simply holds this filter in front of the lens to cover the sky and it darkens the sky without affecting the landscape underneath.
Call me forgetful, but I often forget to bring my GND filter with me when I'm shooting landscapes, and it can ruin the shoot if I can't darken down the sky to balance the exposure. One trick I've learned is that you can simply use anything dark (a black piece of paper, a camera strap, etc) to hold in front of the lens for part of the exposure and the same thing is accomplished.
For example, while filming video tutorials for my intermediate online photography class, I was shooting waterfalls in Oregon and needed to darken the sky without darkening the rest of the frame. Since it was early morning, I was using a 2 second exposure. All I had to do was hold my camera strap over the top half of the glass on my lens for 1 second, and then remove it.
This makes it so the top half of the picture only sees light for half of the time, so it is much darker. And no, you won't see the camera strap in the photo since it's black.
9. Insulation reflector board
I debated whether or not this counts as a “camera trick” or if it's really just a super-awesome reflector that costs basically nothing. Call it what you will, but it works so well that I have to share this tip.
Circular reflectors are excellent for improving the lighting in your outdoor portraits. By holding them to reflect the sun's light, you can fill in shadows and put beautiful highlights on the face of the person you're shooting. However, most circular reflectors only work for a head-and-shoulders shot and only for one person. You can purchase a large full-body reflector, but they usually cost around $70.
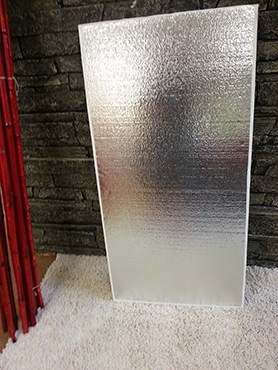
One trick I learned from a photographer who shoots celebrities is to simply purchase insulation board for $5 and then cover the back and edges with white duct tape. You'll find insulation board with reflective silver backing at any home improvement store. It comes in several sizes. I chose one that is 4 feet (1.2 meters) in height.
This simple solution gives you a very large reflector that is lightweight, and you can use one side to reflect silver and the other side to reflect white. Awesome!
Oh, and I also use this as a way to put a little wind in the hair of my models when I'm shooting someone with long hair. Just have an assistant fan up and down with the reflector board and it gives just the right amount of wind to give the hair some bounce without blowing the models away.
10. Get the Popular Trick Photography eBook
 I can highly recommend Evan Sharbaneau's Trick Photography and Special Effects eBook if you're interested in learning more photography tricks. I've given a few ideas for photography tricks in this article, but this book really is quite good.
I like that the book has so many projects of exactly how each photo is taken so you can use the ideas in your own photography.
You can find out more about the book here.
I enjoyed this post! You mentioned a link article at the end of #3 but there is no link. Would be interested in reading it when you post it. Thanks!
your photography quite excellent.Thanks for sharing.
I love #3 and want to learn a little more about it, but the “click here” link is missing.
Click on the actual words. XX
Such an excellent and helpful post. Thanks for sharing this.
nice
it is cool
i liked number 2
i love #6 and i want to learn more about it,
I’d also like to learn about #3. Messing with my camera I accidentally got a shot just like this that turned out great. But I have no idea how I did it and for the life of me can’t recreate it! Great post! very helpful tips!
LB, Matt, and LoRey – Sorry! I fixed the link.
HI..!!! i liked the 5 article but while trying in in Photoshop i didn’t find “statistic” option in “scripts”… please help..
Hello. I would like to ask if what version of Photoshop you are using of ?.
Thank You. I really enjoyed your post
number 5 will save me a lot of time, never thought to search for an automated way of doing it. Never thought of 8 either and 9 could be useful. Surprised to learn so much from a simple short tips page, good post.
Number 7 and 9 are my favorite thanks for sharing.
Just tried the macro and all my shots were black? Am I doing something wrong?
For Just a few $ you can find a metal ring to put between the camera and the lens. That will help you to hold everything firmly and the focus will be more stable. the focus is very narrow in this shooting mode
I got a set of 3 rings – gives 7 optional distances – on Amazon for less than 5$.
open the aperture manually
Nice I like the insulation board one, never thought of that 😀
I have a silver cake board from a shop bought birthday cake in one of the large pockets of the backpack I carry my camera gear in. I use it as a small reflector but it could be used as a background for something small.
@Jill – THANK YOU! You reminded me of one more step I forgot to mention in the tutorial. You have to use your finger on the back of the lens (the side that mounts to the camera) and move the little slider that opens the aperture. I’ll update the tutorial.
I’m really interested in #5. However, I have Lightroom 4, but not Photoshop. Is there an automated method for doing this in Lightroom?
Number 5 is my favourite. I’ve been using PS since version 3 and never knew about this.
I have also used a silver car windshield sun/heatblocker as a silver light reflector in a pinch. It’s not elegant and you need some way (or some_one_) to keep it in position, but it works.
Thank you! Those tips are great. I am looking forward to try them out.
This is a cool article. I’m definitely going to use your tips. Thank you!
As a beginner ( semi professional ) This is GOLD ! I can’t wait to try it all out. Thanks so much for sharing.
Never knew about number 5. I dont enjoy most of my vacation photos because of moments like this. Finally! Thank you!
enjoyed this!
Pure brilliance. I particularly love #3 and #5 and will definitely be trying those out soon! Thanks for sharing Jim.
Total brilliance. I particularly love #3 and #5 and will definitely be trying those out soon! Thanks for sharing Jim.
Concerning the insulation reflector board, I saw someone using a windshield reflector – the type that you place inside your car window to reflect the heat. One side is silvered and as it folds up, it seemed like a “bright” idea. But isn’t the quality of the reflected light from this sort of surface rather harsh?
If it seems a bit too harsh just back it up from your subject and ‘feather’ it away