
Tethered shooting has been available to photographers for quite some time. Tethered shooting (plugging a cord from your camera to the computer) gives the benefit of shooting directly to a desktop computer or laptop and seeing the photo large on a computer screen, and being able to make adjustments to the photo on the spot. Although this method is great, there is also one major inconvenience; you need to be physically tethered to a computer or laptop via cable. Those days, I’m very happy to say, are over.
For several years now, there have been major technological advances making untethered shooting possible, but just not for everyone. The eyefi card, which is an SD card solution that makes shooting untethered possible has been around for a few years. Unfortunately, for those with cameras which don’t take SD cards, for the most part, have been out of luck. And even for those who can use an SD card with their camera, it is a clunky setup.
Enter CamRanger! Finally those of us with cameras that only use CompactFlash (CF) OR SD cards can finally enjoy the wonders of untethered shooting at a reasonable cost…. and not only to a Mac or PC computers, but to iOS and Android mobile devices as well. Having used this product on several successful shoots, I’d like to share with you my impressions and thoughts.
What exactly is the CamRanger?
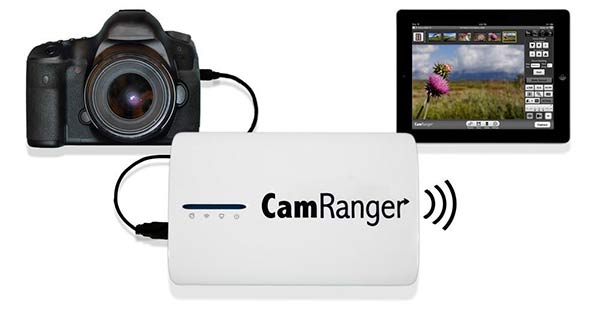
CamRanger is a pocket-sized piece of hardware that attaches to your camera via USB cable and creates a WIFI hotspot which can be joined by a computer or mobile device via its normal WIFI settings. The secret sauce is CamRanger’s free iOS, Android, Mac and PC apps which then connects via this WIFI link to your camera.
What does the Camranger do?
There are a few reasons why the CamRanger or any comparable untethered solution is an essential piece of gear to have in your camera bag.
- Allows you to transfer photos wirelessly from the camera to a tablet, PC, or Mac.
- You can set the camera settings from the remote device (really only helpful if the camera is mounted somewhere, like when shooting a sporting event and you mount a camera above the basketball rim, for example)
- Extended HDR bracketing capabilities
- Focus stacking
- Intervalometer (takes a shot every X number of seconds for use in a timelapse. Nikon cameras have this feature built-in, but Canons do not.)
- View your shots on a large portable high resolution screen as you take them. Your client or collaborator can see what you are shooting from a distance without breathing down your neck asking to see your tiny camera’s screen every time you take a shot.
- Impresses the ladies
Setup
Setup of CamRanger is extremely simple. Once you connect the device to your camera via USB and power it up, it automatically creates a WIFI hotspot and establishes a connection to your camera. Once you download the free CamRanger App to your mobile device or computer, go to your device’s WIFI settings and join the CamRanger network. The network password is printed on the CamRanger itself so you never need to worry about losing it.
Once you have established a WIFI connection on the receiving end, you are ready to start controlling your camera and seeing the shots wirelessly. If you are shooting RAW, I recommend that you set your shooting mode on your camera to RAW+JPG for faster wireless performance. The app downloads the JPG preview much faster than if you just set it to RAW, which will take longer to send over the air. You will still have plenty of resolution on your JPG preview to see detail and verify focus. A double tap or pinch will load up full resolution so you can zoom in and see more detail. if you wish, you can also download the full resolution file you your device and store it locally.
The app also has a genius feature called “Client Mode” which strips the interface from any camera controls and only shows the shots and provides some basic starring from 0 to 5 stars, which is great if you want to start organizing the good shots from the get-go. In short, “client mode” is a way to shut your clients up while you do your work. It's like the kids toys in the corner of the dentist's office that occupy children while mommy gets her tooth drilled.
Hardware and Battery Life
CamRanger is elegantly designed. The device is pocket-sized with just an on/off switch, a strip of LED lights that tell you the status of the device, and a removable battery cover and battery. Having used the CamRanger on many day-long studio shoots, I have to say that battery life is fantastic. Charge the battery the night before and you can pretty much guarantee that the CamRanger will give you a full day’s worth of solid shooting. If you're shooting is so ridiculously intense that you somehow manage to deplete its battery; fret not! You can quickly swap the battery out for another one (purchased separately of course), and continue shooting like the freak of nature you are.
This was a smart move by the design team as not being able to swap out a dead battery in the middle of a shoot could be quite frustrating. Luckily, I haven’t even had this happen as the battery has lasted full day shoots without hiccups. Charging the battery does take a few hours so make sure you start your day off with a fully charged battery to guarantee you get the best possible performance out of your shoot day.
The device comes with a black carrying sleeve and small carabiner which you can use to clip to your belt or tripod. The construction of this sleeve is not very robust since it’s made from light nylon. I broke the loop that attaches to the carabiner a few shoots worth of use. After this happened, I just attached the carabiner to the zipper pull itself and have been using it effectively this way for months. Sometimes I just put the CamRanger in my pocket instead of attaching it to my pants belt loops. Either way, this is a very minor detail.
Software
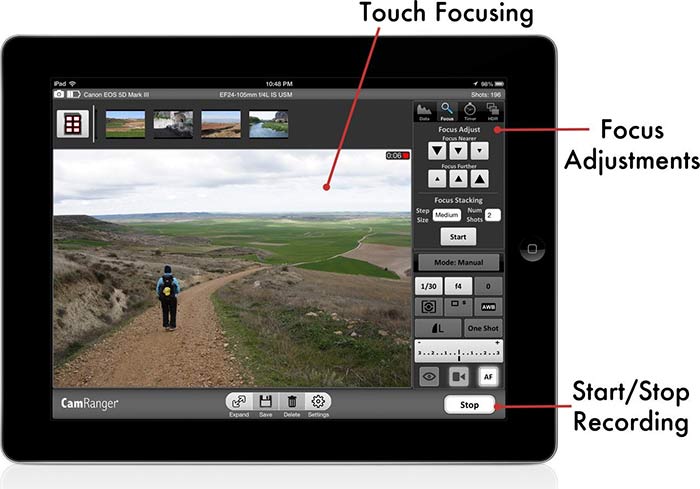
CamRanger’s app is simple to use, feature rich and available in pretty much any platform that’s worth having. Not only can you view the last shot, but you can view all the shots you’ve taken like you would on a desktop program such as Lightroom on tethered mode. You can change your camera’s settings like ISO, Shutter Speed, Aperture, Exposure Compensation, Focus, AF Points. Pretty much any camera control is easily available to you in a simple interface that’s familiar to any photographer.
You also have a built-in intervalometer for shooting time-lapse as well as bulb setting. HDR and Advanced bracketing controls are also available so you can not only bracket with different aperture and shutter speed, but ISO bracketing as well, which opens up a new level of HDR control. CamRanger also helps you shoot video. Although this feature has its limitations, such as a choppy preview on my 5DmkII, and certain camera compatibility, it is still available for control and is useful for video. It’s nothing like a dedicated off-camera monitor, however, so if you’re looking to use CamRanger as your off-camera monitor and recorder for heavy DSLR video use, I suggest you look elsewhere for now. You can only use it for monitoring and controlling the camera, you can’t use it for playback or video transfer. As of this writing, I haven’t put the video functions fully through its paces so I can’t give a detailed opinion on this feature.
Lastly, if there are images you would like to share with someone else, the sister app CamRanger-Share software has sharing functionality for easy collaboration.
Weaknesses
It’s not as small as an eyefi SD card, that’s for sure. It’s also not as tight a setup as a WIFI grip (such as the Canon WFT-E5A Battery Grip) either, but it is also not as expensive or as camera specific; however, you still need to connect a short physical USB cable between your camera and the CamRanger which is not as “clean” as the previous two options. Video recording is probably the only weakness for the CamRanger I can currently see. Even though you can control your camera’s video shooting mode with it, there are limitations on what you can actually do and which cameras have better performance on this front.
Frankly, I am at a loss for words on weaknesses for the CamRanger and new features are constantly being added and improved. Maybe they will improve video performance down the line.
The “Nearly Free” Option
The Camranger is actually just a simple $30 TP-Link 3040 router with special firmware installed. What does that mean? It means you can buy a $30 TP-Link 3040 and change the firmware on it and you basically have a Camranger. Viola!
However, there are limitations to this method. First and foremost, you have to be a little technical to know how to do this. There are step-by-step tutorials online, but if you don't like tinkering, this isn't for you. Second, the functionality isn't exactly the same (though it checks most of the boxes) and the app isn't as slick as Camranger's. Unless you're an adventurous geek who wants to tinker instead of having things work for you, this isn't the best option.
The biggest limitation, however, is that this option only works if you shoot a Canon DSLR and use an Android device. Did I mention that you can pick up a Nexus 7 Android tablet AND the TP-Link 3040 for less than the cost of the Camranger?
Input from Other Reviewers
- Steven, an Amazon reviewer, mentions many bugs in the software, specifically with the tablet app of the Camranger. He also laments the fact that the battery can only be charged while in the device.
- Mike Kelley loves the functionality of the Camranger for his architectural shoots, but mentions that he is not able to give the client an iPad to see the photos and trigger the camera from another iPad. The Camranger wants to only be connected to one or the other.
- Abram Goglanian praises the functionality of the device, but mentions bugginess in the app, requiring him to re-install the app to make it work again.
- Terry White says the product works as advertised and he is getting 5-6 hours of use on a battery charge.
- At the time of writing, 22% of all Amazon reviewers of the Camranger give it 3 stars or fewer.
Final Verdict
I've been cautious in this review to not “overhype” the device, because it is not perfect. It's my job to make sure you go into this purchase with your eyes wide open. After all, that's the purpose of a review.
That isn't to say that I'm not incredibly excited about it. I cannot rave enough about the CamRanger. At $299, it is certainly overpriced considering what it is, but for photographers who want advanced control over their camera, it's the nicest option for doing so and worth the price.
It is a well designed, robust solution that does what it says. It makes your shoots run smoother and in my opinion, absolutely essential when working with a producer, director or client at a studio or on location. If you’ve been jealous of those using eyefi because your camera doesn’t take SD cards; go with the CamRanger and cut the cord!
For some other great tips on beginner photographers, check out this link.
Please correct “Viola!” to “Voilà!”. Nice article. Thanks !
What’s the matter, you don’t like larger violins?
Have you seen CASE? It’s a crowdfunding project I’ve backed, quite similar to the Camranger. Of course the product has yet to become reality, and the quality of the app may also be questionable. But I thought it was worth a punt 😉
https://www.indiegogo.com/projects/case-free-your-camera-free-your-idea
PS: I love how you include the verdict of others in your reviews. Keep up the good work!
Thanks for the review. I think I will be doing the nearly free option sometime in the near future.
My CamRanger was just delivered today. Less than 48 hour delivery, from AZ to CA. (2 thumbs up). Heading out next week for a 3-day shoot, and plan to experiment with both the CamRanger and Eye-Fi Mobi. So far, I give the customer service dept an A+ on product knowledge as well as friendly, available human service! Don’t mean to sound like a commercial, but it really was refreshing to speak to a friendly voice.
Getting to the CamRanger, setup was finished in less than 5 min, (after a 2-hr battery charge). Quick start instructions were accurate and extremely easy to follow, and I love the advice on the guide, stating if it doesn’t connect right away you may need to try a few times. Honest, helpful hint.
Only negatives so far are, the free Share app, which allows other clients to view instant photos on multiple devices, seems to have a glitch, or important features lacking. You cannot view the image file name. Share features are set in the main app, and you can select your watermark overlay to appear on images in all shared devices. But again, no image or any details info on the share. Also, you cannot scroll through images on shared device. Nasty uh-oh on that. Not very user-friendly, if clients cannot easily scroll through their pics and not have filename available to order.
Hoping CamRanger’s next update resolves these issues. Until then, I’ll let you know how it worked when I return from the shoot next week.
Regards,
Lori
P.S. I shoot Nikon D7100 and occasionally still use D90. Using CamRanger on 2 new Samsung Galaxy Tab S, (main app on 1 device, the Share app on the other tablet, plus on my HTC One smart phone.
I went the “nearly free” route shortly after this article came out and haven’t regretted it. The setup of the router was easy – I followed the instructions at Creating a wireless remote from a TP-Link TL-MR3040 to work with my 5D MKII. There also appears to be an option for Nikon shooters at DSLRDashboard.
This feature may be available in the CamRanger as well, but with DSLRController I can save the images to my mobile device which is HUGE! I can do quick edits (like a re-size or a crop) on the phone and quickly get images out to the web. This drastically shortens that workflow as I usually have to download files to the computer, run them through LR/PS, then upload them. This usually happens at the end of the day when I get home and am sifting through all of the photos taken. By then the magic/motivation is usually gone…
Don’t fear the technical know how… It’s pretty easy and worst case you are out the $40 for the router.
Would like to try this gut not sure I can use it on a Canon 60D. How does it connect to the camera?
Nikon shooters, check out DSLR Dashboard App for Android OS… free app, only thing you have to buy is a USB On-The-Go cable for $7 to connect your phone/tablet to your Nikon.
Camranger is a good product, however there was not a lot of forethought in designing it. Yes, you can change the aperture, shutter speed, and ISO settings while you are away from the camera, but all these changes don’t mean a thing because you cannot see the exposure reading, – there is no exposure meter provided by the app. So you just basically “guess” that you have the correct exposure by looking at what you see on your phone or tablet. I don’t know any self-respecting photographer that doesn’t look at the exposure reading just before pressing the shutter release. You are shooting blind when you use this equipment – a great disappointment.
The built in histogram tells you everything you need to know regarding the exposure.
It appear that the maximum an image can be zoomed in is only 200%. Can CamRanger improve on this so that photographers can zoom in as much as possible to satisfy oneself that the shot is not noisy?