
More and more photographers are incorporating video and motion into their skill sets. Are you? Timelapse photography is a great way for still photographers to start getting acquainted with motion. If learning how to do video has been intimidating for you, fear not! The barriers to entry are super low these days. Timelapse photography also does not require a lot of fancy gear (although it could), and so getting started in timelapse doesn’t have to break the bank either.
If you are already doing photography, you likely have everything you need to get started in timelapse. I started dabbling in it this year with just the gear that I had on hand. Here is my first attempt at a timelapse compilation:
I admit it's pretty basic, but experience has me hooked! My hope is that it will help you feel like getting started in timelapse photography is an attainable goal. In this article, I’ll share with you some of the things I learned along the way and wished I had known ahead of time.
What is Timelapse Photography?
Simply put, timelapse photography is a way to speed up time. You can think of timelapse as the opposite of slow motion cinematography. Both techniques are used to manipulate time so that the viewer can see something they otherwise might not be able to perceive. A timelapse is a series of photographs taken over an extended period of time and then later stitched together into a rapid sequence. I like to think of a timelapse as a flipbook. Motion or change might not be detectable in a single frame, but a story can unfold once the images are stitched together.
Why Do Timelapse Photography?
For one, it’s a lot of fun! It’s a great way to approach your photography in a fresh new way and grow your skills. Once you’ve mastered timelapse photography, you can use it in all sorts of applications, from promoting your art to expanding your offerings as a commercial or real estate photographer to starting a YouTube channel. You can also simply use timelapse to tell a story or to recount an event, like the one below of our sugar shack frame-raising (we make Vermont maple syrup). Friends and family loved seeing the footage, and it was a great way to share that fun day with others.
Basic Equipment Setup
To do basic timelapse photography, you will need four things:
- Camera
- Tripod
- Intervalometer (a tool that programs your camera to take a certain number of shots separated by specific interval of time – more details below)
- Video editing program (optional)
I’ll wager that since you are reading a photography blog, that you already own a camera of some kind. You don’t need a super special camera do to timelapse. You can even record a timelapse on your smartphone! Some smartphones come with a native timelapse function in the camera that is super simple to use – it’s literally a push of a button. You record the timelapse, and wammo, the phone automatically stitches the images together into a video. It actually does a remarkable job! Using this feature is the simplest way to get started in timelapse, but keep in mind it lacks any customization to recording process and any editing that you might want to do afterward. A handful of timelapse apps exist, if you’d like to take it up a notch.

Another simple setup for timelapse photography is to use a GoPro. GoPro Hero 6 and 5 Black, Hero 5 Session, and Hero 4 cameras have two timelapse functions – Timelapse Video and Timelapse Photo. The Hero 5 and 6 also have a nightlapse option. The GoPro is a lot more customizable than a smartphone, and you can set the interval time, resolution (4K, 1080p, etc.), and the field of view. If you use the Timelapse Video function, the GoPro will record the images and render the timelapse video for you, like a smartphone, and you will have one mp4 file in the end rather than a series of individual photographs. The GoPro needs to take at least 30 frames for this feature to work.
If you use the Timelapse Photo function, then you will get the individual images and you’ll need to stitch them together afterward. The GoPro App will do this automatically upon import, but you can also edit them separately yourself in Lightroom or with another photo editing program. We’ll get into settings and editing more below. I prefer the option of editing the photos myself and having the individual image files that I could then use for other purposes as well.
Of course, the best way to record a timelapse is with a DSLR. Many modern DSLRs have a built in intervalometer (or interval timer), which is super helpful and eliminates the need for having an external one. Some external intervalometers are integrated in remote shutter release cables like this one available on Amazon. Be sure to get the one compatible with your camera. An intervalometer is basically a way to set your camera up on a timer where the camera takes a pre-determined number of shots at a pre-determined interval for a certain period of time. An interval is the time between shots, and I’ll explain more about how to determine these settings below.
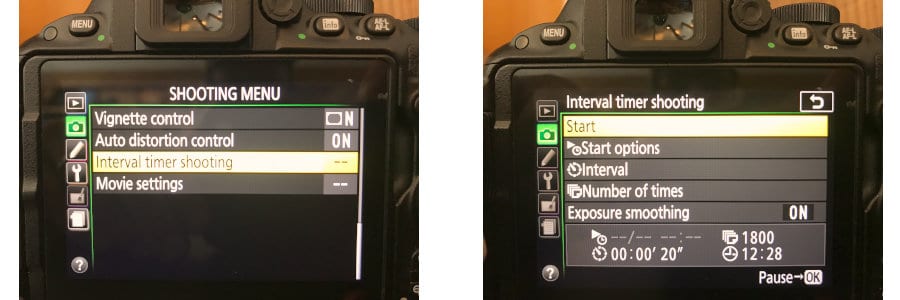
Some newer DSLRs also have a timelapse function in addition to the intervalometer. Like a smartphone and the GoPro, this function will stitch together the photos for you, so that at the end of recording you have a movie file rather than a series of individual photographs. I have this function on my Nikon D810, and it works great for something quick and easy.
It should go without saying, but you MUST have a tripod to record a timelapse. This could be something as simple as a GorillaPod or a Platypod. Timelapses can take several hours (even days!) and you can’t handhold during that time. If the event or subject you are recording is fast enough that you can handhold your camera, you might as well take a video, right? The other reason to use a tripod is to ensure that each frame is identical to the next except for the subject that is changing over time.
Planning the Shoot
What subjects make a good timelapse? Basically, anything that is moving or changing over time. Some classic examples are clouds moving across the sky, shadows moving throughout the day, a blooming flower, melting ice, or sunrise/sunset. The possibilities are endless, really! One thing to keep in mind when planning your timelapse is that you should plan the composition just as you would for a regular photograph. All of the same principles apply. Also consider the time of day that you are shooting, and whether the exposure will need to be changed while the timelapse is being taken.
If you want to make your timelapse feel a little more cinematic, consider adding music. Many photographers recommend choosing your music first, and then planning what sort of timelapse(s) would fit the mood of the music. I admit, I haven’t done this myself yet, but I do see the value in being more deliberate and pre-planned about a shoot.
If you are planning on posting your timelapse video anywhere, then it’s best to use royalty-free music, especially if you’re just starting out. I use Audioblocks by Storyblocks and have been happy with the selection so far. Art List is recommended by Jim Harmer and you can get two free months when you sign up by clicking on the link.
Be sure to bring plenty of spare charged batteries and formatted memory cards! You will go through these like crazy. It’s amazing how quickly batteries drain and cards fill up while doing timelapse photography. The rate of this will depend on how many hours you are shooting, the size of your image files, and how many photographs you are taking over the course of the event.

Timelapse and Camera Settings
The key to a successful timelapse is to get the timelapse settings correct. Determining the best settings isn’t too complicated, but because every situation is different, it may take some practice to zero in on what works best.
When figuring out your settings you will need to consider:
- How fast the subject is moving
- Interval time (the time between photographs)
- Movie clip length
- Frame rate (frames per second or fps)
- Length of time shooting (this will depend on the subject you are recording)
- Shutter speed
- Number of images taken
First, you should consider how fast the subject is moving, as this will help you determine your interval time. For example, to do a timelapse of quickly moving storm clouds, you’ll want to have a short interval time (only a couple of seconds) between shots in order to capture as much of the rapid change as possible. On the other hand, if you were doing a timelapse of a flower blooming, then the interval time would be longer (a couple of minutes or more).
As a general rule, it is best to collect more images than you will need. It’s always good to have too many and throw out what you don’t use than not to have enough and end up with a skippy video. I made that mistake recently while attempting to do a moonrise timelapse. I didn’t take enough images for how fast the moon was rising, and the video ended up looking jumpy.
Other settings to ponder as you plan your timelapse is what length you want your final clip to be and how many frames per second you’d like to use. If you are planning on stitching together a bunch of separate timelapses into a final video, then the clip length will likely be determined by the music you choose ahead of time. For example, some music has downbeats every four seconds, whereas others it could be every eight seconds. You can change the duration of each clip in post-processing, but it is best to have a clip duration in mind to start with so that you are sure to take enough photos. Although frame rate is considered part of the final editing process, it also plays an important role in this calculation. A typical frame rate is 24 frames per second (fps), but timelapse videos may be edited at 30fps or even 60fps for really fast action. More on editing later.
Shutter speed also plays a role when determining timelapse settings. I recommend shooting in manual mode to avoid any unplanned changes in exposure that could otherwise occur. Set your shutter speed appropriately to get the correct exposure based on your aperture and ISO settings. Some timelapse photographers recommend slowing down the shutter speed (1/3s-3s) to capture a little motion blur in each image (and adjusting aperture and ISO accordingly). This supposedly helps smooth the action in the final video clip and reduce flicker. I didn’t apply this tip to the sugar shack timelapse above, and I wonder if it would be a little less jerky if I had done so.
Let’s go through an example together.
Say we are going to do a timelapse of the Milky Way. We know that this is a slowly moving subject, and that it will take several hours for it to move a significant distance across the sky. Shutter speeds are typically around 20-30 seconds for shooting the galaxy (it depends on your lens and camera). In this example, we’ll use a shutter speed of 25 seconds. We want our final clip to be 10 seconds long at 24 fps. Because we’d like to minimize any gaps in the movement of the stars, we are going to use an interval of 2 seconds between shots.
How many photographs will we have to take?
24fps x 10 seconds = 240 frames needed for a 10 second video
How long will the shoot take?
240 frames x (25 sec shutter speed + 2 sec interval) = 6,480 seconds = 108 minutes
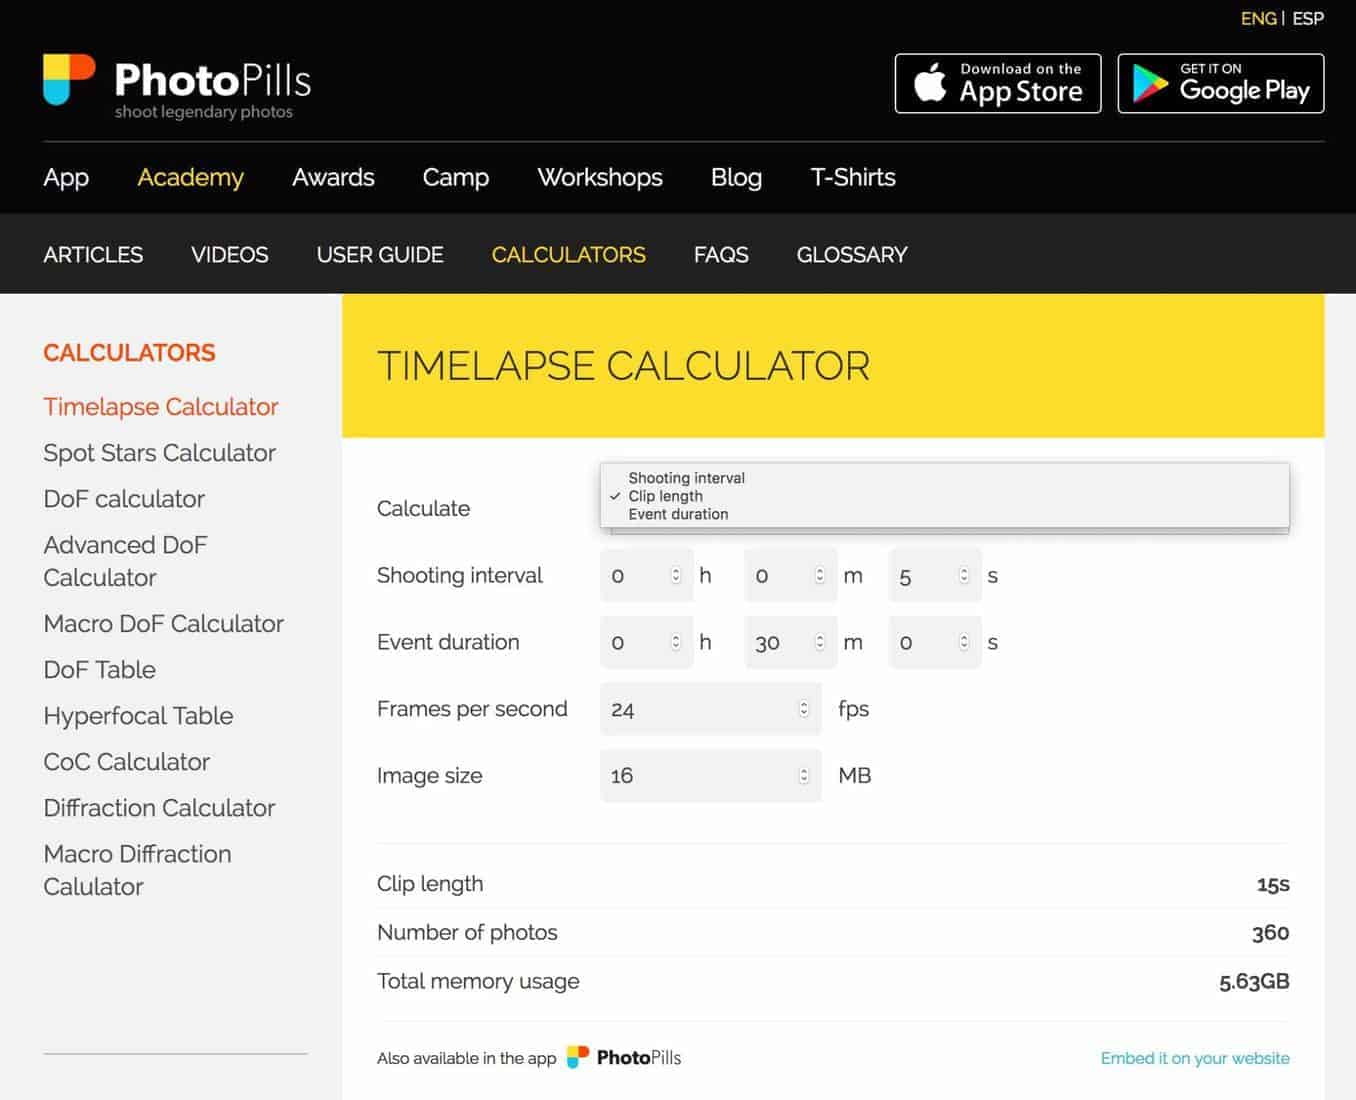
Thankfully, there are timelapse calculators out there to help you through these equations. I recommend using the free PhotoPills online timelapse calculator to determine the shooting interval, clip length, or event duration. It is also available as part of the PhotoPills app available for Apple and Android. It will also calculate how much memory you will consume depending on your image file size, which is great for figuring out how many memory cards to bring. Of note, if you do use this calculator, the shooting interval includes the shutter speed + the interval time between shots, not just the interval time alone. The PhotoPills app also comes with a handy dandy interval table with suggested interval times for various timelapse situations. It’s definitely worth checking out.
Editing
Whew! We’re almost there! It’s time to edit the timelapse. I’m going to briefly review a couple of methods of editing and point you in the direction of more detailed information on the subject. One way to edit timelapses is to use Lightroom and Photoshop. You import your images into Lightroom the way you normally would. If you have a timelapse where the light is consistent, then I recommend making adjustments on the first image and then syncing all of the images while in the Develop module. Before you sync, be sure to change the aspect ratio of the image to 16:9, which is what is commonly used for video. After syncing the edits, then export the images as JPEGs using a sequence format (0001, 0002, etc.) into a new folder. Then import these images into Photoshop to render the video. Be sure to check out this in depth IP article on how to edit timelapses in Photoshop for a step by step guide on how to do this correctly.
 If you’d like to dive a little deeper into editing your timelapses, I highly recommend checking out LRTimelapse. It is a bit overwhelming at first, but it definitely will take your timelapse editing to a whole new level. You can use the software for free with up to 400 images, so you can spend some time getting to know it before purchase to see if it is right for you. Be sure to check out Rusty Parkhurst’s review on LRTimelapse (https://improvephotography.com/50928/lrtimelapse-complete-review-worth-money/). For more info about LRTimelapse, listen to Jim’s interview with Gunther Wegner, the creator of LRTimelapse, on the Tripod podcast.
You may choose to end your processing after editing the photos and rendering the video, but you may want to stitch together multiple timelapses and add some music. To do this, you can simply use iMovie or QuickTime Pro. Several paid video editing software are available, such as Adobe Premiere Pro, but really those aren’t necessary when you are starting out. I’ve used iMovie, and it has been pretty straightforward and capable for doing the simple tasks that I’m trying to do with timelapse photography so far.
Adding Effects
One effect that makes timelapse video more compelling is to add some sort of panning, rotating, or zooming motion to the timelapse. These effects are accomplished using fairly expensive sliders and rail systems. You could easily sink a couple thousand dollars into these systems, so I don’t recommend investing in these unless you’ve already experimented with timelapse and see it as a significant part of your photographic repertoire.
If you want to explore timelapse photography without breaking the bank, then don’t worry about purchasing sliders at this point. This effect can be somewhat replicated using what known as the Ken Burns effect. It’s what I used in my first timelapse above. The Ken Burns effect is a panning and zooming technique that can be used to simulate movement from still images in a video format. Basically, you take two crops of the same photo in your video editing software and set a beginning frame and an ending frame. Then, the video software “pans” across the image between the frames. This effect can be applied in timelapse video clips as well. While it’s not as professional of a look as using a real slider or rotation head, it accomplishes a similar feel.
Other Tips
- Shoot in landscape mode! I wish I had realized this before I shot hundreds of images of the Milky Way. I put the camera in portrait mode to try to get as much of the galaxy as possible in the image, BUT that meant the images couldn’t be used at a 16:9 aspect ratio without significant cropping. Duh.
- Shoot in RAW format if you want to have the most image editing capability.
- Be sure to give your camera enough time during the interval to let it write to the memory card. If you make your interval too short (<2 seconds), then your camera buffer might fill too quickly and you might end up missing shots.
- Get comfortable – timelapses take a while! Bring a book, snack, and something comfortable to sit on. I like to bring a second camera so that I can be still taking images while the timelapse is firing away.
- Check out Rusty Parkhurst’s helpful 13 Sure-Fire Time-Lapse Photography Tips.
Advanced Techniques
If you want to go more in depth with timelapse photography, I highly recommend checking out the Landscapes in Motion course on Improve Photography Plus. Jim goes in depth on how to plan, develop, and edit your timelapse video. You will love the results!