
Daily readers of this site already know how I feel about sharpness. Sharpness is vital to professional photographers who make large prints, but beginners probably will not notice much of a difference between a razor-sharp photo that they view on a computer screen compared to a fairly-sharp photo that they view on a computer screen. Nonetheless, photographers are crazy about sharpness, and I am too.
Sharpness Tip #1: Shoot like a sharp-shooter
Anyone who has ever shot a gun or bow and arrow knows that the key to shooting well is finding a firm shooting foundation. Shooters do this by stabilizing themselves against a bench, using a monopod, or standing in the most stable positions. Not surprisingly, photographers should use the same advice. If you haven't taken a minute to consider whether your photography posture is solid, think about it for a minute and decide how to improve your stability. If you don't regularly use a tripod, just do it!
Sharpness Tip #2: Don't zoom to the extremes
I have never tested a lens that is sharpest at the extremes of the zoom range. For example, if you shoot a 75-300mm lens, you will get sharper photos at 280mm than 300mm. The Nikon 70-200mm lens shoots sharpest at 135mm. I'm sure there are exceptions to this rule, but I haven't seen them personally. Almost all lenses are sharper somewhere between the extremes of the zoom range.
This is especially important if you are shooting a less expensive zoom lens or a kit lens. Spend just a minute and take a picture of a newspaper taped to the wall across from you at different focal lengths and apertures. You're likely to find quite a variation in sharpness levels depending on the focal length.
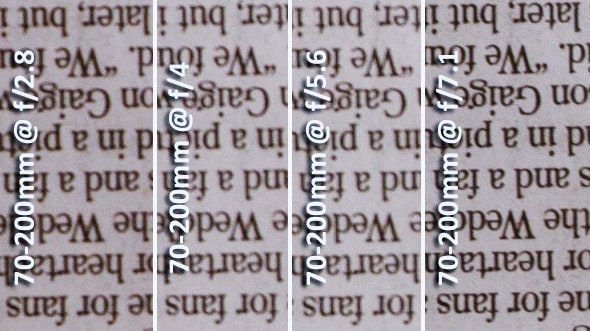
Sharpness Tip #3: Determine your sharpest apertures
Just as the zoom dramatically impacts sharpness, so to does the aperture.
Many photographers learn that the sharpest aperture on many lenses is f/7.1 or f/8, but it totally depends on the lens. That is a good general rule, but it is foolish to accept this as 100% true. Just take a minute to lock your lens on a tripod and shoot a subject at all of your aperture levels to see what photo is sharpest. If you are a landscape photographer, you will likely notice that many wide-angle lenses are significantly sharper at slightly higher apertures, because they are made that way. This test will only take you 5 minutes to perform and will improve your photos for the life of the lens.
To test sharpness, make sure to shoot from a distance that you commonly shoot that lens, shoot in lighting conditions similar to what you will shoot in the field, and do common-sense things like shoot on a tripod with a cable release and mirror lock-up.
Sharpness Tip #4: Do Your Output Sharpening Last
Unfortunately, many photographers use the sharpness slider in Camera Raw or Lightroom first thing. I strongly discourage this technique because sharpening should match the medium, or be applied selectively.
Photos should be sharpened differently for the use on the web as they are for print. For example, when saving a photo that will be displayed on a computer (like posting a photo to Facebook, for instance), less sharpening is needed because a screen is a sharp output medium. When saving a photo for matte paper, more sharpening should be applied than when printing on glossy paper because the matte paper soaks the ink more than the glossy does.
Also, a photo that will be seen small should be sharpened differently than photos that will be seen large. It just doesn't make sense to sharpen before finishing the editing process. This way, you'll be able to go back and re-sharpen the photo in a different way when you want to use that photo for a new purpose without needing to re-do all of the other edits done in Photoshop.
[callout type=”center” title=”Photography Portfolio Reviews – $39″ message=”Have the expert editors at Improve Photography review your photography portfolio in-depth and send you an audio feedback file for just $39″ button_text=”Check it out” href=”https://improvephotography.com/online-portfolio-reviews”]
Sharpness Tip #5: Stop mashing your shutter button
In my photography workshops, I see many photographers smash their shutter button with more force than they would smash a cockroach. Mashing the shutter button will torque the camera at the critical moment when the photo is recording the scene. The proper way to press a shutter button is to simply roll your finger back across the button.
Sharpness Tip #6: Pick up the manual for your LENS
The lens manual will tell you whether or not to use image stabilization (vibration reduction for us Nikon folks) when the camera is on a tripod. Some lenses should have vibration reduction ON when using a tripod, and other lenses should have image stabilization turned off when on a tripod.
Lenses made in the last couple of years will make this switch for you, but you'd probably be surprised by looking at the manual for your lens to find that many lenses that you think may be turning this off for you… are not. The only way to know is to check the lens manual.
Sharpness Tip #7: Decrease Your ISO
Photographers know that increasing your ISO increases the noise in the photo, but their knowledge usually stops there. Did you also realize that increasing the ISO also dramatically reduces the visible detail in the photo? When I say “dramatically,” I mean dramatically!
When you're in a situation where you have to increase your ISO beyond where you're comfortable, consider adding flash or moving to an area with better lighting to produce a sharper shot.
Sharpness Tip #8: Test different copies of a lens
When lenses are created, they are made to certain tolerances. Especially in the case of lower-end lenses, the tolerances are not precise and allow for size variances. For this reason, one lens may shoot better on one camera than another. Make sure the lens is working well for your camera. If it isn't, you might consider returning the lens and buying another copy of the exact same lens model and see if it works better.
Sharpness Tip #9: Know Your Focus
I've given portfolio reviews to THOUSANDS of photographers in my online photography classes just in the last year. THOUSANDS! When they ask me about the sharpness of their photos and how they can improve, the problem is imprecise focus at least 95% of the time.
So here's my recipe for proper focus every time…
#1. Decide if you are shooting an action photo or a photo with a stationary subject. If you're shooting a moving subject, choose continuous focus (AI servo on Canon or AF-C on Nikon). If you're shooting a stationary subject like a landscape or a person standing mostly still, choose AF-S on a Nikon or Single Servo on a Canon.
#2. Always choose the focus point yourself. Don't let the camera decide. Get used to moving the focus point with the four-way selector on the back of your camera. If you're shooting a portrait, ALWAYS place the focus on the eye of the person closest to the camera. On the nose or face or body of the person is not good enough. Always focus on the eye. If you're shooting a landscape, generally focus one-third up from the bottom of the frame, but if you have a strong foreground element, you may want to focus closer.
#3. Once you've focused, be extremely careful not to sway forward or backward at all. When shooting with a fast lens at a wide f-stop, even a slight movement will move the focus before the shot.
#4. Be sure not to focus too close to the lens. Each lens has a close focus distance, and the camera manufacturers like to push the envelope with this distance. I usually find that if I focus right at the closest point where the lens will still focus, the result is a blurry shot. Back up a little bit from the closest you can be to the subject and you'll always improve the result.
Sharpness Tip #10: Upgrade your shutter button
Less expensive cameras come with either a metal or plastic shutter button. It does the job just fine, but it encourages the poor habit of “clicking” or “mashing” the shutter button. More expensive cameras like the 5D Mark III, Nikon D810, etc, have squishy shutter buttons with a rubber coating on top so that the press of the button does not vibrate the camera as much.
For only a few dollars, you can pick up a rubber pad to fit over your shutter button which will solve this problem and upgrade your shutter button for you.
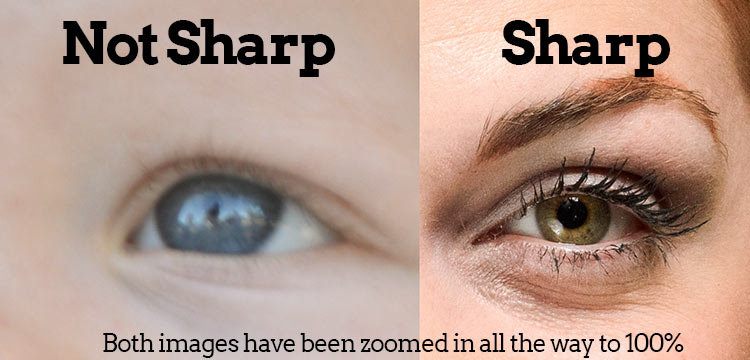
Bonus Tip: Zoom to the Eyes!
The best way to know if you have a sharp photo while shooting is to zoom in on a picture you've just taken all the way to 100%. Zoom in on the eyes and see if you can see the eyelashes. If the eyelashes are just a clump of black, the photo is not sharp. If you can see each hair in the eyelash, you have a sharp shot.
If you have more sharpness tips, please share it with the rest of the Improve Photography community by leaving a comment below.
Great photography tutorial, some really useful thoughts here about sharper photography that aren’t the standard fare; I’d always assumed that zooms would have been optimised for the extremes so it’s good to hear they’re not.
http://www.englishphotographer.com
Excellent! Thanks so much for answering my question in such elaborate detail. I’ll definitely be implementing these techniques on my next shoot!
Hi really useful information. As a beginner, I’d love to know more about what you mean on tip 4 about the differences in sharpening for the web and for print.
Excellent question, Steve. I’ll write up a post to explain this. Stay tuned to the blog for the next week and you’ll see the post.
Mirror up and remote shutter release. Even most P&S’s can do the latter today.
You should keep the speed at least at the same numbers that the lens. At 100 mm at least 1/100, with the 1.6 crop factor of a non full-frame make it 1/160 an so on …
griffey shoes 2012
How cool the Nike Air Griffey Max GD 2 Black Red is. As you can see from the picture, this kind of shoes is made by two colors, black dotted with red. The color combination is so perfect. In the aspect of the quality, we’d like to make promise that the Nike Air Griffey Max GD 2 is very good. Now there are many orders from all over the world. And we have received the good response. We are looking forward to you.
Very good tips, thank you! maybe for the folks that own a cheaper DSLR where the shutter button clunks between half-way down and a full press use a remote control for less than 15$.
Thank you for this great website!
My tip: use the camera’s timer (if possible)!
nice tips of beginner is very useful to people in photography
Hello!
This may seem like a silly question but I have a difficult time getting a group shot (family, weddings etc) with everyone’s face in focus! I know this has to do with aperture…I’m just not being successful and it looks unprofessional. Do you have any advice for me moving forward? I have a family photo shoot tomorrow morning and would love to bring new knowledge to this session.
Thank you!
Another thing that helps sharpness at super wide apertures is focus technique. You have to use you focus points and not the focus and recompose method.
Another idea, instead of the camera’s timer, is a wireless remote. They make a great one for Nikon – ML-L3 $13.95. When used in conjunction with a tripod it helps produce sharp photos, and you can fire off shots as fast as you can push the button. You do not need to keep resetting the timer. This is a must have for anyone using a tripod.
When shooting relatively slow shutter speeds with a Canon EOS DSLR,capture the image using Live View with Silent Mode 1 or 2. This locks up the mirror and the first shutter curtain is electronically simulated at the beginning of the exposure. This is totally silent and vibration free. Naturally, a tripod, remote release, and critical focus are required as well.
Good tips, although not convinced about #3 – finding your best aperture. Many great pro photogs shoot almost exclusively wide open and get pretty stunning results (Cliff Mauntner for example). Maybe if you’re pixel peeping at 100% there may be marginal difference away from the wider extremes, but with regular viewing, can you honestly see a difference?
With professional lenses you can usually get away with shooting at just about any aperture–especially portrait lenses which are made to be shot wide open. But all you have to do is run a test and you’ll see there is a definite difference when shooting at the sweet spot.
For Mario – I have an olympus E-510 with crop factor 2, so when Focal Lenght is 100 mm i should keep the speed at least at the same number that the lens. At 100 mm at least 1/100, with the 2 crop factor of a non full-frame make it 1/200 an so on. Is this correct Jim ?
The 1/focal-length shutter speed calculation is a rule of thumb, based on “average” beginner camera-handling skills, the full image (no cropping) being output to 4×6 to be viewed at arm’s length, a 35mm sensor, etc. If you want the rule of thumb version, multiply focal length of the lens by the crop factor of the camera, then again by the crop factor you might apply afterwards (ex, if you might be cropping so that the long edge is half as long, multiply again by 2), and again by the enlargement factor (if you are shooting for an 8×10 to be viewed at arm’s length, another doubling). For “average beginner hands”, then, a 100mm lens on a 2x crop factor sensor where you are going to make the long edge 75% of the original then output to 8×10, you would have 1/(100*2*1.33*2) == 1/532 as the “minimum shutter speed”.
Of course, there are a lot of assumptions in there. With a bit of practice, you can stabilize much better than “average beginner hands” and can possibly halve that (around 1/256). With IS adding 2.5 stops (say) you can reduce by 2^2.5 or 5.65x (~1/100 again). Throw in a monopod and good handholding skills and you can bring it down probably around 10x. Throw it on a tripod and you can pretty much go to minutes instead (limited by sensor noise now instead of shake).
And, of course, that is all about reducing camera shake. If the subject is moving, the bigger they are in the frame the more visible any motion blur from them will be. And your lens will be less sharp if you are fully zoomed into a zoom lens than if you were backed off the maximum zoom, or if you were using a prime lens. And your lens will be less sharp if you are not using the sharpest aperture, etc. The point is: sharpness is an overall thing, so you don’t want to eliminate camera movement (ex put it on a tripod) if that means sacrificing something else (you have to be very far back from the action, or you then can’t effectively pan with the moving player).
Hi,
Polaroid has a new gadget that I will try during my next airshow. I shoot moving subject and can’t go below 320 (to avoid freezing the prop). Panning an stability is very hard. This thing, Polaroid Aputure Magic Rig / Polaroid Rig http://www.amazon.com/Polaroid-Stabilizer-Support-Cameras-Camcorders/dp/B005MRXPE4 cost 60$ and is very versatile. You can adapt it to your position for better confort. The trick is practice. I made lot’s of reading about sharp shooter rifle handling and I’m getting better and better.
Thanks for these tips! Is there also a difference in sharpness when shooting raw or jpeg. I would almost say that the jpeg looks sharper than the raw one.
Thanks for these tips! Is there also a difference in sharpness when shooting raw or jpeg? I would almost say that the jpeg looks sharper than the raw one.
Thats a fact. The Camera Computer will so Dome work for you while getting the jpeg. The contrast and color optimization will give a “sharper” view and most cameras use the unsharp mask filter when shooting jpeg – more or less is depending of your preference.
Good article and tips! Quick note: I think you had a dyslexic moment in tip 2:
If you shoot a 70-200mm lens, you will achieve greater sharpness at 100mm than at 70mm.
Happens to best of us.
-Phil
I don’t think that was a dyslexic moment. He’s trying to say not to use the the extremes of your lenses.
im shooting TIFF and im finding tiff.s to be sharpest and has best overall image quallity
#11 buy a sharp lens!