
This week's theme is black and white photography. Most of the time, we all like seeing colorful images, but sometimes only black and white can make the viewer enjoy the simplicity of the tones.
New to the weekly Improve Photography Duel? Check out this page, where we explain how it works. A new camera duel will be released each Monday, and we're asking YOU to vote on the photos below.
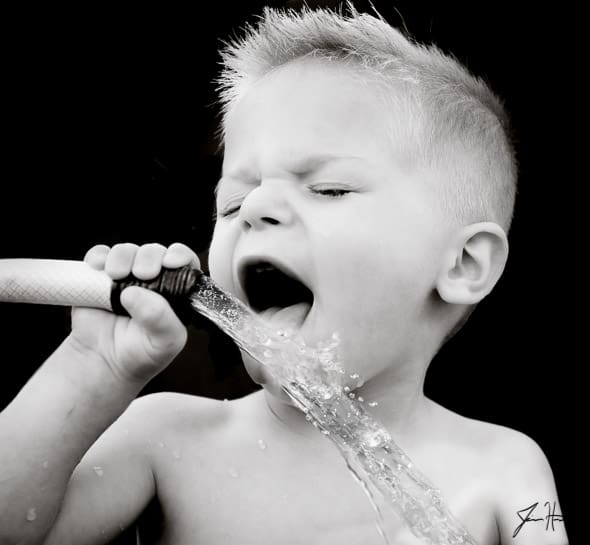
Jim Here: It's summer time in the northern hemisphere, so my two boys spend most of the day in the backyard playing in the mud, running in the sprinklers, and drinking from the hose. It was the drinking water from the hose bit that inspired my black and white photo this week.
The reason I decided to make this photo black and white is because I want the viewer to focus on the tones of smooth skin, the drops in the water, and the simplicity of a boy taking a drink. I usually find that it's the simplest subjects that make the best black and whites. With more complex subjects and textures, I usually feel like color helps the viewer to understand what is in the photo.
Jim's Process: I took this photo by having my wife hold up the lid to a large black plastic bin behind my Taylor. I would have used the black side of a 5-in-1 reflector if I had it on hand, but this was a spur of the moment shot. The lid was a perfect dark background.
I had to lie down on the ground and shoot up at my son, because he kept tilting his head down to take the drink so I would only get his forehead in the shot until I laid down.
Jim's Metadata:
Shutter speed: 1/800 shutter speed to freeze the water and my son, Aperture: f/5, ISO 800. Shot in manual mode at 70mm.
Camera: Nikon D800, Lens: Nikkor 24-70mm f/2.8.
Lighting: Natural light – shot in the shade.
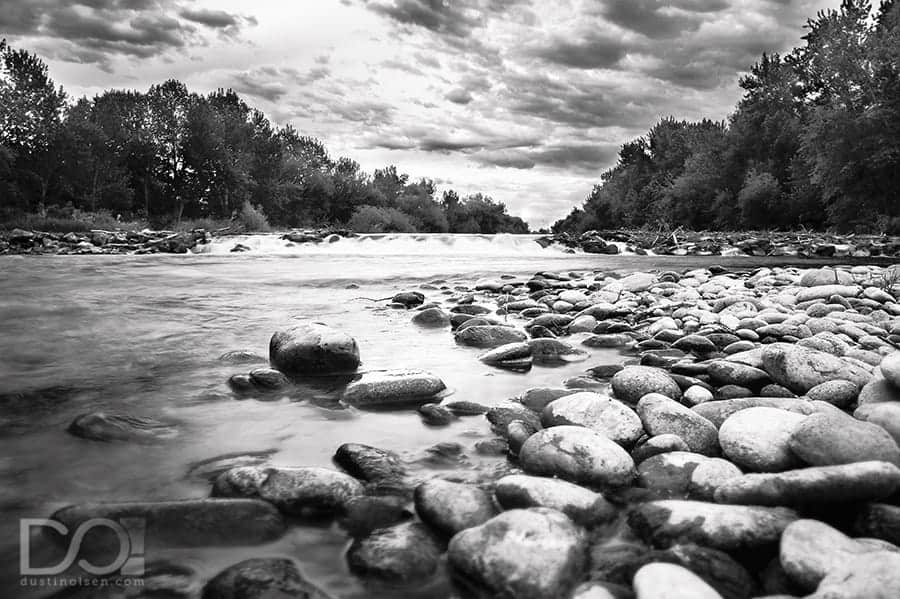
Dustin Here: Looking for a new place to go shooting – I jumped on Google Earth to find anything that looked it might be interesting to photograph. I searched around a few places I was a little familiar with just in case the Google Earth was going to be deceiving and that's what I found what looked like mini waterfall… dam… something. It was on the Boise River and not too far from where I lived so I thought I would scout it out and see what I could make of it. It turned out to be a bit of hike to get to where I wanted to be for the shot. Overall – I'm pleased with how well the shot turned out with all the different elements in the photo.
Dustin's Process: I did an HDR for this shot and processed it just like I did last week with our HDR photo duel. Once I had the image edited in color to how I wanted it, I used a simple Gradient Map in the Adjustment layers. The key to using a Gradient Map to turn your photo black and white is that you need to add in a few different shades of gray. This gives you a greater contrast and depth to your photo. There are a lot of ways that you can turn your images black and white, but for a neutral (slightly contrasty) black and white, I have found this to be effective. But you have the option to be as dramatic as you like with your black and white images.
If you're interested in seeing this image in color, and the original images that went into the HDR, check out my personal website here: www.dustinolsen.com
Dustin's Metadata:
Shutter speed: 1/25, Aperture: f/14, ISO 100
Camera: Canon 6D, 24mm, Lens: Canon 24-105mm lens
Lighting: Natural Sunset Light
Let the Voting Begin!
Please note that you do NOT have to share this to your Facebook page or Twitter feed in order to vote. It just gives you that as an option after you've clicked your vote.
Comments are closed.