
I had the opportunity to go on a photography workshop in Yellowstone and the Grand Tetons earlier this fall and decided to challenge myself by choosing a wildlife-centric workshop. This would be a relatively new area of photography for me. What would I need to know to make it a great trip? This article describes five key things that I found were crucial to getting decent wildlife shots.
I’m basically a landscape photographer. I like shooting mountains, trees, bodies of water, that sort of thing. However, you can’t help but notice that, occasionally gallivanting through my still and carefully composed landscapes, are these creatures with fur or feathers or scales. Wildlife. You also can’t help but notice that there are photography bucket list locations, like Yellowstone, that are teeming with wildlife, where the animals are a significant part of the attraction. Or that photo magazines and galleries have a lot of gorgeous wildlife art. I felt like I was missing out on a whole realm of photography.
I’ve done some bird photography at parks and wildlife refuges in the Washington, DC, area but the critters out in Yellowstone would be something altogether different. Elk, bison, bears and wolves—these were going to stretch my photographic skills. And that’s exactly what I wanted. Why take a workshop that doesn’t challenge you? And what should I do to prepare?
A little online research and a bit of practice at the zoo led me to these five tips.
Be an Ethical Photographer
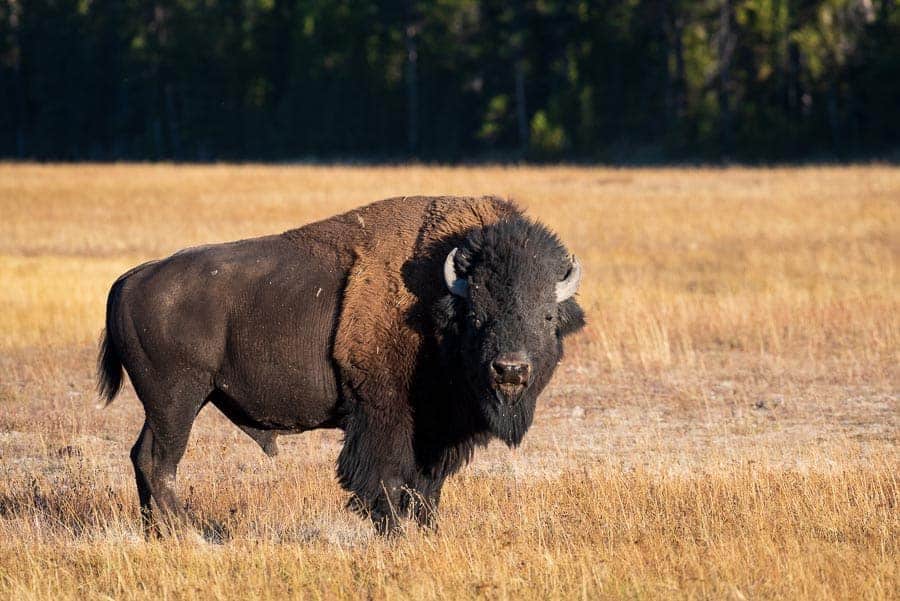
When I was in Yellowstone, every day there was a story about some dumb tourist getting injured by wildlife. One person was run over by a charging bull elk because he was in a line of tourists that was separating the bull from his cows. Park rangers were yelling at the people to move out of the way, but no one did. You do not want to put yourself between a bull elk and his cows, or between a mama bear and her cubs. You just don’t. It’s not going to end well. In addition to elk and bear incidents, every year at least one tourist is gored by a bison when they get too close in search of an epic selfie.
Ethical photographers do not stress or upset wildlife. We don’t make them nervous or scared. We don’t feed them. We don’t shout or make loud noises to get them to move. We keep a safe and respectful distance from wildlife. At Yellowstone, rangers recommend everyone stay at least 100 yards away from bears or wolves, and at least 25 yards away from other wildlife.
Pay attention to park rangers and to your workshop leader or guide. Read our Guide to Ethical Nature Photography and familiarize yourself with a code of ethics, like the North American Nature Photography Association’s Principles of Ethical Field Practices before you go.
Be like Hippocrates and “first, do no harm.” After all, you want the wildlife to be there next time you come with your camera.
Be Prepared
OK, this may sound obvious, but you have to be ready at a moment’s notice. Wildlife is elusive. You never know when and where you’re going to find it. You might be driving down a road and see a moose. You have to be ready or you might miss the shot.
To be prepared, you’ll need to travel with your longest lens on your camera body and your camera in your lap. You may not have time to fumble with your bag or switch lenses. And you need to have your settings already locked in so you don’t even need to think about it once you see wildlife. I have a Nikon D750 and my long lens is a 200-500mm f5.6. I kept that on my camera in the car and I had it set for 1/1000 sec to freeze motion and at f8 for half way decent depth of field. I used Auto ISO with a top limit at ISO 8000. I had my shutter-release set for Continuous High Speed, so I could fire off a burst of shots and have a better chance of capturing a key moment. My Auto Focus was set to Auto Servo AF (other manufacturers may have other names) which selects stationary or continuous AF depending on whether the subject is moving. This allows the camera to automatically keep a moving animal in focus.
If we saw a bear, or bison, or wolf, I could shoot out the window or hop out of the car and be ready to shoot, hand held, with some confidence I’d be able to get a decent exposure. Of course, there were times when, for instance, a moose was in the shade of the woods and I had to adjust the settings, but I was starting from something close and tweaking rather than starting from scratch and searching for the right combination.
Know your camera.
There are certain things you just have to know about your camera in order to shoot wildlife.
Look back to the settings I just listed. Do you know the highest ISO value you can use before your images get too noisy to be useful? My camera can get useable shots as high as ISO 10000, under the right conditions. Just to be safe, I set the upper limit of Auto ISO at 8000. That’s a good compromise. If there’s enough light for a really good exposure, I’ll wind up with a lower ISO and a better-quality image. If it’s darker out, I’ll get a higher ISO and at least have something I can post to Instagram or share online.

Do you know how to set Auto ISO? It’s something you’re going to be doing a lot as you switch from a quick shot of wildlife to composing shots of the somewhat-habituated-to-people elk in the center of Mammoth Hot Springs or of the gorgeous landscapes in the Grand Canyon of the Yellowstone or the Lamar Valley. When you have time, you’ll take Auto ISO off and select the settings that you want for that specific situation. And then you’ll go back to Auto ISO once you get back in the car.
You’ll need to know how to turn on Auto Servo AF and how it works. With Auto Servo AF on, once you lock focus on something, if you continuously press the shutter button down half way, the focus will track the subject, whether it moves or not. With my camera, I use back-button focus, which continuously tracks the subject, so long as I keep my finger on the designated button. (If that term means nothing to you, see the article explaining what back-button focus is and what advantages it provides.)
You should be familiar with your camera’s burst mode, the ability to fire off a bunch of shots in rapid succession. How many shots do you get before the buffer fills? How long does it take to empty the buffer to your memory card? It’s really annoying to miss a great shot because you can’t take a photo while camera is transferring images from its buffer to a memory card. I can shoot at 6 frames per second for between 2 and 4 seconds before the buffer fills.
Related to that, are you using the fastest memory cards your camera can support? You’d be surprised how much of a difference that can make. My 95 MB/sec 32 GB cards are about 1/3 faster than a set of 80 MB/sec 32 GB cards and empty the buffer in a second or so versus three or four seconds. You can find test results for many cameras and cards at cameramemoryspeed.com.
Compose Carefully
First, let’s be realistic. Your chances of getting that one-in-a-million shot are, well, one in a million. There’s a reason why pro wildlife photographers spend months in the field. Those fleeting moments of action, or of a baby bears playing with each other just don’t happen very often. What you’ll mostly see is animals just hanging around. Bison, moose and elk grazing. Birds sitting up on a tree limb. Not hugely interesting stuff. Nobody’s going to want to see your photos of bison sleeping on the ground. Wait for them to do something interesting.
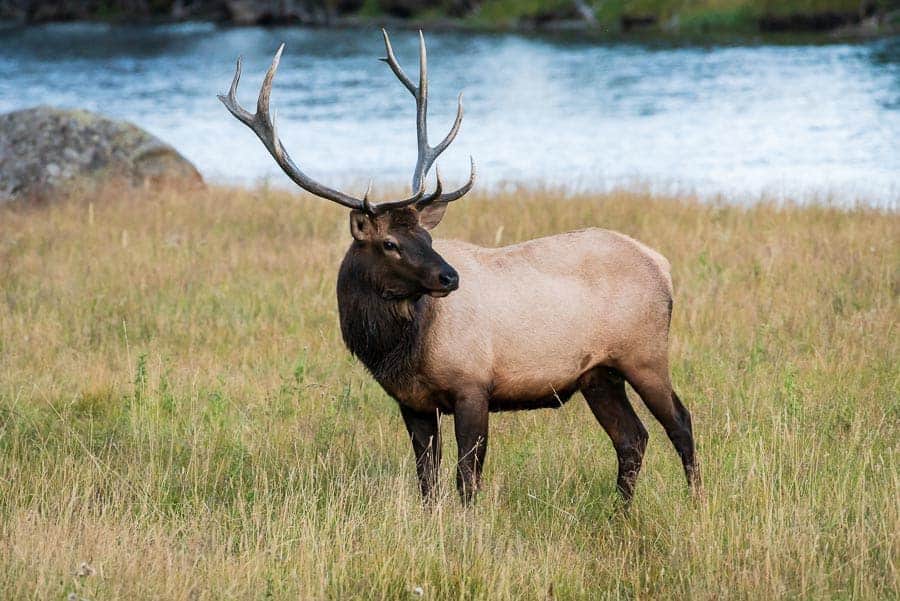
Much of the time, the animals are going to be off in the distance. There were plenty of times when the bison in the Lamar Valley were so far away that, even with a 500mm lens, they would be no more than brown dots in a photo. Set your camera down and just enjoy the moment. The bigger the animal is in the frame, the better. The best shots will be much closer, with the frame filled by a bull elk bugling, or standing majestically with his head up and impressive antlers on display.
Whether the animal is already moving or you’re getting ready for it to do something, pay special attention to three things. All the other so-called rules of composition—rule of thirds, leading lines, etc.—still apply, but these three will make or break your shot.
First, focus on the eye. When we look at a photo of a person or animal, we go right to their eyes. If the eyes aren’t sharp, the photo doesn’t work. Set your focus point on the animal’s eye.
Second, give the animal room to move in the frame. If it is facing right, have enough room in your shot for the viewer to imagine the animal moving in that area. If the right edge of your photo is too close to the animal, it has nowhere to go. That makes the image feel closed and claustrophobic.
Third, pay attention to the background. You’re often excited to sight the animal, may have only a short time to photograph it, and immediately start firing away, but watch out for the background. When you review your photos later that day, you’ll be glad you took a moment to get a clean background. A bunch of dead tree branches behind your bull elk will, for example, fight with and draw attention away from his antlers. Try to make the background as clean as you can while still giving a sense of place. Here, your long lens and its shallow depth of field are your friends, allowing you to pleasantly blur the background, and further draw attention toward, instead of away from, your subject.
Learn About Animal Behavior
You don’t have to become a biologist or zoologist, but knowing a few things about the animals you’ll be photographing can be incredibly helpful. You’ll understand what they are doing and be better able to predict what they are going to do.
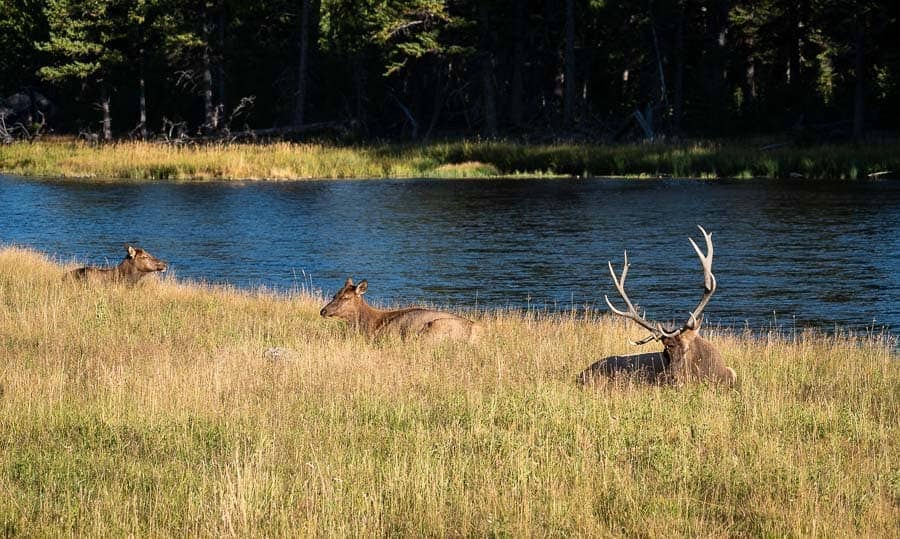
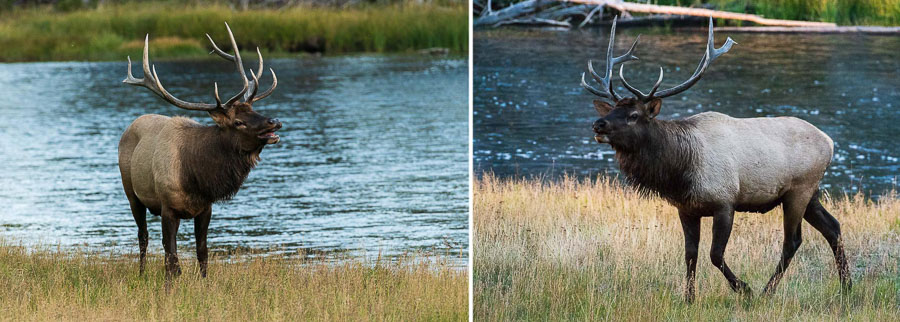
When we came upon a bull elk, several cows and some calves in a meadow, they were laying down, resting (above). Our guide said we’d have to wait a while before there would be any movement and that, if one of the cows got up, the bull would likely get up, too. So, we lounged around waiting, with our gear already set up. One of the cows got up and we all rushed to our cameras. Sure enough, the bull elk got up. Within moments, he was strutting his stuff and bugling.
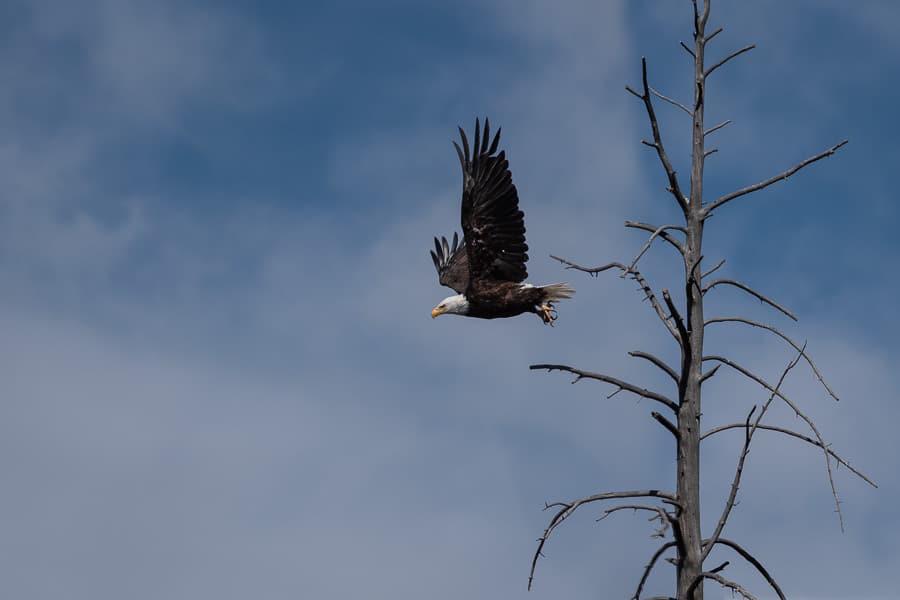
Another day we came upon a bald eagle high up in a dead tree on the banks of a river. It preened for a while, then just sat there, looking at the river. We were probably there twenty minutes when the eagle defecated. A photographer, who was not with our group, said that “eagles poop right before taking off, so get ready.” Anticipating its flight, we were ready, with fingers on our shutter buttons, when the eagle launched itself into the air. It happened so fast that, even being ready, there’s enough of a delay between eye, brain, finger and camera that first shot I have is after the eagle launched (see below).
Anticipating what an animal is about to do helps you be ready when the perfect moment happens. If you’re not able to predict what the eagle is about to do, the moment will pass before you’re ready to shoot.
One Other Thing
This sounds like a lot, and it is. But it’s not overwhelming and it will come in handy whenever you’re photographing wildlife. You’ll find yourself using continuous high-speed shutter release (burst mode), auto ISO and continuous auto servo AF in other situations, too. You’ll observe and begin to predict the actions of your pets, the neighborhood squirrels (or even your children) and be ready with your camera.
If you’re going on a once-in-a-lifetime photo trip to a place like Yellowstone, with an abundance of wildlife, spend the time to get familiar with these techniques before leaving home. Go to a nearby zoo, or natural area, or even watch the squirrels and birds in your back yard and practice, practice, practice. You’ll get comfortable photographing your local not-so-wildlife in no time. And you’ll be better prepared for the real thing.
Now, all you need is a litter of wolf pups frolicking by the side of the road.
i am doing wedding photography, but interested in wildlife coverage. max i have 70-200 zoom. i think i have to get extra focal length for wild life. so i have shortlisted sigma 150-600 in budget friendly. what you say?
According to NPS at Grand Teton National Park:
“There are three Tetons to be precise, and they are Grand Teton, Middle Teton, and South Teton.
They can be referred to correctly as “The Tetons” but not truly the “Grand Tetons” since there is only one Grand Teton.”
Nice Article.It gives me important information.Thanks for sharing it with us.
excellent article!
Thank you for sharing this article
This is one of the most thoughtful, informative and well written TIPS articles I’ve ever read. I’m a first year amateur thinking about a first time trip to Yellowstone. I could not of asked for better information for my planning. Well done and Thank you!