
Since the days of the first explorers, navigation has been all about – Where You Are, Where You Want to Go, and How to Get There. In Part One of this article, we discussed how to find potential photo shoot locations with online tools and then how to create a locations map with Google My Maps. If you’ve not read that article, you will want to do so before tackling this one. Find it here. In this second article, we will explore how to use that map to get to those locations.
I hope perhaps you have already created a simple My Map and have become familiar with the tools and techniques for doing that. If you have, you can use it as we get into this next part. If you haven’t, you may want to download and reference this map of a few of my favorite photo locations in my home state of Idaho.
 There are several ways to use your mapped locations. What you can do and the means of doing it will depend greatly on several things:
- Do you have a Mobile GPS Device (smartphone, tablet, computer (and the means to reliably power it)?
- Do you have a good internet connection (Web access?)
- Do you have a stand-alone GPS device (i.e. Garmin, Magellan, Tom-Tom, etc.)?
There is an inverse relationship between the degree of functionality you will be able to achieve with your mapped locations and routes and the level of complexity to accomplish those tasks. With a mobile device and an internet connection, you can do the most but everything will need to work reliably. You will need to have a good battery or connect the device to a power source in the car. (GPS apps and lots of on-screen time suck down your battery fast!) You'll also need to have a stable mobile data connection (i.e. 4G). At the other end of the spectrum would be a simple printed map and a list of your pre-determined photo spots. No technology needed at all, but no sophistication either.
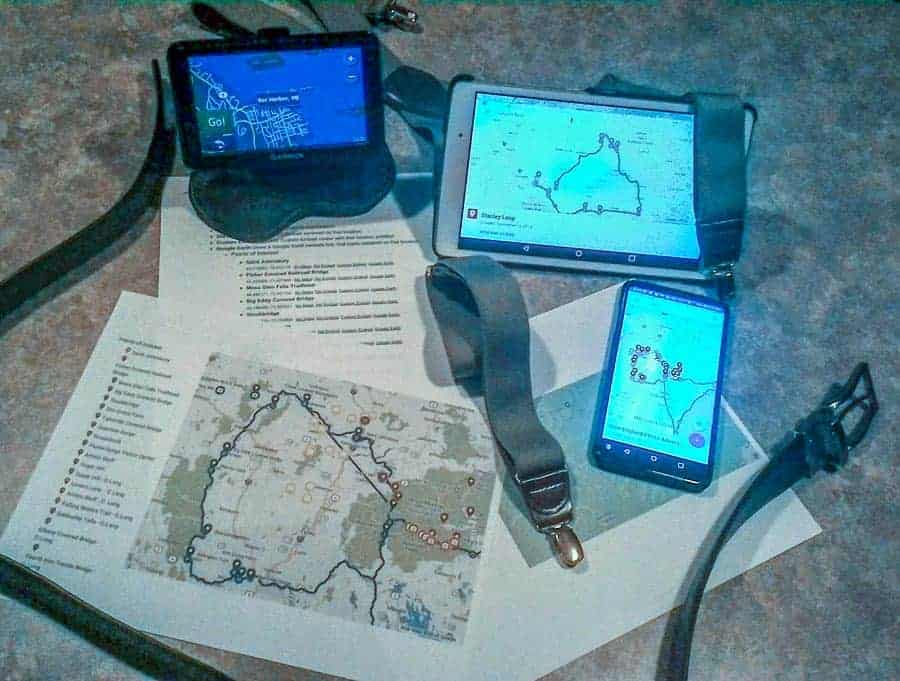
Belt and Suspenders
I suggest you employ a “belt-and-suspenders approach.” When technology works, it’s great, but if it fails and you have no backup plan you could be lost in a strange place much less not finding your photo spots. If you have already created your map in Google My Maps as we discussed in the first article, print it out and take the paper copy with you. I also suggest you print out a list of your pre-planned points of interest. I've found a great online application for doing so which will not only list those points, but also list the GPS coordinates for each of those. First, let’s discuss how to generate those printouts.
Printing from Google My Maps
Do this at home before you start your journey. Open My Maps and open the map you created for your photo adventure. If you created multiple layers, turn on the layers you wish to see by checking the box next to those layers. Zoom your map to show the area you want to see printed. Click the three-dot menu option next to the name of your map and click “Print Map.”
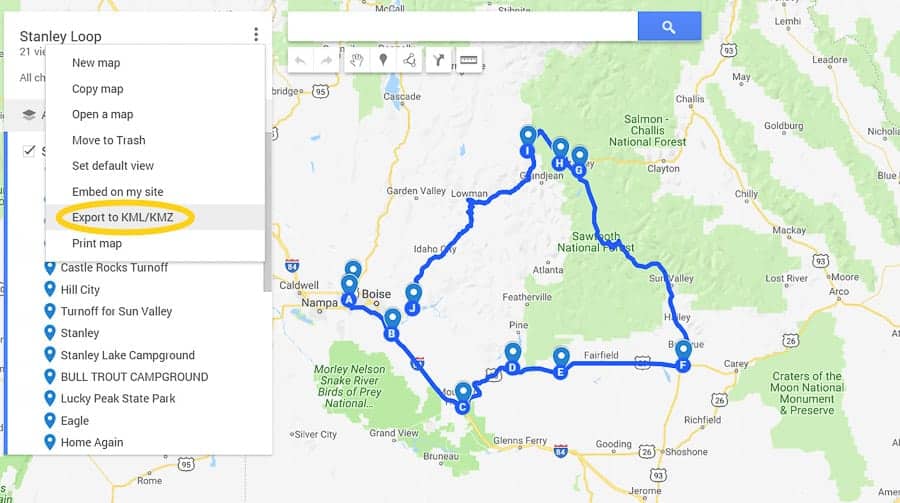
After you’ve printed your hardcopy map, stay in this My Maps view as we are going to do two more things. First, again from the three-dot menu option pick “Export to KML/KMZ.” (See the illustration above). Now decide which layers you want your KMZ file to include. You can leave the default of “Entire Map,” or click that and select only the layers you wish to include and click the Download button. Save the file to a place you can find later. We will discuss why you are saving this KMZ file in a bit, just do it while you are here.
Now for printing that list with GPS coordinates I mentioned. While viewing the My Map you are still in, copy the URL to your buffer. (click the URL at the top of the screen, then right-click it and pick Copy, or just hit CTRL-C, (Cmd-C on a Mac), which will also copy it to the buffer).
Now, go to the link below to run a utility which will extract the data and print your list.
https://www.nearby.org.uk/google/parseMap.php
Right-Click in the blank box in the utility and then Paste your copied URL. Then click Get Coordinates. Voila! A nice list of each location with GPS coordinates will be generated. There will also be links to send any given point to My Maps, or Google Earth. Print out this list and take it with your printed map. This is the “suspenders” part I spoke of. (Or is it the belt? Either way, it’s your printed backup).
Take to the Highway
You’re ready to roll and go to your photo spots! How can you use the map to navigate? Well, that depends on what mobile devices you will be taking and whether you will have internet access on the road. Having a smartphone or tablet and a good mobile broadband data connection like 4G allowing web access as you drive is optimal. But we all know there are places where we can’t connect. What then? Let’s discuss both scenarios.
Safety First!
When I was a student pilot I learned the axiom, “Aviate, Navigate, Communicate.” It was a reminder of the priorities while flying; First – Control the airplane, Then – Determine where you are and where you’re going, and Only then – Communicate with the ground. Keep priorities in order! It should be no different when driving and using mapping devices. Always pay attention to the road and drive the car, know where you’re going, and finally check your equipment and program or stop and get directions. Never let the business of fooling with a mobile device take your concentration from driving safely. That said, whenever possible have a “Co-Pilot,” a traveling partner that can be your Navigator and work with the mapping equipment. The techniques here can require interaction with the program and is best left to someone not behind the wheel. If you are alone, at minimum do whatever you need to with the software while safely parked, then activate the program and let it do its thing without diverting your attention. Turn-by-turn voice navigation is great – when it works. When it doesn’t, keep safety a priority. Never perform crazy driving maneuvers because you missed a turn or have a conflict with the directions. Don’t drive into the lake because the voice guidance told you to “Go Straight” and you’ve reached the end of a road or go off into the wilderness without some idea of where you are and if you have enough gas to get there and back. Be Safe and Be Smart! If you have a problem, stop when and where it’s safe to do so before making any adjustments.
Time for Google Maps
I mentioned earlier while we would develop our map in Google My Maps, for turn-by-turn driving directions you will use Google Maps. I, (and more than a few others from posts I read on My Maps website), can’t understand why since you are able to create Points and even a driving route in My Maps why the program doesn’t handle active navigation too. It doesn’t… at least not at this writing. (C’mon Google! This should be simpler!)

Just remember, Google My Maps is a program for creating maps, plotting points of interest, and creating a route. The file it creates is stored automatically in a Google My Drive folder in the cloud. To access that map you will need to have internet access. Google Maps is a navigation program you can run from a mobile device or your computer. You don’t need to have created a My Maps map to use it, but you can bring up your created map and use it in Google Maps to assist navigation. Google My Maps is a creation tool while Google Maps is a navigation tool. Confused? Stick with me and hopefully, it’ll click.
Navigating With a Data Connection

So, how can you use your My Maps map when on the road? How you go about this will depend on whether you do or don't have an internet data connection. Let’s assume you DO have a good internet connection via 4G on your smartphone or tablet. Follow these steps BEFORE starting the drive:
- On your mobile device, open Google Maps. https://www.google.com/maps
- On the far left look for the three horizontal line menu option (some call this the “hamburger menu.”) Tap that and look for “Your Places” in the drop-down menu. Tap that.
- On the next menu, Maps will be at the far right. Tap it.
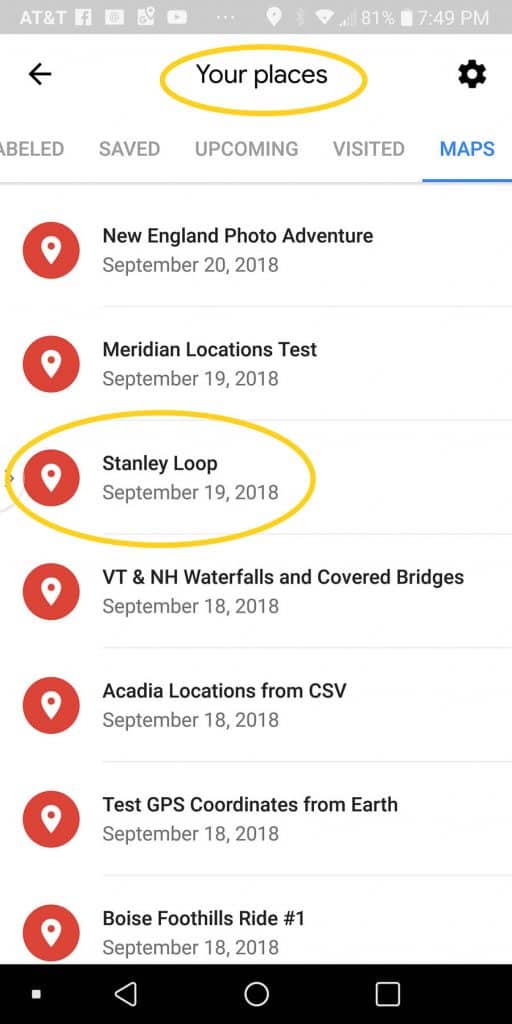
This is a list of the maps I created in My Maps, now appearing under the Your Places menu in Google Maps. - You will see all the My Maps you have created. Pick the one you want.
- Your created map will come up. (If a banner comes up from the bottom, tap anywhere on the map to make it collapse down). Now, to orient the map to where you are, tap the Crosshairs icon at the bottom right.
- Tap the “Go” Icon at the bottom right. Note at the very top it will say Your Location in the first fill in spot and below that a place that says “Choose Destination.” Tap that.
- Look toward the top of the next screen tap Choose on Map.
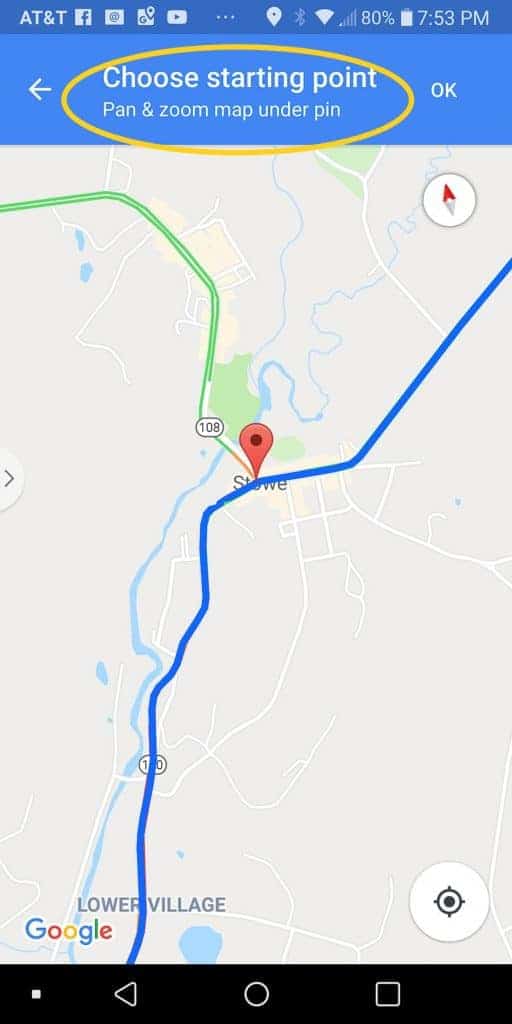
To use your My Map for actual navigation, bring it up in Google Maps and use this method to add your points. - Your map will reappear with a red pin on it. Use your finger to move and zoom the map until the place you wish to go is Under the pin. Zoom in closer for greater accuracy. Once the pin is on your spot, tap the OK in the top right corner. Your selected location will now be in the second position at the top of the screen.
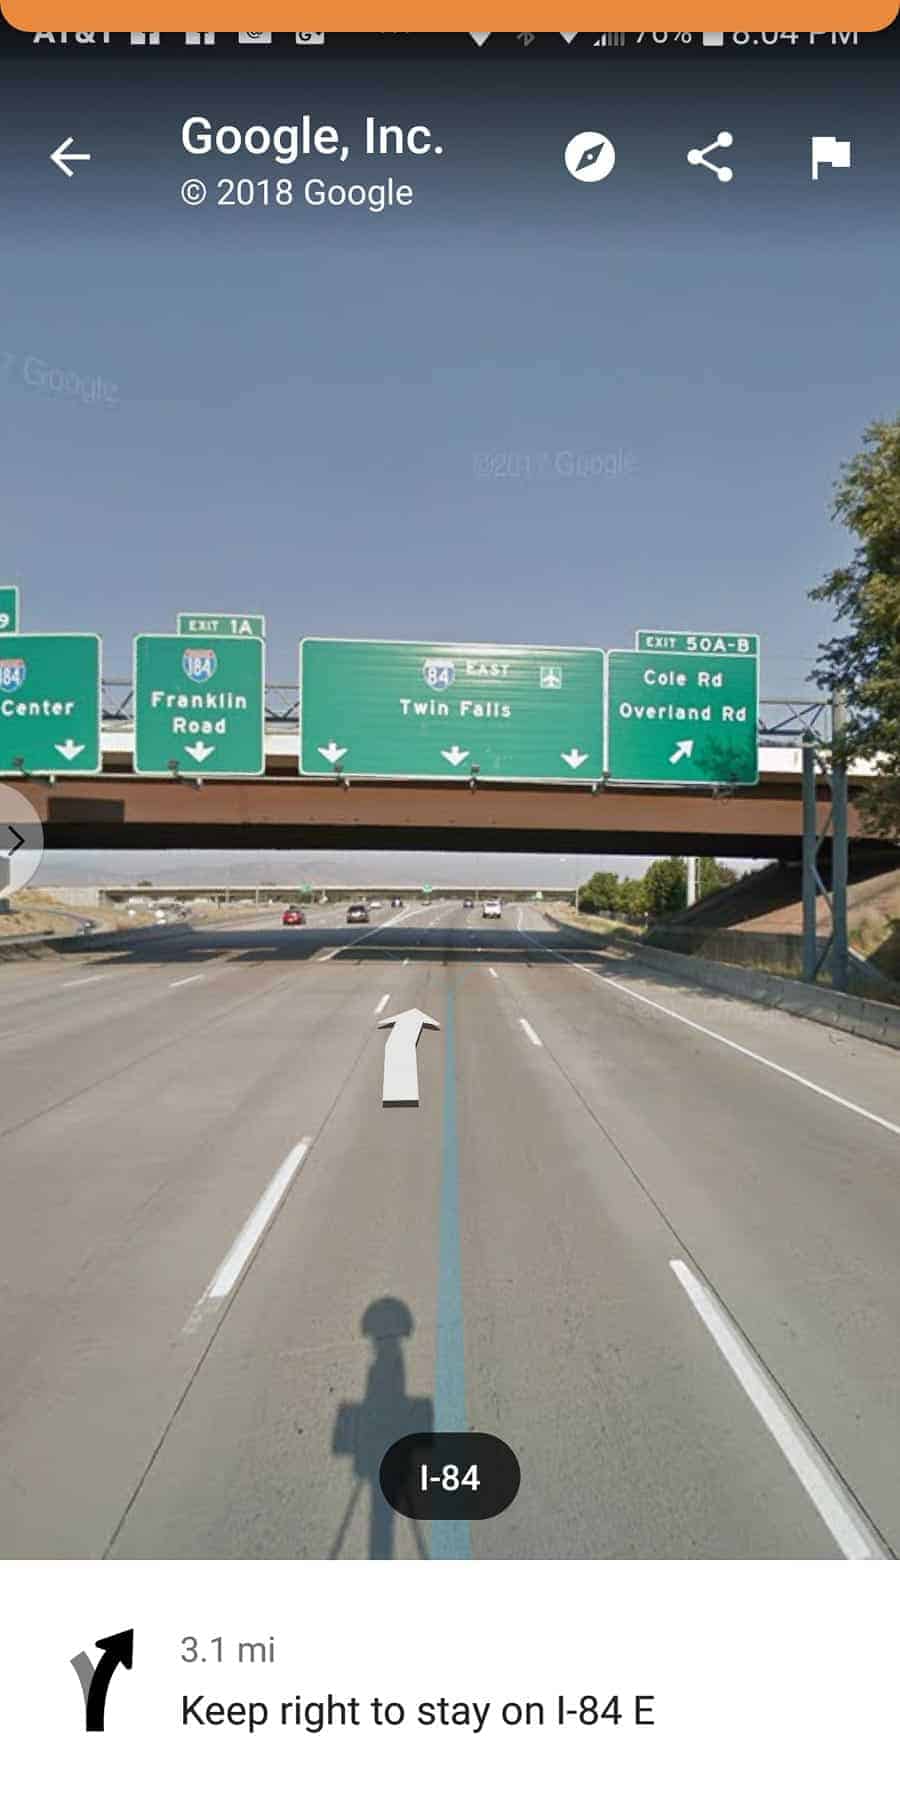
- If you only want to go to that location, tap Start at the bottom of the screen. Start driving and the voice-prompted navigation will begin.
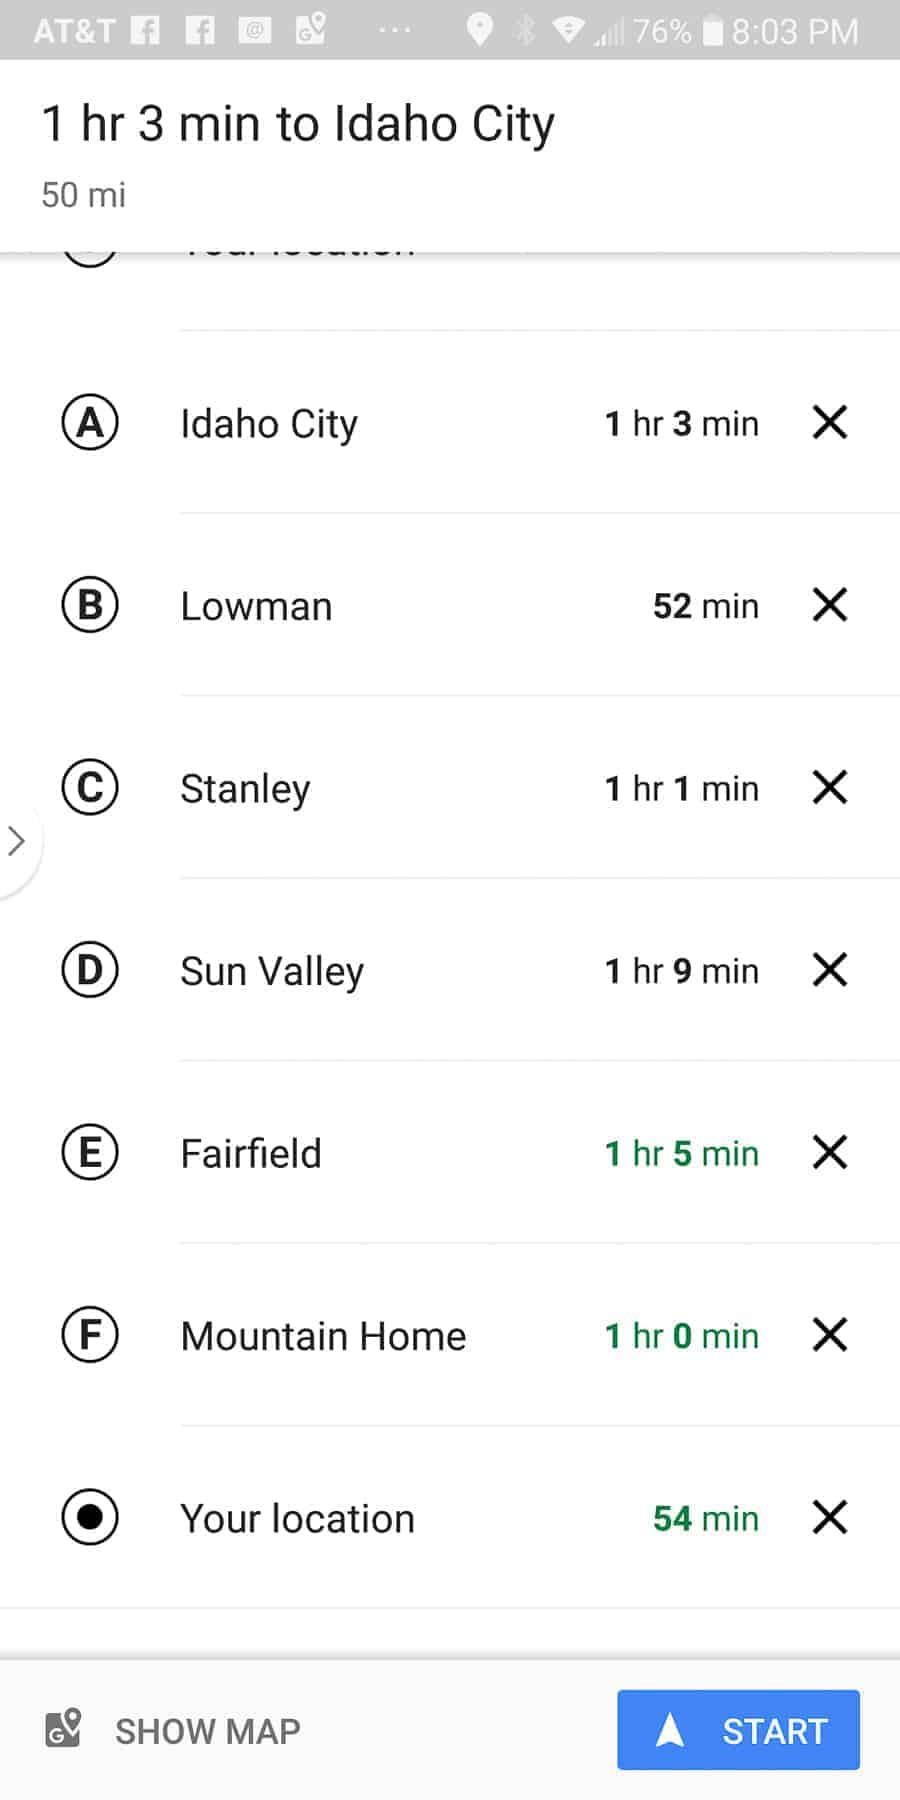
- If you want to go to multiple locations in sequence, tap the triple-dot menu item at the top right, then tap Add Stop. You can now tap in the next Add Stop spot and repeat the procedure in #8 above (bringing the next location under the pin and taping OK) to add it to list. Repeat up to a maximum of 10 possible stops on your “route.”

You can add multiple points to Google Maps by adding them to your route order. Up to 10 points can be added. - Check your sequence by taping the Steps and More item at the bottom of the screen. You will see the turn-by-turn directions. Expand other steps if you need to.
- When you’re ready, tap Start and you’re ready to drive.


I suppose one advantage of this approach is you can either stick with the route sequence you developed in My Maps or enter spots in whatever order you like. Another nice feature is breaking into the route while underway to insert an ad hoc point. Say while enroute you decide you need gas or maybe a cup of coffee. At the coffee shop, someone mentions the World’s Largest Ball of String is in the area and you didn’t include that on your map. Gotta get a photo of that, no? Tap the small arrow at the bottom right of the screen and check the options. Tap Search Along Route and then enter something to search for, (World’s Largest Ball of String), or pick a category; Gas Stations, Restaurants, Grocery Stores, or Coffee shops. Pick one and those locations will appear on your route. Choose the one you want and that stop will be inserted as the next one on your route. Obvious this kind of “while driving” adjustment is why you want a co-pilot/navigator!
Now, this all works fine if you have a consistent online connection as you might have in an urban area. You will be able to access your map and your mobile device will use both GPS and cell tower triangulation to determine where you are. Google maps can also let you know of traffic and road closures as with a live connection the map will be updated as you go. But, travel into an area where you lose your data connection and things will be different. So, here how you deal with that so you can use Google Maps offline.
Navigating Offline
Let's first think about how standalone GPS navigation devices work. Using a pre-stored map on the device and determining your position using the GPS satellites in space, they determine where you are, allow you to enter where you want to go, and using the stored map, plot a route. Continuously locating you with the GPS satellite communication, they can display your movement over the map and with voice turn-by-turn instructions, tell you where to go. No internet connection is needed. So long as they have a clear view of the sky and can connect to enough satellites, they can plot your position and all should work. At this writing, there are 24 GPS satellites in orbit around the earth. Your GPS device needs to “see” at least three to locate you, four if you also want altitude information.
Back to using your mobile device (smartphone or tablet) offline. In this mode, your device works exactly like a standalone GPS device. It can establish your location using the GPS satellites and you can enter a destination. What it won’t have, until you load it, is a map to navigate with. So… here’s what Google offers and how you use it. Do this before your trip and while online. It’s best to have a wifi connection so as not to incur mobile data download charges while downloading maps.
- Open Google Maps
- Type into the Search Here box a location central to the area you will be traveling. Click the magnifying glass at the bottom to display that location.
- With that displayed, Click the “hamburger menu”, look for Offline Maps.
- Click Offline Maps. You may see one already listed for your Home area. You’ll need maps for the area where you plan to travel so click Select your Own Map.
- It will display Download a Map of this Area?
- In the window displayed, zoom the map as needed to display the area you plan to travel. You are limited to a 120,000 square kilometer (about 46,000 square miles) area. If this will not cover the area where you plan to travel and need an offline map, repeat this progress to add other map sections.
- Click Download and the map will be downloaded to your device.
So let’s go find our plotted photo locations! (This is about the photography, yes?) You will use the same procedure as described in the 12 Step procedure above in the Navigating With a Data Connection section of the article. If you do have a data connection, Google Maps will use it and you will be able to travel with voice guidance from point-to-point or, to multiple points if you’ve entered those. But, if you venture to a location without a data connection or it drops out, Google will then use the map you stored. If you go out of the area covered by your stored map, don’t have a data connection, or the technology otherwise fails you… uh… you did print out that map yes?
Other Programs for Navigation
You don’t have to use Google Maps for navigating and if you expect to be doing much of your travel without a data connection, it might not be the best choice anyway. Here are some other options:
Maps.ME – Available for both Android and iOS devices, Maps.ME has its own downloadable maps and they have them for pretty much the entire world. Larger areas can be downloaded too such as entire states or countries.
Sygic – Also for both Android and iOS. Also works offline. One feature of interest to photographers is the Photo Navigation option. Click that in the menu and the device will allow you to search for a photo, either on your device or online. Then, if that photo has embedded GPS coordinates (and many cellphone photos do), it will plot the spot on the map where the photo was taken and allow you to navigate there if you want.
Remember that KMZ file?
If you followed my instructions, you downloaded a .KMZ file copy of your My Maps map. This is how you get your plotted points and route into Maps.ME. (The makers of Sygic tell me, unfortunately, they their program can't import .kmz or .kml files at this time). I find it easiest to e-mail myself with the .kmz file attached. I bring up the e-mail with the attachment and, when I click the attachment, Maps.ME loads it. Save the .kmz file to your device – you won’t be able to get to e-mail (nor can you get your My Maps Map from Google Drive) without an internet connection). You then can use the maps for offline navigation much as you would do in Google Maps.
Here are a couple other potential uses for the .kmz file.

Back to Google Earth
Not only will Maps.ME load the file and plot the points, so will Google Earth. I’ve had better luck with this back on the computer than on my mobile device, but if you load your .kmz file into Google Earth (easiest to open Google Earth and then drag and drop the .kmz file onto it), you will see your plotted route with the marker points you added. Why do this? Three reasons: 1 – Google Earth will allow you to “fly” the route and better view the 3D terrain of your intended points, 2 – Dropping the “pegman” onto a spot will give you a Street View of that spot so you can better see what’s there, and 3 – Google Earth can also show photos taken by others on the map. Check them out and you might find other places along your route to add.
Using Your Stand-Alone GPS Device
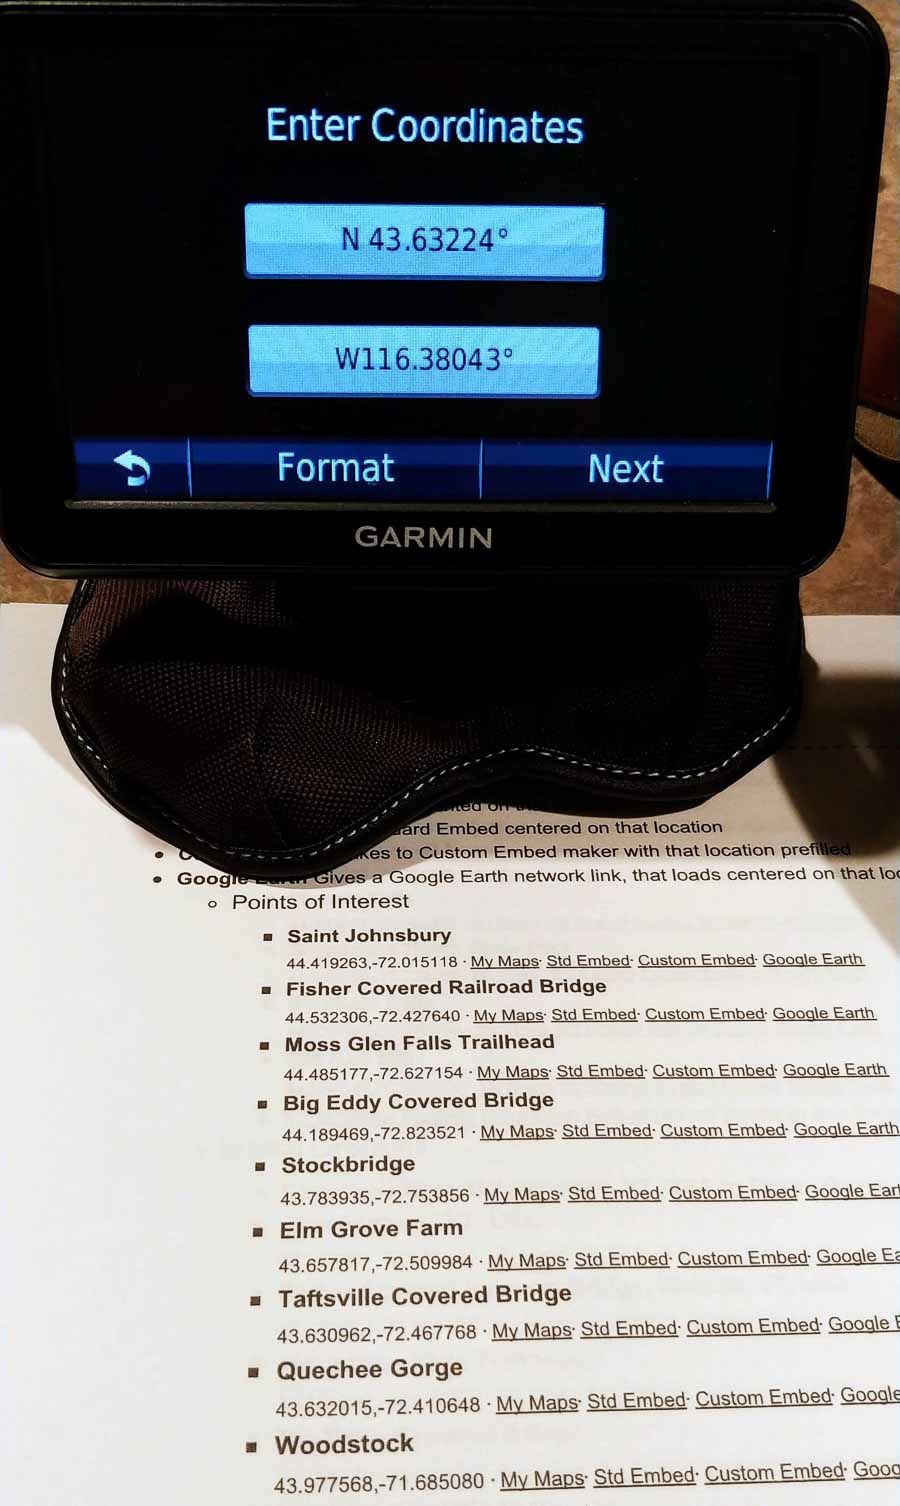
Yet another use for your .kmz file – transferring your plotted points into a stand-alone GPS device. I can only speak to how this works on my device, an older and quite basic Garmin Nuvi 50LM. I’d guess with some research you can figure out how this could work on other makes and models. I loaded my .kmz file into a free app called Garmin Basecamp. The route and points from Google My Maps came right in. Then, I connected my Nuvi to my computer via its USB cord and exported the map to the device. My Nuvi didn’t bring in the route but it did add the points. So… now not just the belt and suspenders but a third way for navigating to a point – bring it up in my Favorites list on the Garmin and from wherever I am, the device will plot a course to that destination.
And That Printout?
You did output that printout of your plotted points using the utility I mentioned, yes? So not only do we have belt, suspenders, and the stand-alone GPS, but a fourth way. Say you didn't pre-enter the points and you want to get to a spot on your printed list. Manually type the GPS Coordinates into Google Maps, (either online or offline if you downloaded the area map), or into your stand-alone GPS device and it should plot the point as a destination. So here’s a test… If I type in 44°23'28.39″N, 68°12'21.30″W and go there, where will I be and what am I apt to be doing there? Leave your answer in the comments if you figure it out!
Other Scouting / Navigating Tools
Another app needing mention is produced by Improve Photography founder Jim Harmer. Called Really Good Photo Spots it can direct you to spots near your location. Its location database was submitted by photographers and continues to grow as more photographers upload data. Unfortunately, I’m an Android guy and have no experience as it is for the iPhone/iPad only.

A similar Android app I have tried and used is ViewPointer. When you are in a location, (or you can type one in), it will show you other photos taken near that spot. It may give you ideas about what’s nearby. Its database is Flickr. One disadvantage – it pulls up ANY photos taken in the area. If someone did family photos or something near there and the GPS coordinates are embedded in the photo, you’ll see those shots too. Sifting through stuff is often needed.
I also like GPS Status on my Android mobile device. (There are similar iOS apps). It shows if I have GPS satellite connection, my GPS coordinates, my altitude, my speed, and maybe most useful – a big compass. If I can determine where I am and what direction is North, I can usually find my way. It also allows GPS “Bookmarks” to be saved. Find a spot, bookmark it and you can find it again later or plot it to a future map. It can do other cool things too which you will discover with some exploration.
Practice Makes Perfect
I know there’s a lot to learn here, but like photography itself, it’s practice that will make it all second-nature. Also like digital photography, there are technical “gotchas” that will crop up and only practicing will help you learn where those are, what works, what doesn’t, and workarounds as necessary. I highly suggest you read the first article and make a simple map using Google My Maps of your town with just a few points on it. Then using this second article, see if you can successfully navigate it both online and offline. (To simulate offline, put your smartphone or tablet in Airplane Mode if you have to). If you have a stand-alone GPS device, see if you can figure out how to import your data into it. Then give it a go. After you’ve done all of this, then develop your map for your next photo adventure and use it to navigate once you’re there.
Use the belt-and-suspenders system with plans for navigating both online, offline, or even using your paper printout if all else fails. And though planning is great, leave some room for Serendipity. Sometimes the best photo locations are the ones that weren’t in your plans or on your map!
One final thing, if you do get lost it’s okay, Real Men, (and Women) really Can Ask for Directions. Besides, who really knows where the good spots are and when it’s best to go there better than the “locals?” Happy traveling and best wishes for that next Great Photo!
well, its good to have so much information about photography.
Great article, so much helpful information!
Practice Makes Perfect