

If you’ve been around Improve Photography, or photography in general, for some time, you may have heard the term “high key” thrown around in reference to photographs. This article is an attempt to clarify this term, as well as hopefully provide some useful examples and suggestions to start attempting your own high key imagery. You may find that you do not want to pursue the effect as a consistent statement in your work, or you may find that you quite love and would enjoy utilizing more of the technique; either way, it is good to understand what and how it is so that you can respond to whatever shooting conditions you are working with.
“High key”, at it’s most base and over generalized definition, could simply be described as bright, or extremely bright, images. High key imagery focuses the majority of your image pixels in the highlight range of your histogram. What this means is instead of aiming for a bell curve histogram, where your pixels are evenly spaced throughout the range of zones, your histogram will instead look like a bell curve (or even a jagged peak) that was pushed over to the right – the hump of the curve will primarily display in the top 50% of your pixel count.
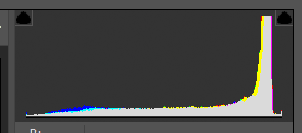
If you don’t know what a histogram is yet, no worries! When you’re looking at a high key image, you’ll notice a distinct lack of blacks and shadows throughout the image. Does this mean there are no blacks or shadows? Not necessarily. It is possible to create a fairly low contrast high key image that exists with 75% or so of the pixels in the work in the upper half of the histogram. Generally, though, you’ll just have a very bright, even blown out background to your image, with a subject that contains the contrast.
High key lighting was birthed in cinematography as a way of balancing out scenes that would have been too hard to display on the screens at the time (the ability to accurately render contrast was a challenge in early television and cinema screens). As technology progressed, the need for the smaller contrast range became antiquated, which allowed the technique to migrate to an artistic tool.

Take a look at some product photography online. Most of the time, the products will be shot with a high key mindset: bright white background (sometimes completely blown out so the objects seem to float on the white of your browser window), with not much dark shadow defining the image. There should still be some, somewhere, as the shadow is how an object is perceived as being three dimensional (an obvious exception to this would be any product that is actually two dimensional and thus does not need shadow to help define the form).
If you cruise through your favorite image browser and simply search “high key photography”, you’ll see a plethora of examples immediately populate, with various extremes. This technique is used predominantly in work with models, products, newborn, and wedding photography. There is a feeling of optimism, cheer, even calm that will generally be transmitted with these bright types of images. Can it be used in other genres? Of course! It’s all about how you want to get your message across.
Now that there is a baseline for understanding what high key photography is, let’s get into the how. You’ll find a lot of articles that talk about needing a three or four light studio setup in order to produce high key images, and this just isn’t the case. You can get your feet wet and start experimenting with this visual language with one light and a little creativity. For ease of learning, I would recommend two speedlights and access to a white background. I did the following images of these Warhammer table top game minis with just two lights, and I actually used the white side of my 5-in-1 reflector (without the diffuser inside) and diffuser.


Despite being high key images, you can still see shadows and definition in these three dimensional images
When I was creating these images, I took the diffuser, and placed it just above the miniatures, about four to six inches up, just out of the line of sight for the lens. This allowed the diffuser to function as a massive key (primary) light, giving me soft, beautiful light that wrapped around the figurines. I could have flattened the light out more had I had used a small fill light coming from the front and just a little below the plane of my lens, but I chose not to in this instance, as I wanted there to be definition of shape and depth through the shadows on the miniatures; however, doing so would have created an even more high key image. The important thing to notice is there is still appears to be a full range of contrast in the images.
What can be interesting to notice is that even though the blacks and shadows aren’t as prevalent in the images, they’ll still feel three dimensional – the contrast still exists, it’s just been shifted into a smaller overall range. Since the images will work in a series as well as convey a very apparently intentional decision to limit this contrast area, it won’t (generally) read as a mistake, something beginners in the high key world occasionally worry about.

Another occasional challenge could be shooting a subject that is dark in color in a high key setting. Notice the histogram still has a majority of data in the highlights, but there is a small bump in the shadows.
For the background, I simply took my second speedlight, used a Rogue FlashBender to increase the size of the light, and manually set that light to overexpose the background by around 2 stops. Since I was shooting such small subject matter (they’re each around four inches tall) I was able to use proportionally smaller modifiers on my lights and still have them appear to be large modifiers (if you want more information on lighting and modifiers, check out this series of articles by Jim Harmer). What this translates to is the larger your subject matter, the larger you’ll need your modifiers to be in order to create the same effect. If getting more than two or three flash units is out of your budget for the time being, practice the technique with smaller subjects.
Once you understand how the lighting works for high key photography, it becomes easy to address any scene with a high key mentality. The following images are all product shots, done with a high key approach, still creating the feeling of optimism, with a very small range of shadows and contrast that exists in the top fifty percent of the histogram. You don’t always need a white background to create a high key image, any bright color will work! White is simply a standard that has come to pass due to the simplicity and cleanliness of the look (and some purists may argue that a white background is needed in order to be considered high key), and since that was often the look of the background at the genesis of the style.
When you graduate yourself to working with three (or more!) lights, start utilizing one light on your subject as your key light, and one as your fill light. Learn how to really flatten a subject to where the subject is almost imperceptibly three dimensional. This is the challenge that I’m currently pushing myself towards in my high key work. The image of the handcuffs and children toy tools are probably the closest I’ve gotten thus far – but I can still push it more.


It can be difficult to really push these images when you’re initially delving into the technique. One of the hardest things to do is not blow out your highlights on your subject when working on your exposure. This is one of the reasons the most common type of high key photography is studio based: the photographer has complete control over all the light sources. However, it is perfectly plausible to take high key images in natural light as well, if one simply searches for the right conditions.

In fact, you probably see these natural light high key photos all the time! Every time you see the wedding image of a bride in front of a window, and the space beyond the window is completely blown out because of the dynamic range limitations of the camera, that can be considered a high key image. The same can be said of nature images (such as flower or bird images). However, as I’ll talk about in the next paragraph, this type of high key imagery can come with its own set of challenges. One big danger to be aware of when shooting natural light high key images is lens flare; you want to try and use your best lens, and avoid having the sun shining into the lens (utilize your lens hood or some other block).

Though it's not a perfect
high key image, this image
contains a borderline
dangerous amount of lens
flare. Just make sure you
stay aware of the hazards of
flare when creating images
in natural light!
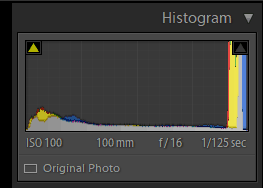
It’s really important to talk about when it’s “okay” or “allowed” to blow out portions of your image. This is a rule that really only applies to when you’re learning the functionality of your images – if you decide to blow out half your image and your client likes the effect, or if you still sell the work, who’s to say that it isn’t an okay thing to do? When you’re setting up your high key image, you want to try to never completely blow out your highlights in the RAW file itself. If you aren’t sure how to tell if you’re doing this, just check the histogram in your camera (you may have to consult your manual to figure out how to turn it on), and you want to make sure that you don’t have a completely vertical bar on the right side of the histogram. As bright as your image is, it should still exist underneath the “completely blown out with no data” line, whenever possible to get the shot.
When you’re learning how to see and understand how high key images are created, plan to fail. Plan on overexposing beyond salvation through many of your images, especially if you’re utilizing a model. Speaking from experience, if you overdo it first and then learn to pull back the exposure to create stunning high key images, it will actually serve you better. Otherwise you’ll limp along, occasionally pushing the “high” portion of the high key work, always surprising yourself by how much further you could go.
Be cautious when attempting to shoot metallic or otherwise glossy/reflective objects with high key techniques. Because of the higher rate of reflectivity, it is a lot easier to accidentally lose the highlights on your subject without realizing, and sometimes in such a small area that you may not even notice the line on the histogram. Because of this, I recommend bracketing shots when shooting an object constructed of a new-to-you material, and even when shooting with models (though if I’m being honest, I almost always shoot bracketed, a habit I developed from shooting film).


Overall, shooting bright, open, clean, simple, high key images can be some of the most fun and rewarding type of photography. I find myself enjoying it immensely among the current trend of dark and moody images, it’s nice to do something that I find myself looking at and translating to a giant breath of fresh air. Spend some time looking at some high key work. Spend some time experimenting with it yourself. Start with natural light if you don’t have your own flash units or constant lights yet. Figure out what works and what doesn’t. The most important thing, though, is that you don’t let yourself be stymied by what you’ve heard or seen as being the “right” way to do high key work. Just try stuff, and be ready to fail, but also be ready to grow in your understanding of the technique and, consequently, your understanding of photography and photographic lighting.
To summarize, here are some tips to help drive your high key work to it’s next level, whether that’s level 1 or level 9000:
- The true photography tip: practice practice practice. If you’re not shooting a high key situation, try and shoot it anyways to learn how you would make it a high key image (if time/budget allows).
- Start with just a couple of flash units or natural light. Learn to balance your exposures with fewer variables to control, so that you can actually better understand what’s happening, then add in new lighting units when you want to push the balance into a new level.
- Research high key work. This is another tip that is true in any form of photography, but especially when learning particular techniques. See where others have taken the technique, and find out what you do and don’t like about those iterations of the technique. Also take a look at classic cinema and see if you can find the high key lighting present.
- Learn about how light functions, and how modifiers impact the light on your subject. Some of this comes down to practice, but don’t forget to check out this series of articles by Jim Harmer to get some understanding on the matter.
- Take risks. Make it your own. Try color backgrounds, dark subjects, whatever you can to see where the true edges of the technique exist for you and your artistic vision.
- Remember that rules are made to be broken. For every perspective on a technique there is someone who could be considered a “purist” of that perspective, but for every purist there is a rebel.
- Finally, learn to verbalize what you’re seeing. If you think it’s a high key image, try to verbalize why you think that. If not, try to verbalize that instead. Learn to think and talk to yourself about how you could make an image more or less in line with this technique. If you can’t put what you’re doing into words (even if only to yourself), it will only take you that much longer to accomplish it in the moments you really want to.
Do you love or hate high key photography? Drop a comment below and let’s talk about it! Share some of your favorite high key work, some of your busts, or share some of the tips you’ve learned as you’ve worked on high key images!
Gear used in referenced photographs:
Canon 5D Mark III (Mark IV linked)
Canon Speedlite 600EX II-RT
Yongnuo YN560-IV
Bowens Gemini 400Rx 2 head kit (Discontinued)
Neewer 5-in-1 reflector/diffuser
ExpoImaging Rogue FlashBender
Canon 100mm f/2.8 Macro Lens
Canon 85mm f/1.4 Lens
This is recommendations for the how we can keep it secure and what are the some more alternate options I can use. Whole story given in the some details but specaiily for the person who want some good options and differnet from the traditional tools.
Since Perl 6 is multi-threaded in its core, it was decided at a very early stage that reference counting would be problematic performance-wise and maintenance-wise. Instead, objects are evicted from memory when more memory is needed and the object can be safely removed.”
Am I missing something?
Regards
it was decided at a very early stage that reference counting would be problematic performance-wise and maintenance-wise. Instead, objects are evicted from memory when more memory is needed and the object can be safely removed.”
Am I missing something?
Regards