

If you’re looking to up your video game and you enjoy shooting on a mobile platform you should give the Osmo Mobile 2 from DJI a serious look. It’s not without its flaws, but at $129 USD it’s one heck of a bargain.
The Osmo Mobile 2 is the successor to the popular Osmo Mobile. A little lighter and less expensive, the Mobile 2 has been highly anticipated. Since I do not have any direct experience with the original Osmo, I am focusing on the Mobile 2 for this review.
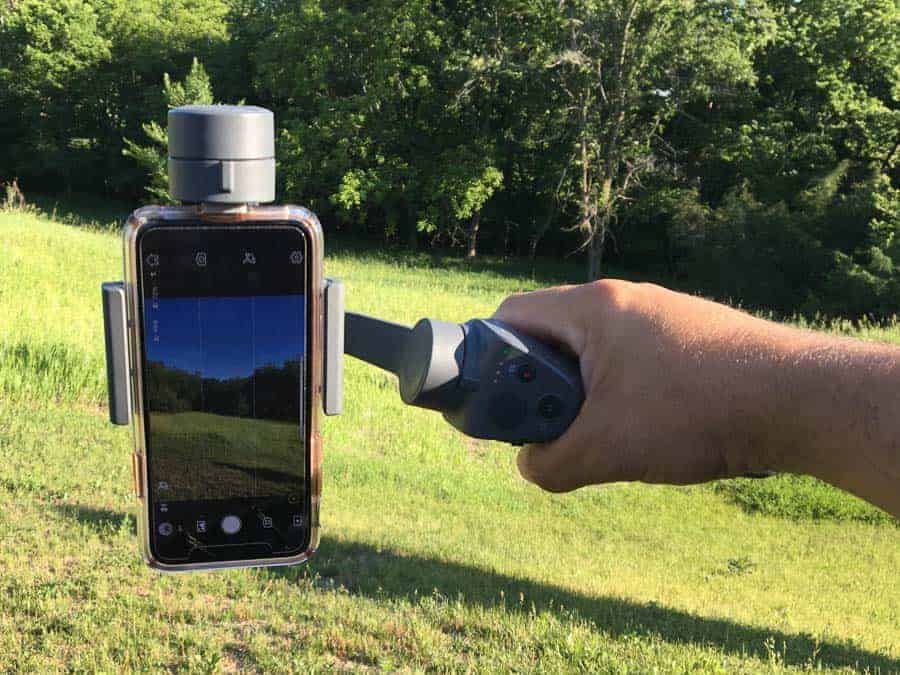
I will also note that the phone I used for this review is the iPhone X. I do have a protective case installed on the iPhone and the gimbal handled it just fine. The phone does balance a bit easier without the case. I also tried out my wife's iPhone 8 Plus (no case) just to see how the gimbal handled the larger phone form factor and it did just fine.
In the Box
It’s quite simple. In the box, you will find the Gimbal itself (fully assembled) and a charging cable (micro USB) that is used to charge the device. Not included is any sort of wall adapter for the USB charging cable. This is all packed within a box inside of a dense, Styrofoam based molded case that can be used as a long-term storage and transportation option for the gimbal.
If you’re planning to use the case that comes with the gimbal as your long-term storage solution (as I am), I recommend working on a way to latch it closed as it is not designed with a latch in place. I'm thinking Velcro or something like it.
Starting the device for the first time
Overall the gimbal was very easy to use right out of the box. The quick-start guide, however, was less than useful as I was trying to acquaint myself with the device. I ended up googling the full manual and watching some videos to help myself to properly balance the phone in the device.
It’s not overly difficult, but you will want to take the time to properly balance your phone in the gimbal. This will greatly enhance performance and especially, battery life. The device is listed as having a 15-hour battery life, but this is tested with the phone perfectly balanced and with the gimbal in a static state. The first you can do but if you’re not going to move the gimbal around, why do you need it? The device for you is a tripod.
Once the phone is mounted in the device and properly balanced, it’s very easy to activate Bluetooth and launch the DJI Go App to pair and activate. You shouldn’t need to do this over and over so long as you always use your same phone in the gimbal.

Using the DJI GO App
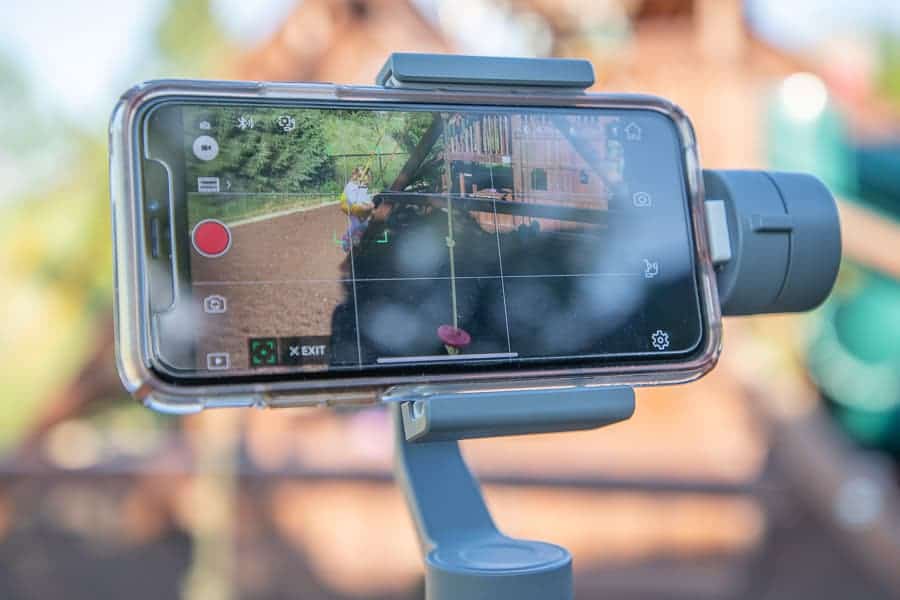
This brings me to my next point…The DJI GO App also downloadable on Google Play. Once I had the app installed (which is required to activate the device), and I started shooting some video my first instinct was to go through all of the possible video modes. The very next thing I did was make sure I could use another app to actually capture video. The GO app is OK but somewhat limiting.
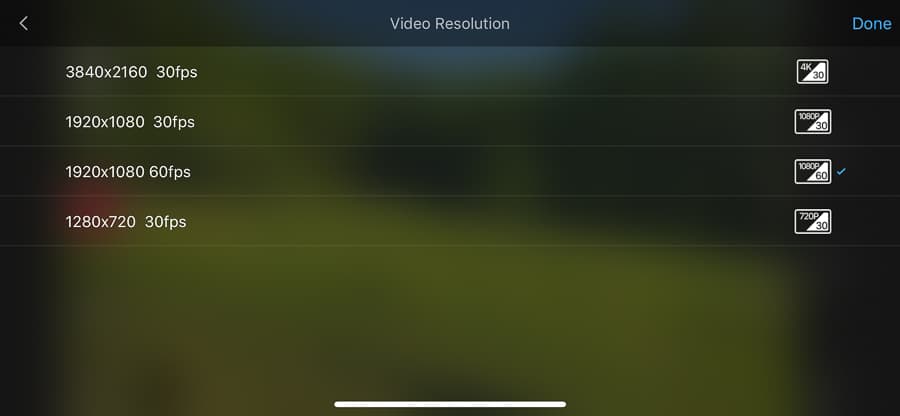
Video resolutions include:
- 4k 30 fps (3840×2160)
- 1080p 30 fps (1920×1080)
- 1080p 60 fps (1920×1080)
- 720p 30 fps (1280×720)
It would be nice to be able have more of the options at my disposal. Only having these 4 isn't cool. Even the native iOS camera app adds 4K 24 fps and 4k 60, which would be nice as well as 1080 at 120 and 240 which would be epic even though the effects of instability are lessened when looking at slow motion footage. It would still be a benefit to have the footage stabilized.
The app does have “slow motion” mode but it was difficult to determine what the specifications of the file were. It is definitely a 1280×720 (720p) size and appears to be 120 fps. Still far less flexibility than is possible.
Another limitation I stumbled across was more directly related to my iPhone X (or any other mobile device that utilizes two back side cameras). Only the wide angle camera could be used. At the time of writing, there was no way to access the telephoto camera system.
Sigh… Overall the app isn't horrible and has some other useful features (covered below). I'd venture a guess that part of the reason the app is nerfed for the mobile is to make sure people have a reason to buy the Osmo+. Like I said though, that's just a guess.
Controlling the device
The buttons are in very logical locations and are within easy reach for use. There is a joystick for movement as well as a record button to start and stop recordings. Alongside the joystick and record button is the power/mode button. All very easy and simple to use.
A single click of the mode button locks the orientation (free mode) of the phone so that it's always pointed the same direction regardless of the movements your hand makes (until you reach the limitations of the device). Another single click takes you back to standard (follow) mode where the phone will slowly follow your movements. Two quick taps re-centers the phone and three quick taps will toggle between front and back cameras. Though, you cannot switch cameras while recording.
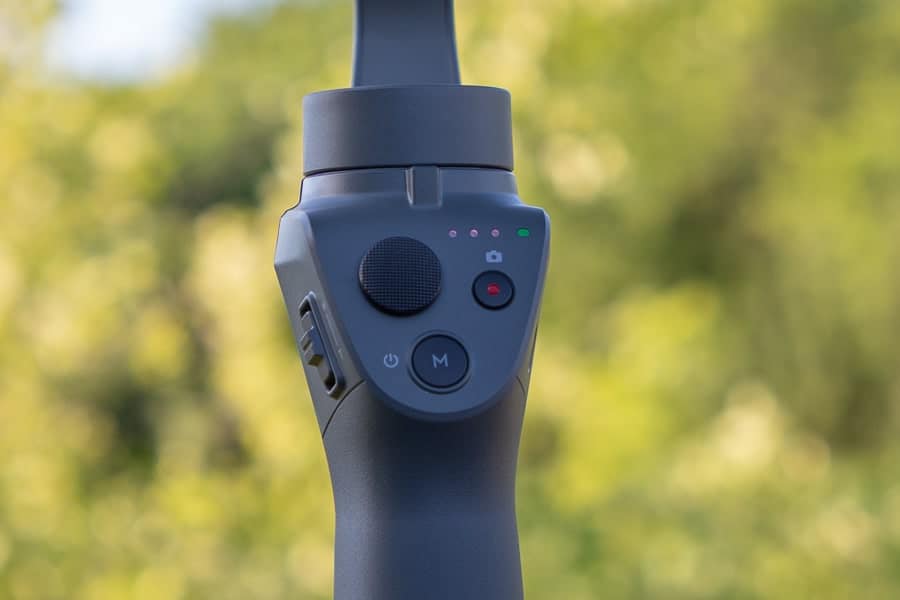
The joystick allows for look inversion, so you can decide which way you want the gimbal to move when you perform certain inputs (i.e. push the joystick up to look down, etc.). This is very convenient and can shorten the learning curve getting you to high-quality video in less time.
The zoom slider on the side of the device is also very easy to reach with the thumb and the zoom is quite smooth. I generally won't zoom since with a mobile device, the zoom is digital and not optical so you're better off just zooming in post. But if you're live or don't want to mess around in post production, the zoom feature works well (with the DJI app). Features like tracking and zooming don't work in other apps.
I was a little surprised that the buttons make an audible “click” when pressed. So be sure to keep this in mind when shooting video. If you're really focused and picky on sound quality though, you will probably not be using the microphone built into your mobile phone. Just a guess. However, if your external mic is close enough and you need to push these buttons, it might still pick up the sound.
Orientation
If you want to shoot portrait or landscape orientations, it's a breeze to do so. There is a dial on the back side of the mounting clamp that holds your phone. Simply loosen the dial and you can rotate the clamp 90 degrees counterclockwise to the portrait orientation. There also are two intermediate settings at about 30 and 60 degrees from Landscape.
If you're needing a quick switch, another option is to simply move the gimbal handle to a horizontal position to the right of the device. The gimbal will enter a portrait mode and will continue to work as before.
Most will find this beneficial and if you're using the gimbal to shoot stills, it makes a whole lot of sense. I find video shot in the portrait orientation to usually be less than compelling and I think many will agree. However, it's nice to have options!
Note that if you change orientations, it is best to go through the balancing for that orientation.
Battery life
I haven't pushed the battery to its limits yet but it seems to hold a charge rather well. Don't expect the 15 hours that are advertised though. That figure is generated based on a perfectly balanced phone (which you can do) and a perfectly motionless gimbal (which you won't do).
I did start my review period with a full battery a couple days ago and I'd bet that it would easily outlast my phone battery if I'm shooting all the time.
Enter a new and cool feature. On the front of the grip, there is a USB port. You can run a cable from this port to your phone to charge your phone. Thus, theoretically at least, one device won't outlast the other though you will see less battery performance from the gimbal. The user manual does specifically state that you should not have the phone connected while the gimbal is charging, so keep that in mind.
If you're using a phone that has a micro USB connection for charging, the same cable that charges the device can double as the cable between the device and your phone. If you're like me and you use an iPhone (or another phone that does not use micro USB), you'll need a different cable.
Use as a video gimbal stabilizer
While not the only way to use the device, I'm guessing this is how it is used a vast majority of the time. I mean, that's what it is! I'm a relative noob to video stabilization (this is my first ever gimbal of any kind) but I have watched a lot of video. So I, like you know when somebody just held their phone vs. when they likely had some help. I find the results to be of a decent quality. Not perfect but for $129 it's very good.
The tracking mode does a decent job. Actually it does quite well. It defaults to having the subject dead center in the frame but a quick adjustment with the joystick and you can have it tracked wherever in the frame you like. Overall nice results.
If you're more into manual control over where the camera points, you have some flexibility there too. A quick tap of the power button will change the device into a steady mode where the camera points in the same direction all the time. Useful if you don't want your hand movement to slowly pan or tilt your view.
If you tap the button again the handle of the gimbal itself becomes something of a joystick for slow, fine adjustments in composition (the joystick still works too). Want to pan left or right? Just rotate your hand that way and the gimbal follows. Same thing for up and down. It works pretty smoothly too. With a little practice, I found that I prefer the manual method to the automatic tracking in many situations.
More on Tracking
One situation where you might want to just use the tracking is if you're capturing video of yourself for a vlog. You can use the front facing camera, enter tracking mode and tap your face. Then holding the handle at arms length you will notice that the camera follows you. This could also be helpful if you have the gimbal mounted on a tripod and you want your camera to follow you around as you move. Both great uses for tracking.
I used my daughter as my target for testing the tracking feature. As an energetic, two year old, she was a perfect subject. Running back and forth from about 30 degrees left of my front and center to 90 degrees to my right the gimbal did a decent job of keeping at least part of her in the frame. I held the handle motionless during this non-scientific test.
The movement of the motors was a little jumpy at times as it had to be to keep up with her and if it lost her it was immediately able to pick her back up once she was back in the frame. I'd consider this something of a torture test and it did OK. Certainly not perfect but surprisingly good. At least as good as I could do hand holding the phone.
Use for motion timelapse
In the bottom of the gimbal handle, you will find a 1/4″ 20 thread for mounting the device to a tripod or slider cart or anywhere else that a 1/4″ 20 thread can go. Alternatively, you can use the base designed for use with the Osmo. From within the app, you tap on the mode icon and you can switch to among other modes, motion timelapse. It's very easy to use.
Within the app, you can set start position, end position and positions in between. Select the shooting interval and for how long you want the shoot to last and go! Super easy. Just make sure you have enough battery power to last.
Use for shooting panoramas
I'll be honest…It's kinda fun to watch the head zip around as it captures panoramas. There are 3 basic modes and the difference between them is just a matter of size. The “wide angle” setting captures 9 photos in a 3×3 grid. Up next is the “fish eye” mode, which captures 15 photos in a 3×5 grid. Finally, you have the “panorama” mode which gathers 27 photos in a 3×9 grid. The panorama mode covers more than a full 180 degree field of view when using the wide angle camera on my iPhone X.
Framing basically centers on whatever is front and center relative to the handle. It would be really cool if you could set the parameters of the capture manually. Of course, you could use the gimbal and manually capture each frame. While more versatile and probably capable of superior results, it's less fun than watching the robot take the photos for you.
There are some stitching errors that occur, especially when you have elements that are close to the camera. This is not unexpected as the gimbal does not rotate around the nodal point of the camera but overall it's quite good. You do have the option in the settings of keeping each individual photo as well as the processed final stitch so you can try to do a better job yourself if you want.
My principle complaint with the panorama mode is the fact that the software vastly scales down the final image. The below image is a photo taken in the “fish-eye” mode with 15 photos in a grid that is 5 photos wide and 3 rows tall. The final image stitched by the GO app is 3038 px by 1259 px (about 3.8 megapixels). This is fine for posting to social media in many applications as they'll scale it down anyways.

However, if you want all of the resolution that comes along with a stitched image, you'll want to make sure you opt to save the individual images so that you can stitch them later on your own for a much higher resolution product. I used the same images and Photoshop to create the following image. This image has a slightly less rectangular aspect ratio and appears to be a better stitch in terms of accuracy and distortion. This image came out at 10,485 px by 5,291 px (about 55.5 megapixels).

Verdict
At $129 USD, I have to give it a solid green light. It's got its shortfalls (especially in the app) but the price is more than right. You will have fun messing around with it and the video you shoot will, without question, be superior to what you can capture hand-holding your phone.
If you are that interested in video, chances are you will quickly be looking at gimbal rigs that can handle your DSLR or mirroless body and lenses. Be forewarned though, these rigs are A LOT more expensive! I'm going through this as we speak.
Did the hardware IS in the iPhone X fight the gimbal stabilization resulting in video jitter like reported in other reviews of this product?
Hi Scott,
You know, I didn’t encounter such a problem in my case. At least it wasn’t noticeable. I’ll keep messing around with it and see if I can cause some issues. I imagine that just as in many other cases with different equipment, it is best to disable any IS when mounted to a gimbal or tripod.
As I was writing this response, I fired up the unit and tried it with IS enabled and disabled and while there is a slight lag in the movements with IS enabled, I wouldn’t call it “jittery”. I’ll keep messing around and post updates as necessary. At this point, I’m still very happy with the purchase.
Cheers!
Thanks for answering back Brad. A lot of the reviews I had read was that because the IPhone X is hardware IS, and not software IS that can be turned off, that the DJI and Iphone X sometimes get in a tug-of-war against each other. I am not sure if more prevalent during heavy movement vs idle. I just ordered the DJI and hopefully it is not an issue.
One more follow -up Brad. I did more research. It looks the DJI app and the Filmic Pro app CAN turn off the IS, but the issue that causes the jitter is the lens itself. Apparently when the IS is off it does not lock the lens, leaving it floating free. If you are walking or running that movement causes the unlocked lens to move as well slightly causing the jitter. It turns out it is not the two Is’s fighting each other. I will be testing as well as my unit arrives today.
Hi Scott,
Makes sense that it might be a hardware issue. Again, I have not noticed anything in terms of jittery video but maybe I’m not moving around enough. I assume you have yours in hand…Any additions or issues on your end?
The phone holder is beautiful and very handy, I like it
Thanks to author for such impressive article. Here I have an informative article helps you to create windows 10 recovery partition in easiest way without wasting your time.
This is developed by the new technology and it is the best mobile to used in the mapping process which is really good for us. And your article such a wonderful because you provide the best information about the Osmo mobile. it is really good for us. it is also used in the i-phone. And I can easily activate iphone without using the sim card.