
I started taking my photography hobby seriously about 3 years ago when I decided I wasn't going to let another hobby atrophy and die because I wasn't putting in the effort to make it great. Like most people, I saw big improvements after a few months just by making it a point to get out and shoot. I got to the point (after about a year) where I was pretty certain I could take on the likes of Ted Gore or Peter Lik. I thought my images were creative, emotional, and worthy of hanging on every living room wall in America.
I came to a hard realization that my prints weren't all that when I entered in my first photo contest at the State Fair and didn't get any awards. This was the first time I had actually printed my photos and I took a long look at them to find out why they didn't beat out the likes of kittens with creamy bokeh and sunflowers. In this article, we are going to discuss how printing will take you to the next step in your photography. If you think you are pretty good (which I'm sure you are) but you've stuck to digital mediums for your images (Facebook, Instagram, Flickr), then this article is aimed to you. It doesn't matter if you are a landscape, wedding, or pet photographer, printing your work will help you get better faster.
Printing is not expensive
The first reason to print your photos is because prints are not expensive at all (for personal use, anyway). I can get a 12×18 lustre (semi-matte) print made at my local print shop (not Costco or Kinkos) for about $4. This is by far the cheapest way to ensure your photos look amazing. Every year around Black Friday, several home photo printers will go on sale as well. You can pick up a printer capable of printing 13×19 for $100-$150 which usually includes a pack of 50 sheets of paper.
Because prints are so cheap, I can print a photo after my first edits are made, review the print, make corrections to the file in Lightroom or Photoshop, and print again. I'll repeat this step until I'm happy with the final product. Next, we'll talk about many of the benefits you'll see when you print your work.
Learn proper exposure
The first thing you will notice is that prints often come out darker than how you see them on your computer or phone. The reason behind this is because most people have their brightness turned up too high. This leads you to believe that your images are brighter than they really are. When I first started editing photos, I had my monitor brightness set at about 50/100 because I liked seeing a bright, vibrant computer screen. And it was great for playing video games. But after my first few prints came out so dark I could hardly see detail in the shadows, I turned my monitor brightness all the way down. This gives me a more realistic experience when editing my photos and adjusting the brightness.
In turn, learning about editing the exposure has taught me about proper base exposure when taking the photo. I don't like to go past 1 full stop of exposure in Lightroom, so I know if I'm pushing my exposure slider that far, I've underexposed the image when I took the picture. Better exposures in camera have taught me about dynamic range and the best times of day and light conditions for taking pictures. This has also led me to understand when I need to bracket and by how much when I am facing a scene with high highlights and low lowlights. All of this has given me the skills to know the best exposures to take so I can have the best images to work with when doing my editing and not throw away an entire shoot because of blown highlights or lowlights.
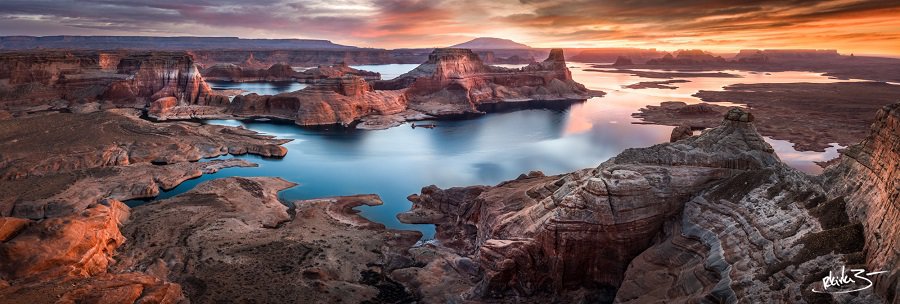
The image below had extreme highlights and lowlights because I was shooting toward the sun. The experience I learned through the entire chain of events I mentioned taught me what exposures I needed to get in order to have detail in every part of the image. When I put them all together in Photoshop I have a complete image that looks amazing instead of throwing everything away because I had blown out highlights or muddy shadows.
Editing mistakes
The next thing you'll start to see is editing mistakes. Sloppy exposure brushing, bad cropping, tilted horizons, or missed sensor dust spots. These will show up differently in prints than how you see them on screen (mistakes will be more obvious).
One of the tricks I like to do is take a Sharpie and circle areas on the print that need to be fixed and jot down notes. Then I can have the print on my desk to use as a reference so I don't forget to correct the mistakes I see
Color depth and saturation
The next thing you'll learn about is color depth and saturation in two ways: in your editing and in your print medium.
Let's first talk about what you learn in your editing. A computer monitor has a contrast ratio that is over 2,000,000 times greater than paper. This means that colors appear richer, fuller, and more detailed. We have the ability to push our images beyond the point of reality when we edit them on the computer. When you print these images, the colors appear fake, over saturated, sloppy, runny, and/or crunchy. This is called “out of gamut,” meaning either the specific color or the saturation percentage does not exist in a physical environment. The inks made for printing simply do not have the physical traits represented on your computer screen. They cannot “run the gamut” so to say. When you start to experience this, you'll know how to back off on your editing so your prints turn out amazing every time.
Next, you'll learn that different types of print mediums (paper, canvas, metal, etc) have different properties and the inks used to print will reflect light differently. Each medium gives a different feel and you'll know on which one to print certain images. Some images look better on canvas, some images look better on metal. You'll also start to see that some parts of your image will come out on different mediums. I have a print where I caught the last bit of sunlight on a butte in Southern Utah. When I print the image of paper, you can't see the glow. But when I print on metal it shows up just like you see it on the computer.
ICC profiles
The next thing you'll learn about is ICC profiles. Each paper, ink, and physical printer has different ICC profiles. ICC profiles are how a color space is represented. Basically, you'll use ICC profiles to make sure your prints turn out exactly how you want them. Remember what we mentioned before, your image will turn out differently on paper than it will on the computer. You'll use ICC profiles to adjust your image to best reflect how you see it on your screen. Normally, a print shop will have ICC profiles available to download for the printer/paper/ink they use. You load these profiles into Lightroom and use them to make changes to your image. Viewing your image with the ICC profile selected will give you an approximation of what your printed image will look like. So you'll change the exposure, contrast, and saturation to your liking.
Learning how to use ICC profiles is great because you have the final say in how your image looks. You'll start to realize the default settings many print shops use don't bring your photo to life. So you'll load the ICC profile, edit your final image for printing, and then be happy with the prints you get back.
Print shops
Speaking of print shops, when you start printing your photos you'll start to notice that some are better than others. And I'm not just talking about the quality of print, but also the price, the customer service, the turnaround time, and what happens when they screw something up. Believe it or not, but there are lots of printers out there who do a much, MUCH better job than Costco.
There is a local print shop who has the best price but their turn around time is more than double what other shops do and their customer service is terrible. I've been talked down to on the phone for asking simple questions and following the directions of the last guy I spoke with. And when they make a mistake, they don't offer to make it up in any way, just a generic “so sorry about that” is all I get. I won't shop there anymore.
Knowing who the best printers are and which ones you like working with helps to establish you as a professional in your trade. You wouldn't want to hire a general contractor to remodel your basement who uses just anybody off the street to do the electrical, drywall, carpet, or painting would you? You'd expect them to know and be confident in the work of various sub-contractors. Knowing who the best printers are gives you the ability to justify print prices to your clients who will inevitably push back on your seemingly high prices. You will know who has the best quality, longevity, durability, and color accuracy so you can guarantee a lifetime of satisfaction for your clients.
Print sizes and ratios
Printing your work will help you know and recommend the best sizes for your client's needs (or for your needs when printing for yourself). You'll know that an 8×10 will look like a postage stamp on the wall even if it's in a small bedroom. You'll know that a 24×36 looks awesome above a couch and that something even larger will command the attention of anyone who walks into the room. Knowing different sizes helps you to ask better questions when clients are talking about making a print purchase and helps you to possibly upsell them on something you know they'll be happy with. I recently had someone purchase a 10×30 panorama from me, telling me the were going to put it above their fireplace. 30 inches long may seem like a substantial size, but I tried to encourage them to go larger, saying they might find out that a 10×30 doesn't look as large on their wall as they think. They decided to stick with the 10×30 size and less than a week later told me they wish they went with a larger size. I knew what would be best because I've printed many pictures and different sizes and have seen them in various locations.
Printing also helps you understand ratios better: 1×1, 1×2, 1×3, 2×3, 3×4, 4×5, and so on. You can give some images an entirely different feel just by making it a 1×2 ratio instead of a 2×3. This also helps you imagine a scene before you shoot it if you have a specific ratio in mind. It adds flexibility to your skillset, knowing you can shoot something at a different ratio instead of the standard 2×3 or 4×5. It also gives you the ability to meet a client's wants if they say “I want something unique for this photo.” Giving them a 1×1 instead of a 4×5 could make all the difference. And you'll know what the final image will look like because you've tested and printed in several different ratios.
Bring your prints into life
Lastly, I love printing because I don't believe a photograph really exists until it's been printed. The walls of my house are adorned with many of the photos I've taken because I do great work which I love looking at (not to toot my own horn or anything…). I have developed a deeper appreciation for art because seeing a gigantic print hanging on my wall pulls me into the image. You could have a huge 32″ 4k computer monitor to edit and view your photos but it will never be as impressive as a 60″ print hanging on your wall. I've stopped to admire my work on many occasions.
People also love, love, LOVE getting prints. Whether they buy it for themselves or they get it as a gift, a gorgeous print of something near and dear to their heart will be cherished forever. I've gifted many prints to family and friends and have watched them cry when they see it for the first time.
A physical print is a constant reminder of an event, a person, a promise, or an emotion. It doesn't require electricity, it doesn't require an app, it doesn't require time set aside in someone's busy schedule to look at it. All it takes is to walk past it to see it, appreciate it, and fall in love with it all over again.
Conclusion
Printing your photos will help you take the next step in your photography. So many things can be learned by bringing your work into the real world. You'll immediately see areas for improvement once you start examining a print. Find a reliable, local printer, print some photos, and you'll wonder why you've never done it before.
Have you printed from online stores that will ship to your house? Would you recommend the local labs over online?
Yes I have. The downside to printing with local shops is that you can’t see the final product until it’s shipped to your door and this process takes at least 7-10 days for serious prints. There are places that has a pretty quick turn around time and can get simple prints to you in just a couple days though. What I like about the local places is most of the shop owners are more than happy to show you around the shop and let you watch the printing process. I like being able to develop this relationship with them. However, smaller local places can be affected by small shop problems like someone calling in sick or getting a flood of orders. I had a print delayed more than 3 weeks due to a local place being busy and I had to apologize to my client (who was buying the print) twice because the print wasn’t ready in time. If I printed with a bigger online shop, I would have had the print in a week. You’ll just have to see what works best for you.