

Learning how to photograph shootings stars will add a unique touch to your nighttime photography. So, if you want to make your star filled landscape shot stand out among the rest, mark your calendar for the next big meteor shower and add some shooting stars to your photos!
There are few things that will enhance your star filled astro-landscape photo in a more unique way than to have a bright shooting star streak through your frame. The excitement you will feel when this happens and you know your camera was pointed in the right spot, properly focused and exposing is very real.
So, what do you do to try to make this dream shot a reality? While predicting a shooting star with any accuracy is basically impossible, we can do a few things to try to optimize our chances of photographing them.
Understanding What A “Shooting Star” Is
A shooting star is really not a star at all. It is a meteor striking the Earth’s atmosphere at high velocity and burning up. The burning part is the part we see and hope to photograph. These meteors start in space as interplanetary debris. As they move through the atmosphere they can sometimes exhibit different colors making them even more photogenic.
On occasion meteors can survive entry and strike the surface of the Earth as meteorites. But one need not worry. Significant impacts are very rare and when they do happen they are far more likely to strike in uninhabited parts of the world (usually in one of the oceans) and not in your shooting location (hopefully!).
This is not to say it’s completely impossible that you are hit. In 2013 the sonic boom from a meteorite injured hundreds of people in the Chelyabinsk region of Russia. And in 1954 Ann Hodges of Sylacauga, Alabama, USA became the only person known to have been directly struck by a falling meteorite. She suffered a nasty bruise but survived.

Meteor Showers
The easiest way to increase your chances of photographing a shooting star is to go out shooting during an active meteor shower. Meteor showers are periodic increases in meteor activity and are caused by trails of debris left behind by comets or asteroids as they orbit the Sun.
These debris trails intersect the orbit of Earth and the showers associated with them tend to peak at about the same time each year. One of the most popular meteor showers each year is the Perseids meteor shower which peaks in mid-August.
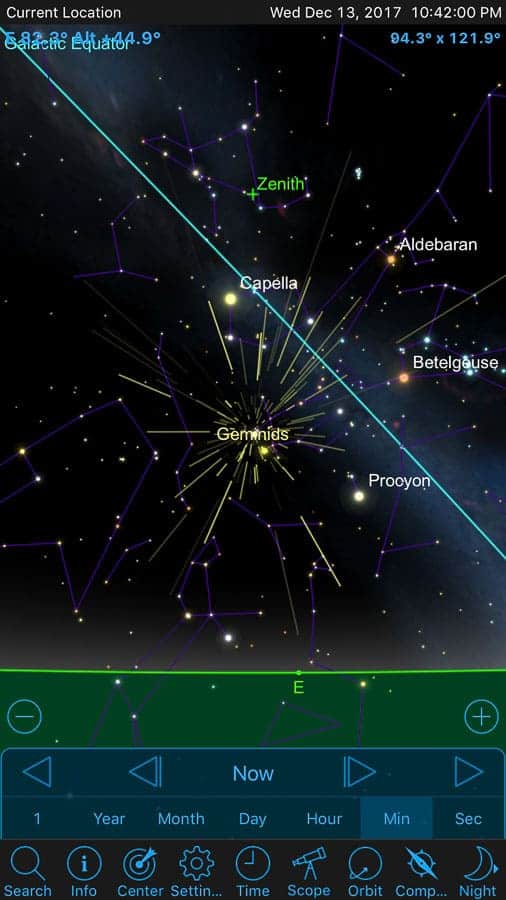
Another solid meteor shower peaks around mid-December each (requiring warmer clothing for most of us) and has the potential to outshine the Perseids each year. This is the Geminids meteor shower. The Geminids has the advantage of being in a great viewing position shortly after sunset eliminating the need to stay up until the pre-dawn hours to catch the best parts.
Each of these showers has the potential to produce meteors at rates in excess of 100 per hour if viewing from a good, dark location. The American Meteor Society has a great list of some of the most active showers as does Time and Date.
You will notice that each shower is named for the constellation from which it appears to radiate. This gives us a good idea where we should point our cameras if we want the best chance of capturing a shooting star. This is not a hard and fast rule though as the shooting stars can really show up in any part of the sky. In 2015, I was with a group of people photographing the Perseids and some of my best meteor shots were taken looking in the opposite direction of the constellation Perseus.
Gear Needed
Obviously, if you desire to photograph a meteor, you need a camera. While just about any camera has the ability to capture a bright meteor, (think of the times you’ve seen them on dashcam footage) having a setup similar to what would be used for typical landscape astrophotography would be more ideal.
Camera: Start with an interchangeable lens camera (DSLR or Mirrorless). More recent camera bodies are more likely to have sensors that are better performers in terms of high ISO performance and noise control. The last couple of times I’ve gone out trying to photograph shooting stars, I’ve relied on my Canon 70D (not the very best but works ok) and my Canon 6D Mk I (still love this body for astrophotogaphy).
Lens: Next, add a wide-angle lens that is capable of a large aperture (f/2.8 or a smaller number). The fast aperture is important for shooting star photography. These meteors are often moving fast and are sometimes rather faint. The fast glass will help you to capture these faint meteors. I have three Rokinon (Samyang) branded lenses that are my go-to’s for shooting star photography. The 16mm f/2.0 (APS-C only); the 24mm f/1.4 and the 14mm f/2.8.
One lens that I will consider renting the next time I plan to go out chasing meteors is the Sigma 14mm f/1.8 “ART”. The reason this lens is so appealing is because of that extra stop and a third of speed over the f/2.8. This would really help to brighten those rather dim shooting stars and increase the “hit rate” in your shooting star photography. The 14mm part is also very appealing for this type of photography as it will cover a large portion of the sky all at once, increasing the chances of capturing those elusive meteors.
Other Gear: There are several other items that will help you to be successful in your endeavor to immortalize shooting stars in your epic photography portfolio. A sturdy tripod will be helpful as your exposures will be long. Also helpful is a wired intervalometer or even a basic shutter release that locks the shutter down to take one exposure after another. Some camera systems have intervalometers built in to them and this is another option. I have found the following additional gear to be rather helpful on my outings as well: Extra camera batteries, Hand warmers (which can be wrapped around your lens near the front element to prevent dew from forming), a good headlamp with the red light feature to save the night vision of yourself and those around you, a chair and a stocked cooler full of your favorite beverages.
Exposure Settings
If you read my article: “How to Photograph Lightning and Never Miss the Shot”, some of this will sound familiar. When you think about it, photographing shooting stars is very similar to photographing lightning at night. They are both natural phenomena that happen very quickly and are very difficult to predict.
Shutter Speed is going to be fairly similar to what would be used for Milky Way photography or similar starry night shots. However critical minimalization of star trailing may not be important for every frame you take and you can cheat this a little. Many times, the intention is to create star trails as part of the final image anyway so feel free to go with the longer exposure time. In this case, 30 seconds seems to work well.
If you want a composition that is star trail free, you will want at least one frame where you have worked to minimize star trailing and then you can layer in your shots containing meteors. In this case you can use the popular “500 rule” where you take 500 divided by your effective focal length to give you your shutter speed.
It should be noted that the “500 rule” often fails when closely scrutinized (though it will probably work just fine for posting on social media). If you are planning to print large, you might want to do a little research on the “NPF Rule” which takes the sensor size, pixel size, pixel count aperture (diffraction) and declination (where in the sky your camera is pointed) all into account to try to really create “spot stars”. These times are often much shorter than what the “500 rule” would indicate. Don’t worry about the math as the popular app PhotoPills has this built in now!
Aperture is a very important setting as I have noted above. Often times, meteors can be faint but you still want to do what you can to make sure they “stick” to your sensor. My suggestion is to use the widest aperture you have available to you. This is why I’ve indicated my own interest in that Sigma 14mm f/1.8.
Technique
The technique for this type of shot is really very simple. Make an educated guess as to where the meteors will fall, then start taking exposures. Simply take one exposure right after another and wait for your meteor to show up. As stated above, longer exposures will be used. Just as in lightning photography, as long as the meteor happens while your shutter is open, you will capture it.
As noted above, meteor showers will give you the most action. Go out while these showers are active and find a dark place to shoot. The Moon may interfere with the shower (this was the case with much of the 2016 and 2017 Perseids Showers) but it is still very possible to see and capture bright meteors.
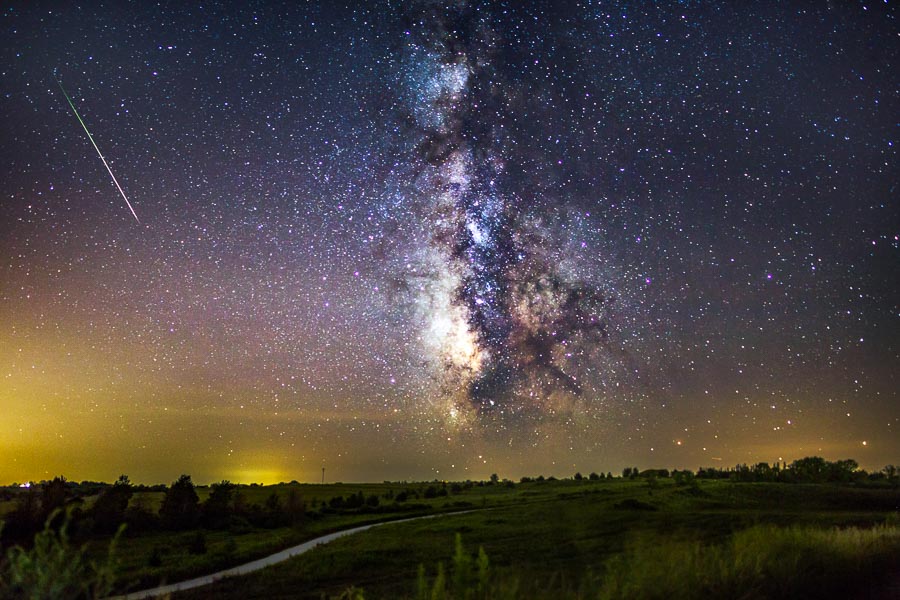
One of my favorite techniques is to have two cameras running. One will be pointed in the direction of the constellation from which the meteors are supposed to be coming from (i.e. Perseus for the Perseids, etc.) and taking one exposure right after another just as one would for capturing star trails. Meanwhile I have the second camera to “chase shooting stars” and gather different compositions. This has been my favorite way of shooting under a meteor shower that I have found. The photo below is an example of this. I took the photo in the direction opposite of where everyone else was looking. Out of the group of 30 or so of us, I was the only one to capture this bright meteor.
Special attention should be placed on the exact composition you would like to have as you are going to have the most luck by sticking with it. There is a temptation to point your camera in the direction of the most recent meteor. This action is usually followed by a meteor streaking through the part of the sky you had previously included in your composition. I have seen many people grow very frustrated with this.
Is That a Shooting Star?
Often times I see people get excited thinking they have captured a shooting star when it is far more likely that they have captured something else entirely. The most typical non-shooting star that I see is the common airplane. The dead giveaway on this one is the solid, perfectly uniform light and/or the dashed, repeating lights (caused by “blinking” lights on the aircraft).

Another one that will fool many (and is MUCH more convincing than a typical aircraft) is a satellite in orbit. Some of these, especially the International Space Station, can be very bright and will show up easily in your exposure.
Iridium flares are usually mistaken as being shooting stars. And after you’ve seen a photo of one, it is easy to see why. Iridium flares are caused by sunlight reflecting off the antenna of one of many Iridium satellites (communication satellites). Seen with the naked eye, these are easy to separate from meteors as they move much more slowly, but in a photo they look really very similar. The very cool thing about these flares is that one can predict them with a great deal of accuracy. Visit Heavens Above , enter your location in the top right and click on Iridium Flares in the list along the left and you will see a list of events with time and maps to tell you where to look.
Conclusion
Remember that an element of luck is involved when chasing shooting stars. The image at the top of this article was a product of pure luck. It is one shot. My goal was to take a photo of myself posing as if I were taking a photo of the Milky Way with my phone. Midway through the exposure a bright fireball streaked through the middle of the Milky Way. It was all I could do to wait for the exposure to finish and not ruin the shot by moving.
To put luck in your favor:
- Shoot during a meteor shower (like the Perseids in August or the Geminids in December)
- Find a dark location and hope for minimal interference from the Moon
- Point your camera toward the constellation from which the meteors are supposed to come
- Use a wide angle lens (14mm works great!)
- Long exposures with your widest aperture
- Don't be afraid to use High ISO's to help brighten the meteors
- If you can make it work, running two cameras makes a HUGE difference!
- Use cable releases or intervalometers so that you're constantly taking photos
- Have Fun!
All noise reduction settings to “Off”?
Good point to bring up Oscar! The main one I concern myself with is the “long exposure noise reduction” setting. What this setting does is take a second exposure with the shutter closed at the same shutter speed and ISO. The purpose is to filter out hot pixels, etc. and it works quite well. The problem with it is that Murphy’s Law kicks in and all the best shooting stars will happen in that downtime between your light frames. If you want to keep the benefit of this type of noise reduction, simply take a few frames with the lens cap on after you are done for the evening and you can use those dark frames to remove noise in post. The key being that your dark frames must have the same settings and be taken in the same ambient temperature as your light frames.