
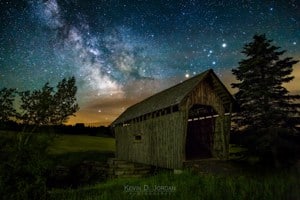
I started taking photos of the night sky three years ago and quickly became a stickler for getting as clean of an image as I possibly could with the gear that I had. Since capturing photos of the Milky Way pushes the limits of modern day camera sensors, this is not always an easy task. I quickly learned about how stacking images of the sky could reduce noise in my photos. This process is done by aligning the images and removing the random bits of grain that appeared in each shot, leaving the stars sharp and intact as a result.
While the process of stacking is actually fairly simple, it has two noticeable complications. First, a simple RAW file editor such as Lightroom does not have the ability to stack images to reduce noise. And second, if your image has a foreground in it, alignment of each exposure becomes tricky because the stars appear to move from frame to frame while the land below remains in the same place.
There are available programs that are designed to reduce noise in photos via image stacking. However, many of these programs either cost money or are not terribly effective at stacking images when a foreground is involved. Photoshop can perform the process with good results and is the program I currently use in my workflow, but there is a level of manual labor involved to combine sky and foreground images after the stacking is complete, and Photoshop doesn't come free, which will be a deal-breaker for those on a budget. Free programs such as Deep Sky Stacker tend to work well for images without foregrounds such as deep space astrophotos; however, I personally have never been able to get good results because of the steep learning curve and due to the foregrounds in my images.
There is a program called Starry Landscape Stacker for Mac computers that I have heard excellent reviews of from other astrophotographers. The problem for me and many others is that it is not available for Windows operating systems. As a result, I have been on the hunt for years to find a piece of software that can do what Starry Landscape Stacker does and can also be run on my PC.
After years of waiting and occasional unrealistic grumbles to myself that I should just learn software development and create my own program, I finally came across a piece of software that caught my interest.
Sequator
In a nutshell, Sequator is a free program that is meant to stack images of the night sky for the purpose of reducing noise. Not only that, but Sequator is meant to also handle images with foregrounds, making it a tempting choice for landscape astrophotographers. The program was made by software engineer Yi-Ruei Wu from Taiwan and is available only for Windows. The website for Sequator states that the program is meant to be “simple but powerful.” That all sounds like good news, right? Well, yes, it is good news, so that's probably why it sounds that way. And there really isn’t any bad news to go with it, other than the fact that from what I can tell, the program has been around since at least 2015 and I just never knew about it…
As soon as a heard about Sequator I knew I wanted to see what it could do in case I could use the program to assist in simplifying and speeding up my workflow for processing night sky photos. Since my current workflow involves aligning and stacking images in Photoshop, I decided to use the speed and results of Photoshop as a measuring stick to compare to Sequator.
Basic Features
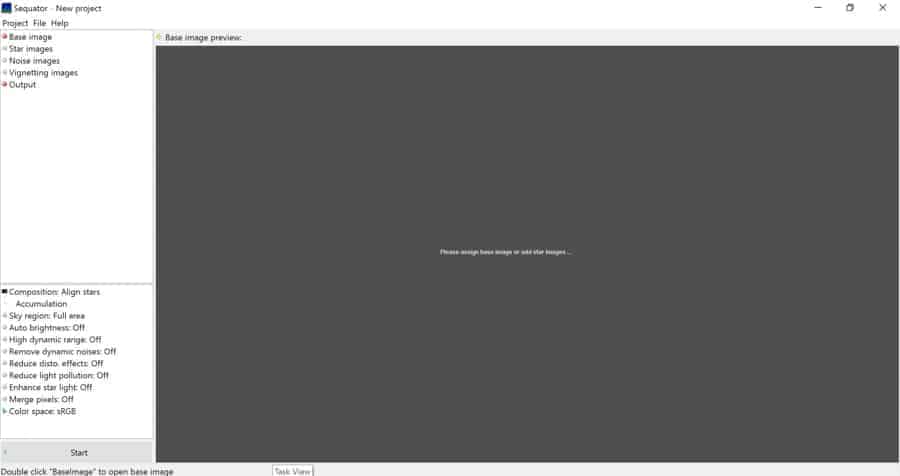
Sequator is a simple program, both in terms of the design and in terms of the features it offers. It offers the main function of stacking night sky images for the purpose of reducing noise, while also attempting to assist along the way with challenges that often arise during astrophotography such as distortion, light pollution, hot pixels, and more. It supports both RAW and DNG, so rest assured that you can use the program with high-quality files.
Unlike my experience with Deep Sky Stacker, I understood how to use Sequator after just a few minutes of experimenting with it. You open up the night sky images you wish to stack under the menu labeled “Star Images” and Sequator will both load these photos into the program and chose an image from this batch to use as a “base image”. (Sequator picks the middle image in the sequence of photos you load, but a different base image can also be assigned manually.) You can also choose to add “noise images”, which are dark frames you took in the field to map long exposure noise in your image or “vignetting images” which map the darkening in the corners of the images often noticeable on wide-angle lenses shot at wide apertures. Lastly, you name your “output image”, which is essentially a “Save As” function you carry out before Sequator processes your images. Sequator can output your file as a 16-bit TIFF, so rest assured that the resulting image can be brought back into an editing program such as Lightroom or Photoshop and be further processed to your heart’s content.
Settings
While the functions above are the bare bones steps necessary to process your images with the programs, there are several other features you should consider in order to get the most out of the software. On the upside, some of these features are surprisingly effective. However, selecting which of these features you will want to utilize during the stacking process will vary from image to image, especially because the effectiveness of some of these features can be somewhat inconsistent. I won’t go through the ins and outs of every setting here since a straight forward manual is available on the Sequator website, but I will mention the ones I found to be most useful for getting good results in the stacking process and which ones didn't seem to be helpful.
Composition
In the Composition tab, you have a few basic options to decide on based on the images you are stacking and what you want your output file to look like. The basic questions you need to ask yourself are “Do I have a foreground in my image?” and “Do I want pinpoint stars or star trails?”. The setting “Align Stars” is selected by default, which should be kept selected if do not want star trails. If you do, select the “Star Trails” option instead.
Sky Region
The Sky Region setting allows you to help Sequator to determine which part of the image is your sky and which part is your foreground. This is where the program really sets itself apart. In Photoshop, you will need to spend time masking out the foreground in each image to align the stars, only to later have to blend the resulting image with a blurry foreground with a foreground base image. This process can be frustrating, especially with complex foregrounds such as tree branches. In Sequator, however, you only need to differentiate the sky from the foreground on your base image and Sequator will figure it out from there.
In order to differentiate the foreground from the sky, you can use the “Boundary Line”, which draws a simple linear barrier between sky and foreground (this works well for a simple flat horizon), the “Gradient” tool, or the “Irregular Mask.” By using the Irregular Mask tool, you can use your mouse to paint a mask over the sky in your image, using your mouse’s scroll wheel to change the size of the brush. For tricky, uneven foregrounds, the Irregular Mask tool is the way to go.

Auto Brightness Control and High Dynamic Range
The Auto Brightness Control and High Dynamic Range options are similar and are both meant to control the exposure of the output image during the stacking process. If you find that your output image is too bright and has blown out highlights, try selecting one of these options to help.
Remove Dynamic Noises
The Remove Dynamic Noises setting is meant to remove hot pixels that are the result of sensor heating caused by capturing long exposures. Give this setting a try if your exposures were long enough that you have random, bright, colored pixels that need to be removed from the image.
Reduce Disto. Effects
Sequator also has a setting meant to remove streaking of stars in the corners of images that occur from wide angle distortion. I was hoping this feature would help to remove sagittal astigmatism and comatic aberrations in the corners of images, but I didn’t find this to be the case in any of my tests.
Reduce Light Pollution
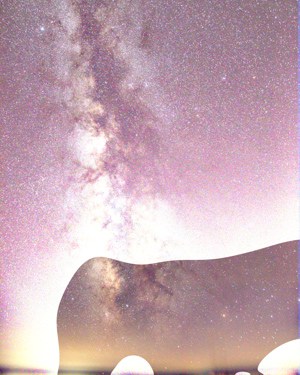
Another hopefully helpful feature unique to night sky photos is the Reduce Light Pollution setting, which is meant to be used when your photos were taken under light polluted skies. The attempts I made to use this feature yielded ghastly results. It may vary from image to image, so give it a try if you have light pollution you are trying to get rid of, but the feature seems to just try to drop the blacks in the sky and increase contrast, which is something that could be done with more control with a RAW editing program such as Lightroom later in post-processing. At its worst, the Reduce Light Pollution function yielded the results you see to the right.
Enhance Starlight
Another option that you can test on an image-to-image basis is Enhance Starlight, which is meant to give the stars in your photo a bit more pop. I didn’t find it terribly useful in the photos I stacked, and I think the same effect could be achieved with more control in later post-processing. However, that doesn’t mean it isn’t worth experimenting with.
Merge Pixels
This option merges pixels in your image in the interest of reducing files size. Keep this turned off.
The Results
I was not entirely sure what to expect with Sequator, especially given how much precision and control I could achieve stacking and blending exposures in Photoshop. However, the results Sequator yielded definitely surprised and impressed me.
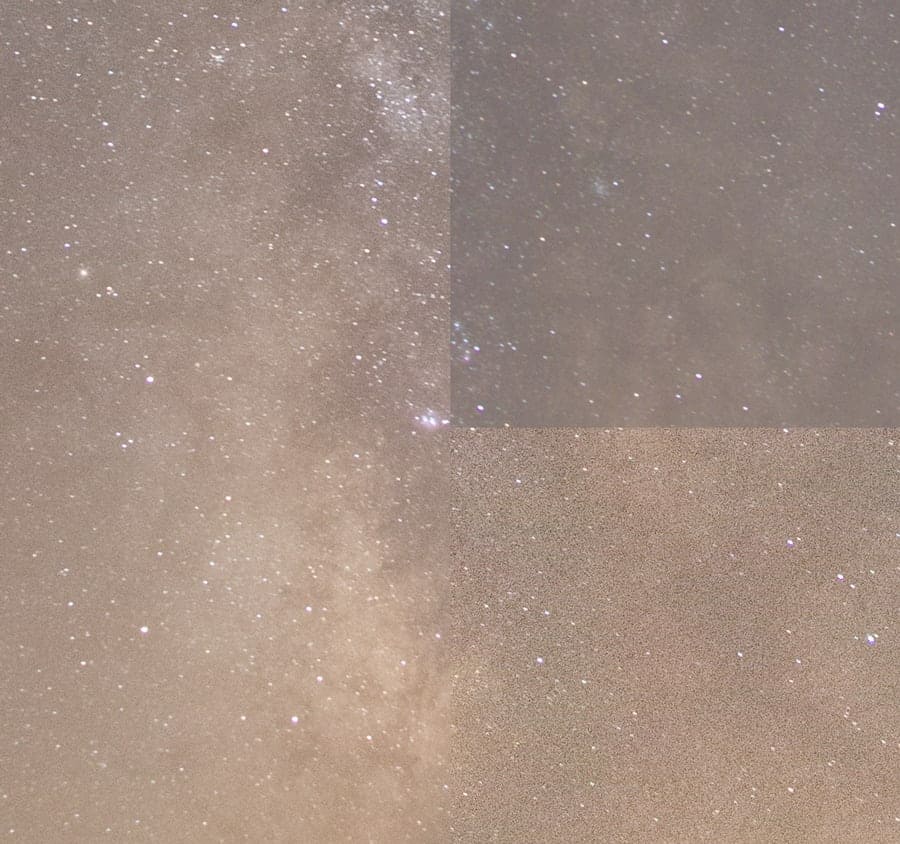
When it comes to a simple stack of the sky with no foreground objects, the process in both Sequator and Photoshop is fairly easy, so the area in which either program could set itself apart was via processing time and the final result. In processing a 10-image stack of exposures to reduce the noise, Sequator (~1 minute) beat Photoshop (~3 minutes) in processing time. (For the sake of doing this test, I counted Photoshop's processing time to include loading each file as a layer, aligning those layers, converting to a Smart Object, and stacking with a median filter.) As you can see below, the results are very similar. If I had to nitpick, I would say that the file stacked in Photoshop had slightly sharper stars and the file stacked in Sequator yielded a flatter image. However, these are still unprocessed files aside from the stacking process, so I could easily post-process these shots to overcome either of these minor points. For a free program, Sequator held up extremely well and actually processed the final image much more quickly than Photoshop. Both programs brought out more detail in the core of the Milky Way.
Since its clear that Sequator is capable of reducing noise by stacking images, what could set it apart from other programs for me would be the ability to handle files with foreground elements and shorten my workflow.
The masking process in Sequator is simple and only takes a few seconds. I started out with a somewhat easy foreground with a series of shots taken in Joshua Tree National Park. The edges between the foreground and the sky are smooth with no tree branches or complex edges. Sequator handled the images like a champ, giving me an output file with a clean sky and a sharp transition between the sky and the foreground.
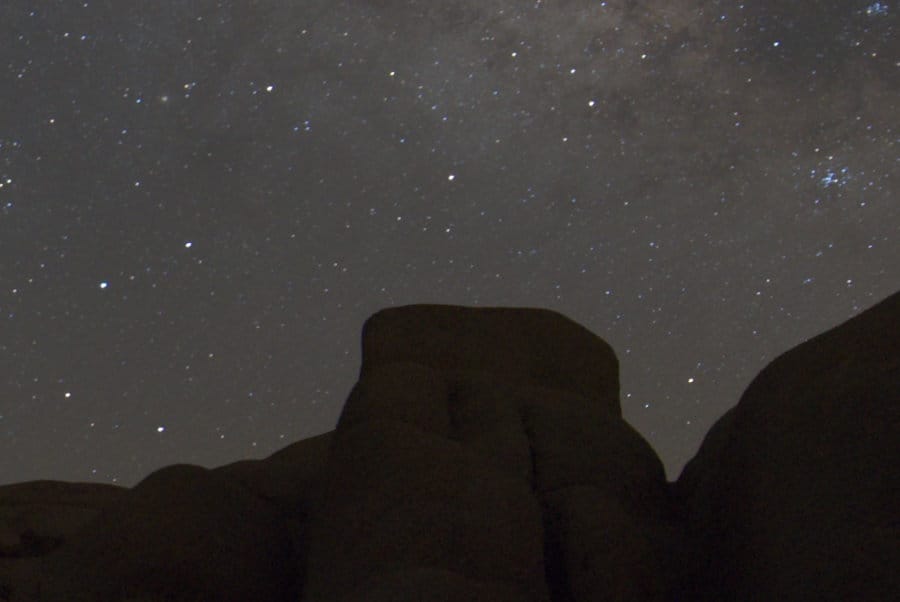
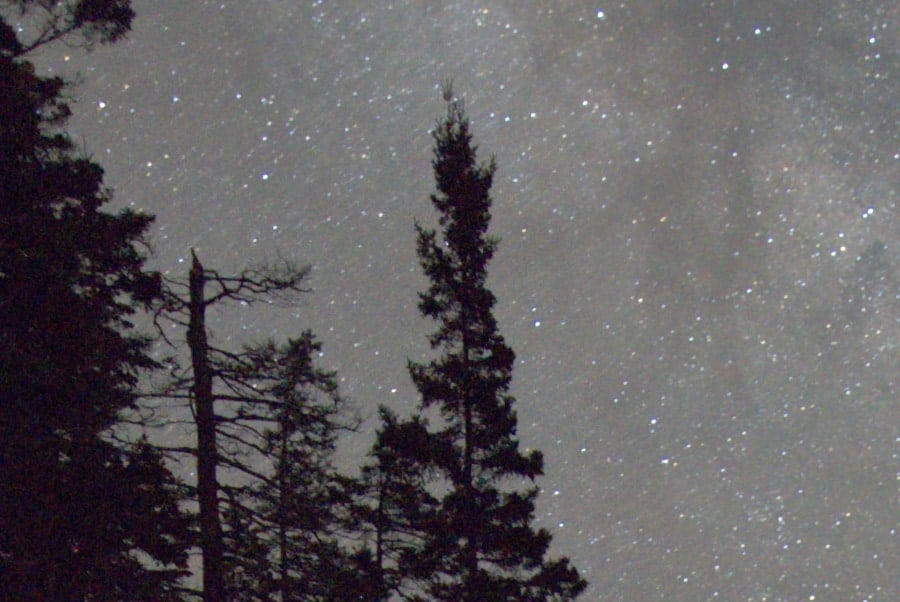
At this point in the testing, I was very pleasantly surprised. However, those nice smooth foreground edges in Joshua Tree aren’t what I usually shoot. I typically shoot in the northeastern United States and my foregrounds are a complicated mess of tree branches and plants. So, I dug into my archives and took a series of 5 exposures captured in Acadia National Park in Maine to see how Sequator would handle a more complex foreground. To my surprise, Sequator handled those tree branches without issue.
Final Thoughts
With all of that said, Sequator is a pretty darn good free program. While all of its features aren’t as useful as they could be, the main function—stacking landscape astrophotography images to reduce noise—is very effective. It simplifies the process when compared to Photoshop, and provides good enough results that I will be looking to integrate it into my workflow in the future. One thing to keep in mind is that I could not seem to get any basic edits I made to my RAW or DNG files to stick when being imported into Sequator. So, if you want to make any kind of edits to your files before stacking, you may have to export your RAWs or DNGs to a new file in order to get Sequator to see those edits. One of the most noticeable results of this was the Sequator output files having slightly more color noise than the images stacked via Photoshop, which is most likely because Photoshop was benefiting from the standard Color Noise reduction applied by Lightroom upon import.
For those who are interested, you can download Sequator here and give it a try for yourself.
is there a Sequator user manuel or pdf i can download Please
The article is very good, I like to read your article, it helps me improve my photography status clearly
Nice review. Thank you.
I found that when activating Enhance light, set to the minimum, it does not alter the stars but it reduces the chromatic noise a bit further. That is why I usually let it activated.