
Common wisdom tells us to place the sun at our backs when taking photos. I'm sure we've all heard that old chestnut, at some point or another. In the film days, it may have been relevant, film offering way less dynamic range than even our modern cell phone sensors. Times have changed. It's time to start breaking that “rule”, and you don't need a fancy camera and a bunch of expensive lighting equipment to do it. Follow these tips on how to take an iPhone photo with the sun in the background and you just might want to make shooting into the sun your new rule.
It's always a good idea to know the rules before you start breaking them. In this case, the old advice seems like common sense. If the sun is at the photographer's back, then it is lighting the subject, and that must be a good thing, right? Well…yes and no. First of all, if your subject is any sort of living creature with eyelids, then they will probably be squinting if they are facing the sun. That's not an attractive look on anyone. Secondly, if the sun is at your back, then chances are, you'll be fighting to compose the shot without casting your own shadow onto the scene. While that can occasionally work and make for an interesting photo, it will not be desirable the majority of the time. Thirdly, photographing a front lit scene or subject often makes for flat and uninteresting light. Shooting into the sun (or light source) adds drama and creates a mood.
Will It Hurt My Lens?
Especially after all the buzz about the recent eclipse, some of you may be wondering if it's ok to point your iPhone at the sun, and the answer is “yes”. It can be unsafe to point a telephoto lens at the sun because it has a magnifying effect, just like how you can start a fire using a magnifying glass. You can damage your sensor, or worse still, your eyes if you look through the viewfinder. Your iPhone doesn't have a telephoto lens, it has a wide angle lens, so this is not a concern. Looking at the sun on the screen of your phone will not harm your eyes. Also, during the eclipse, it became quite dark out, especially in the areas of totality. Photographers had to use long exposure times to capture the scene, but that won't be the case at all when you're taking photos on a normal, bright, sunny day. Your shutter speed will be very, very fast.
Dynamic Range
Dynamic range is the amount of difference between the brightest parts of the scene and the darkest parts. If you are taking photos on an overcast day, chances are there will be very little dynamic range, and you'll have nothing to worry about. On a sunny day, you start getting very dark shadows and very bright highlights. Your eyes have no problem seeing detail in both the shadow and highlight areas – they are capable of seeing a very wide dynamic range. In fact, the human eye can see about 20 stops of difference between light and dark, with each “stop” being a doubling of the last amount of light. That adds up to an enormous difference. Assuming that you are capturing JPEGs on your iPhone (and if you don't know what that means, then you almost certainly are), then you get about 8 stops of difference. Keeping in mind that each stop doubles the last amount of light, if we assigned the amount of light a number value, then our eyes see from 1 to 1,048,576 while the iPhone can only capture a range from 1 to 256. (RAW files, captured on a full frame DSLR sensor tend to capture something in the neighborhood of 13 stops of light, equivalent to a ratio of 1 to 8,192).
So, what does this all mean? It means that if you want to shoot into the sun, literally the brightest thing possible in any scene, then you are going to have a problem. The difference between the sun and everything else that you might want to show in the photo is always going to be more than 8 stops. If you expose correctly for the sun, then everything in your foreground will be very dark or black. If you expose for your foreground, then not only the sun but probably the whole sky will just be a big, blown out area of white.
(Pro tip: did you know that you can choose which part of the scene your iPhone camera will focus on and meter the exposure from, by tapping on the screen? You can experiment with this by tapping on different parts of the scene and seeing how it affects the brightness of the image. You can also tap and then slide your finger up and down to adjust the brightness and see the effect it is having in real time before you hit the shutter button).

HDR
Enter HDR, which happens to stand for High Dynamic Range, a process that will solve a lot of your problems. HDR involves taking multiple photos, at different exposures and then blending them together. Usually, you take one “properly” exposed photo, one over exposed and one under exposed. Now, you can blend in the bright parts of the over exposed photo and the dark parts of the over exposed photo and you will have an end result that shows much more than the 8 stops in dynamic range that you were limited to before. Your iPhone makes all of this super easy, by having apps that take the multiple exposures and blend them all together, with just one simple press of the button.
The native camera app on your iPhone is capable of taking HDR photos – in fact, you may have it turned on without even realizing it was happening. If you are using the native camera to take an iPhone photo featuring the sun in the background, you will always want to make sure to use the HDR mode. For even better results, use one of the dedicated HDR apps (I use Pro HDR X). You just have to remember to hold your phone very still for a couple of seconds. Even though you only have to press the shutter button once, It will take three photos in rapid succession and if you move in between photos, you will get some…interesting results. All of the photos in this article were photographed using the HDR technique.

Embrace Haze
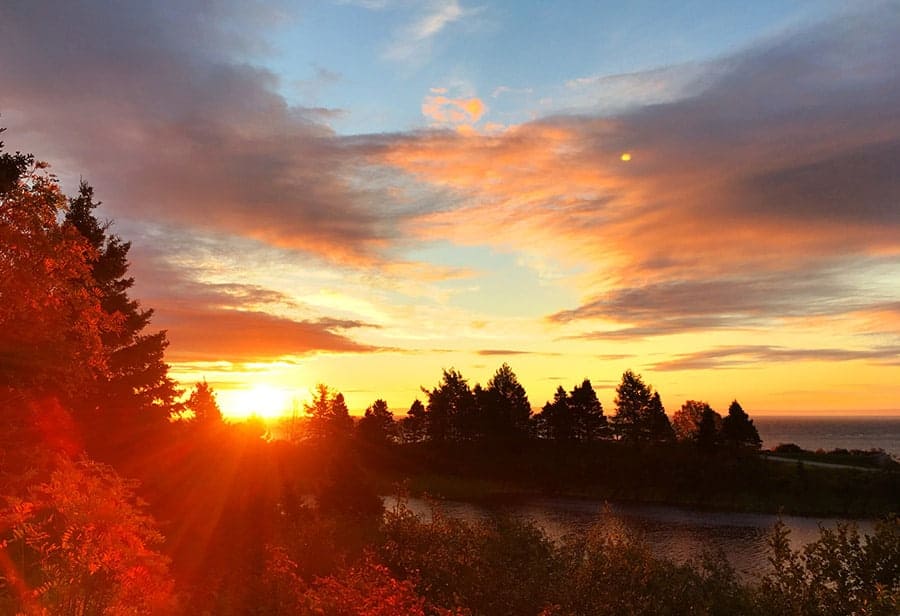
When shooting into the sun with an iPhone, your images will often have a hazy effect radiating out from the sun. This effect really creates a warm, summer mood and there are many photo presets and filters on the market that attempt to recreate the look. Don't fight it! Use that warm summer haze to your advantage and help the viewer enter the image and feel that warmth on their skin. For best effect, place the sun just outside the frame of the photo and let the light stream in at one corner or edge.
Show Some Flare
It won't take many attempts shooting into the sun before you will notice some lens flare happening. How it looks will depend on your model of iPhone. The 5's were known for their purplish flare and I get a curved, green flare showing up in many of my backlit photos taken with my iPhone 6s. If you can't beat it, join it. Make your flare intentional and move around while composing your shot, to place it where you want in the scene.

Clean Your Lens
While on the subjects of lens flare and haze, cleaning your lens every now and then will decrease both of these artifacts and lead to clearer photos. Obviously, this applies all of the time, but the effects of a dirty lens are especially noticeable when shooting towards the sun. Those iPhone lenses stick out a bit and do get grime and dust on them. I know I inadvertently touch mine all the time and it gets dust and lint stuck to it from being in my purse and pockets. A quick wipe with a lens cloth or micro fiber cleaning cloth can make a world of difference in the clarity of your photos.

Catch Some Rays
Partially obstruct the sun behind your subject to create awesome light rays. This works especially well with the sun streaming through trees, but you can also place it just behind a building, or a person and get the same effect. You will have to move around and experiment a bit. It can be difficult to actually see what's on your screen when pointing towards the sun, so you may need to employ a spray and pray technique, taking a dozen shots to get one with the effect you want.
Make Airy, Backlit Portraits
Placing the sun at your subject's back can make for lovely, bright and airy portraits, which are very much in style right now. In this case, you will want to select your subject's face for focus and exposure, let the sky blow out to white, you don't care. Your subject's hair will glow like a halo, with the sun streaming through and they'll be much happier, without having to squint into the sun. Experiment with turning HDR mode off for this technique, see which you like better.
Add Some Light
Your iPhone's flash is no match for the mighty sun, so that will be no help in this case. Look for light colored buildings, or even sand on the beach, which can help to reflect light back onto your subject, filling in harsh shadows.
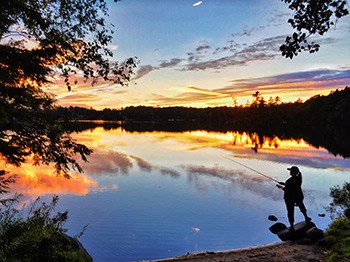
Create a Silhouette
A silhouette can make a very dramatic statement. Place your subject in a larger scene and expose for the sky, letting your subject and the foreground fall into darkness. You will need to get down very low and find a clear background. On a beach, or the top of a hill works very well. Try and position your subject so that their limbs are separated from their bodies, so that their shape is obvious, otherwise, they can look like a nondescript blob.
If you want to level up your iPhone photos, don't be afraid to shoot directly into the sun. You may also be interested in this article, 17 Tips For Clear iPhone Photos Every Time.
Thanks! Good stuff, will be sharing with my community.
Very interesting, thanks!
When taking pictures of the sun it leaves a big dot somewhere in the picture. Why??
I keep getting several dots in sunrise pictures. This is ruining my morning picture taking. Sometimes I can move phone around and not get it but time is fleeting and I miss the shot I want! If I zoom over 1.5 it gets worse! And my zoom gives me fuzzy pictures!
Wish I could add some pictures to show you! Pretty sunrise this morning and I missed it! All my pictures have the dots!
It’s a lens flare, quite common when shooting into the light source.
Hi Rebecca. It sounds like you are getting lens flares from shooting into the sun. As you have noticed, changing your angle, even a little bit, can help. So can shading your lens with your hand. This is why you see photographers using those lens hoods on bigger cameras, it helps to reduce flare.
As for the zoom, there are 2 possible reasons for your photos being fuzzy. One is that most phone cameras don’t really zoom, they are effectively just cropping the photo, so you will always have less detail. If your phone’s camera really does have lens zoom, then you may be experiencing camera shake. At longer focal lengths, it is always harder to “hand hold” and you will have to make sure that you are very steady.