
Everyone loves shooting landscape photos, right? OK, maybe not everyone, but what's not to love? Landscape photography gets you out of the everyday busyness of life and into the stillness of our wide open and wild spaces. Whether in the rugged mountains and alpine meadows, or the dry and unforgiving deserts. Or perhaps the mysterious coastal forests, or the wind-blown prairies. No matter which direction you go, eventually you will find nature in all its beauty. It's out there, just waiting to be captured. It's up to us to be there and be prepared to bring but a minuscule part of it home in our images.
When I was just starting out in photography, I remember looking at incredible landscape photography images in such places as 500px, Flickr, and other photo sharing sites. My thought was that now that I have a “good” camera, I can take pictures like that. Wouldn't you know it, my images didn't look anything like those. (For the most part, they still don't, but that's another topic.) It quickly became evident that it was about much more than just the gear. A whole lot more.
The “more” includes such things as being able to masterfully manipulate camera settings; a good understanding of compositional elements; creative vision; being in the right place; being there at the right time; and so much more. Basically any modern DSLR or mirrorless camera is capable of capturing amazing images. Putting these other things into practice along with the gear will get you where you want to go. It just takes time…and a lot of shooting to get there. This article will look into some of these things, and how to apply them to your photography. They are mostly pretty basic on the surface. It's up to you to dig deeper and discover the impact they can have on your landscape photography style.
Finally, this article will provide just a few tips that will hopefully help get you started and perhaps provide a little inspiration. For even more tips and inspiration, as well as some amazing images, check out this article written by Jim Harmer.
First, A Word About Camera Settings
The main crux of this article is not necessarily to share what camera settings to use for landscape photography. There are so many variables, and the settings will be different depending on the situation. Here are a few pointers, however, to help get you started.
Exposure Mode
Most of the time, Aperture Priority (A or Av on most cameras) will work just fine for landscape photography. This is where you set the aperture and let the camera work out the rest for a correct exposure. However, landscape photography affords you great opportunities to experiment and try different settings. There's usually plenty of time, so go ahead and explore Manual mode. Try working out the exposure by adjusting all the settings yourself and see what you come up with. After a bit of practice, it will become second nature.
Shutter Speed
As a general rule of thumb, if you are hand-holding the camera, the shutter speed should be roughly the reciprocal of the focal length or faster. In other words, if the focal length is 30mm, then shutter speed should be at least 1/30th of a second. Of course, there are exceptions to every rule. Sometimes, you can cheat and go a little slower if your lens (or camera) is image stabilized to offset camera shake. Then there are other times you actually want a slow shutter speed to show movement. More on that later.
Aperture
For landscape photography, you will usually want to have a large depth of field to have everything in the image in focus. To accomplish this, set the aperture to a large number, such as f/13, f/16, or even f/22. Just keep in mind that diffraction could be an issue for the smallest lens apertures.
ISO
Keeping the ISO to its lowest setting will typically produce a “cleaner” image. That means an image with less noise or grain. Your camera most likely either goes down to 100 or 200 for the lowest ISO setting. Start there and bump it up only if you need to increase shutter speed while hand-holding the camera.
Image Format
Shoot RAW! If you like to edit your images on the computer, there's really no reason to not shoot RAW for landscape photography. The RAW image file will preserve much more of the data than a JPEG, allowing you to pull much more detail out of the shadows and highlights. Yes, the RAW file takes up more space on the memory card and hard drive, but it's worth it.
There is much more to camera settings, but I won't go into exhaustive detail in this article. If you would like to learn more about these and other camera settings, try the Improve Photography Photo Basics tutorial. Now onto the tips!
Tip #1: Do Your Homework
There's no doubt that we've all heard this one a few dozen times. However, it's ever so true and a great place to start. Before heading out to shoot landscape photography, learn as much about the area as possible. This is true whether you are close to home, traveling far away, or anywhere in between. There are so many resources to use to find amazing landscape photos for just about anywhere on earth. Before leaving home, do a search on 500px, Flickr, or Google Images to find images for your area of interest. Simply typing in a place name will yield tons of photos that will show you what to look for and provide inspiration for your own shoot.
While in the field, there are smartphone apps that can help with this as well. As of the writing of this article, the all new Really Good Photo Spots (rGPS) app is just over 2 weeks away from its initial release. This will be an invaluable tool for iPhone users to find awesome shooting locations from wherever they are.
Tip #2: Go for the Gold
Not only is it important to know where to go for a landscape photo, it is also important to know when to go. Perhaps even more important. The quality of light can make or break an image, so you'll want to be there when the light is best. The harsh sun of mid-day is not it. When the sun is directly or nearly overhead, transitions from bright to shadow areas are very hard. The direct sun makes a scene with very high contrast and little depth and texture.
The best light for landscape photography is typically in the mornings and evenings. Golden hour light, which is roughly the first hour of light after the sun rises and the last hour of light before the sun sets, is optimal. However, it is still possible to shoot later into the morning and start earlier in the evening and get good results. During these times, the low angle of the sun creates more diffuse light and increased depth and texture for a much more pleasing and interesting image.

Tip #3: Cut the Clutter
Probably more important than deciding what to include in an image is deciding what not to include. When in doubt, simple is usually better. A viewer looking at a landscape image should intuitively know what the main subject is in the image. Other elements included in the frame should be there to lead the viewer's eye or complement the main subject by adding depth and dimension. If there are things that do not add any interest to the image, consider changing the composition slightly to remove them or minimize them in the frame. This could be done by zooming in or shooting from a different angle. For example, if the mid-ground is uninteresting, try setting up the camera at a lower angle to accentuate more of the foreground and hide some of the mid-ground.
Before pressing the shutter button, don't forget to do a quick check around the edges of the frame to see if there are any unwanted elements. A tree branch protruding in from the side or top could really distract from the main subject of the image.
Tip #4: Composition is King
You may be shooting during the best light, but without a strong composition, the image just may not work. On the other hand, even if the composition is perfect, if the light is not good, the image just won't be nearly as strong. Good composition and good light work hand in hand to create amazing images.
Even if you are just getting started in photography, you've probably heard of at least some of the “rules of composition”. Things like the rule of thirds, rule of odds, and leading lines are all good things to know and to practice. Learn these rules, why they are important, and how they can be used to create more impactful images. Good composition (and good light) is one of the main ingredients that make a photograph and will set your images apart from the dreaded snapshot.
The fun thing about the “rules” of composition is that they can be broken. It is important, however, to understand that they are being broken and why the image still works. Sometimes it might be as simple as saying, “that's the way I like it.” There are many articles and tutorials on the Improve Photography website that deal with composition. Jim Harmer's Block Method Composition is an alternative to the traditional rules and provides a lot of interesting concepts for developing a strong composition.
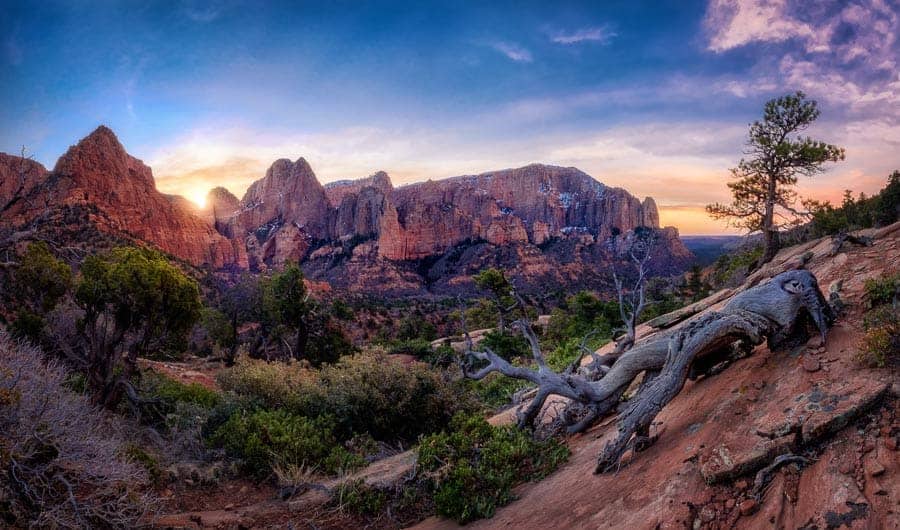
Tip #5: Have a Strong Foreground Element
A strong foreground element can be very important in creating landscape images. Think of the foreground as the introduction or the first impression of your image. As they say, you only have one chance to make a good first impression. That's what the foreground should do. A strong foreground element draws you in and then leads your eye deeper into the image to the main subject. It gives a sense of depth and makes a viewer feel as if they are standing right there where the shot was captured.
A strong foreground element could be anything from a small tree, a rock formation, a bush, or other plant. It is generally placed prominently in the lower third of the image and is close to the camera. Getting the camera low and as close as possible to the foreground can really help create a dynamic composition.
Tip #6: Get Everything in Focus
You will generally want to get everything in the scene in focus for a landscape image. Remember that you control the depth of field (how much is in focus) using the aperture setting on your camera. Setting the aperture to a larger number, such as f/13 or f/16, and then focusing roughly one third of the way into the scene will usually do the trick. The camera that you use most likely is capable of displaying grid lines in the viewfinder and/or on the back LCD. Focusing on something that is near the bottom third grid line will likely get the entire scene in focus.
The exception to this is if your foreground element is extremely close to the camera. In that case, you may not be able to get the foreground object and everything else in focus in a single image. If you focus on the foreground and the background looks a little soft, you could try taking 2 or 3 separate images, each focused on a different portion of the scene, then stacking them in Photoshop. For starters, however, try adjusting the aperture and changing the focus point to get everything acceptably sharp in a single image. Focus stacking is a more advanced technique that you can learn as you go.
Tip #7: Change Perspective
Most beginning photographers hold the camera or set up the tripod at eye level to take the shot. That may work fine, depending on the subject, but many times a change in perspective will dramatically change the look and feel of a photo. Get down low to the ground and see how that changes the image. It could really accentuate a foreground object or eliminate a boring middle ground. If you are using a tripod or monopod, try a shot from up high. Mount the camera to the tripod, start the 10-second timer, then hold it above your head. Of course, if you are using a drone, that would be an even simpler and more fun way to get that elevated shot, but that's a subject for a different article.
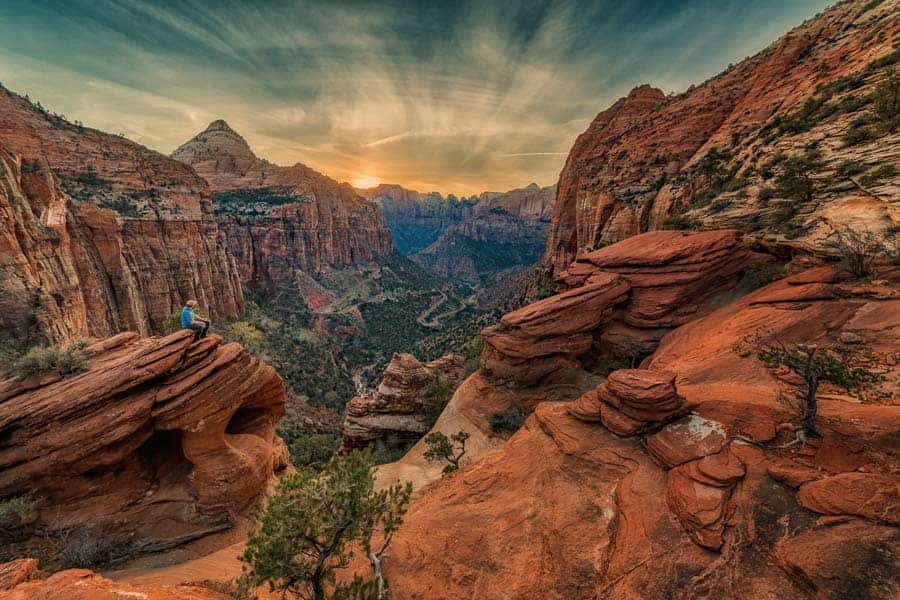
Tip #8: Show Scale
There are times when shooting a landscape that it is difficult for the viewer to know the scale of the subjects or the scene in general. Try placing something in the frame that will give some sense of the grandness of the landscape. It will have to be something that is familiar and easy for the viewer's eye to quickly determine the relative size compared to the surrounding area. Placing a person in the scene works really well for this. I know, it sounds crazy, and I have a hard time doing this. When I'm out shooting landscapes, or just about anything for that matter, I generally work hard to keep people out of my frame. However, it really could help add some perspective and could even make a good stock image if you choose to give that a try. It only has to be one or two images from a shoot, so don't worry too much about it.
Tip #9: Zoom In
Landscape photography typically is shot using a wide angle lens to capture an epic scene. You've probably heard the phrase, “the picture doesn't do it justice”. The main reason is because a landscape is so grand that it just can't be captured in an image. We usually try anyway by shooting with an ultra wide focal length. The problem with doing this is that things in the distance will appear tiny in the image. As an alternative, try zooming in and capture just a small segment of the landscape. These types of images may be referred to as intimate landscapes. A series of intimate landscape images may be very effective at telling the story.
Tip #10: Make Friends with your Tripod
There are times that a tripod will be necessary for landscape photography. If you rarely (or never) use one, it's time to get familiar with it. If you don't have one, there are many great options available without breaking the bank. During the low light times of early morning or late evening, a tripod is needed to allow the shutter speed to be dropped and keeping the ISO low. There are plenty of other times that tripod comes in handy, too. Plus, if you plan to shoot into the night, then a tripod is mandatory. So get to know your tripod. Make friends with it. If it is a pain to use, then perhaps you have the wrong one for you.
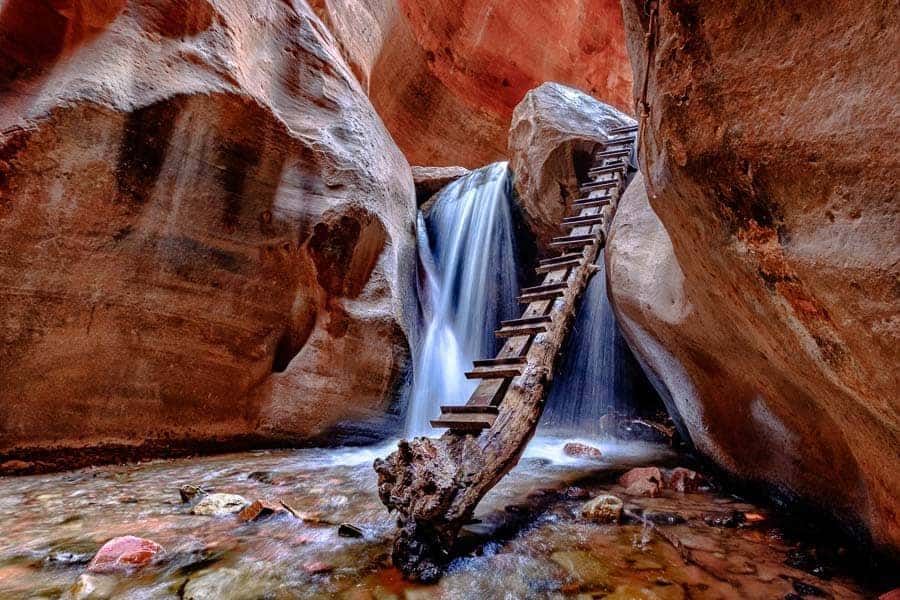
Tip #11: Show Motion in the Image
Here's another reason for needing a tripod. If you are shooting a scene that has something moving, such as a stream or a waterfall, it is fun to drop the shutter speed and show some of that movement in your image. The shutter speed may not have to be as slow as you think, either. For a fast moving stream, 1/4th of a second may be slow enough. If you are not able to get the shutter speed slow enough using the aperture and ISO settings, it will be necessary to attach a neutral density (ND) filter to the lens. An ND filter cuts the amount of light reaching the sensor so you are able to achieve a slower shutter speed. To learn more about ND filters and how to use them, check out this article.
Tip #12: Get Moving!
Here's the scenario: You get to an awesome landscape photography location, find your composition, set up your tripod, and start shooting. Before you know it, the light is gone and it's time to pack up and head home. Upon popping the memory card from your camera into the computer, you discover that you have dozens of images that are all virtually the same. Why is that? Because you never moved to a different location. This has happened to me more times than I'd like to admit. It's easy to get caught up in the excitement and forget to move around. This is one of the drawbacks of using a tripod. Once the tripod is set up, the tendency is to not want to move it again. Move it anyway. Discover other compositions, new angles, and different perspectives. Don't let you tripod (or your feet) grow roots!
Tip #13: Turn Around
This goes along with the previous tip. As you are moving around a location, don't forget to turn around to see what is behind you. There could be something pretty amazing happening back there, too. You'll never know if you don't give it a try.
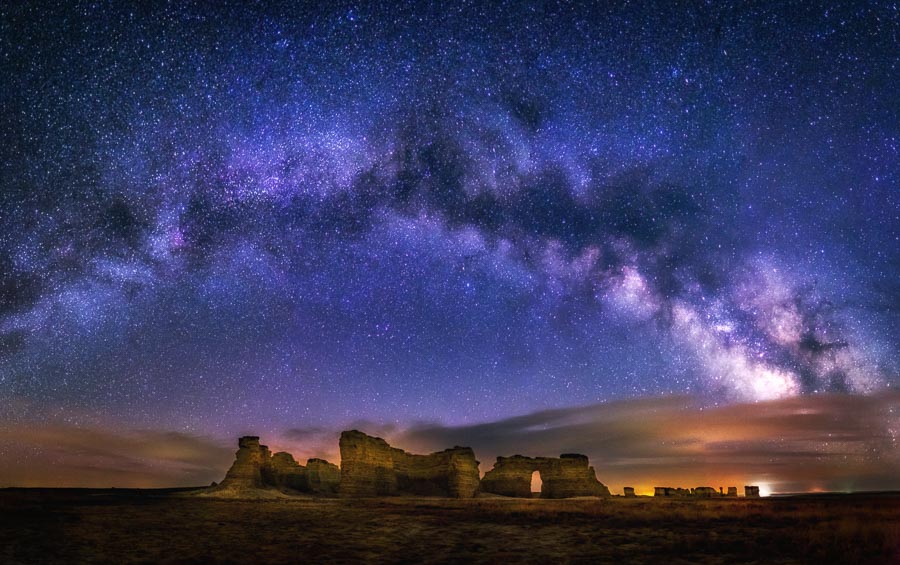
Tip #14: Stay Out Late
Just because the sun has set and the light is fading doesn't mean you have to pack up and head home. Wait for the stars to get visible. If you have some time, stick around until astronomical twilight ends and true darkness begins. Depending on where you are, the Milky Way may be visible. If it's not, you could always try shooting a sequence of images to create star trails. Not to mention, it's just cool to be out enjoying the night landscape.
Tip #15: Never Stop Learning
Finally, the last tip! And it's a very important one. Regardless of where you are in your photography, there is always more to learn. I never get tired of listening to photography podcasts on my long commute to work. The Improve Photography network now has five different podcasts available, so there is something for everyone. If you haven't tried Improve Photography Plus, head over and give the free demo a try. There are tons of video tutorials covering all types of photography. If that's not enough, there are plenty of free Youtube video tutorials from many well-known photographers that are fun to watch and have lots of useful information. The point is to keep learning new things. Challenge yourself with new techniques. It's a great way to keep photography fresh and fun.
Fantastic article! Thanks for all of the useful tips.
Metering Modes: Average- the camera will assess the entire image, corner to corner, and expose the scene to 18% grey from the assessment. Centre-weighted- camera focuses on the center that comprises of approximately 80% of the scene. Spot Metering– the camera will assess a very small area of the scene, approximately 5% of the total scene and expose it to 18% grey.
Awesome article! The best tips that i love to your article is the word KEEP THE FOCUS.
Thanks for sharing this wonderful tips and tricks for capturing landscape photography!!! I faced lot of problems while taking landscape pictures, these tricks will enhance my photography. I will be looking for more great tips in future:)
Thanks for your nice tips. Here are some tips to get the most out of sunrise/sunset photography:
Try to arrive about an hour before sunrise/sunset. This gives you a half hour or so to get everything positioned before the best shots present themselves.
To capture a sweeping landscape in the rising/setting sun, use a wide-angle lens. To capture the sun itself dominant in the shot, use a telephoto lens.
Use a tripod to ensure your camera doesn’t move while you’re shooting.
Hi, I have a question.
Can you please tell me How Can I take blur images using 18-55mm lens with Flash.
How Can I adjust white balance? I am confused.
Thanks for your nice tips. These are some tips to get the most out of sunrise/sunset photography.
Thanks for sharing and guidance ….!
You instinctively pull the vehicle over, grab your camera and your tripod, and search for the ideal spot to establish. In case the camera isn’t turning on, make certain that the batteries are charged fully. If you need a high performance digital camera, you might have to compromise on your financial plan.
I faced lot of problems while taking landscape pictures, these tricks will enhance my photography. Thanks.
How to capture the perfect picture in landscape mode . help me please.