
Light painting is a great way to add interest and drama to low-light images. Photographers of all levels are always looking for that little extra ‘something' to push their images to the next level. Light painting is a technique that can do just that. The really nice things about light painting is that it can be done with basic gear, is pretty easy to do with a little practice, and is tons of fun. Even if you never shoot astrophotography, at night, or in low-light situations, this is one technique you could try when you are in a rut and need to step outside the box. So grab your camera and tripod, and some type of external light source and give it a whirl.
As the title implies, this is a guide for those who may have never tried light painting or are just getting started. As such, only the basics will be covered, such as the necessary essential gear, general camera settings, and fundamental technique. If you are a seasoned veteran or someone looking for more advanced techniques, stay tuned for my next article.
What is Light Painting Anyway?
I believe it would be remiss to assume that everyone reading this knows what light painting is, so let's start with a basic definition. According to Wikipedia, “Light painting…is a photographic technique in which exposures are made by moving a hand-held light source while taking a long exposure photograph…”. In other words, this technique literally ‘paints' elements in a scene with light while the camera's shutter is open. Think of yourself as the artist and the light source you are using is your paint brush. Just like an artist, you have the creative freedom to add light anywhere you want and to keep other areas of your image in darkness.
Light painting can be used for virtually any night photography scene. Whether you are photographing the stars or Milky Way and want to add some light on a foreground object; an old barn or abandoned house that needs some illumination against a dark background; or even still life right at your kitchen table. The possibilities are endless. If you can think it, then there is probably some way to do it. That is a huge part of what makes light painting so much fun to do.
What Gear Do You Need?
Guess what? You probably already have what you need to get started with light painting. It doesn't have to be high-end top-of-the-line gear, either. That's not to say it wouldn't be nice to have that more expensive camera body or lens. But what you do have will most likely work, and you can always upgrade later if you want.
If you're reading this, I assume you have a camera. That's important. It can be a DSLR or mirrorless camera body. Some point-and-shoot cameras might even work. Any camera will work, as long as you are able to manually control the exposure settings. However, it should be noted that some cameras are better able to handle noise than others. When doing this type of photography, the shutter is open for up to 30 seconds or longer. Long exposures tend to cause a camera's sensor to heat up. When that happens, your image can begin to have more noise, or graininess, especially in the shadow areas. To learn more about this topic, click on over the Kevin Jordan's article about long exposure noise. With all that said, don't worry about the noise. Just have fun. An interesting image will still be interesting, even if it is full of noise.
The same is true for lenses. If all you have is the kit lens that came with your camera body, don't worry about it. Just give it a try. You might be surprised by the images you can create even with the least expensive lenses. Ideally, if you are shooting a landscape or the night sky, you will want a wide angle lens. But once again, experiment with what you have and work at different focal lengths to see what works best for your situation. When shooting the night sky, or any night scene, you will typically hear that you need a “fast” lens, or one that has a really wide maximum aperture (such as f/2.8 or f/1.4). Opening the aperture on a lens allows more light to enter the camera and hit the sensor. Although your kit lens (which probably has a maximum aperture of f/3.5 at its widest focal length) may work fine for a while, you might eventually want something faster. There are tons of options out there, for about every camera brand. I recently purchased the Rokinon 14mm f/2.8 for night photography. It's a wide angle lens, with a fast aperture, that doesn't totally break the bank.
Since you will be shooting long exposures, you are going to want a tripod. You could set up your camera on a solid stationary object, but that will really limit your compositions. A tripod will be much easier to use and is way more versatile. If you don't have one, start saving your pennies. And whatever you do, don't opt for the cheapest tripod you can find at Walmart or Best Buy. Just don't. The price may look good, but the tripod will be flimsy and you will not be happy with it for long. Spend a little more and get something that is going to be easier to use and be much more durable. Jim Harmer wrote a great article comparing some relatively inexpensive, high quality tripods, here.
Finally, you will need some kind of external light source. The light will be the paint brush you use to create the image that you envision. The options are seemingly endless here, but sometimes the ‘less is more' approach is best. If it is really dark, then only a small amount of light can make a big difference. This could be a small flashlight, pen light, an off-camera flash on a low power setting, or even a cell phone. On the other hand, if the subject you are lighting is a long ways from the camera, you may need to use a large spotlight to provide enough illumination. The light source that you use may not necessarily be something that you control directly. This could be light from the moon, streetlights, or traffic lights. Something else to remember is that different types of light will produce different colors. For example, LED lights will generally be cooler, or more blue, and incandescent or halogen lights will be warmer, or more yellowish-orange.
While we are on the subject of lights, don't forget a headlamp. Since it will probably be dark, you will need something to light your way. A headlamp gives you light to help with setup, helps you to see the camera to change settings, and also keeps your hands free.
Camera Settings
Camera settings will vary quite a bit, depending on the scene and the image you are trying to make. Generally speaking, though, you will need to keep the shutter open long enough to give yourself enough time to paint light into the scene. Since these will be long exposure images, you will need to have your camera locked down on a tripod. Start out by switching your camera into manual mode. That will allow you to set the shutter speed, aperture, and ISO independently of one another to get the desired result. You will then want to focus on the element in the scene that will be light painted. That can be difficult since the object is in the dark. To get focus, use a light to illuminate the object and focus on it using the camera's autofocus. After getting focus, switch off the autofocus function on the lens and/or camera so it will not be trying to change focus each time you press the shutter button.
Before you begin adding light into the scene, take a few test shots to get the base exposure where you want it. For example, if you are photographing the night sky and want to light paint something in the foreground, get the exposure for the sky and stars set first. A good place to start would be at the widest aperture setting for your lens; shutter speed at 15-20 seconds; and ISO at 1600. Getting the correct exposure will take some experimentation on your part. Don't be afraid to try different combinations of settings to see what you come up with. It's a great way to really learn what each setting does and how they work together to create an image. Also, shooting in RAW file format will give you much more information to work with in post-processing.
When shooting long exposures, you want to minimize any camera movement. The tripod will help keep everything steady, but touching the camera could introduce some camera shake and result in a blurry photo. To trigger the shutter, either use the camera's self-timer or a wired or remote shutter release. I like to use the 10-second self-timer so that I have time to get into position to begin light painting when the shutter opens. If you find that you need a shutter speed longer than 30 seconds, you will need to use a cable release. To do this, set your camera to ‘Bulb' mode. Then press and lock the shutter release button on the cable release. This will open the shutter and it will remain open until you unlock and release the button. For longer exposures such as this, you may want to have a stopwatch or use the timer on your cell phone to determine how long the shutter stays open.
Read my article about shooting a night landscape for more tips about this.
Light Painting Technique
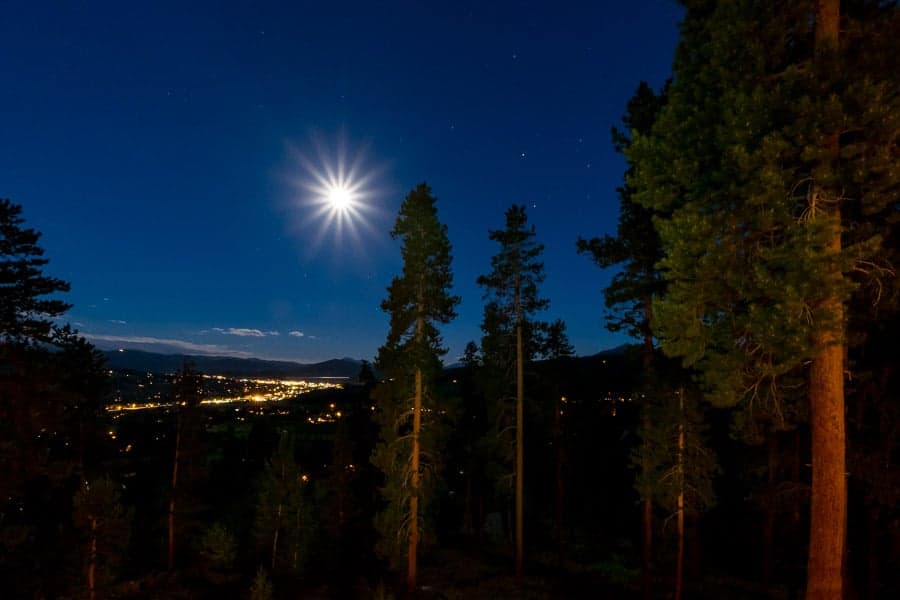
Once you have a good base exposure for your scene, you can start adding light. This is where things really get fun and you can create some interesting images. Start out with just a little bit of light on a single object in the foreground, just to see how it looks. Depending on how dark it is,  you may need only a very small amount of light to make a big difference in the appearance of the image. For the image of the Milky Way above, the base exposure was aperture f/2.8, shutter speed of 30 seconds, and ISO at 3200. The light on the ground and the small tree was added using the flashlight app on my iPhone. I actually had to partially cover the light so that it was shining through my fingers to keep it from being too bright.
The key is to light the scene selectively, to add depth and dimension. If you overdo it and light up the entire scene, it will become more flat and uninteresting. With that in mind, focus the light source on small areas at a time. Keep in mind that the longer the light is focused on a particularly area, the brighter that area will be in the image. So, vary the amount of time you shine the light on each area to add even more depth.
You may even want to use more than one light source for an image. For small details, use a smaller light, and then use a larger light for the larger elements in the scene. Another option is to vary the color of the light sources, either by using different types of lights or by placing a colored gel in front of the light. Gels are simply a piece of translucent plastic that comes in different colors.
Unleash Your Imagination
There are so many amazing possibilities with this type of photography. You can try new things to really stretch your creativity and make the images that live in your imagination. Remember that you are the artist and you hold the ‘brush' in your hand to create the photos that you envision.
Great article
Love it! Ready to go play in the dark!
How long did you leave your cell phone flash light on during the 30 second exposure? All 30 seconds or something much shorter?
I don’t recall the exact time, but do believe the light was on for most of the 30 seconds. I was mostly covering it so it filtered through my fingers to soften the light and was also moving it around the entire time.
Hope that helps. Thanks for reading, Tom!
Great article for me as a beginner. Love your photo examples.
Thanks for reading, chuck. Glad you found the article helpful!