
A couple of weeks ago, I published Part 1 of my Post-Wedding Workflow advice. Part 1 covered everything from backing up and organizing yourself to editing and blogging weddings. This week, I want to continue with this workflow advice by talking about how I deliver images to my clients, how I deal with product orders and the delivery of those products, how I wrap up a contract and follow up with clients, and how 17 Hats has changed my workflow system (and my life!).
Image Delivery
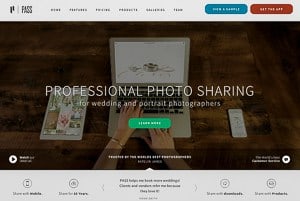
If you've listened to Portrait Session, you know that I'm a huge advocate of PASS.
PASS is an image delivery program that has worked wonders for me and my business. By using PASS, not only am I providing my clients with an aesthetically beautiful collection of their photos, but I'm giving them the opportunity to share their photos easily and quickly, download their photos immediately, and order prints through a high-quality professional photo lab at prices that I have set (yay for more profit!). Seriously…it's so convenient, easy, and user-friendly that I don't know how I ever operated without it!
I create a client's PASS gallery at the beginning of my time with them. It's part of my workflow system early on so that I don't have to spend valuable time later setting up the gallery. I then use the gallery for both the couple's engagement and wedding photos. This allows them to have all of their photos in one place, eliminating the need to remember multiple links and log in information.
Within their gallery, I include an introductory image, which contains information about all of the cool things they can do within the gallery. I also include an instructional image that demonstrates how to order prints. I've heard from several clients that these are extremely helpful, especially for the older generation who aren't as familiar with technology.
In summation, because I want you to have a workflow that doesn't make you insane, just use PASS. I promise it won't leave you wanting to pull your hair out. 🙂
Products
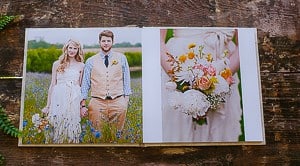
Because 95% of my clients choose to include an album in their collection, I'm going to talk mainly about albums here. I think every wedding photographer should offer high quality albums to their clients, either as part of a collection or as an available add on. In my opinion, albums memorialize the wedding day better than most other product options, and since memorializing the day is essentially our job as wedding photographers, offering albums only makes sense!

That being said, I use Loktah for my wedding album lab. Loktah offers a very unique, environmentally friendly line that aligns perfectly to my brand and to my clients' taste. Their flush mount albums are thick and beautiful and their selection of cover options is seemingly endless. To top it off, they're completely earth friendly, with all of their products made from recycled materials and their non-toxic inks.
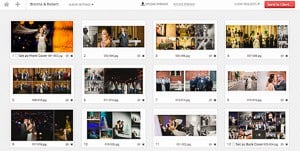
Now, for the album process. When I deliver final images to a client, I tell them that they must choose their top 50 favorite images (if they have gone with the standard album…upgraded albums can choose more than 50) to be included in their gallery. To select these images, they simply mark their favorites within their PASS gallery. Once, they're finished selecting their favorites, I can then access their Favorites folder within the gallery and see exactly which images they want in their album. Another reason why I love PASS 😉 I feel it's very important for the client to choose their album images rather than simply designing an album full of my favorites. It's their wedding day, their images, and their album, so it only makes sense that they're part of the album process!

Once I have the favorited images downloaded, I then use Fundy Designer (mentioned in my last post when I discussed blogging) to create the album spread designs. When loading the images, I can select my preferred lab and album size and the designs will be made according to the required specifications from Loktah. I then place the images into spreads and organize them as I wish. Using Fundy allows me to design a full album in approximately 15 minutes. It's glorious.
After exporting the designs from Fundy, I then upload the spreads to Album Draft. Album Draft is an AWESOME website that allows photographers to upload spread designs and send them to the client so that the client can review, request changes, and/or approve the designs. Clients can simply click on a photo and add a comment such as “remove this” or “rearrange this page” or anything their little heart desires. Should the client have any requests, I receive an email with their feedback and make the requested changes in Fundy and resubmit new proofs via Album Draft. Once they're completely happy with the design, they simply click the Approve button in Album Draft and I'm then notified that it's time to place the order!
Of all of the steps of my post-wedding workflow, this is probably my favorite. Fundy Designer has made the album design process so FUN for me. What used to be something I dreaded is now one of my favorite parts about my job. And, Album Draft is so easy to use (I could probably fill up their entire Reviews page on their website with all of the positive feedback I've received from my clients) that I don't think I'll ever work without it again. These two programs are simply life savers.
And, in case you're curious, here's what I use for my other popular products:
Canvases – CG Pro
Prints – Millers
USBs – Photoflashdrive
Unbound Albums – HH Boogie
Product Delivery
After I receive the album (and any other products that have been ordered), it's obviously time to deliver. Although these people have likely been your clients for a year or so at this point, it's still so important to make a good impression. So, I take the time to wrap up the album with paper and ribbon that matches my branding, hand write a personalized thank you card, and present everything in a beautiful way.
As far as delivery goes, I used to ship everything via USPS. But, I've come to realize that the extra effort of hand delivering products really goes a long way. So now, I either hand deliver to their houses or we meet up at a convenient location to exchange the goods. Either way, delivering it in person and being able to genuinely thank them for trusting you with their wedding is a very nice touch.
Follow Up and Wrap Up

This often overlooked step of the post-wedding workflow process is probably one of the most important, so don't forget this part! It's so important to take some time after the craziness of the wedding has settled to follow up with your clients. In doing this, you will gain insight into their experience with you and (hopefully) gain reviews and referrals.
My follow up process is in the form of an automated email that is sent out approximately 2 months after their products are delivered. The email includes:
- another thank you (you can never be too gracious)
- a few questions regarding their experience
- an ask for reviews with links to all of my review sites (Facebook, Wedding Wire, The Knot)
- a reminder about my referral program with an attachment that describes the program
This system has gained me a ton of reviews and referrals. If I hadn't ever sent out this follow up email, it's likely that I would have hardly any reviews and maybe half of the referrals I do. Both of these things are a huge source of business for me.
17 Hats
So, here's my secret for keeping this workflow organized and even automating some of the process: 17 Hats.
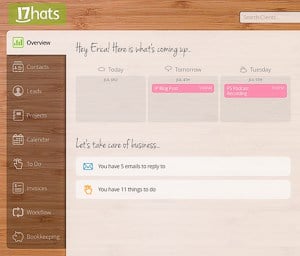
17 Hats is an online studio management program that may actually have been sent from heaven. I use 17 Hats for client communication, record keeping, note taking, contracts, invoices, questionnaires, workflows, and more recently, bookkeeping since they've recently integrated with Quickbooks. It's crazy for me to think about what my life was like before 17 Hats. Now, instead of multiple spreadsheets, paper contracts, multiple websites, etc., I have everything in one place. And, what's even more awesome, is that clients can access their contracts, invoices, questionnaires, etc. at any time by just following the link to their portal. It's so great, so easy to use, and such a time saver.
Feel free to check them out – they have a 15-day free trial in which you can explore the different ways in which you can improve your organization and your workflow. And, should you decide to sign up, be sure to be patient during the set up process. It does take some work to get it set up, but once everything is in place, you won't regret your decision.
Workflow Checklist
As a recap, here is my full post-wedding workflow in a checklist format. Feel free to print for yourself! Thanks for reading!
◊ Backup
◊ Cull images using Photomechanic
◊ Edit “Getting Ready” images
◊ Edit “Ceremony” images
◊ Edit “Formal” images
◊ Edit “Recepetion” images
◊ Create & post blog
◊ Deliver images
◊ Album design
◊ Product ordering
◊ Product delivery
◊ Wrap up and follow up
Can you please share the introductory image that you use for Pass?
I really agree with this, “I have everything in one place. And, what’s even more awesome, is that clients can access their contracts, invoices, questionnaires, etc. at any time by just following the link to their portal. It’s so great, so easy to use, and such a time saver.”
That is the way best for all.