
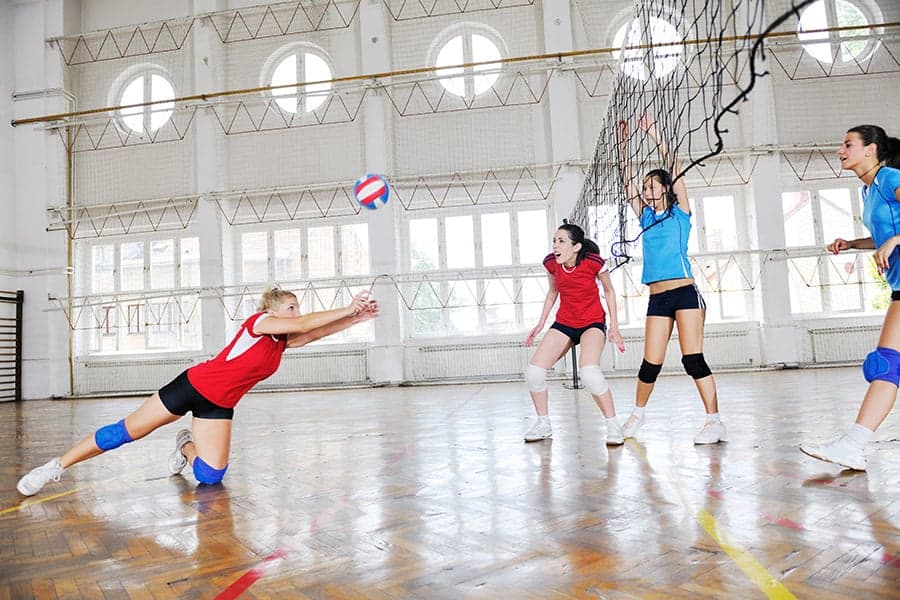
High school gymnasiums can offer a multitude of photographic opportunities – basketball games, crowd shots, and other school events. But they can also have the most abysmal lighting conditions around. Just how do you get a clear photograph in a dark, often mixed lighting environment? With a little bit of know-how and preparation you can!
If you'll be photographing volleyball, basketball, wrestling, gymnastics, or other indoor sports, these tips will hopefully help you to get a clear image.
The real problem with shooting in an indoor gym is that the area is usually not well lit. Normally this could be counteracted with a slower shutter speed to gather light, but that would produce a blurry image since the players are moving quickly. Shooting indoor sports is actually one of the most challenging photography situations there is. This creates an opportunity to test your skills!
Recommended Camera Settings for Shooting in a School Gym
Usually, getting the exposure settings for a particular situation is easy, but photographing fast moving sports action in a dim environment is quite challenging. Here is a good starting point for setting your camera settings for shooting in a school gym:
- Use the largest aperture (lowest f-stop number) available on your lens. Ideally, you'll have a lens with a max aperture of f/2.8 or f/4. Slower lenses that can only open up to f/5.6 will likely not gather enough light to have a successful shoot in a gym for photographing sports.
- Set your shutter speed to 1/500 or faster to freeze the action. Ideally, we'd shoot at 1/1000 but unless you have a very fast lens, this often isn't feasible. You may find yourself at 1/500 or 1/640 which will show some motion blur on hands or feet when the players are moving around, but otherwise the image is too dark.
- Set your ISO to 1600 or faster. You'll likely find that most setups will require ISO 3200 to properly expose the image. This will produce some noise in the picture, but some noise in unavoidable in indoor sports photography unless the gym is extremely well lit (rare).
- Set your focus to continuous so you can track the action of the players. This will be written “AF-C” on Nikon cameras or “AI Servo” on Canon cameras.
The ISO is the most important part of this equation. I highly recommend reading my article on setting the ISO for any situation if you haven't yet.
None of these settings are ideal. Using an ISO that high will undoubtedly produce some noise in your photo. Shooting with a fast aperture will make focus more difficult. Shooting at a fast shutter speed makes gathering enough light difficult. Nothing is ideal when shooting indoor sports, but you have to learn to make compromises with your camera settings in order to get a properly exposed photo in a dimly lit gym.
More Tips for Shooting Sports Photos in a Gym
Do some scouting ahead of time. This will ease your anxiety and frustration. Take some test shots, specifically to nail your white balance. White balance means that the camera is trying to determine what the neutral color is and which color balance to apply to the photo. If you’re in a gym, you’ll see kind of a green, sickly light due to the bulbs they use. In most houses, the light is a yellowish color unless you’re using daylight balanced light bulbs in which case they will be more of a white color. The light changes everywhere you go – shade is different than the sunlight, etc. There are some presets for white balance in your camera so you can use these and it will get you pretty close to where you need to be. You can also set a custom white balance if you know you will be shooting somewhere in particular with terrible lighting like the gym.
Gymnasiums often have mixed lighting from natural windows spilling out light up high to tungsten lighting which can cause you photos to look orange. Ask if you can shoot some of your kids practices – this will be a good warm up for the main event and see exactly which camera shooting work the best. After adjusting your settings and shooting the practice, look at the photos on your computer to see how well the pictures turned out. From there you can adjust the white balance further than the settings could in Photoshop or Photoshop Elements.
Once you have your white balance and positioning in place, now you can concentrate on actually taking the shot. One thing to remember is to be sure to get to the gym ahead of time so you can choose your seat. The key to taking good sports photography is anticipating the action. During the practices, learn where to position yourself so you will have an unimpeded view of the action without getting in the middle of the action!
After you have done all the prep work and are in the precise shooting position, what should your settings be? Your DSLR does offer some standard modes – you know the little icons on the dial – look for the figure running. But those settings are an approximation and generally work best outdoors where there’s plenty of light otherwise you will get motion blur. If the sports mode works for you and you are happy with the results – great. If not, manually adjusting your settings is the next option.
Sports photography is about freezing the action so you will need a fast shutter speed of at least 1/125 or 1/250 of a second or higher. Anything slower and you risk blurring the players. You will probably have to increase your ISO – look in the range of 800 to 1600. Depending on your camera, it could introduce noise into the picture so experiment with different ISOs to see how high you can go before noise creeps into your photos.
For the aperture, the kit lens that came with your DSLR may work just fine outdoors but indoors that 18-200mm f4.5/5.6 may not open up enough. You may have to open up your aperture to f/2.8 which should give you decent depth of field. But that also means you might have to purchase or rent a lens that is capable of handling low light situations. Unfortunately, because it’s a sporting event, you probably won’t be able to use your speedlight or built-in flash. There will be too much concern that your flash will temporarily blind a player and interrupt or alter the play. Check with school officials to see what their policy is on flash photography.
Sadly, there is not an easy solution to ugly gymnasium photos, but these tricks will at least get you better photos. With time, you will learn more of what works and what doesn't. Luckily, we can adjust quite a bit while post processing.
Do you want want to be the BEST photographer you can possibly be? Well then you would be a PERFECT fit to join many other photographers in the Improve Your Photography Facebook Group. Click here to join!
Great tips Jim!! And to say most schools are poorly lit for photography is an understatement!! This will REALLY push your gear but you can do it with most modern mirrorless and DSLR cameras!!
One really great way to nail the WB is to use your cameras Kelvin WB adjustment while in Live View. I found it gets you not only close but it will also produce consistent results across the entire shoot!!
What is a Kelvin WB adjustment while in Live View, Brian? I am just venturing out of Auto mode on my Canon Rebel because I am sick of the ball being blurry! I have been reading MANY articles as most of my photography is for sporting events and they just happen to be indoors most of the time. 🙂
Dayna, he is referring to manually setting the color temperature, which is measured in Kelvin, usually just K. This can be anywhere from 2000 to 50000, and the lower the number, the colder (more blue) the light, and the higher the warmer (more yellow) the light is. If I am using studio strobes and want natural skin tones I will usually end up between 5000 and 5500. Using live view allows you to see in real time what effect the color temperature has on your photo, and you can eyeball it so that it looks good. Color temperature and tint (more green to more magenta) are serious problems in school gyms, and the smaller the school the worse the problem will probably be. Auto mode just won’t cut it for such difficult situations. Depending on how you are metering, the camera can change the white balance for different colored uniforms and skin tones, so manually setting the white balance will save you tons of work in post.
Speaking of post, make sure that you are always shooting RAW in difficult lighting situations. White balance is not set in stone until the RAW image is converted to another format (after which adjustments can cause color degradation). For gyms that use flickering fluorescent lights this can be a lifesaver since the color temperature changes between different temperatures and tints when the lights flicker.
Good luck and have fun!
I am struggling with basketball/volleyball photography in a high school gym. I shoot very often. Does anyone know if Nikon has a camera with effective anti-flicker mode (I’ve heard Canon’s good)? I’m considering changing from a basic editing program to Lightroom or Elements. Does anyone have a suggestion which would be better for raw conversion, white balance adjustment, and flicker repair? And learning curve?
thanks.
I have shot some college basketball and its amazing how dark it actually is in there. While I was able to get enough light on the court (which was lit 10X better than a high school gym), it was near impossible to get the crowd where there was less lighting. I am always surprised how well our eyes can adjust to low lighting such that I don’t realize how dark it is until I pull out the camera. Another reason to scout ahead of time if possible. In a gym, I am not afraid to crank the ISO when necessary. I would much rather have some noise than blur in most situations.