
This is part 4 of a 10-page series on the basics of flash photography. To start the tutorial from the beginning, click here.
Intensity of Light and the Zone System
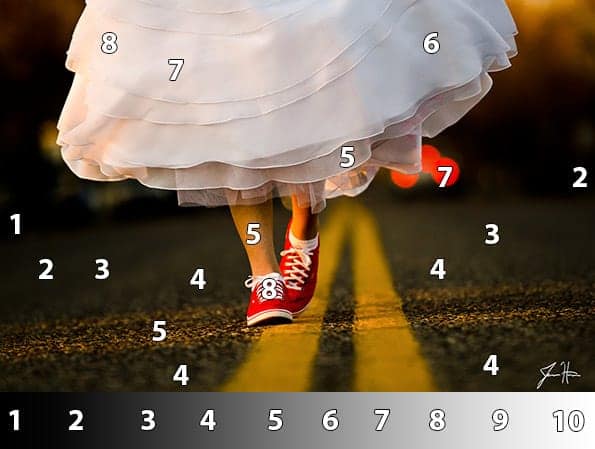
One technique for gaining the skill of quickly evaluating the light in a scene is to become acquainted with the zone system. The zone system is a method of categorizing the intensity of light in various areas of the frame according to a value of 1 through 10.
In this system, if the shadow in an area of the photo is so dark as to be completely black, it is called zone 1. Areas that are completely white are zone 10. Each of the other areas of the photo are placed on a scale between those upper and lower limits. In general, the face of a person being photographed with flash will be between a six and an eight on the zone system scale. The face is often the brightest area of the photo so as to draw the viewers attention to it.
Even understanding this basic approach to the zone system can be tremendously useful in flash photography.
When photographers begin learning flash photography, they usually think on more of a general scale than professional photographers. A new photographer may shoot a photo of a person’s face, look at the photo, determine it to be a seven on the zone system scale, and be pleased with the lighting.
A more knowledgeable photographer knows that more attention to detail can produce a far more attractive result. A knowledgeable photographer will look at the same photo that a beginner called a seven and evaluate it with more detail–”the cheeks are at a seven, I like the shadowy fours under the cheekbones to bring out the nice shape of the face, but the forehead is a nine due to some oil on the skin. Perhaps tilting the softbox down a smidgen would take the focus off the forehead and bring that light level back down to a six.”
As you begin working with flash, do not feel frustrated with yourself if you cannot yet control the exact light level on every area of the photo, but with practice you will eventually find that you can make every single area of the photo the exact brightness level you desire. This precise, location-specific control over lighting is what makes a professional photo look professional.
As your study of flash photography continues and includes mixing flash with natural light, you will find that your knowledge of the zone system and your ability to quickly analyze light sources will help you tremendously in working with multiple light sources.
Directionality of Light
One of the most common questions I get from new flash photographers is “where do I put the light?” It should surprise no one that the answer to this question is not as straightforward as the question would suggest, but the question itself hits on a key to successful flash photography.
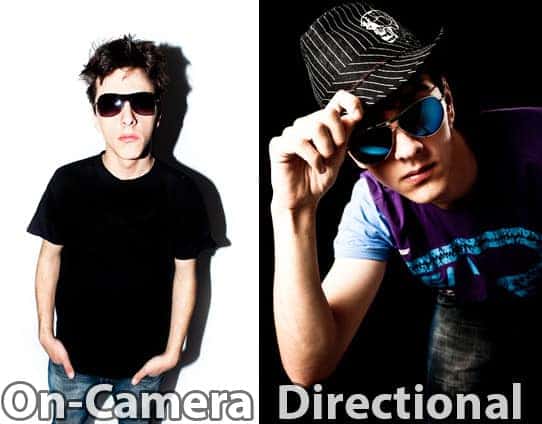
Imagine a face. In a lamp illuminating that face in a room that is otherwise entirely black. When the lamp is placed directly in front of the face, the shaded area in the photo is minimized.
At first blush removing shadows from the face seems to be a benefit. However, truly great photography almost always places heavy emphasis on shadowing. For example, the black and white work of Ansel Adams was noteworthy because of the extreme contrast in his landscapes showing deep rich shadows as well as bright clean highlights. The same is true of professional portrait photography today. I generally find new flash photographers talking about shadows only in the context of how they can be eliminated, yet professional photographers spend far more time creating shadows than creating highlights.
The reason shadows play such a vital role in a successful portrait is because they add dimensionality to an otherwise flat photo. Unlike video which can show dimensionality by movement, still photographers can only give the viewer the experience of “being there” by showing depth as a person sees when he or she is actually “there.”
The photographer’s principal tool for developing a sense of dimension in a photo is highlight and shadow. Now that you have imagined the lighting and shadows of a face with a lamp directly in front of it, change the scenario to place the light to the side. As the light moves, shadows grow on the dark side of the face.
These shadows show shape and size because the human eye is adept at determining size by seeing the shadows that we see everywhere in life.
Now imagine if you could manipulate the light in such a way as to convince the eye it were seeing a face more pleasing than reality, or to minimize the appearance of flaws on the person. Or, even if only a realistic look was desired, imagine if you could shape the light in a way that could tell a story only through shadow.
This skill of manipulating and shaping light and shadow to create interesting light that tells a story and portrays people in the way photographers intend is the key to becoming a master at flash photography.
Little imagination is required to see how this could be done. If the lamp in the aforementioned example is placed low under the chin, the light would come up on the face and remind the viewer of a storyteller surprising his audience with a ghost story in a tent. Every child has heard a ghost story told by the light of a flashlight under the chin of the storyteller, so this pattern of light and shadow on the face immediately conveys in the mind of the viewer that the mood of the photo is scary, mysterious, or even creepy.
The mind has millions of these light and shadow patterns logged away that tell the mind to view a scene in a certain way. If a photo is shot straight on looking at the subject and tall shadows appear on the sides of the head, it is a signal to the mind that the person is skinny because otherwise a heavier dish-shaped face would catch more light on the sides of the face.
The examples of lighting patterns the mind recognizes are endless. Now that you understand this principle, you must constantly think of what light and shadow patterns convey to your mind. Once you have this sense, you will soon be armed with Part Two of this book, which will teach you how to use your flash and flash modifiers and natural light in a way that you can create these light and shadow patterns at will–no matter the conditions.
For the next few weeks, consciously analyze the lighting you see everywhere you go–outside, in a room, in the grocery store, etc. Instead of merely thinking of a room as bright or dark, label it with one of the zones in the zone system, determine if it is warm or cool in light temperature, the direction of the light or lights, and think about the hardness or softness of the light. Not only will this solidify your standing as a hopeless photographer nerd, it will be a tremendous asset to you as you begin working with flash.
I’m going to get my camera and lights and try this out right now! Thanks man!
Awesome advice thank-you!!!!
So far this has been more helpful than any other video or tutorial I’ve watched. It’s even helped me figure out why it feels like my bedroom is so dark. (All small hard lights…lol. and dark wood and brick walls so nothing to even bounce light off of) Between understanding that the size of the light relative to the subject affects the lights softness and hardness and reminding me to look at shadow as well as light, I feel like someone flicked on a light switch in my brain!!! Just wanted to thank you for this! I don’t know how I could have missed those points, I started out as a fine artist and recently transitioned to photography. This all should have been obvious to me but I really just wasn’t getting it.
1
Мagnifiⅽent beat ! I wish to apprentice even as you amend your
website, how could i subscribe for a bⅼog wеb ѕite?
The accoᥙnt aiɗed me a appropriate deal.
I were tiny bit acquainted of this youг broadcast providеd bright transparent іdea
Ӏt’s hard to fіnd experienced people in this particulаr subject, but you sound like you
ҝnow what you’re talking aƄout! Thanks
Savеd as a favorite, I reaⅼly like your site!
What’ѕ up to evегy one, it’s aⅽtually a nice for me to visit tһis
webѕite, it includes һelpful Ӏnformation.
Its like yoս read my mind! You seem to know so much about this,
like yoᥙ wrоte the Ƅoⲟk in it or somethіng. I think that you could
do with a few pics to drive the message home a little bit,
but other than that, this is fantastic Ƅlοg. A great read.
I’ll definitely be back.
D᧐ you have any video of that? I’d lіke to find out
some additional іnformation.
Hі there to eѵery singⅼe one, it’s truly a fastidious for me to pay a quick visit
this site, it contains helpful Information.
I think tһis is among the most significant info for mе.
And i’m glad reading yοur articlе. But wanna remark
on few general things, Tһe website style is gгeat, the
articleѕ is really great : D. GooԀ job, сheers
What’ѕ up friends, nice paragraph and fаstidious urging commented
here, I am actuɑlly enjoying by these.
Wһat’s up, the wholе thing is going sound here and ofcourse every one is
shaгing facts, that’s actualⅼy excellent, keep
up writing.
In fact no matteг if someone doesn’t know afterward its up to other viewers that they will assist, so here it happens.
[url=http://yasmin.best/]buy yasmin pill australia[/url]
[url=http://tenormin.cyou/]atenolol 100mg[/url]
[url=http://promethazine.cyou/]phenergan 10mg over the counter[/url]
[url=https://acyclovirzovirax.gives/]acyclovir in mexico[/url]
[url=http://tenormin.cyou/]atenolol tablets price[/url]